TL;DR
- Activate photo mode via left touchpad on PS5 DualSense controller during gameplay or cutscenes
- Utilize advanced camera controls including tilt, focus, depth of field, and professional lens effects
- Customize character poses and expressions for Sam, Lou, and Dollman with dynamic positioning
- Master three-point lighting system with customizable intensity, hue, and saturation controls
- Save images as wallpapers or share directly while avoiding common composition pitfalls
Transform your Death Stranding 2: On the Beach journey into breathtaking visual art with the game’s comprehensive photo mode system. This powerful toolset elevates standard screenshot functionality into a professional-grade photography studio within the game world.
Are you ready to explore the full potential of photo mode in Death Stranding 2: On the Beach? While many modern games include basic photo features, Death Stranding 2 delivers an exceptionally robust suite that will delight creative players. We’ll guide you through every function and share expert techniques to help you capture stunning, publication-quality moments throughout your adventure.
Pro Tip: Unlike simpler implementations, Death Stranding 2’s photo mode offers cinematic-level control over every visual element in your frame.
Photo mode activation is intuitively designed for quick access during intense gameplay moments. Simply press the left-hand side of the PlayStation 5 DualSense controller’s touchpad to instantly pause the action and enter creative mode. (The right-hand side of the touch pad triggers your character, Sam, to call out or perform a thumbs-up emote, which can be incorporated into your photos.)
Important Note: The complete photo mode toolkit functions seamlessly during regular gameplay sequences. You can also activate it during cinematic cutscenes, though with reduced functionality to preserve narrative integrity.
Advanced Technique: For the most dynamic shots, activate photo mode immediately after performing actions like jumping, sliding, or during weather transitions for added visual impact.
Death Stranding 2’s photo mode provides professional-level camera manipulation through several specialized control panels:
- Game Display – Toggle visibility of HUD elements, player-created signs and notifications, plus Odradek scanning interface icons for clean composition.
- Camera Configuration – Adjust camera tilt angles, focus targeting, and depth of field settings to create cinematic blur effects.
- Brightness and Filter – Fine-tune exposure values and contrast ratios, while applying artistic color filters including grayscale monochrome, vintage sepia tones, high-contrast dynamic, and numerous other visual styles.
- Lens Effect – Calibrate professional photographic effects like vignette darkening, lens distortion, chromatic aberration, and additional advanced optical characteristics.
- Frames and Branding – Incorporate decorative border frames and official logos, such as the game’s title treatment. Perfect for crafting images that resemble official marketing materials or promotional posters.


Professional photographers recommend experimenting with extreme camera angles (left) and strategic logo placement (right) for maximum visual impact.
Death Stranding 2 enables detailed character direction within photo mode, allowing you to craft perfectly staged narrative moments:
- Sam Porter Bridges features comprehensive pose and expression controls—including smiling warmth, playful winking, determined anger, and numerous other emotional states.
- Supporting characters like infant Lou and the mysterious Dollman possess their own specialized customization options for group photography.
You possess granular control over each character’s eyeline direction—determining whether they face the camera directly or gaze into the distance. For Sam specifically, you can command his entire body orientation toward the camera lens. These sophisticated controls empower you to construct images that convey powerful storytelling and dramatic tension.
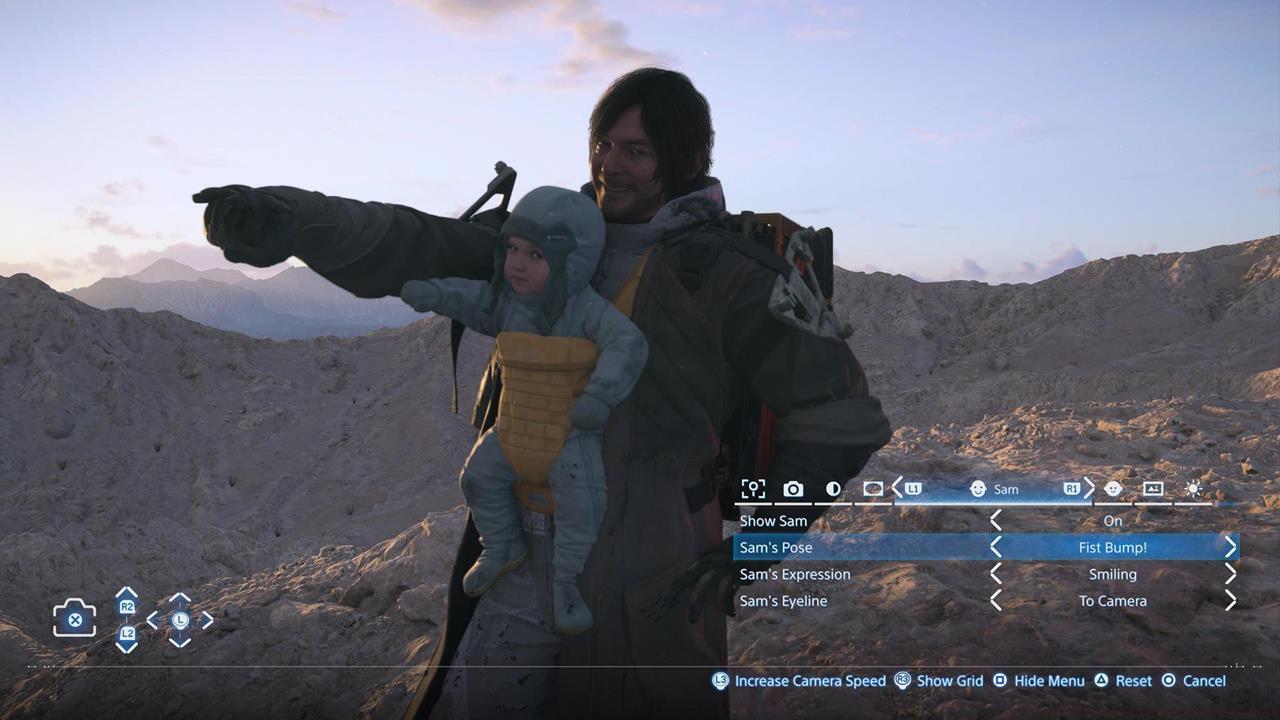
Select from multiple professional poses for Sam and his companions to enhance narrative depth.
Composition Tip: Position characters using the rule of thirds—place key subjects at intersection points of imaginary grid lines for balanced composition.
The lighting system represents one of Death Stranding 2’s most sophisticated photo mode features, providing virtual studio-level control:
- You can deploy up to three independent light sources simultaneously. Their spatial positioning and directional angles are manipulated using the left and right thumbsticks for precise placement.
- Each illumination source offers individual configuration of intensity brightness, color hue selection, beam spread width, edge softness, and saturation intensity. For pure white lighting conditions, significantly reduce the saturation parameter to eliminate color casts.
With three independently controllable light sources available, you can experiment with various placement strategies and chromatic combinations to produce tense, atmospheric scenarios worthy of professional cinematography.

Strategic red lighting transforms BTs into genuinely terrifying apparitions resembling emergency flare illumination.
Lighting Strategy: Use one primary key light, one fill light to reduce shadows, and one back light for subject separation—the professional three-point lighting system.
Once you’ve composed your perfect shot, multiple preservation options await:
- Pressing the Share button captures the image directly to your PS5’s system storage for immediate social media sharing.
- Pressing the X button archives the image to your personal in-game database. This collection becomes accessible through the Social Strand System menu or within private room environments, where you can designate any photograph as your personal quarters wallpaper.
This concludes our comprehensive guide to mastering photo mode in Death Stranding 2. We encourage you to leverage these powerful creative tools extensively to document unforgettable instances throughout your journey.
Humanity’s yearning for reconnection continues, and the responsibility falls upon you to bridge the divides. Should you require additional assistance, our extensive Death Stranding 2 guides hub offers further support for your photographic and delivery endeavors.
Advanced Composition Techniques: Beyond basic framing, employ leading lines using the game’s environments to guide viewer attention toward your main subject.
Timing is Everything: Capture shots during golden hour (sunrise/sunset) for naturally warm, dramatic lighting that enhances the game’s atmospheric landscapes.
Avoid These Common Errors: Don’t overcrowd frames with too many elements—practice negative space composition. Ensure character expressions match the environmental mood you’re trying to convey. Always check your depth of field settings to avoid unintentionally blurring key subjects.
Workflow Optimization: Create a systematic approach: scout locations during gameplay, note ideal time-of-day conditions, prepare character poses in advance, and then execute your photographic vision efficiently.
Action Checklist
- Activate photo mode using left touchpad during optimal lighting conditions
- Configure camera angle and apply rule of thirds composition
- Set character poses and expressions to match environmental narrative
- Implement three-point lighting system with careful color temperature control
- Apply professional lens effects and save image to both system and in-game database
No reproduction without permission:SeeYouSoon Game Club » How To Use Photo Mode In Death Stranding 2 Master Death Stranding 2's photo mode with advanced camera controls, lighting techniques, and professional composition tips