TL;DR
- B-01 ruins introduce pressure plate puzzles requiring specific activation sequences
- The second chest pattern clue is visible on the wall behind the chest location
- Careful observation of environmental cues prevents common solving mistakes
- Proper execution unlocks valuable rewards for character progression
- Mastering these puzzles prepares players for more complex ruin challenges
Games and Esports Articles
Developed by Hotta Studio, Tower of Fantasy represents a groundbreaking anime-inspired MMORPG experience accessible across PC, iOS, and Android platforms. The global launch occurred on August 11, introducing players to an immersive post-apocalyptic universe filled with exploration opportunities and dynamic combat systems.
This gaming masterpiece combines extensive character customization with intricate puzzle-solving mechanics and fast-paced battle sequences. Players encounter both player-versus-environment and player-versus-player content, with ancient ruins comprising significant portions of the explorable world. These dungeon-like areas challenge adventurers to overcome environmental obstacles, defeat hostile entities, and collect valuable treasure containers throughout their journeys.
The B-01 location marks your introduction to pressure-activated floor tile challenges, requiring precise stepping sequences to progress. While the primary exit mechanism follows straightforward logic, accessing the supplementary reward container demands careful pattern observation and strategic plate engagement.
Pressure plate mechanisms in B-01 function as sequential activation devices that must be triggered in correct order to unlock corresponding barriers. The initial doorway presents an easily discernible pattern that most players solve intuitively through trial and observation of immediate visual feedback.
However, the secondary containment area housing the additional loot crate introduces increased complexity. This challenge requires deciphering environmental clues rather than relying on obvious mechanical indicators. Success depends entirely on recognizing the subtle pattern reference provided within the chamber itself.
The critical visual indicator for the hidden chest sequence appears as a wall marking positioned directly behind the reward container’s location. This deliberate placement ensures observant players receive the necessary information while maintaining the puzzle’s challenge level for those who rush through without environmental scanning.
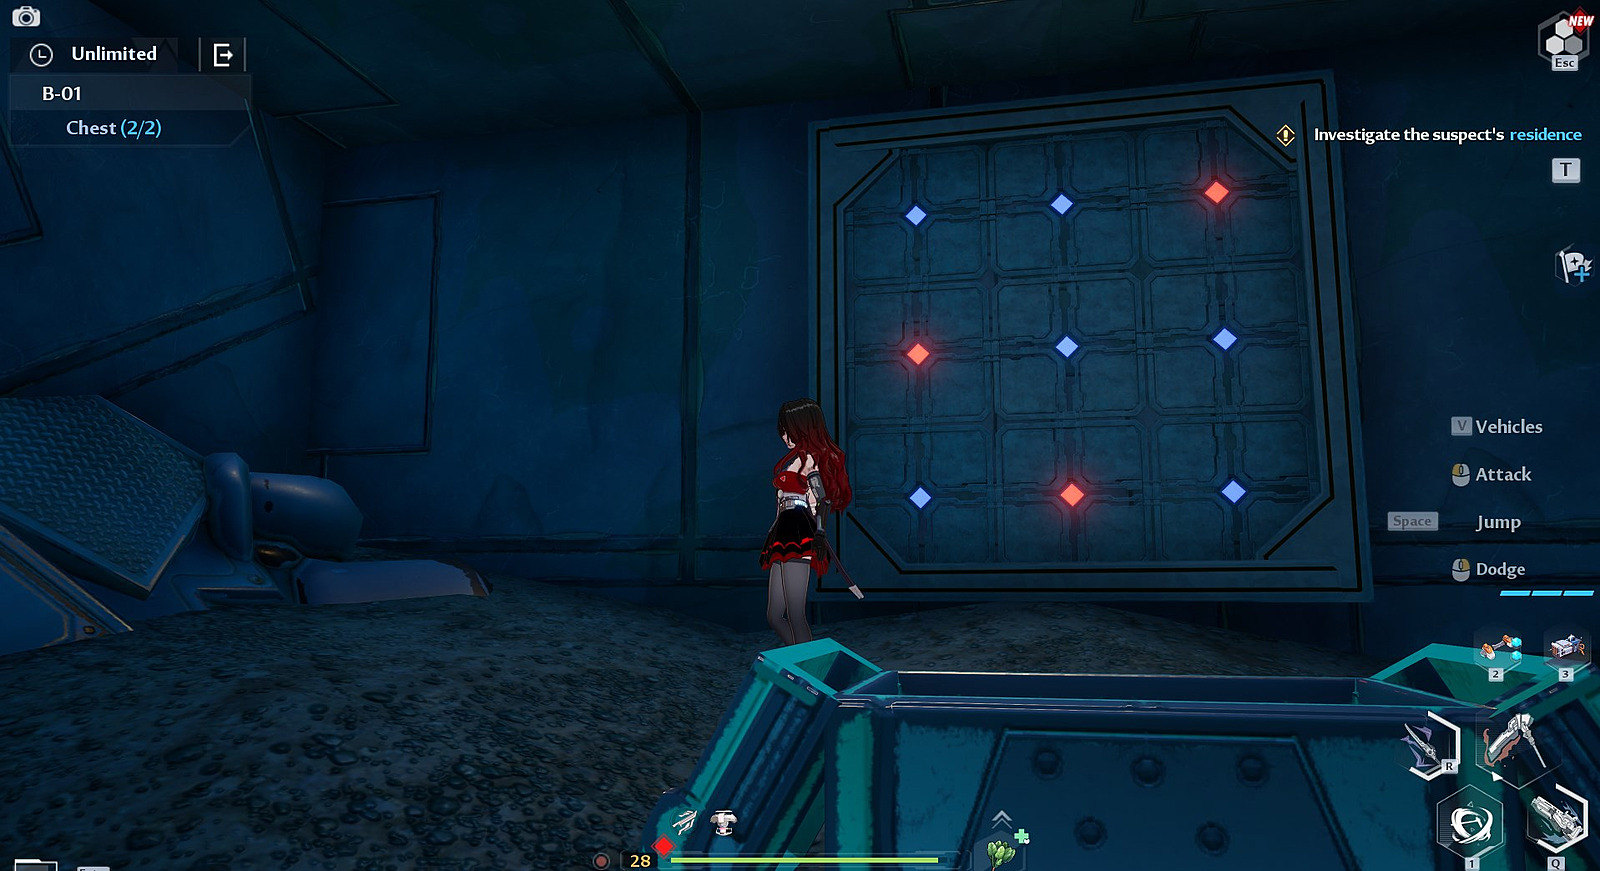
Begin by thoroughly examining the chamber’s rear wall section after entering the initial puzzle room. You’ll notice distinct markings arranged in a specific configuration that corresponds to the pressure plate layout on the floor. These symbols indicate the precise activation sequence required.
Execute the pattern by stepping on plates according to the wall diagram’s sequence. Typically, this involves activating plates in a non-linear pattern that may include diagonal movements or specific timing between engagements. Listen for audible confirmation clicks with each correct plate activation.
Upon successful sequence completion, the concealed doorway adjacent to the main exit will slide open, revealing the coveted secondary reward container. This chest typically contains enhancement materials, currency, or potentially rare equipment crucial for character development.

Seasoned explorers recommend methodically scanning all wall surfaces before attempting any plate activation. Rushing directly to puzzle solving often causes players to miss critical environmental clues, resulting in unnecessary frustration and time expenditure. The wall pattern typically mirrors the floor layout from a top-down perspective.
Avoid the frequent error of assuming plates require simultaneous activation with other players. These early ruin puzzles are designed for individual completion, though cooperative play becomes valuable in later, more complex dungeons. Another common mistake involves misinterpreting the pattern direction—some sequences read left-to-right while others follow right-to-left or circular patterns.
For optimization, complete B-01 ruins during peak gaming hours when server populations facilitate quicker matchmaking for subsequent cooperative content. The puzzle-solving skills developed here directly translate to more advanced challenges in later game stages, making mastery essential for progression.
Understanding these pressure plate mechanics early provides significant advantages when encountering similar puzzles in Complete Guide environments where similar sequential activation systems appear. These foundational skills become increasingly important as you advance through the game’s Class Guide progression system.
Action Checklist
- Thoroughly examine all wall surfaces for pattern clues
- Decipher the activation sequence from wall markings
- Execute plate activation in correct order with attention to auditory feedback
- Collect rewards from newly accessible secondary chest
- Apply learned mechanics to future ruin puzzles and Weapons Unlock challenges
No reproduction without permission:SeeYouSoon Game Club » How to get second chest in B-01 ruins Tower of Fantasy Complete guide to solving the B-01 ruins pressure plate puzzle and claiming the second chest reward