Master the Wormzilla boss fight with advanced strategies, common mistakes to avoid, and expert timing techniques in Revenge of the Savage Planet
Initial Encounter: Mastering the Deflection Mechanics
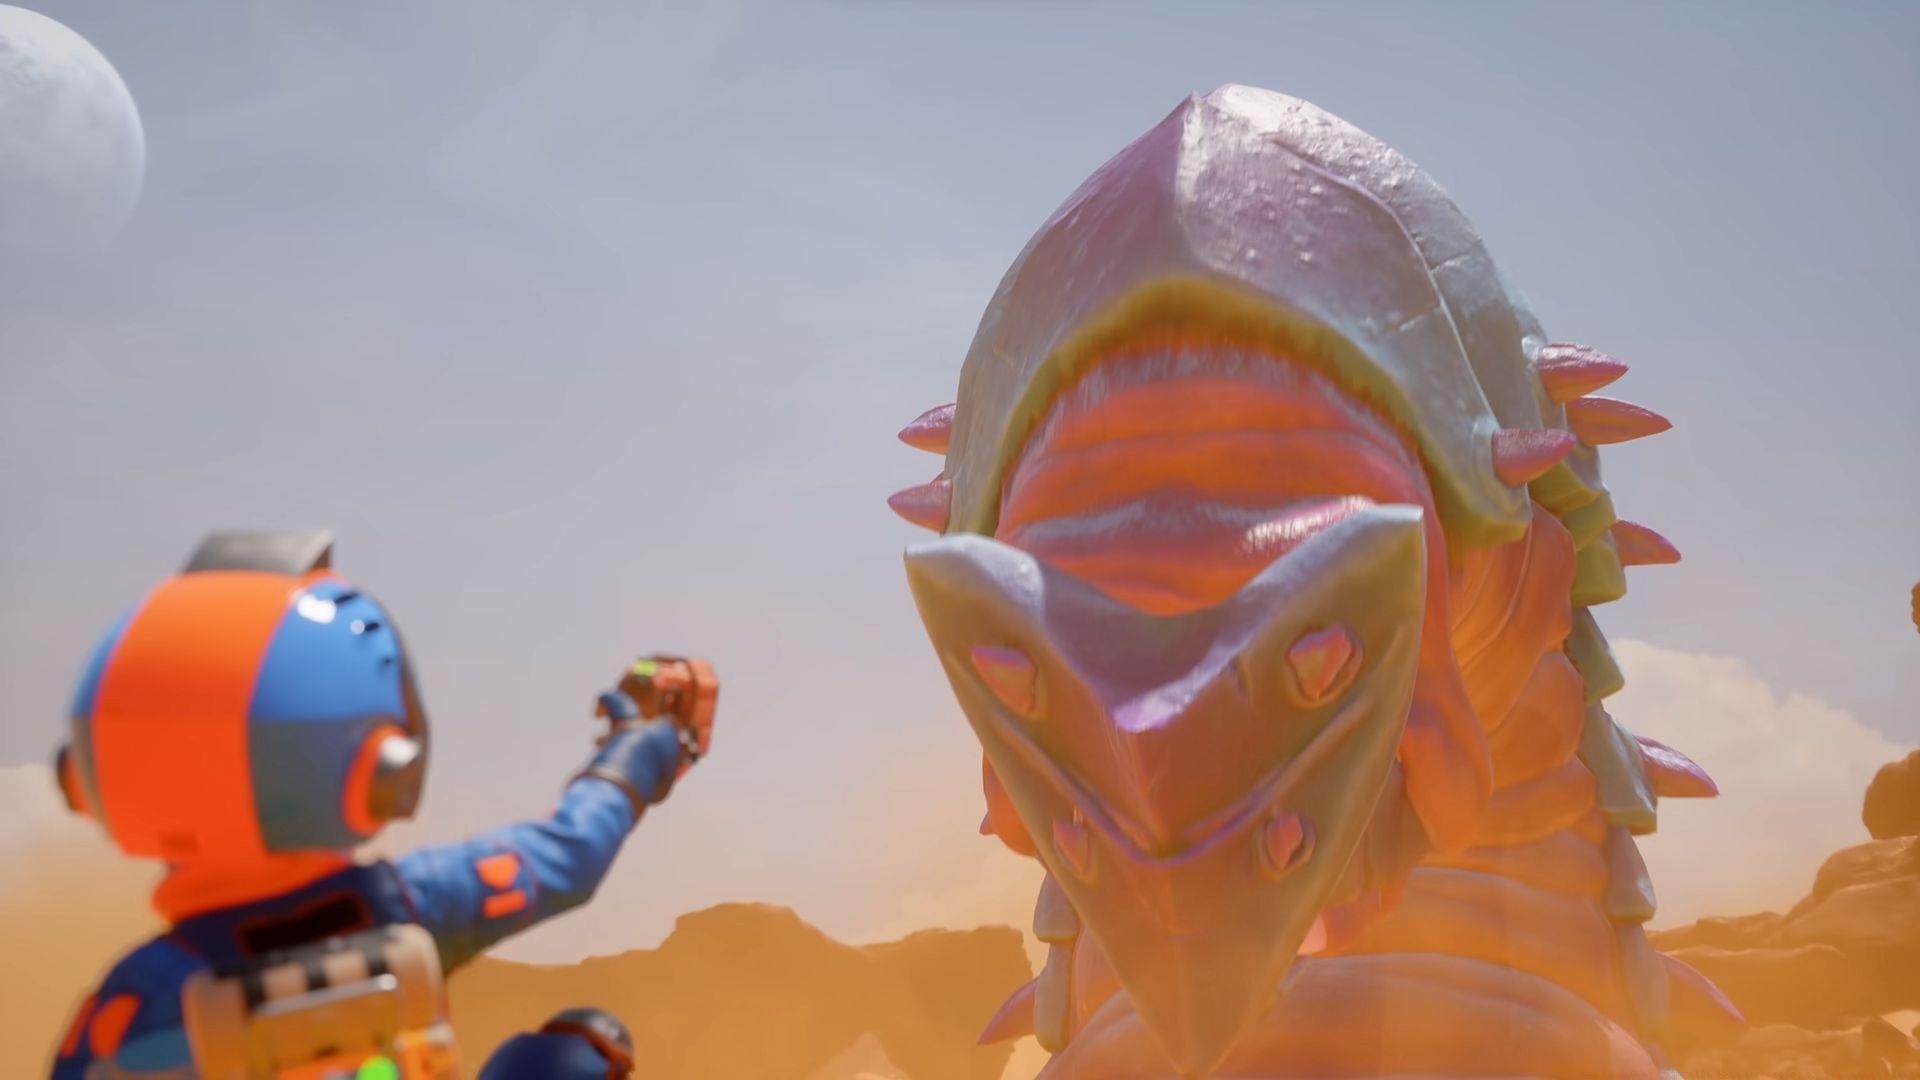
Wormzilla in Revenge of the Savage Planet presents your inaugural major challenge, confronting you immediately upon arrival at Xephyr. As you approach the critical Mag Fork container location, this enormous subterranean creature dramatically submerges your objective right before your eyes. This cinematic moment signals the beginning of an extended pursuit that will test your combat skills until you successfully acquire this essential equipment.
Your initial confrontation occurs right after obtaining the crucial deflect capability. Return to the submerged container site where you’ll encounter egg-like structures launching offensive projectiles. Skillfully deflecting these projectiles back toward their source serves as the primary method to lure the boss from its sandy hiding place. Wormzilla employs a diverse arsenal including fiery beam attacks, individual projectile launches, and deceptive sand-diving maneuvers followed by surprise emergence assaults. The deflection mechanics demand precise timing rather than rapid button mashing.
Advanced timing technique: Allow incoming projectiles to approach nearly within contact distance before activating your deflection ability while maintaining direct visual contact with the creature. Typically, three to four successfully countered attacks will temporarily incapacitate the boss, though this represents merely a temporary victory. The creature will inevitably reclaim the container and retreat once more.
Mid-Game Preparation: Crafting the Goo Ingestor
Your subsequent encounter with this formidable adversary occurs at greater subterranean depths, but essential preparation precedes this confrontation. You must first fabricate the vital Goo Ingestor attachment for your Water Hose apparatus. The two necessary components reside within distinctive purple containers dispersed throughout the Xephyr landscape. After constructing this device at your home base, you gain the capability to absorb various goo varieties, with Ferrous Goo proving particularly crucial for the upcoming battle.
Common Mistake Alert: Many players waste time searching randomly for purple containers. Instead, systematically check elevated platforms and hidden alcoves near rocky formations, as developers consistently place these components in visually obscured but logically accessible locations. Additionally, ensure you’ve cleared nearby minor enemies before attempting collection to avoid interrupted crafting sequences.
Pro Tip: Before departing your base, test the Goo Ingestor on various goo types to familiarize yourself with switching mechanics. Different goo varieties have unique properties that may prove useful in other game sections, though Ferrous Goo remains your primary focus for this specific encounter.
Second Phase: Electric Trap Strategy
Within the new combat arena, Wormzilla reappears with enhanced aggressive behaviors and attack patterns. Its fiery breath attack now covers both horizontal and vertical trajectories, necessitating constant positional awareness and movement. The environment contains specialized flora generating Ferrous Goo alongside electrically-charged mushrooms. Deploy your Goo Ingestor to create strategic Ferrous Goo pathways adjacent to these mushrooms, then tactically maneuver Wormzilla across the conductive surface during the mushroom’s electrical discharge cycles.
When executed with proper synchronization, the resulting electrical discharge inflicts catastrophic damage sufficient to eliminate the initial health segment in a single powerful strike. Following this successful maneuver, you finally obtain the Mag Fork, a versatile implement designed for lifting and projecting metallic or crystalline objects. However, before experimenting with your new equipment, Wormzilla unexpectedly consumes you entirely.
Advanced Strategy: Position yourself at arena edges to maximize baiting distance. The mushrooms pulse in predictable 5-second intervals – time your goo placement to coincide with the beginning of a pulse cycle. For optimal damage, create intersecting goo paths that force Wormzilla to remain in the electrified zone longer. Experienced players can set up multiple trap zones to create fallback positions if the initial attempt fails.
Internal Battle: Gut Phase Tactics
Within the creature’s digestive system, you’ll discover crystalline spikes scattered throughout the interior landscape. Utilize your recently acquired Mag Fork to collect these spikes and forcefully impact them against vulnerable points visible along the intestinal walls. After successfully damaging all critical weak spots, Wormzilla expels you from its internal cavity.
Critical Timing Insight: The weak spots glow rhythmically in a distinct pattern – strike during the brightest glow phase for maximum damage. Avoid hurling spikes randomly; instead, methodically target one weak point completely before transitioning to the next. The creature’s internal movements create brief safe zones between convulsions – use these moments for strategic repositioning.
Common Pitfall: Players often panic and waste spikes on non-weak point areas. The vulnerable zones have a distinct pulsating orange glow compared to the static blue of ordinary tissue. Conserve your spikes by only attacking when you have clear shots at the glowing targets, as spike respawns are limited during this sequence.
Final Phase: Precision Throwing Mastery
At this combat stage, the boss ceases projectile attacks entirely, and Ferrous Goo no longer inflicts damage. This segment focuses exclusively on Mag Fork proficiency. Throughout the area, crystalline pillars stand available for utilization – acquire these pillars and patiently await the boss’s distinctive roaring animation when it exposes its oral cavity. This opening represents your designated target area. Precisely project the pillar directly into this vulnerable point. Multiple accurately placed throws will be necessary for success.
If targeting proves challenging or you require temporary combat respite, electrified Ferrous Goo can still momentarily immobilize the creature, though it no longer causes health depletion – this tactic merely provides valuable time for strategic reassessment. After several precisely aimed projections into its oral cavity, Wormzilla in Revenge of the Savage Planet experiences final defeat, and you permanently retain the Mag Fork.
Aiming Technique Mastery: The throwing arc requires practice – pillars travel in a slight parabola. Aim slightly above the mouth during roars to account for drop. The optimal moment occurs during the roar’s peak when the mouth remains fully open for approximately 2 seconds. Advanced players can pre-position pillars near strategic locations before baiting the roar animation to minimize movement during critical throwing windows.
Strategic Expansion: Mastering the Mag Fork opens new exploration possibilities throughout Xephyr – discover advanced applications in our companion guide
No reproduction without permission:SeeYouSoon Game Club » How to defeat Wormzilla boss in Revenge of the Savage Planet Master the Wormzilla boss fight with advanced strategies, common mistakes to avoid, and expert timing techniques in Revenge of the Savage Planet