TL;DR
- Use Osteo Striga with void fusion and linear fusion rifles for optimal damage output
- Strand grapple is essential for avoiding instant-death environmental hazards
- Stay on outer platforms during Phase 1 and prioritize Tormentors immediately when they spawn
- Conserve heavy ammo for Tormentor weak points and Calus’s overshield phases
- Master the timing for finishers on Tormentors to prevent ability suppression
The Desperate Measures mission culminates in one of Destiny 2’s most demanding encounters, requiring precise gear selection and tactical execution. This comprehensive guide provides battle-tested strategies for overcoming Calus, including advanced techniques for players struggling with the Legendary difficulty.
The final confrontation with Calus in Destiny 2: Lightfall—especially on Legendary mode—represents a significant skill check. Completing Desperate Measures pits you against a brutally difficult engagement where environmental hazards and suppression mechanics will test your survival skills to their limits. Fortunately, systematic approaches exist that dramatically improve your chances of success against both Calus and his Tormentor reinforcements.
Warning: Major Desperate Measures spoilers contained below.
This climactic battle unfolds within a circular combat arena featuring multiple elevation levels and deadly drop-offs. For comprehensive campaign strategies and Exotic armor recommendations, consult our Lightfall Legendary campaign guide. Regarding weapon optimization, I strongly advocate for Osteo Striga paired with a void fusion rifle and a linear fusion rifle (I utilized Cataclysmic, whose origin trait provides crucial health regeneration during reload sequences). Osteo Striga excels at both crowd control against the numerous combatants and sustained damage against Calus himself. The void fusion rifle proves invaluable for eliminating green-bar shielded adversaries (prioritize these foes due to their devastating knockback capabilities) along with other elite enemies, while also rapidly dismantling the protective barrier Calus periodically activates.
You gain access to Strand capabilities before engaging Calus, and although this might appear disadvantageous in direct combat scenarios, I contend it’s absolutely critical for survival. The predominant lethal threat during this encounter isn’t projectile damage from Calus and his forces, but rather being forcibly ejected from the arena platforms. Strand’s grappling hook enables spectacular last-second rescues, providing a potential lifeline when plummeting toward certain death. Consequently, maintaining grapple availability becomes paramount; reserve its usage exclusively for emergency recovery situations or when attaching to Tangles (which instantly refreshes the cooldown timer).
Advanced players should practice creating “grapple points” by strategically placing Tangles near platform edges. This technique transforms potential disaster zones into repositioning opportunities, allowing rapid transitions between combat positions while avoiding deadly knockback effects.
The engagement unfolds across two distinct combat phases, with the initial stage demanding exclusive occupation of the perimeter platforms. Enemy squads will systematically assault these rectangular staging areas, requiring swift neutralization. Calus employs homing missiles alongside direct energy weapon attacks; the projectiles can be intercepted and destroyed, while the vertical shields positioned at each platform’s forward edge effectively block his primary weapon discharges, creating temporary safe zones. Periodically, Calus initiates a pyramid-tech assault pattern targeting these platforms, necessitating immediate evacuation to prevent instant elimination. I strongly advise utilizing the elevated arched connectors that bridge the four primary outer platforms (advance toward the central area to gain protection from Calus’s main weapon). Adopting this perimeter strategy, rather than venturing into the central zone, maintains critical separation from Calus’s most dangerous close-range capabilities.
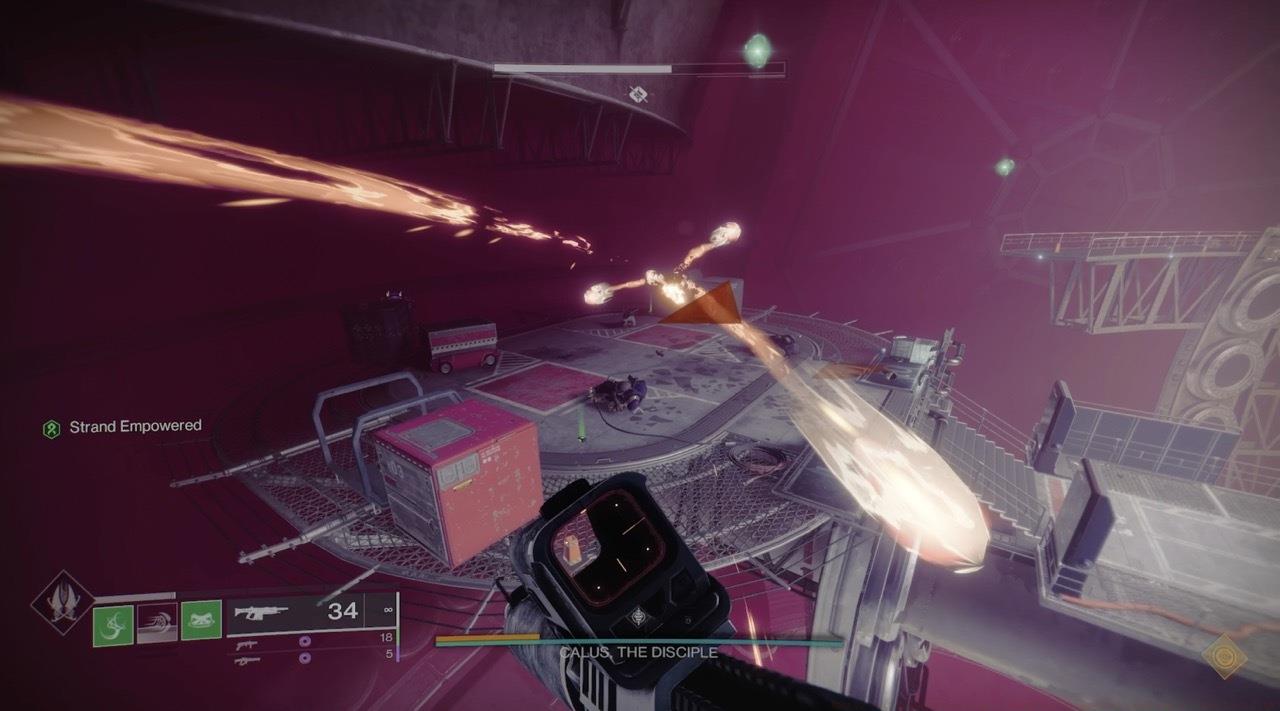
Strategic platform positioning is crucial for surviving Phase 1’s environmental hazards and enemy assaults
Common positioning errors include remaining stationary behind barriers too long, failing to anticipate platform destruction sequences, and clustering with teammates making everyone vulnerable to area attacks. Always maintain situational awareness of escape routes when utilizing cover positions.
You should preserve Heavy ammunition reserves whenever feasible, so maintain position behind those protective barriers on the outer platforms and apply damage to Calus using Osteo Striga, eliminating additional threats as they materialize. After inflicting sufficient damage, Calus activates a protective overshield and summons a Tormentor. The Tormentor immediately becomes your primary elimination target. Since they can displace you through knockback effects and disable your grapple and mobility abilities, they represent the most probable cause of failure during this encounter. Employ your linear fusion rifle to target their vulnerability points and maintain sufficient distance to avoid their suppression aura. The moment you gain access to execution prompts, I strongly recommend initiating finishers when they’re within range—never risk allowing them opportunities to disable your combat capabilities.
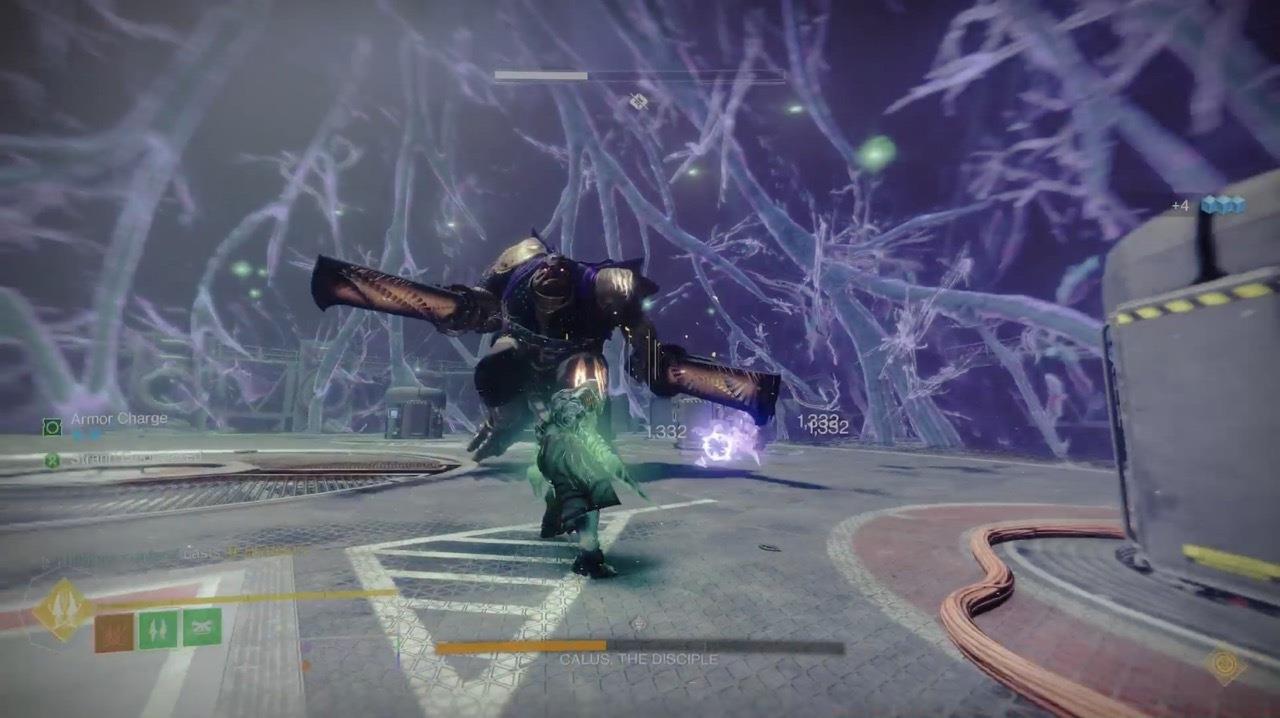
While Calus’s direct attacks are dangerous, environmental knockback presents the greatest lethal threat
Once neutralized, you can eliminate Calus’s overshield protection and continue offensive operations; remember that high-impact weaponry like fusion rifles, or deploying Strand Tangles, will dismantle his shield significantly faster than kinetic alternatives. Also recognize that this protective barrier will regenerate if you delay damage application for extended periods.
After dealing additional significant damage to Calus, another Tormentor materializes; repeat the elimination process until you completely deplete Calus’s health reservoir. Ensure complete Tormentor eradication—their continued presence during the battle’s concluding segment creates untenable combat conditions.
Timing your heavy weapon usage between Tormentor spawns is critical—wasting ammunition on Calus when a Tormentor is imminent will leave you critically underpowered for the encounter’s most dangerous moments.
Many players underestimate the importance of ability cooldown management. Your grenade, melee, and class abilities provide crucial survivability and damage opportunities. Coordinate with teammates to stagger supers and create continuous pressure windows against Calus.
Resist the temptation to use your grapple for minor positional adjustments—this often leaves you vulnerable when genuine emergency situations arise. Instead, utilize conventional movement abilities for routine repositioning, preserving your grapple for life-saving recovery maneuvers.
The most frequent fatal errors include: prematurely expending heavy ammunition, failing to prioritize Tormentors immediately upon spawn, attempting to damage Calus during his immunity phases, and remaining on platforms during destruction sequences. Learning these patterns reduces unnecessary deaths significantly.
For players seeking additional strategic frameworks, our Complete Guide offers additional tactical principles applicable across challenging engagements.
Action Checklist
- Configure loadout with Osteo Striga, void fusion rifle, and linear fusion rifle
- Practice Strand grapple recovery from platform edges in safer environments
- Master Phase 1 platform positioning and enemy wave management
- Execute Tormentor elimination protocol immediately upon each spawn
- Coordinate heavy weapon usage between overshield phases and Tormentor engagements
No reproduction without permission:SeeYouSoon Game Club » How To Beat Calus In Destiny 2: Lightfall Legendary Campaign’s Final Boss Fight Master the Calus boss fight with expert strategies, loadout optimization, and survival techniques for Destiny 2 Lightfall