TL;DR
- Furnace Golems feature predictable but devastating attacks that require precise timing to counter
- Strategic use of Torrent’s mobility and spirit summons can dramatically reduce encounter difficulty
- Each defeated golem rewards unique Crystal Tears essential for character progression
- Location knowledge and environmental awareness provide significant combat advantages
- Advanced tactics include exploiting vulnerability windows and managing summon boundaries
GameSpot may receive revenue from affiliate and advertising partnerships for sharing this content and from purchases through links.
Throughout your journey in Elden Ring: Shadow of the Erdtree, you’ll encounter numerous formidable adversaries, but few match the sheer destructive potential of the massive Furnace Golems. These towering constructs, often called “Brazier Giants” by experienced players, present one of the expansion’s most challenging combat scenarios. However, with proper preparation and execution, you can systematically dismantle these behemoths to acquire valuable Crystal Tears that enhance your character’s capabilities.
Furnace Golems patrol various regions across the Shadow Realm, serving as both environmental hazards and rewarding optional encounters. Engaging them prematurely often leads to swift defeat due to their enormous health reserves and area-denial abilities. Understanding their mechanics and attack patterns is crucial for success.
This comprehensive guide provides detailed strategies for overcoming every Furnace Golem encounter, including precise location data, combat methodologies, and reward information to maximize your efficiency.
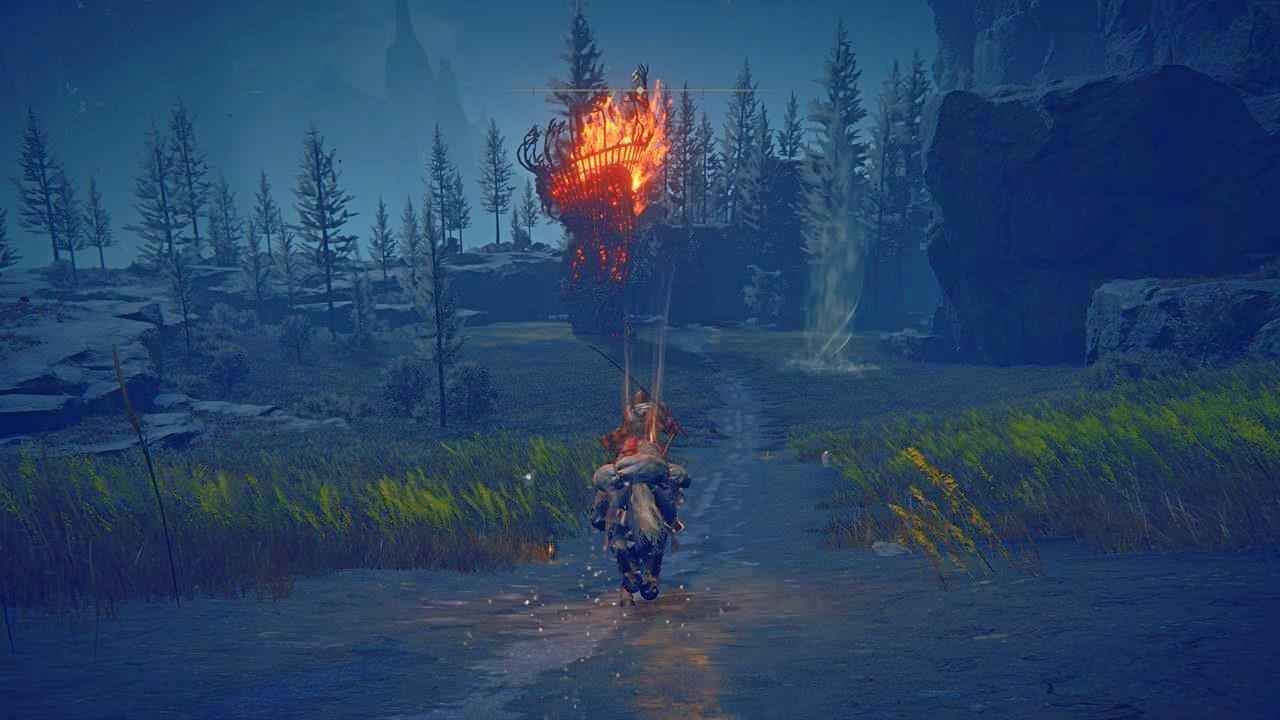
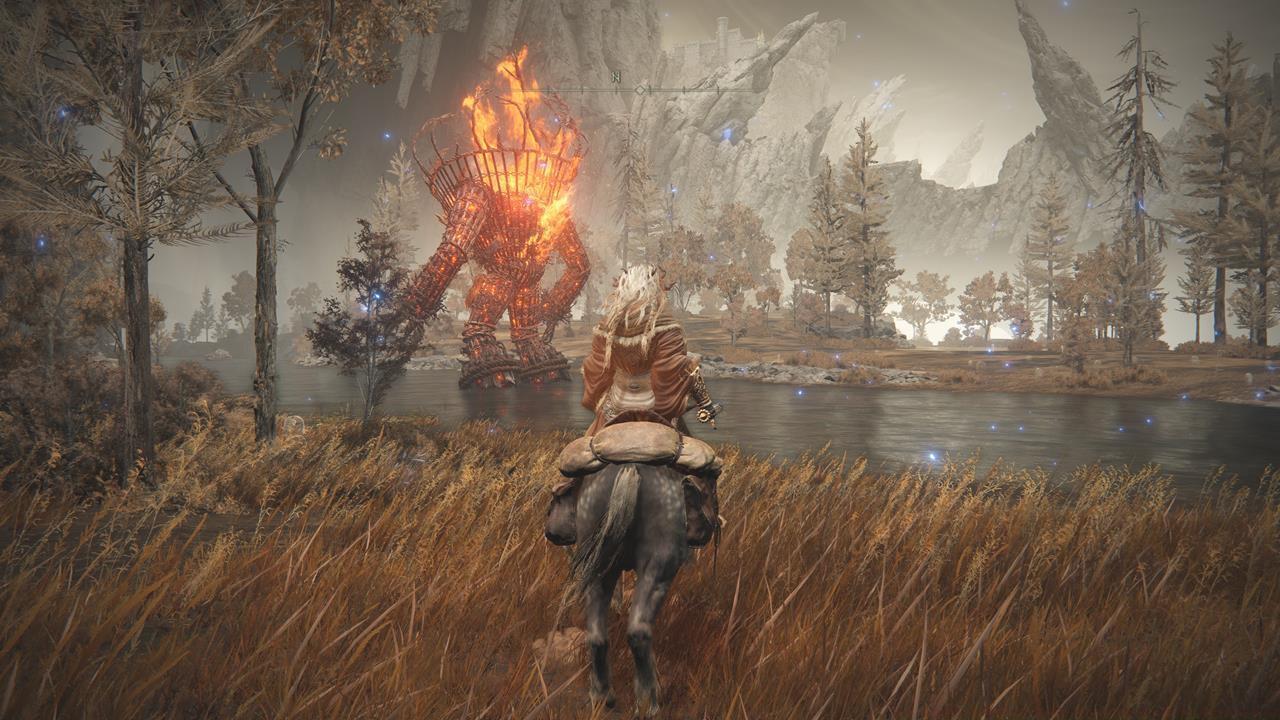
Furnace Golems move with deliberate slowness, making their attacks highly telegraphed but exceptionally punishing when they connect. Success requires mastering both evasion timing and identifying optimal damage windows. Here’s a breakdown of their capabilities and counter-strategies:

Primary Attack Patterns:
- Stomp Eruption – The giant elevates one foot before slamming it downward, generating cascading ground flames. This can be completely avoided by executing a well-timed double-jump on Torrent, creating an opportunity for aerial counterattacks.
- Homing Fireballs – These tracking projectiles relentlessly pursue your position. Maintaining constant lateral movement until the casting sequence concludes is essential for survival.
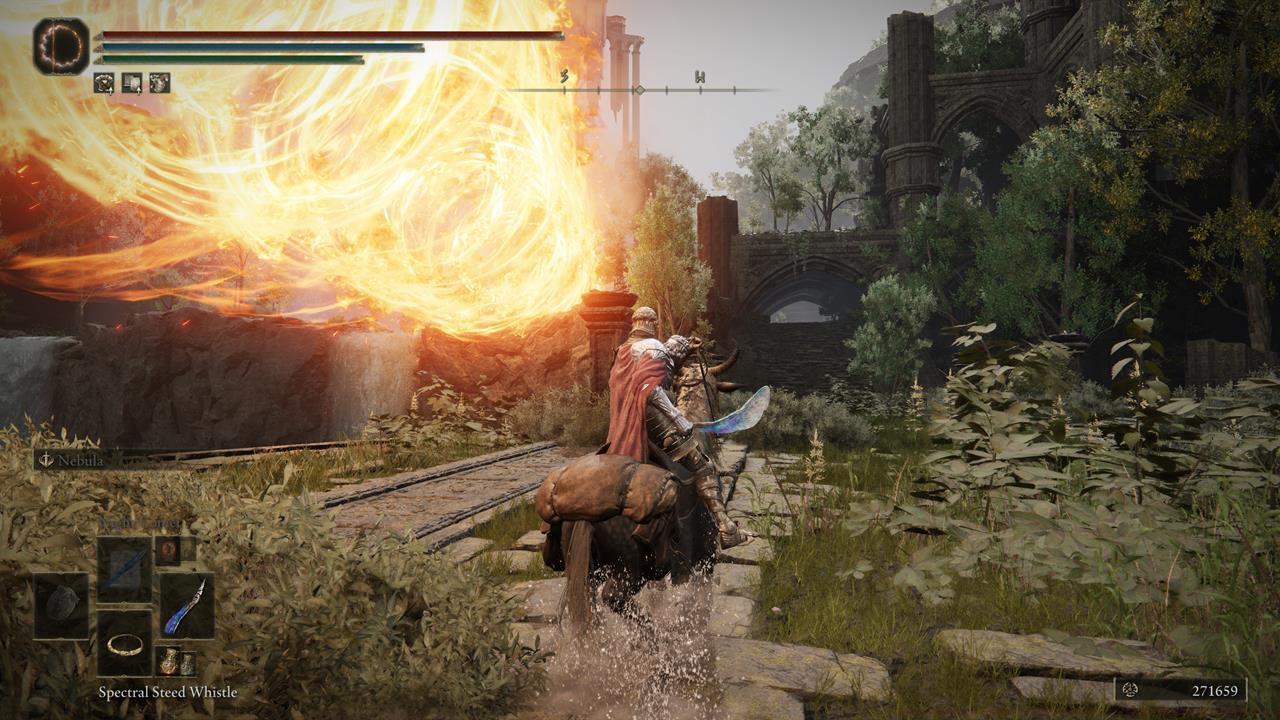
- Omega Beam – The colossus emits intense light before discharging a devastating wide-beam attack. Failing to evade this attack typically results in instant death, requiring either perpendicular dodging or seeking cover.
- Melee Combos – Standard swipes and kicks that launch debris. These have longer wind-up animations but cover substantial areas.

Advanced Combat Tactics:
Many Furnace Golem locations permit spirit summon usage, providing valuable distractions and additional damage. However, be cautious when mounted on Torrent, as moving beyond certain boundaries can cause your summons to despawn prematurely. Position yourself strategically to maintain summon presence while utilizing Torrent’s mobility for hit-and-run attacks.
For players struggling with these encounters, our Class Guide offers insights into optimal character builds that can better withstand the punishing attacks.
Furnace Golems are strategically positioned throughout the Shadow Realm, often guarding key areas or serving as environmental obstacles. Knowing their exact positions allows for better preparation and approach strategies.
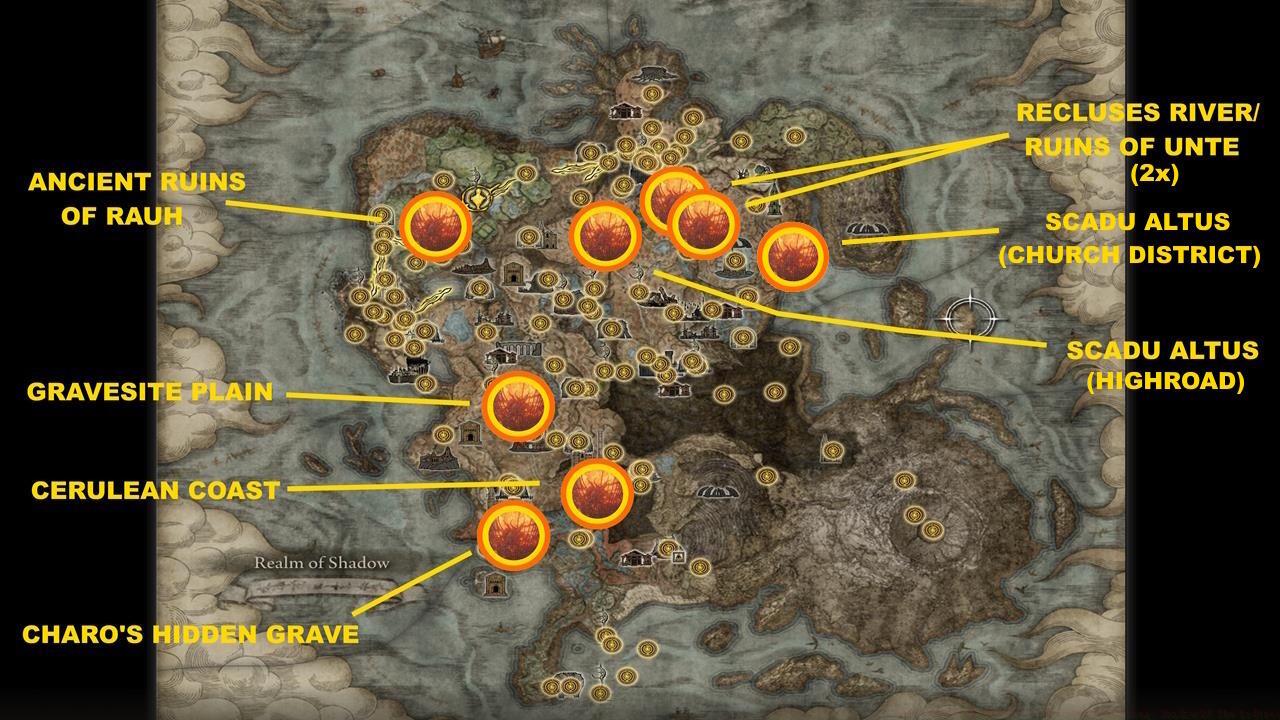
Regional Breakdown:

Gravesite Plain – The introductory area features one Furnace Golem patrolling near important early-game resources. This encounter serves as an ideal training opportunity once you’ve acquired basic combat proficiency.

Scadu Altus (Highroad) – Positioned along a main thoroughfare, this golem controls access to significant progression routes. Defeating it opens up safer travel through this region.
Scadu Altus (Church District) – Guards a valuable Crystal Tear near a ruined chapel. The surrounding architecture provides limited cover against its projectile attacks.
Ancient Ruins of Rauh – This particularly aggressive golem patrols among crumbling structures, requiring careful environmental navigation during combat.
Cerulean Coast – Located near shoreline areas, this encounter features unique terrain considerations. The watery environment affects movement but can be used strategically.

Charo’s Hidden Grave – A well-concealed golem guarding a particularly valuable reward. Finding this location requires exploration off the main paths.

Recluses River/Ruins of Unte – This area contains multiple Furnace Golems, presenting the most challenging cluster encounter. Coordinated strategy and resource management are essential here.
For comprehensive exploration strategies beyond Furnace Golem encounters, check our Complete Guide for additional navigation tips.
Beyond basic attack patterns, mastering Furnace Golem encounters requires understanding subtle mechanics and avoiding common mistakes that lead to unnecessary deaths.
Optimization Strategies:
- Timing Precision – The 0.8-second window after most attacks represents your primary damage opportunity. Striking during this vulnerability phase maximizes efficiency.
- Environmental Utilization – Many golem locations feature destructible elements that can create temporary cover or alter attack trajectories.
- Resource Management – These extended encounters demand careful stamina and healing item allocation. Aggressive play typically results in resource depletion before victory.
- Weapon Selection – Strike-type weapons and those with fire resistance perform particularly well. For weapon-specific strategies, our Weapons Unlock guide offers detailed analysis.
Common Mistakes to Avoid:
- Overcommitting to attack sequences that extend beyond safe windows
- Failing to monitor spirit summon health and positioning
- Attempting to block instead of dodging fire-based attacks
- Underestimating the range and tracking capability of homing projectiles
- Neglecting to upgrade gear specifically for these encounters
Time Investment Estimates:
For experienced players, individual Furnace Golem encounters typically require 3-5 minutes of focused combat. Newer players should anticipate 8-12 minutes per encounter while learning patterns. Completing all golem encounters represents approximately 45-60 minutes of gameplay for prepared characters.
Action Checklist
- Study attack telegraphs and practice evasion timing before engaging
- Identify and utilize environmental cover elements in each location
- Coordinate spirit summons with mounted combat for maximum efficiency
- Execute precision strikes during 0.8-second vulnerability windows after attacks
- Systematically clear all locations using acquired Crystal Tears to enhance capabilities
No reproduction without permission:SeeYouSoon Game Club » How To Beat All Furnace Golems In Elden Ring: Shadow Of The Erdtree Master the art of defeating all Furnace Golems in Elden Ring's DLC with expert strategies and location guides