TL;DR
- Each character has six distinct weapons with specialized combat roles
- Weapon locations include story progression, shops, and easily missable hidden spots
- Strategic weapon selection dramatically impacts battle effectiveness and party synergy
- Upgrade paths and materia slots vary significantly between weapon types
- Advanced techniques require mastering specific weapon combinations and timing
Final Fantasy 7 Remake’s weapon system offers deep character customization that fundamentally shapes your combat approach. Unlike many RPGs where weapons serve as simple stat upgrades, each piece of equipment dramatically alters how characters perform in different battle scenarios.
Every playable character possesses six distinct armaments, each designed for specific tactical purposes. Some excel at close-quarters melee engagements, others significantly boost magical potency, while specialized variants provide unique advantages like enhanced critical strike probabilities or superior defensive capabilities.
Weapons and their enhancement trees serve as the primary method for tailoring character roles during combat encounters. While certain armaments become available naturally through narrative progression or merchant purchases, several require exploration in specific locations that players can easily overlook. This comprehensive guide details acquisition methods for every available weapon across all party members.
- Cloud
- Buster Sword – Balanced starting weapon with solid all-around performance
- Iron Blade – Magic-focused blade ideal for spellcasting builds
- Nail Bat – High-damage unconventional weapon with random criticals
- Hardedge – Pure physical damage specialist with limited magic
- Mythril Saber – Excellent magic stat booster for hybrid builds
- Twin Stinger – End-game weapon with balanced stats and materia slots
- Tifa
- Leather Gloves – Standard starting equipment with balanced attributes
- Metal Knuckles – Enhanced physical offense at magic expense
- Sonic Strikers – Speed-focused gloves improving attack frequency
- Feathered Gloves – Critical hit specialization with aerial combat advantages
- Mythril Claws – Magic amplification for elemental strike builds
- Purple Pain – Unique weapon with stagger enhancement capabilities
- Barret
- Gatling Gun – Reliable starting firearm with steady damage output
- Light Machine Gun – Improved accuracy and rate of fire combination
- Big Bertha – Defensive powerhouse sacrificing mobility for survivability
- Steel Pincers – Close-range specialist with melee capability enhancements
- Wrecking Ball – Slow but powerful weapon with unique attack properties
- EKG Cannon – Specialized tool with electrical damage and crowd control
- Final Fantasy 7 Remake Intergrade Analysis – Enhanced Materia System
- Complete Wall Market Attire Guide: Obtaining Every Available Dress Option
- Complete Chapter 3 and return to Beginner’s Hall for Iron Blade
- Finish Kids On Patrol side-quest in Chapter 8 for Nail Bat
- Purchase Hardedge from Wall Market Weapons Shop in Chapter 9
- Acquire Mythril Saber during Chapter 14 Wall Market revisit
- Discover Twin Stinger in Chapter 17 after bridge sequence
- Regularly visit weapon upgrade stations to enhance your current arsenal
- Experiment with different weapon-materia combinations against various enemy types
- Thoroughly explore each chapter’s optional areas before progression
- Check merchants regularly for newly available weapons as story advances
- Master weapon switching mid-battle to counter different enemy types
- Create save points before major story decisions to avoid missing time-sensitive weapons
- Experiment with different weapon and materia combinations for optimal synergy
- Complete Chapter 3’s Scrap Boulevard and return to Beginner’s Hall for Iron Blade
- Finish Kids On Patrol side-quest in Chapter 8 to obtain Nail Bat
- Visit Wall Market Weapons Shop in Chapter 9 for Hardedge
- Use Steal materia on Eligor boss in Chapter 11 for Bladed Staff
- Complete Subterranean Menace side-quest in Chapter 14 for Wrecking Ball
- Master Buster Sword fundamentals in early chapters
- Acquire Iron Blade in Chapter 3 for magic-focused builds
- Complete Kids On Patrol quest in Chapter 8 for Nail Bat
- Purchase Hardedge before Colosseum battles in Chapter 9
- Obtain Mythril Saber during Chapter 14 for spellcasting superiority
- Secure Twin Stinger in Chapter 17 for endgame versatility
- Practice weapon switching against different enemy types to master situational combat
- Complete Wall Market side quests in Chapter 9 to obtain Arcane Scepter
- Thoroughly explore Train Graveyard in Chapter 11 for Mythril Rod
- Use Steal materia on Eligor boss fight for Bladed Staff
- Check Aerith’s room in Shinra Tower at Chapter 17 start for Reinforced Staff
Successfully collecting every weapon requires meticulous exploration and awareness of missable opportunities. Many powerful armaments reside in optional areas that don’t appear on main paths, demanding thorough environmental investigation.
Common acquisition mistakes include rushing through chapters without checking side areas, overlooking destructible environmental elements, and missing time-sensitive acquisition windows during specific narrative segments.
For optimization, prioritize weapons that complement your preferred combat style while maintaining versatility for different enemy types. The Weapons Unlock principles of strategic collection apply similarly here – methodical exploration yields the best arsenal.
Advanced players should master weapon switching during combat to adapt to changing battle conditions, similar to how Class Guide tactics emphasize adaptability in different combat scenarios.
Final Fantasy 7 Remake features an extensive weapon system where each character can access six distinct armaments throughout their journey. Understanding when and where to acquire these tools, plus how to optimize them through the Weapon Upgrade interface, becomes crucial for mastering the game’s combat mechanics. Unlike many RPGs where early weapons become obsolete, FF7R’s proficiency system ensures your starting gear remains viable when properly enhanced.
Strategic weapon selection goes beyond raw damage numbers—you’ll need to consider materia slot availability, stat distributions, and special abilities that complement your playstyle. Many weapons offer situational advantages that can turn difficult encounters into manageable challenges.
Buster Sword
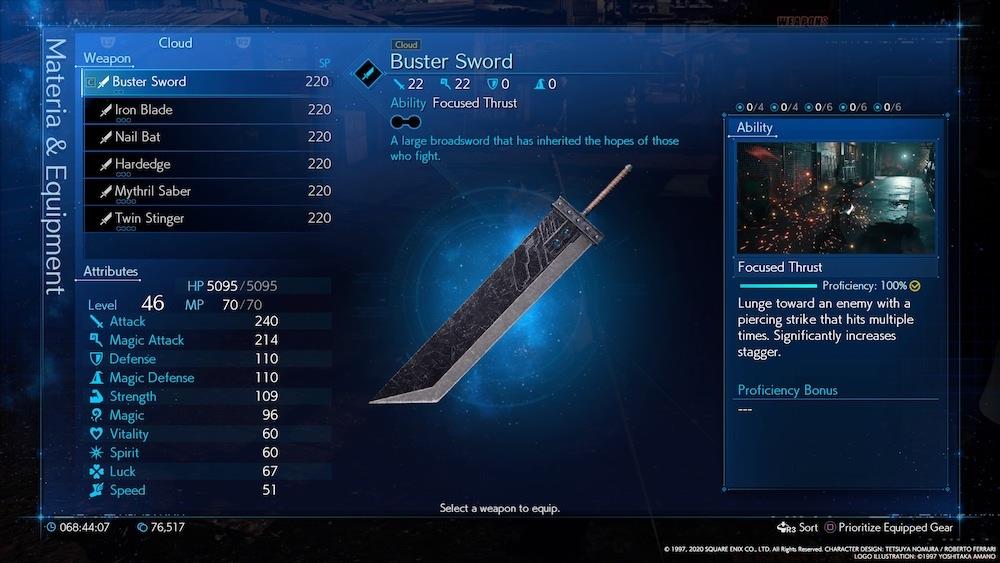
Cloud’s iconic starting blade maintains remarkable versatility throughout the entire campaign when upgraded strategically. Its balanced approach between physical strikes and magical potency makes it adaptable for virtually any combat scenario you encounter. The Buster Sword particularly excels when you need a reliable all-purpose weapon without specialized weaknesses.
Iron Blade
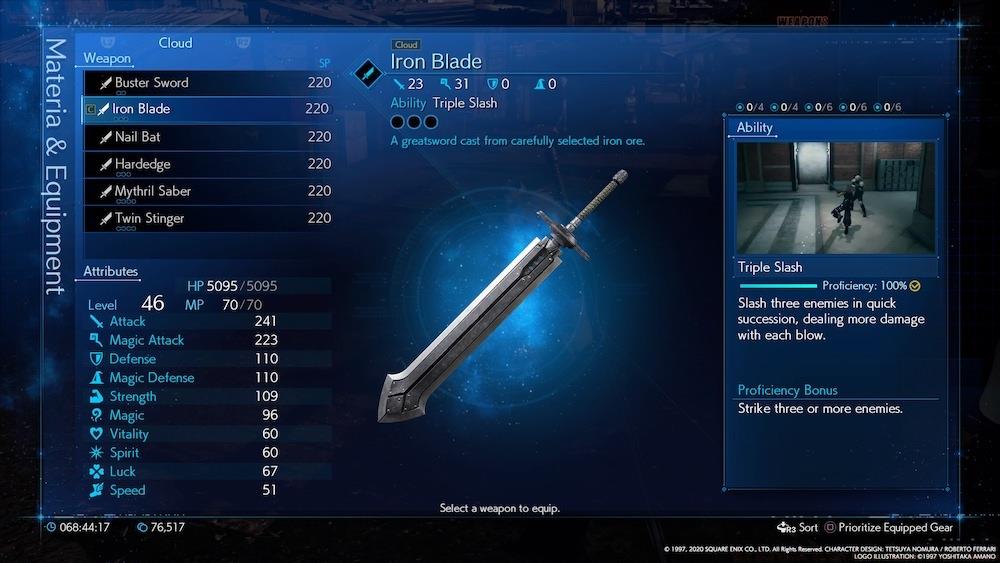
Acquired automatically after completing Scrap Boulevard in Chapter 3, this blade significantly enhances magical capabilities while preserving respectable close-quarters performance. It’s ideal for hybrid builds where Cloud needs to cast spells between sword combos.
Nail Bat
Unlocked by finishing the Kids On Patrol side-quest during Chapter 8, requiring you to defeat the Toad King and his Hedgehog Pie minions. This unconventional weapon prioritizes critical hit potential and health pool expansion, sacrificing both base attack power and spellcasting efficiency in the process.
Hardedge
Available at Wall Market’s Weapons Shop in Chapter 9, Hardedge represents Cloud’s pure physical damage specialization. It exchanges magical aptitude and materia capacity for unparalleled raw striking power and defensive enhancements.
Mythril Saber
When Wall Market’s inventory refreshes in Chapter 14, magic-focused players will appreciate the Mythril Saber’s extensive materia slots and substantial magical amplification. This weapon transforms Cloud into a formidable spellsword when properly equipped.
Twin Stinger
Located in an unmissable chest during Chapter 17’s events, specifically on the walkway just through the door where Cloud and Barret first encounter the M.O.T.H. Unit after the bridge collapse sequence. This end-game weapon provides excellent elemental damage coverage alongside generous materia accommodation.
Leather Gloves
Tifa’s signature fighting implements maintain impressive combat effectiveness from beginning to end when upgraded appropriately. Their attack potency can be substantially elevated through strategic proficiency investments, making them viable even during late-game encounters.
Metal Knuckles
Rewarded after defeating the Crab Warden boss, these knuckles compensate for limited materia capacity with substantial physical damage enhancements. They’re perfect for players who prefer Tifa as a pure physical damage dealer.
Sonic Strikers
Found within a chest positioned in the hallway between the B6 and B5 Air Buster labs during Chapter 7. These specialized gloves excel at elemental damage applications and spell amplification for magic-oriented Tifa builds.
Feathered Gloves
After entering Chapter 10’s sewer system, you’ll encounter a chamber requiring sluice gate manipulation to drain water and create passage. Once the water recedes, navigate beneath the gate to discover a container holding the Feathered Gloves. These provide valuable improvements to ATB accumulation, movement speed, and tactical positioning advantages like rear assault bonuses.
Mythril Claws
Acquired automatically after vanquishing the Failed Experiment boss in Chapter 13. Following the pattern of other Mythril equipment, these claws provide substantial magical power increases ideal for spellcasting-focused Tifa configurations.
Purple Pain
Easily overlooked during Chapter 16’s Shinra Tower exploration, these distinctive gloves reside in the main lobby area. When Tifa retrieves the keycard from reception, ascend the exhibition structure to access a ladder adjacent to a crimson toolbox. Circumnavigate the ladder’s rear to locate an overhead traversal point leading westward, where a concealed chest rests atop a display unit. Purple Pain incorporates multiple materia slots alongside significant critical strike enhancements.
Gatling Gun
Barret’s default firearm remains exceptionally effective when utilizing him as a damage-absorbing tank for your party. You can dramatically increase his health reserves using the Gatling Gun’s enhancement tree, which synergizes beautifully with advanced weapon capabilities like the Lifesaver technique.
Light Machine Gun
Barret’s secondary weapon option provides well-rounded performance characteristics with several defensive attribute improvements. This armament is obtained automatically from Biggs as narrative progression occurs in Chapter 6.
Big Bertha
When revisiting the Collapsed Expressway alongside Tifa and Barret during Chapter 13, you’ll eventually arrive at Evergreen Park where several vendors have established operations. Check the Weapon Store to purchase Big Bertha, representing Barret’s most devastating ranged implement. Maximize its assault capabilities to make it indispensable during prolonged, demanding engagements.
Steel Pincers
The inaugural melee option in Barret’s collection is Steel Pincers, available for acquisition at the Moogle Emporium during Chapter 14. This equipment specializes in elemental damage amplification—you can access numerous elemental spell enhancements while unlocking additional materia capacity. The strategic compromise involves engaging enemies at close quarters rather than maintaining distance.
Wrecking Ball
Barret’s Wrecking Ball represents another close-combat alternative, featuring the maximum assault statistics among all his available gear. You’ll receive it as compensation for finishing Chapter 14’s “Subterranean Menace” optional mission, obtainable from Wymer stationed in Evergreen Park.
EKG Cannon
The EKG Cannon, representing Barret’s ultimate firearm, also constitutes the implement most frequently overlooked. Acquire it through conversation with Hart, the butler serving Mayor Domino, located within Shinra Tower’s archival section. After resolving matters with Domino, engage Hart regarding intelligence about the Shinra executive you’re pursuing. He’ll consent to provide details, but demands 10,000 gil payment. Despite appearing exorbitant, fulfill his request; subsequent to information disclosure, he’ll present the EKG Cannon, which incorporates abundant materia slots and emphasizes critical impact performance.
Guard Stick
Aerith’s introductory magical implement delivers substantial enhancements to spellcasting potency and mana reserves, alongside improvements to her fundamental assault capabilities and restoration magic. This represents a versatile magic-oriented weapon suitable regardless of which combat function you designate for Aerith.
Silver Staff
Upon reaching Sector 5’s underground settlement in Chapter 8, advance through narrative sequences until granted admission to the Kids’ Hideout. Procure the Silver Staff from the Moogle Emporium situated there. This constitutes another balanced magical staff, emphasizing spell cost reduction and amplification of Aerith’s vitality.
Arcane Scepter
Obtain this staff simply by finishing designated optional missions within Wall Market during Chapter 9. When engaging Madam M within her establishment, select any alternative besides “Luxury” to activate two side-quests: “The Party Lasts All Night” and “Dynamite Bodies.” Achieve victory during the Colosseum confrontation for “Dynamite Bodies” and the Arcane Scepter serves as your compensation. It specializes particularly in elemental spellcraft applications.
Mythril Rod
You might inadvertently bypass the Mythril Rod if rushing through Chapter 11. Immediately after entering the Train Graveyard, traverse a railway carriage to proceed. Upon emerging opposite, directly ahead rests another train car. Navigate through it and pivot rightward to proceed southbound. At the zone’s extremity, concealed behind a freight container, resides a chest housing the Mythril Rod. This variant provides enormous magical power augmentation, sacrificing all other attributes.
Bladed Staff
Without understanding the Bladed Staff’s acquisition mechanics, you might remain permanently unaware of its existence. You must employ the Steal materia against Eligor, the spectral chariot-commanding boss encountered in Chapter 11, to secure this implement—and multiple attempts might prove necessary. If utilizing Aerith as a distance combatant, however, this proves advantageous; its improvements concentrate primarily on elevating your critical assault probabilities.
Reinforced Staff
Aerith’s ultimate weapon cannot be overlooked. It’s situated within a container precisely at Chapter 17’s commencement, inside Aerith’s chamber within Shinra Tower, so ensure retrieval before departure. The Reinforced Staff excels in defensive applications, while accommodating numerous materia slots.
Final Fantasy 7 Remake features an extensive weapon system that allows Cloud to adapt his fighting style to any combat situation. Understanding when and how to acquire each weapon, along with their specialized strengths, is crucial for mastering the game’s combat mechanics.
The Weapon Upgrade system provides significant customization options, enabling you to enhance even your starting equipment to remain competitive through the entire campaign. This flexibility means you’re never locked into a single playstyle.
Your journey begins with the iconic Buster Sword, which maintains relevance throughout the entire adventure due to its well-rounded stat distribution. This balanced approach between physical strikes and magical attacks makes it exceptionally versatile for players who prefer adaptability over specialization.
The Iron Blade becomes available after completing Scrap Boulevard in Chapter 3. Return to Beginner’s Hall and speak with Biggs and Wedge to receive this magic-focused upgrade. It provides substantial magical power enhancements while preserving respectable melee capabilities.
Unlock the Nail Bat by finishing the Kids On Patrol side-quest during Chapter 8. This requires defeating the Toad King and his Hedgehog Pie minions. This unconventional weapon emphasizes critical hit probability and health point boosts, trading off both standard attack power and magical potency.
Visit the Weapons Shop in Wall Market during Chapter 9 to purchase the Hardedge. You’ll need to progress through the chapter’s storyline to unlock shop access, but acquiring it before Corneo’s Colosseum battles is highly recommended. This weapon prioritizes raw offensive power and defensive enhancements at the cost of magical capabilities and materia slot availability.
Return to Wall Market in Chapter 14 to find the shop’s inventory refreshed. The Mythril Saber serves as an excellent choice for magic-oriented builds, offering abundant materia slots and significant magical power amplification.
The Twin Stinger awaits discovery in Chapter 17 within a conspicuously placed chest. Locate it after reuniting with Barret following the bridge collapse during the Hojo pursuit. It’s positioned on the walkway immediately past the doorway where Cloud and Barret first confront the M.O.T.H. Unit. This advanced weapon provides exceptional elemental damage output and extensive materia capacity while maintaining balanced performance across all combat metrics.
Effective weapon management involves understanding each blade’s specialized role in your combat repertoire. The Buster Sword serves as your reliable all-rounder, while Iron Blade and Mythril Saber cater to spellcasting specialists. Hardedge dominates pure physical confrontations, and Nail Bat excels in survival-focused scenarios.
Materia synergy plays a critical role in maximizing weapon effectiveness. Pair magic-focused weapons with elemental materia for devastating spell combinations, while physical-oriented blades benefit greatly from attack-boosting and defensive materia setups.
Seasoned players should master situational weapon switching to counter specific enemy types. Against magic-vulnerable foes, equip Mythril Saber with corresponding elemental spells. For brute force encounters, Hardedge’s raw power proves invaluable. The Twin Stinger’s versatility makes it ideal for unpredictable combat situations where adaptability is paramount.
Common mistakes include sticking with a single weapon throughout the game or neglecting to upgrade weapons that don’t initially match your preferred playstyle. Diversifying your arsenal ensures you’re prepared for any combat challenge the game presents.
Final Fantasy 7 Remake Latest Updates
Weapon Acquisition Priority List:
Securing the Arcane Scepter requires strategic engagement with Wall Market’s side content during Chapter 9. When consulting with Madam M in her establishment, deliberately select any dialogue option other than “Luxury” to activate both “The Party Lasts All Night” and “Dynamite Bodies” questlines. Your success in the Colosseum combat challenge for “Dynamite Bodies” directly rewards you with this specialized staff. The Arcane Scepter excels particularly in amplifying elemental magic potency, making it ideal for players focusing on fire, ice, and lightning spell combinations.
While progressing through Chapter 11’s Train Graveyard, many players overlook the Mythril Rod due to its clever concealment. Immediately after passing through the initial train car that advances the storyline, you’ll emerge to find another carriage directly ahead. Proceed through this secondary car and immediately turn right to navigate southward through the environment. At the southernmost boundary, concealed behind a substantial cargo container, rests the chest containing this powerful weapon. The Mythril Rod delivers an exceptional enhancement to magical capabilities but comes with significant compromises to physical attributes and defensive statistics.
Acquiring the Bladed Staff demands specific knowledge of the steal mechanic system. You must successfully utilize Steal materia against Eligor, the spectral chariot commander encountered in Chapter 11. This acquisition method often requires multiple attempts due to variable success rates. For players who prefer utilizing Aerith as a distance combat specialist, this weapon proves exceptionally valuable; its enhancement tree primarily concentrates on maximizing critical strike frequency and damage output potential.
Aerith’s ultimate weapon is impossible to overlook for attentive players. It resides within a chest positioned at the very beginning of Chapter 17, specifically located in Aerith’s personal quarters within Shinra Tower—ensure you retrieve it before progressing further. The Reinforced Staff provides substantial defensive capabilities while offering an extensive array of materia slot configurations for tactical flexibility.
Action Checklist
No reproduction without permission:SeeYouSoon Game Club » How And Where To Get Every Weapon In FF7 Remake