TL;DR
- Complete the Field Guide mission (first hour) to unlock Photo Mode permanently
- Access via ESC/Options menu with K key (PC) or designated controller button
- Utilize depth of field, filters, and character posing for cinematic results
- Toggle UI visibility before capturing to eliminate on-screen distractions
- Experiment with seasonal changes and time manipulation for unique compositions
The eagerly anticipated Photo Mode functionality in Hogwarts Legacy transforms how players document their magical journey through the wizarding world. This powerful tool enables comprehensive character and environmental capture with professional-grade customization.
Community demand for screenshot capabilities has been overwhelming since the game’s initial release. Capturing distinctive character moments, breathtaking locations, and dramatic scenes represents an essential component of modern open-world gaming experiences. While many enthusiasts believed Photo Mode implementation was unlikely, the comprehensive summer update delivered this highly requested feature alongside other significant content additions.
The summer enhancement introduced substantial new gameplay elements, prominently featuring the long-awaited photographic system. Players can now create studio-quality screenshots directly within the game environment and distribute them across social platforms, though mastering access protocols remains crucial.
Before initiating your photography session, specific progression requirements must be satisfied. Photo Mode activation occurs exclusively after completing the critical main story mission that grants access to your Field Guide. This foundational objective typically concludes during the initial sixty minutes of gameplay, after which photographic capabilities become permanently available.
To engage Photo Mode, press the Escape key on PC keyboards or Options/Start on console controllers. This action opens the primary navigation interface where you can select equipment, configuration settings, and additional menus. Crucially, no specific menu selection is necessary—instead, direct your attention to the screen’s lower-right quadrant and locate the “Enter Photo Mode” prompt. Adjacent to this text appears the activation button; selecting it transitions you into photographic interface. On standard keyboard configurations, the default key binding is typically “K,” though controller mappings vary by platform.
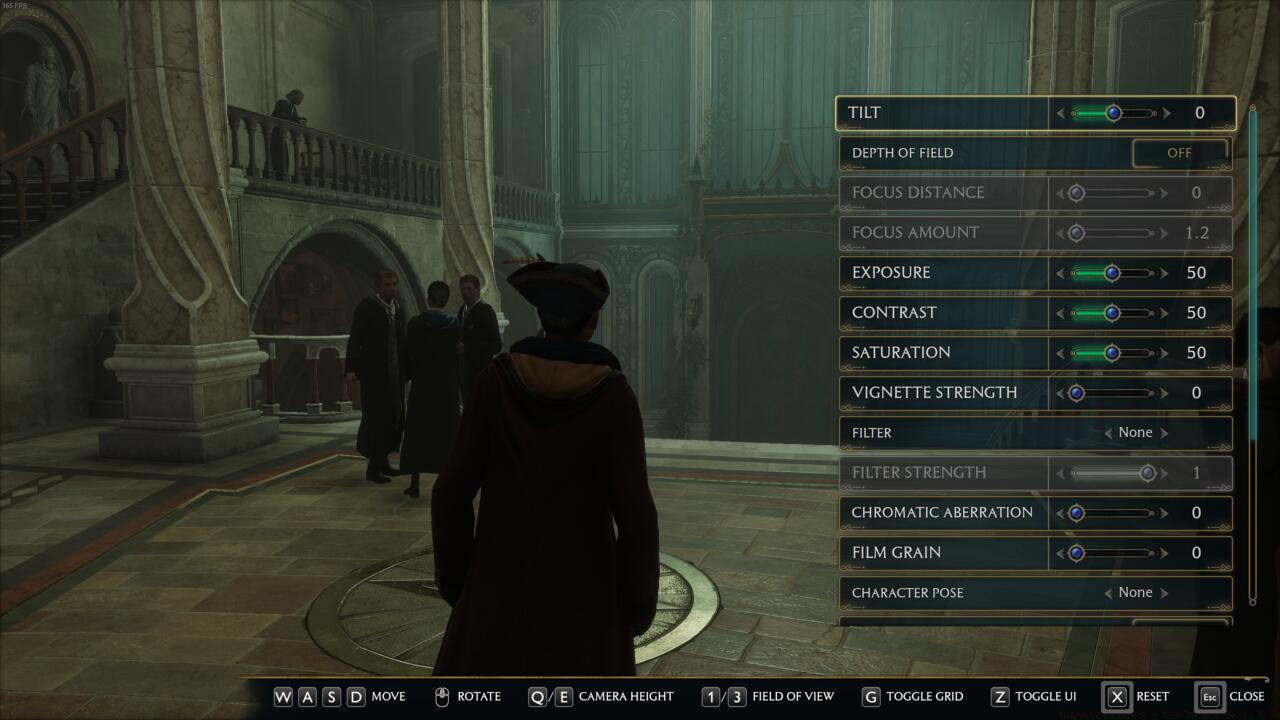
Upon entering photographic interface, numerous adjustment parameters become available for fine-tuning your captures. Essential controls include Tilt manipulation, Depth of Field intensity, Exposure compensation, Contrast modification, Saturation adjustment, and various additional imaging parameters. Beyond basic photographic settings, you can designate specific seasonal environments (Spring, Summer, Autumn, Winter), apply visual filters, and manipulate time-of-day lighting conditions. Importantly, temporal adjustments affect only photographic previews rather than actual in-game chronology.
Among the most compelling Photo Mode capabilities is character pose selection. Multiple preset poses are available including Standing positions, Sitting postures, Taunting gestures, among others. For compositions excluding your avatar entirely, complete character removal represents a viable option. Advanced zoom functionality permits detailed framing beyond standard character perspectives using either mouse-wheel scrolling or controller analog sticks.
Mastering composition represents the foundation of exceptional magical photography. Implement the rule of thirds by positioning key elements at intersection points rather than frame center. Utilize leading lines within Hogwarts architecture to guide viewer attention toward primary subjects. For character-focused shots, ensure adequate negative space around your wizard to prevent visual crowding.
Depth of Field manipulation creates professional-looking images by blurring background elements while maintaining subject sharpness. This technique proves particularly effective for emphasizing magical creatures, important artifacts, or dramatic moments. Combine DOF with strategic posing to create narrative-driven compositions that tell compelling stories.
Lighting conditions dramatically impact photographic quality. Morning light creates soft, warm tones ideal for Hogwarts exterior shots, while evening illumination enhances dramatic interior scenes. Experiment with time-of-day adjustments to find optimal lighting for each location without affecting gameplay progression.
Avoid common photographic mistakes like over-saturation that creates unnatural color intensity, or excessive contrast that loses shadow detail. For action sequences, slight motion blur can enhance dynamism, while static scenes benefit from maximum sharpness. Consider your photographic purpose—social sharing versus personal collection—when selecting resolution and format options.
When prepared to capture your final image, locate the “Toggle UI” option at the screen’s bottom edge. Activate the corresponding button to eliminate all interface elements and textual overlays. Subsequently, capture your photographic compositions, reactivate the UI toggle, then maintain pressure on Escape/Options to return to Hogwarts Legacy’s primary interface.
Future development may introduce additional Photo Mode functionalities, though the current implementation already provides robust creative tools. If exploring additional summer update content interests you, consult our comprehensive Complete Guide for detailed walkthroughs of new quests like Minding Your Own Business or examine the complete update feature breakdown.
For optimal results, establish a systematic workflow: scout locations during different times, pre-configure your preferred settings, practice pose transitions, and master the UI toggle sequence. Advanced photographers often capture multiple variations of each scene with different filters and compositions to maximize selection options during post-capture review.
Consider creating thematic photo series focusing on specific elements like Hogwarts architecture, magical creatures, spell effects, or seasonal transitions. These collections create compelling narratives of your magical education and showcase the game’s visual diversity. Share your best creations with the community to inspire other aspiring wizarding world photographers.
Action Checklist
- Complete the Field Guide unlocking mission (approximately 60 minutes gameplay)
- Access Photo Mode via ESC/Options menu using K key or controller equivalent
- Experiment with depth of field, filters, and character poses
- Practice UI toggling for clean captures without interface elements
- Create and share a themed photo series showcasing Hogwarts diversity
No reproduction without permission:SeeYouSoon Game Club » Hogwarts Legacy – How To Use Photo Mode Master Hogwarts Legacy's Photo Mode with expert techniques for capturing magical moments and professional screenshots