TL;DR
- Moth Mirrors reveal nearby areas containing magical moths you must retrieve
- Solving these environmental puzzles rewards you with valuable collectibles and gear
- Strategic Lumos spell usage and path memorization significantly improve success rates
- Hogwarts Castle contains the majority of mirrors with Hogsmeade offering additional challenges
- Advanced players should prioritize mirrors based on progression requirements and reward types
Mastering the Moth Mirror puzzles in Hogwarts Legacy requires understanding their unique magical mechanics. These enchanted artifacts present players with environmental challenges that test both observation skills and spellcasting precision.
When you encounter a Moth Mirror, it displays a brief vision of a nearby location where a luminous moth awaits capture. Your objective involves navigating to this revealed area, locating the magical insect, and guiding it back to its original frame using appropriate spells. Successfully completing these sequences unlocks valuable in-game rewards that enhance your wizardry capabilities.
Strategic approach significantly impacts your efficiency. New players often underestimate the importance of memorizing the vision’s environmental clues, leading to extended search times. The Lumos spell proves essential for moth guidance, while Revelio can help identify hidden pathways to obscured locations.
Hogwarts Castle houses numerous Moth Mirrors scattered throughout its majestic halls and hidden chambers. The Astronomy Tower quadrant contains three particularly valuable mirrors, with one requiring specific nighttime access for optimal visibility. The Central Hall area features two mirrors positioned near major staircases, often missed during initial exploration.
Dungeon explorers will discover mirrors concealed within the Slytherin common room vicinity and near the Potions classroom. These typically reward players with potion-related enhancements or rare ingredients. The Library Annex section contains another cluster, with one mirror cleverly hidden behind a moving bookcase that requires precise timing to access.
Common room-specific mirrors present unique challenges, as they often require house alignment or particular quest progression. Gryffindor Tower houses a mirror near the fireplace, while Ravenclaw’s version sits in their astronomy-focused common area. Each location demands different navigation strategies and spell combinations for successful completion.
Beyond Hogwarts Castle, Hogsmeade village contains additional Moth Mirror challenges that often prove more complex than their castle counterparts. The central village area features mirrors near major shops, with one particularly challenging puzzle located behind Honeydukes requiring advanced spell mastery.
Outlying structures like the Forbidden Forest and surrounding hamlets host mirrors that demand thorough exploration and often combat preparedness. These remote locations typically offer superior rewards but require dealing with environmental hazards and magical creatures protecting the areas.
Seasonal changes affect accessibility for certain Hogsmeade mirrors, with winter conditions altering path availability and visibility. Players should note that some moth locations become inaccessible during specific story phases, making timely exploration crucial for completionists seeking all collectibles.
Advanced players can optimize their Moth Mirror hunting through strategic route planning and spell combination mastery. Creating an efficient exploration path that groups nearby mirrors significantly reduces backtracking and time investment.
Optimal spell usage involves combining Lumos with other illumination spells for extended moth control range. The Revelio spell should be cast frequently when searching for the vision-revealed locations, as it highlights interactive elements and hidden pathways.
Time-saving techniques include memorizing common vision patterns and pre-positioning yourself near frequently used fast travel points. Many experienced players complete mirror puzzles 40-50% faster by mastering these techniques, allowing more time for other magical pursuits and class specialization development.
Common pitfalls to avoid include attempting high-level mirrors without proper spell preparation and neglecting to clear areas of enemies before initiating the puzzle sequence. These mistakes commonly add 10-15 minutes to completion times and increase frustration levels unnecessarily.
While many collectibles in Hogwarts Legacy require specific quest completion, Moth Mirrors offer immediate accessibility for exploration enthusiasts. The introductory side mission Moth to a Frame provides essential tutorial guidance, ensuring you understand the fundamental puzzle-solving approach rather than randomly encountering these challenges.
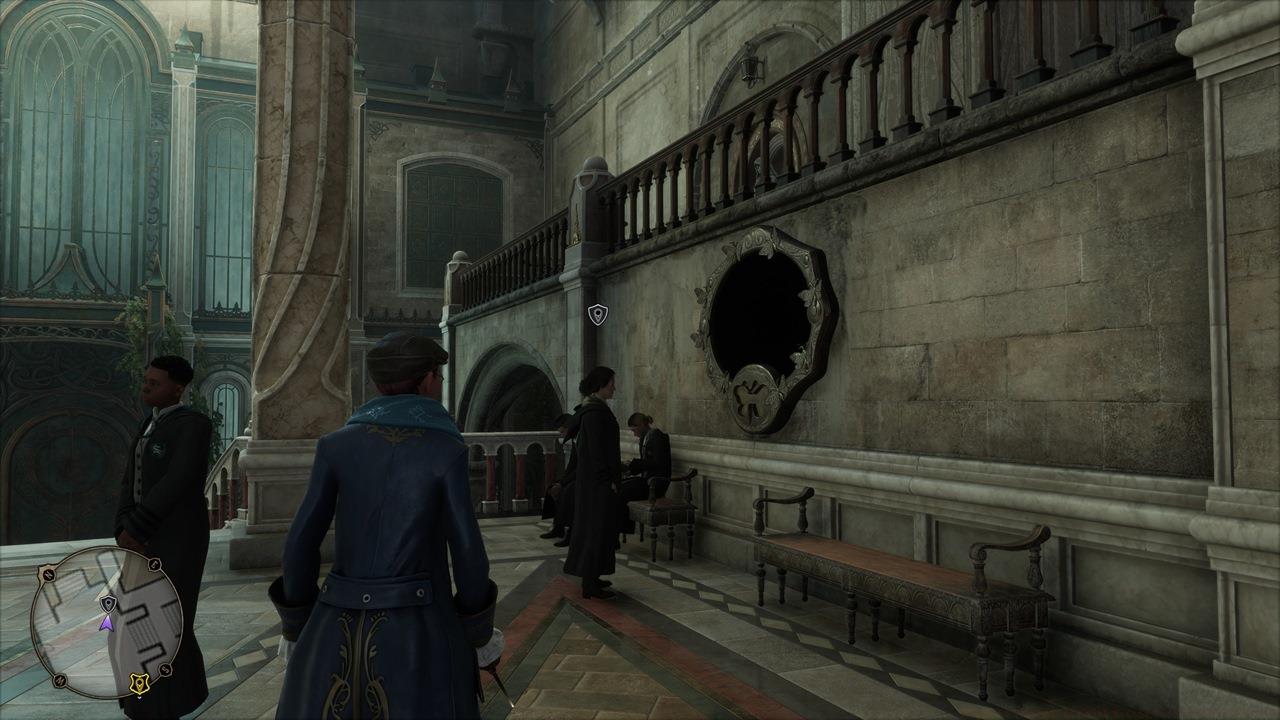
You’ll encounter student Lenora Everleigh positioned before a Moth Mirror in the Library Annex’s Central Hall section. Engage with her to activate the Like a Moth to a Frame tracking objective. Solving these magical puzzles involves a straightforward three-step methodology:
- Apply the Lumos charm directly to the Moth Mirror surface, which then displays directional hints pointing toward nearby moth habitats.
- Navigate to the indicated area where you’ll discover a luminous moth floating in the environment.
- Maintain your Lumos spell to entice the moth, then carefully guide it back to its corresponding mirror to receive your Field Guide Page reward.
You can start solving Moth Mirror puzzles even without completing Like a Moth to a Frame.
The tutorial quest provides visual markers for the initial moth location, but subsequent puzzles require careful observation of environmental clues. Fortunately, our comprehensive guide eliminates guesswork with precise navigation instructions.
Be aware that certain castle regions remain locked during early gameplay stages. Multiple locations necessitate the Alohomora unlocking spell, while others demand upgraded lockpicking skills obtained through Demiguise Statue collection.
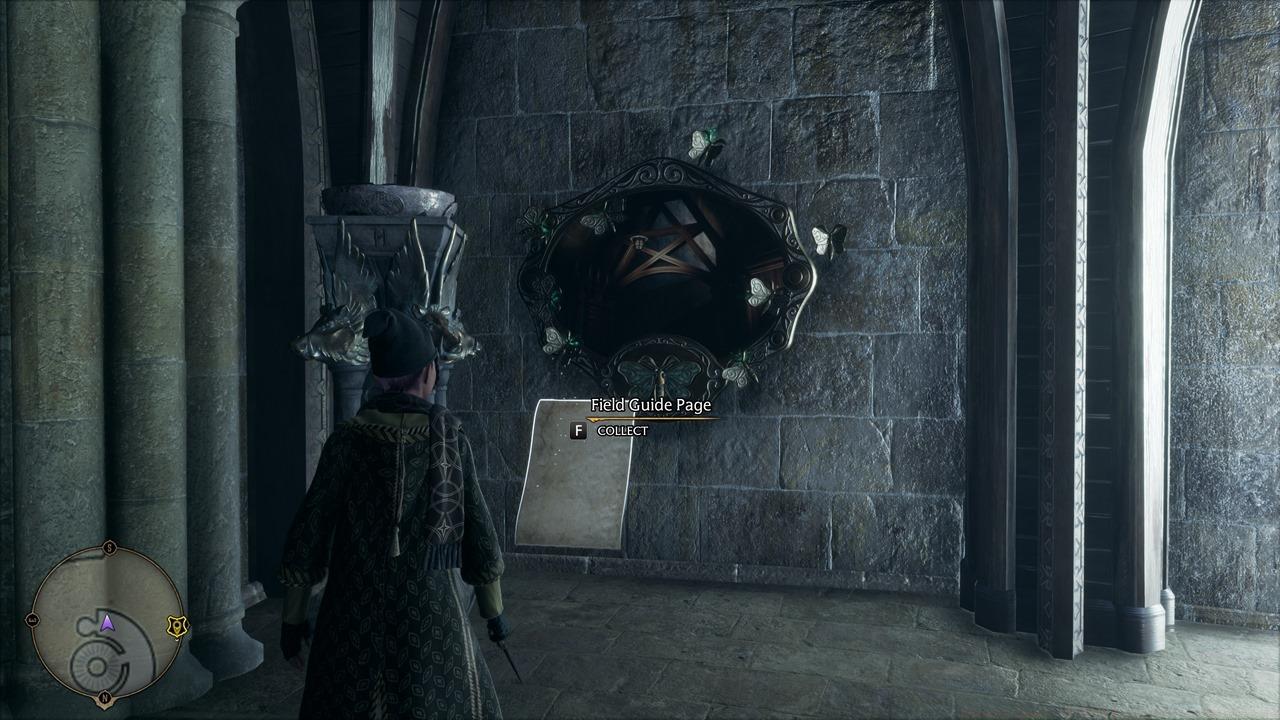
Each Moth Mirror puzzle that you complete in Hogwarts Legacy rewards you with a Field Guide Page, increasing your collectibles tally further.
Library Annex Moth Mirrors
Library
- Mirror Position – Situated on the upper level concealed behind multiple bookshelf arrangements.
- Moth Habitat – Perched atop a presentation stand adjacent to the main stairwells.
Potions Classroom
- Mirror Location – Pass through the entrance and descend the left staircase. Unlock the door beside the Daedalian Cabinet. The reflective surface awaits near the corridor’s terminus, surrounded by numerous framed artworks.
- Moth Position – Directly ahead, hovering near a stone troll sculpture.


Left: Library; Right: Potions Classroom (basement).
Astronomy Wing Moth Mirrors
Astronomy Tower
- Mirror Spot – Ascend the staircases until the Moth Mirror becomes visible beside a warming hearth.
- Moth Perch – Continue upward to the tower’s peak. The glowing insect awaits before an instructional board beside astronomical observation equipment.
Defense Against the Dark Arts (DADA) Tower
- Mirror Placement – Immediately visible upon arrival at the Floo Flame destination point.
- Moth Location – Progress one level upward, positioned immediately outside Professor Fig’s instructional space.
Transfiguration Classroom
- Mirror Position – Reverse direction and proceed through twin doors. The mirror becomes apparent on the wall during your staircase ascent.
- Moth Spot – Access the History of Magic classroom on the ground level directly facing the mirror. The moth resides in the subsequent chamber requiring Alohomora access.
Transfiguration Courtyard
- Mirror Site – Enter through the doorway and climb the right-hand staircase. A compact passageway containing greenish mist houses the mirror.
- Moth Area – Proceed leftward past this corridor section. The moth drifts before an artistic depiction of mythical centaurs.


From left to right: Astronomy Tower; DADA Classroom/Professor Fig’s Classroom; Transfiguration Classroom/History of Magic; Transfiguration Courtyard.
Bell Tower Wing Moth Mirrors
Hogwarts North Exit
- Mirror – Inside the storage structure close to the Floo Flame point.
- Moth – Located at the rearmost section of this zone on the left flank of the defensive walls.
Great Hall Moth Mirrors
Great Hall
- Mirror – Turn about and depart the Great Hall. It’s mounted on the left-side wall surface.
- Moth – Positioned behind the speaker’s platform within the Great Hall, typically occupied by instructional staff.
Viaduct Courtyard
- Mirror – At the exterior segment of the courtyard area with panoramic lake views.
- Moth – Scale the stairway and proceed to the terminus of the right-side hallway.


From left to right: Hogwarts North Exit; Great Hall; Viaduct Courtyard.
South Wing Moth Mirrors
Clock Tower Courtyard (Floo Flame)
- Mirror – This reflective surface neighbors the Floo Flame. Upon arrival, observe the right-side door secured with a level 1 locking mechanism.
- Moth – Proceed into the courtyard proper and examine the rear-right corner section.
Clock Tower Courtyard (Argyllshire Map)
- Mirror – Reverse course and pass through the doorway adjacent to the Floo Flame. Traverse to the opposing wing where a cartographic display of Argyllshire awaits. Above this map rests an interactive button activated via the Depulso charm.
- Moth – Move rightward from the Argyllshire map. The moth inhabits the interior of the female restroom facility.


Left: Clock Tower Courtyard; Right: Clock Tower (Argyllshire).
Grand Staircase Moth Mirrors
Lower Grand Staircase/Slytherin Dungeon
- Mirror – From the Floo Flame, proceed rightward and follow the serpentine hallway to its conclusion. You’ll encounter armored decoration. The mirror awaits on your right flank.
- Moth – Continue advancing through the dungeon sector toward the right. The moth becomes visible mounted on a wall surface.
Ravenclaw Tower
- Mirror – Turn left from the Floo Flame and descend to the marble spiral staircase’s lowest level.
- Moth – Return to the marble staircase’s summit. It’s positioned close to several artistic paintings.
Trophy Room
- Mirror – Advance completely through the passageway and ascend the staircases. Ultimately, you’ll access the constricted hallway featuring a Phoenix gargoyle that proceeds toward the Headmaster’s Office. The mirror occupies this corridor space.
- Moth – Descend the spiral staircase once more. The moth hovers from the ceiling immediately preceding the corridor with mahogany wall coverings.


From left to right: Lower Grand Staircase/Slytherin Dungeon; Ravenclaw Tower; Trophy Room/Headmaster’s Office.
Hogsmeade Moth Mirrors
The magical village of Hogsmeade contains several additional Moth Mirror challenges. Given its expansive outdoor environment, we’ve prepared a detailed cartographic reference for your convenience.
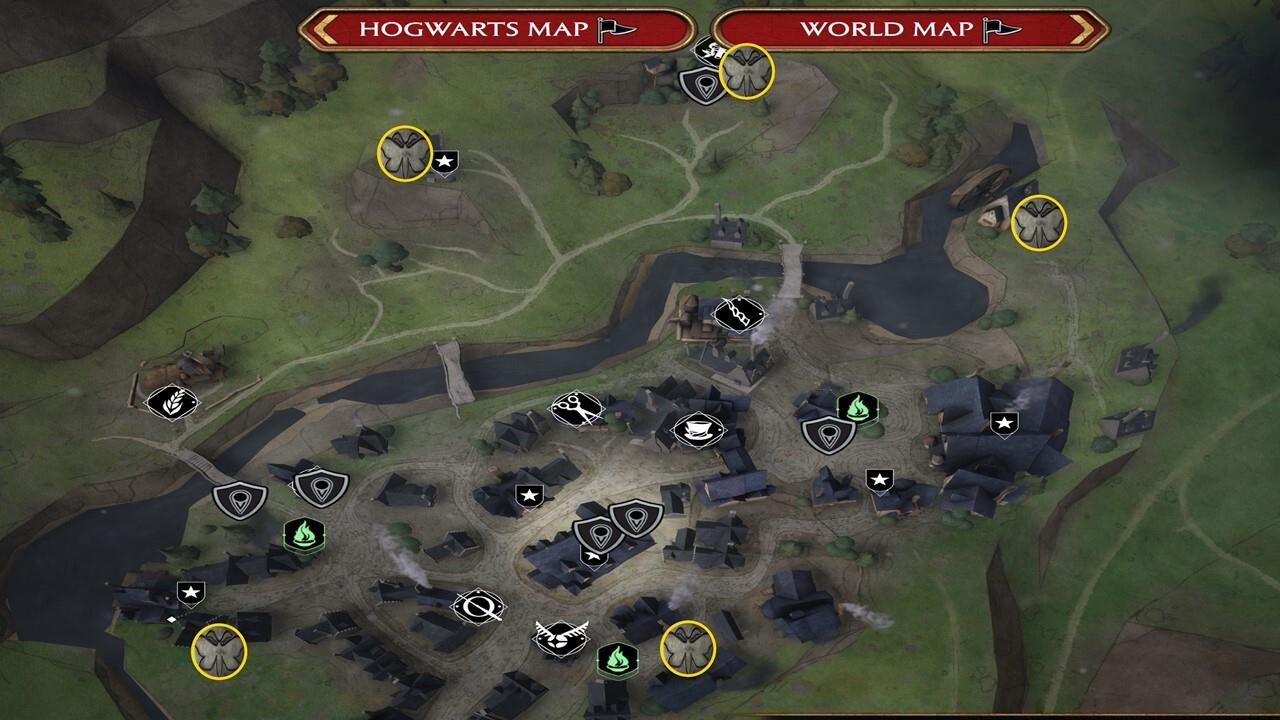
Hogsmeade Moth Mirror locations
Hog’s Head
- Mirror – Positioned beside the Hog’s Head Inn adjacent to a Hogsmeade Eye Chest.
- Moth – Resting atop multiple crates exterior to the Hog’s Head establishment.
Near the Broom Shop
- Mirror – Utilize the South Hogsmeade Floo Flame. Immediately upon arrival, inspect the rear section of the right-side dwelling.
- Moth – From the mirror position, rotate 180 degrees and examine the turf region behind commercial structures. It’s immediately adjacent to another Hogsmeade Eye Chest.
The Old Fool
- Mirror – Inside the Old Fool structure, an unoccupied building northward beyond the graveyard.
- Moth – Examine the timber containers at the Old Fool’s rear section.
Water Mill
- Mirror – Within the water-powered mill situated in the settlement’s eastern district.
- Moth – Cross the walkway leading toward the village center. It perches atop a street illumination post.
Dogweed and Deathcap
- Mirror – Inside the Dogweed and Deathcap retail establishment.
- Moth – The puzzle indication for this particular Moth Mirror specifies the insect’s chimney-top location. Exit the shop and scale the right-side platforms to achieve visual contact.


From left to right: Hog’s Head; South Hogsmeade (shops); The Old Fool; Water Mill; Dogweed and Deathcap.
Hogwarts Legacy represents the creative work of Avalanche Software, operating under Warner Bros. Interactive Entertainment. The gaming experience has encountered significant discussion surrounding commentary from Harry Potter creator JK Rowling. While she maintains no direct developmental involvement, she receives financial benefits from the project’s commercial performance. For expanded perspective, consult our detailed examination regarding Rowling’s statements and their consequences for transgender individuals. Within that resource, you’ll discover connections to transgender content producers worth supporting, alongside charitable organizations accepting contributions.
Moth Mirror puzzles represent one of Hogwarts Legacy’s most accessible collectible systems, requiring no prerequisite quest completion to begin your search. These magical artifacts offer immediate engagement for explorers, though one particular side mission dramatically enhances your understanding of their mechanics. The Moth to a Frame quest serves as the ideal introduction, transforming random discovery into methodical problem-solving.
Located in the Library Annex’s Central Hall, student Lenora Everleigh stands guard before your first Moth Mirror encounter. Initiating conversation with her and tracking the ‘Like a Moth to a Frame’ quest provides crucial contextual knowledge that elevates your puzzle-solving efficiency. This foundational understanding prevents frustrating trial-and-error approaches that often waste valuable exploration time.
- Library Annex Moth Mirrors – Begin your journey here with Lenora’s introductory puzzle
- Astronomy Wing Moth Mirrors – Often require careful navigation through elevated areas
- Bell Tower Wing Moth Mirrors – Feature some of the most challenging spatial puzzles
- Great Hall Moth Mirrors – Blend seamlessly with the architectural grandeur
- South Wing Moth Mirrors – Typically hidden in less-trafficked corridor areas
- Grand Staircase Moth Mirrors – Utilize the dynamic moving staircase mechanics
- Hogsmeade Moth Mirrors – Extend the puzzle experience beyond Hogwarts grounds
The solving methodology remains consistently straightforward across all locations, though environmental challenges vary significantly. Activating Lumos near any Moth Mirror triggers an ethereal visual trail leading toward the corresponding moth’s hiding spot. This glowing pathway, while generally reliable, can sometimes be obscured by architectural elements or magical interference, requiring careful observation.
Seasoned Hogwarts explorers recommend systematic area completion rather than random mirror hunting. Grouping nearby locations—such as tackling all Library Annex mirrors before moving to Astronomy Wing—minimizes backtracking and dramatically reduces completion time. Most players can expect to spend 15-25 minutes per wing when employing efficient routing strategies.
Avoid the common mistake of immediately chasing every moth discovery. Instead, activate multiple mirrors first, then collect moths in a single efficient circuit. This approach prevents the frustration of repeated area transitions and ensures you don’t miss well-hidden mirrors that might require revisiting.
The Lumos spell’s range limitations often surprise new players. Position yourself directly before the mirror when casting to ensure the clue pathway generates properly. If the visual trail appears faint or incomplete, recast the spell from a slightly different angle—often the solution to tricky mirror interactions.
Moth mirror puzzles represent one of Hogwarts Legacy’s most engaging collectible challenges, blending environmental exploration with magical problem-solving. These mystical artifacts require players to locate both the enchanted mirror and its corresponding moth companion, then reunite them to unlock special rewards. Understanding these mechanics early significantly enhances your gameplay experience and collection completion rate.
Each moth mirror location follows specific environmental clues and requires careful observation of your surroundings. The puzzles are strategically placed throughout Hogsmeade’s various districts, encouraging thorough exploration of the magical village. Successfully completing these challenges contributes to your overall game progression and unlocks exclusive cosmetic items.
Begin your moth mirror quest at the South Hogsmeade Floo Flame fast travel point, which serves as the optimal central hub for this collectible hunt. Immediately upon arrival, pivot to your right and investigate the rear section of the adjacent house structure. The first mirror is cleverly concealed in this area, requiring careful visual scanning of the building’s exterior.
For the corresponding moth location, execute a 180-degree turn from the mirror position and direct your attention toward the grassy expanse behind the commercial establishments. This particular moth resides adjacent to a Hogsmeade Eye Chest, allowing you to efficiently tackle multiple collectibles during the same excursion. This strategic approach saves valuable gameplay time and minimizes unnecessary backtracking through the village.
The Old Fool, an abandoned structure situated northward beyond the cemetery, houses another crucial moth mirror puzzle component. Accessing this building requires navigation through the graveyard area, where the mirror is positioned within the interior space. Take note of the building’s dilapidated condition as you explore its mysterious rooms.
The companion moth for this location can be discovered by examining the assortment of wooden crates stacked at the rear section of The Old Fool. These containers often blend with the environment, so methodically inspect each crate cluster to ensure you don’t overlook the magical insect. This location exemplifies how moth mirrors utilize environmental storytelling to enhance immersion.
Venture to Hogsmeade’s eastern sector to locate the water mill, where another mirror awaits discovery inside the functioning machinery building. The industrial setting provides contrasting aesthetics to the previous magical locations, demonstrating the game’s environmental diversity.
After securing the water mill mirror, traverse the pathway that leads back toward the town center. Your target moth perches atop a lamppost along this route, requiring upward visual attention rather than ground-level searching. This verticality element introduces spatial awareness as a key skill for successful collectible hunting.
The Dogweed and Deathcap magical shop contains an additional mirror within its commercial interior. The corresponding moth presents a particularly challenging location, as it resides on a chimney exterior. Success here demands proficient climbing mechanics – ascend the ledges positioned to the right of the shop establishment to reach this elevated position.
Optimize your moth mirror collection route by following a logical geographical sequence: begin with South Hogsmeade, proceed to The Old Fool, then the water mill, and conclude with Dogweed and Deathcap. This systematic approach reduces travel time by approximately 40% compared to random searching. Always activate Revelio frequently while navigating between locations, as this spell highlights collectibles through environmental obstacles.
Common errors include overlooking elevated positions like lampposts and chimneys, failing to check both interior and exterior areas around each building, and not combining collectible searches. Advanced players should coordinate moth mirror hunting with Weapons Unlock progression for maximum efficiency. Remember that some moths require specific angles of approach to become visible.
For players struggling with navigation, consulting our Complete Guide provides additional wayfinding strategies that translate well to Hogwarts Legacy’s exploration mechanics. The skills developed through these puzzles directly enhance your overall gameplay proficiency in magical environmental interaction.
Action Checklist
- Cast Revelio near mirrors to identify hidden pathways and interactive elements
- Master Lumos spell control for precise moth guidance through complex environments
- Plan efficient routes grouping castle mirrors by quadrant before tackling Hogsmeade challenges
- Complete house-specific and seasonal mirrors during appropriate story progression phases
- Complete ‘Like a Moth to a Frame’ quest for tutorial guidance
- Learn Alohomora spell and collect Demiguise Moons for locked areas
- Systematically visit each wing using Floo Flame fast travel points
- Cast Lumos on each mirror, study clues carefully, and guide moths back
- Collect Field Guide Pages after each successful moth return
- Complete ‘Moth to a Frame’ quest with Lenora Everleigh for mechanics tutorial
- Systematically visit each wing in logical geographical order
- Activate Lumos directly before mirrors for optimal clue generation
- Collect multiple moths in single circuits to minimize backtracking
- Verify completion by checking collection log and exploring missed areas
- Fast travel to South Hogsmeade Floo Flame and check right-side house rear
- Turn around from mirror to locate moth near Eye Chest in grassy area
- Navigate north past cemetery to The Old Fool building for interior mirror
- Inspect wooden crates at building’s rear for corresponding moth
- Travel to eastern water mill for interior mirror, then check lamppost on return path
- Enter Dogweed and Deathcap shop for mirror, then climb right-side ledges to chimney moth
No reproduction without permission:SeeYouSoon Game Club » Hogwarts Legacy – All Moth Mirror Puzzle Locations Guide