TL;DR
- Yae Miko requires Vajrada Amethysts, Sea Ganoderma, Handguards, and Dragonheir’s False Fins for ascension
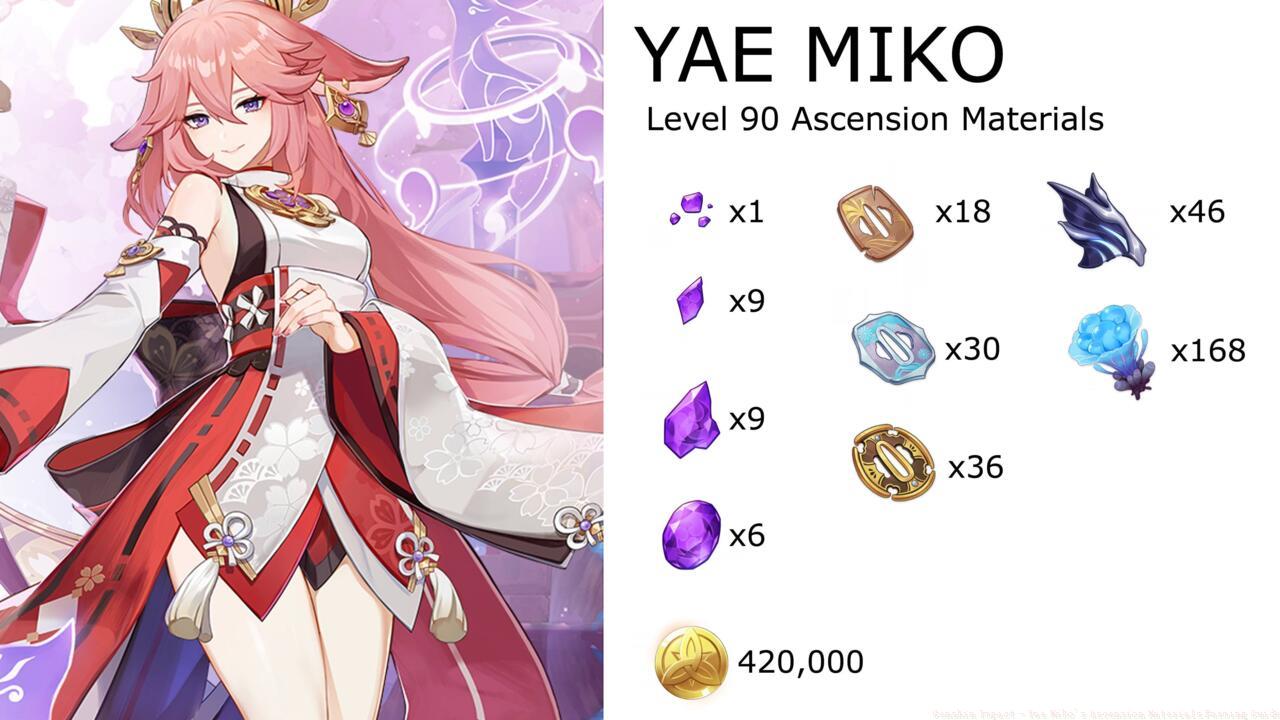
- Level 90 costs 168 Sea Ganoderma, 46 Dragonheir’s False Fins, and 420,000 Mora
- Talent upgrades need Light talent books, Handguards, and The Meaning of Aeons
- Optimal farming routes exist for Sea Ganoderma and Handguard collection
- Plan your resource allocation based on whether she’s main DPS or support role
Mastering Yae Miko’s material requirements begins with understanding her versatile combat capabilities as an Electro catalyst user. This elegant shrine priestess brings both devastating damage potential and strategic support options to your team composition.
As the esteemed Guuji of Grand Narukami Shrine, Yae Miko debuted in Genshin Impact version 2.5, offering players a sophisticated character with multiple build paths. Her ascension journey demands careful planning, especially for free-to-play adventurers managing limited resources across multiple characters.
Your leveling strategy should align with her intended battlefield role. For primary damage dealers, maximize her potential by reaching level 90, while support configurations perform excellently at level 80. Newer travelers must note that advancing beyond early stages requires access to Inazuma’s regions, making her an intermediate-to-advanced character project.
Ascension Materials
Yae Miko’s ascension process follows a structured material progression across six distinct phases. Each stage introduces new resource requirements while building upon previous investments, creating an escalating cost curve that rewards forward planning.
The core material categories include Vajrada Amethyst gemstones, Sea Ganoderma flora, Handguard drops from samurai enemies, and specialized boss materials from the Bathysmal Vishap encounter. Understanding drop rates and farming efficiency for each category will significantly reduce your preparation time.
| Ascension | Vajrada Amethysts | Sea Ganoderma | Handguards | Dragonheir’s False Fin | Mora |
|---|---|---|---|---|---|
| 1 | 1 Vajrada Amethyst Sliver | 3 | 3 Old Handguard | 0 | 20,000 |
| 2 | 2 Vajrada Amethyst Fragment | 10 | 15 Old Handguard | 2 | 40,000 |
| 3 | 6 Vajrada Amethyst Fragment | 20 | 12 Kageuchi Handguard | 4 | 60,000 |
| 4 | 3 Vajrada Amethyst Chunk | 30 | 18 Kageuchi Handguard | 8 | 80,000 |
| 5 | 6 Vajrada Amethyst Chunk | 45 | 12 Famed Handguard | 12 | 100,000 |
| 6 | 6 Vajrada Amethyst Gemstone | 60 | 24 Famed Handguard | 20 | 120,000 |
| TOTAL (level 80) |
|
108 |
|
26 | 300,000 |
| TOTAL (level 90) |
|
168 |
|
46 | 420,000 |
Pro Tip: Farm Handguards consistently during your daily routes rather than in dedicated sessions. Samurai enemies appear throughout Inazuma, allowing you to accumulate materials passively while completing other objectives.
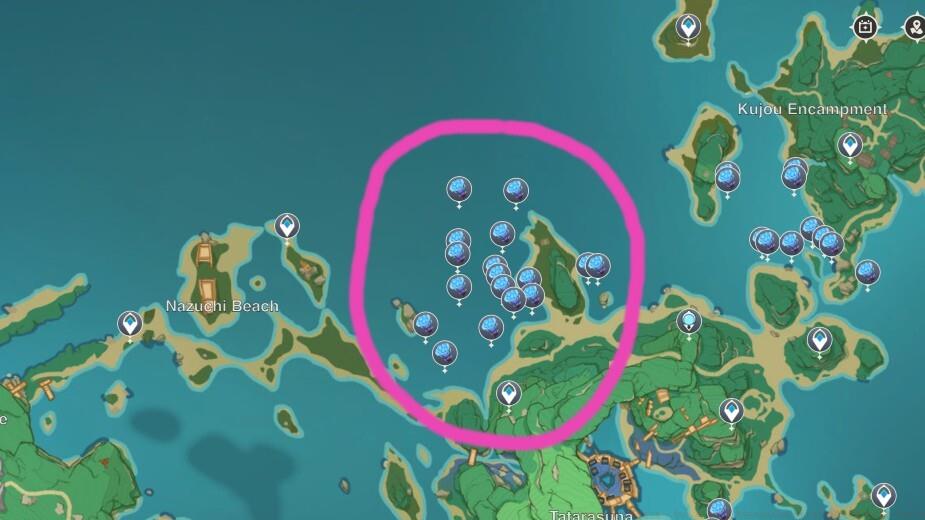
Sea Ganoderma recommended farming location–near Nazuchi Beach. Photo credit: Teyvat Interactive Map
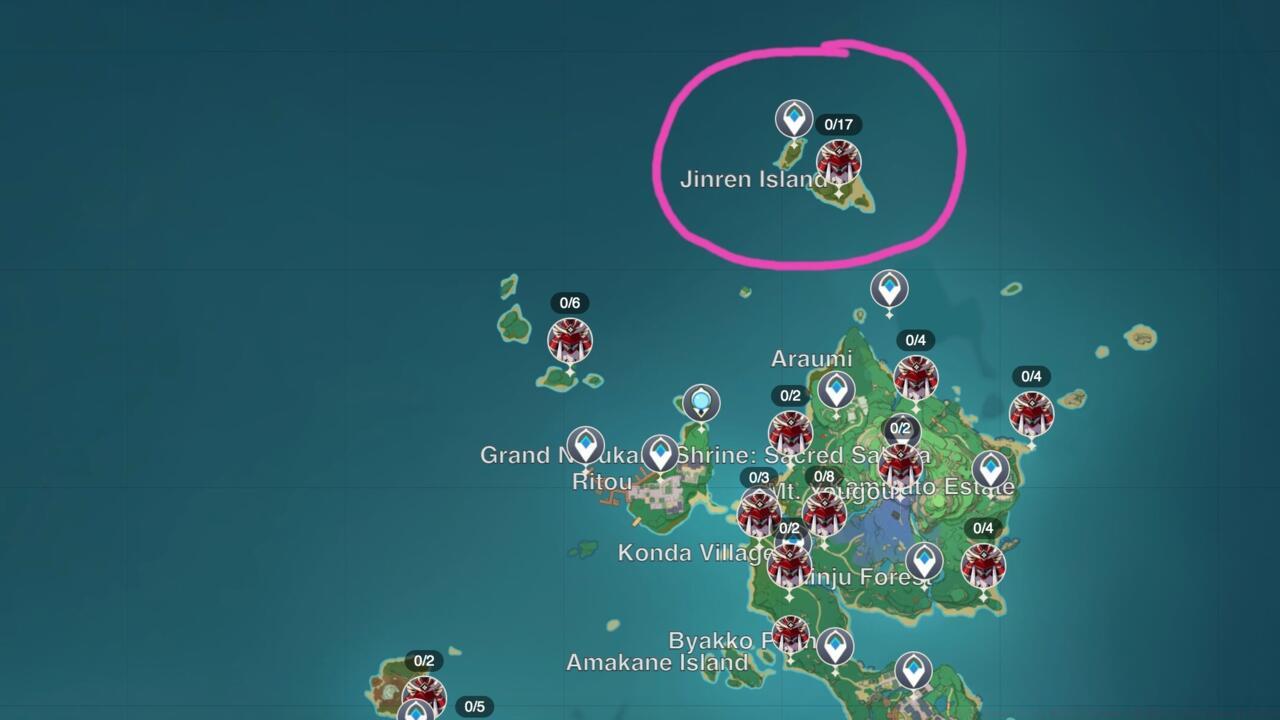
Handguards recommended farming location–Jinren Island. Photo credit: Teyvat Interactive Map
Elevating Yae Miko’s talents transforms her from a competent character into a battlefield dominator. Each talent level increment requires specific material combinations with escalating rarity and quantity demands.
The Light talent book series forms the foundation of her skill development, progressing from Teachings through Guides to Philosophies. These materials are available on specific days from the Violet Court domain, making schedule planning essential for efficient farming.
| Talent Level | Handguard | Talent Books | Boss Drops | Other | Mora |
|---|---|---|---|---|---|
| 1 -> 2 | 6 Old Handguard | 3 Teachings of Light | 12,500 | ||
| 2 -> 3 | 3 Kageuchi Handguard | 3 Guides to Light | 17,500 | ||
| 3 -> 4 | 4 Kageuchi Handguard | 4 Guides to Light | 25,000 | ||
| 4 -> 5 | 6 Kageuchi Handguard | 6 Guides to Light | 30,000 | ||
| 5 -> 6 | 9 Kageuchi Handguard | 9 Guides to Light | 37,500 | ||
| 6 -> 7 | 4 Famed Handguard | 4 Philosophies of Light | 1 The Meaning of Aeons | 120,000 | |
| 7 -> 8 | 6 Famed Handguard | 6 Philosophies of Light | 1 The Meaning of Aeons | 260,000 | |
| 8 -> 9 | 9 Famed Handguard | 12 Philosophies of Light | 2 The Meaning of Aeons | 450,000 | |
| 9 -> 10 | 12 Famed Handguard | 16 Philosophies of Light | 2 The Meaning of Aeons | 1 Crown of Insight | 700,000 |
| TOTAL (8 -> 9) |
|
|
4 The Meaning of Aeons | 952,500 | |
| TOTAL (9 -> 10) |
|
|
6 The Meaning of Aeons | 1 Crown of Insight | 1,652,500 |
Critical Insight: The Meaning of Aeons drops exclusively from the Raiden Shogun weekly boss encounter. Plan your weekly boss rotations strategically, as this material is shared among multiple Inazuma characters. Consider using Dream Solvent to convert unwanted boss materials if needed.
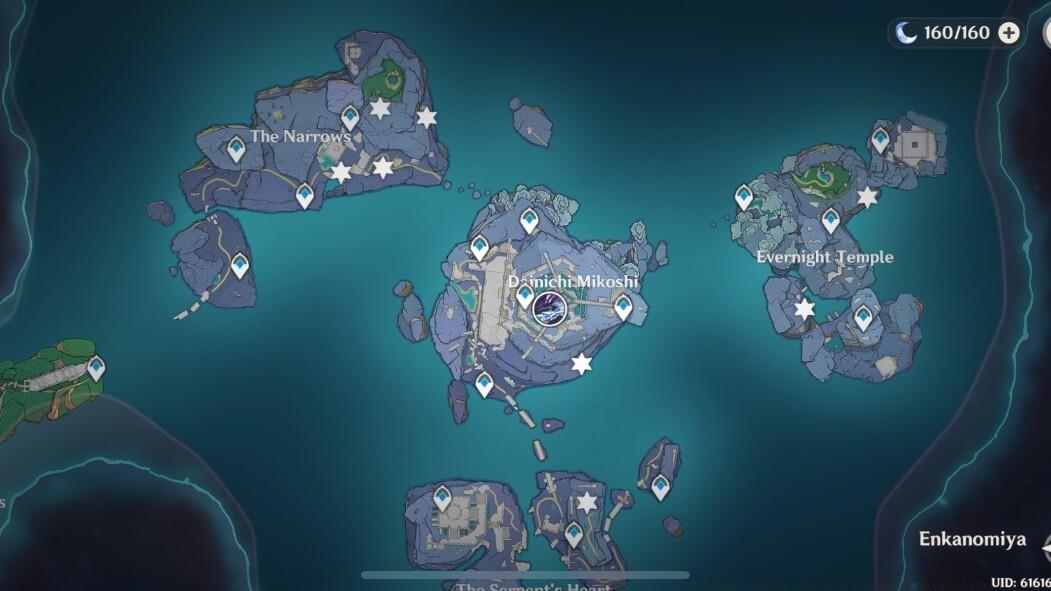
Normal Bathysmal Vishap Herd Boss Fight location is under the Dainichi Mikoshi.
Crowns of Insight represent the pinnacle of talent investment, available only through limited-time events or significant progression milestones. Prioritize which characters truly deserve this precious resource.
Maximizing your farming efficiency requires understanding spawn mechanics, respawn timers, and optimal route planning. Veteran players can reduce preparation time by 40-60% through strategic approaches to material collection.
Sea Ganoderma Farming: These aquatic plants respawn every 48 hours and cluster around Inazuma’s coastal regions. Nazuchi Beach offers the highest concentration, but don’t neglect smaller clusters along Yashiori Island and Kannazuka shores. Use characters like Sayu or Yanfei who reveal local specialties on minimaps.
Handguard Collection: Samurai enemies have variable drop rates, with higher-tier handguards appearing more frequently from elite opponents. Jinren Island and the surrounding areas provide consistent farming routes, but remember that Nobushi and Kairagi scattered throughout Inazuma also drop these materials.
Common Mistakes to Avoid:
- Don’t farm Handguards only when you need them – accumulate them continuously
- Avoid using Condensed Resin on artifact domains when you should be farming talent materials
- Never ascend characters beyond your current World Level capabilities
- Don’t neglect daily commission routes that pass through high-density enemy areas
Time Investment Estimates:
- Sea Ganoderma collection: 2-3 hours total across multiple sessions
- Handguard farming: 4-6 hours depending on drop luck and route efficiency
- Boss material farming: 30-45 minutes per week for required encounters
For players managing multiple character projects, our Complete Guide offers comprehensive resource management strategies that apply across your entire roster.
Action Checklist
- Determine Yae Miko’s primary role (main DPS or support) to set appropriate leveling targets
- Farm 168 Sea Ganoderma using coastal routes around Nazuchi Beach (2-3 sessions)
- Collect Handguards through daily samurai enemy routes
- Defeat Bathysmal Vishap Herd 12-15 times for Dragonheir’s False Fins
- Farm Light talent books on Wednesday/Saturday/Sunday domain rotations
- Challenge Raiden Shogun weekly boss for The Meaning of Aeons
- Allocate Crown of Insight strategically based on your team composition priorities
No reproduction without permission:SeeYouSoon Game Club » Genshin Impact – Yae Miko’s Ascension Materials Farming Guide Complete Yae Miko ascension guide with farming strategies, optimization tips, and resource management for Genshin Impact