TL;DR
- Season 2 extended to June 17 provides extra time for challenge completion
- Weekly challenges unlock exclusive Battle Pass skins and cosmetic rewards
- Storm The Agency missions require strategic approaches to faction chests and henchmen
- Location Domination overtime challenges feature unique objectives across multiple zones
- Pro strategies include optimal routing and common mistake avoidance techniques
Fortnite Chapter 2’s second season continues with exciting spy-themed content that has transformed the battle royale landscape. Originally slated to conclude in late April, Epic Games extended the season through June 17, granting players additional weeks to tackle the extensive challenge roster. This extension period represents a golden opportunity for those who fell behind or want to maximize their Battle Pass progression before the season concludes.
The current season introduced groundbreaking spy mechanics that fundamentally changed gameplay dynamics. Players now encounter faction-locked chests requiring specific approaches, face intelligent henchmen AI at secure locations, and navigate revamped points of interest with enhanced tactical considerations. The Deadpool crossover event added further depth with unique challenges and premium cosmetic items.
Fortnite’s weekly challenge system remains the primary progression pathway for Battle Pass holders seeking exclusive rewards. Each new challenge set delivers substantial experience points that accelerate Battle Pass tier advancement. Reaching specific milestones unlocks premium cosmetic items including character skins, weapon wraps, emotes, and gliders that remain accessible beyond the season’s conclusion.
Strategic challenge completion requires understanding the experience point economy. Focus first on high-XP challenges that offer the best time-to-reward ratio, then tackle location-specific objectives during quieter match times to minimize competition. Many players mistakenly attempt challenges in sequence rather than prioritizing based on efficiency and current player density in target areas.
For optimal progression, consult our comprehensive Complete Guide to Battlefield 6 for similar strategic approaches to assignment completion in other major shooters.
- Open A Faction Locked Chest At Different Spy Bases
- Eliminate A Henchman At Different Safe Houses
The faction chest challenge demands visiting multiple spy bases across the island. These specialized containers require either Ghost or Shadow affiliation access, determined by your current allegiance choices. Strategic routing between The Agency, The Shark, The Rig, and The Yacht can complete this objective in 2-3 matches if planned efficiently.
Henchman eliminations present different tactical considerations. These AI-controlled guards patrol specific safe houses and exhibit predictable behavior patterns. Approach with silenced weapons to avoid alerting nearby players, and utilize peek-shooting techniques from cover to minimize damage taken. Each safe house typically contains 2-3 henchmen, allowing multiple eliminations per location visit.
Similar strategic planning applies to weapon progression in other titles – check our Weapons Unlock guide for Battlefield 6 to see how assignment focus translates across different military shooters.
- Destroy Teddy Bears At Holly Hedges
- Apply Shield Or Healing Items At Shanty Town Or The Orchard
Destroying teddy bears at Holly Hedges requires thorough exploration of the suburban neighborhood. These decorative items spawn in fixed locations throughout the area, primarily inside houses, on porches, and in backyard spaces. A systematic sweep from north to south ensures complete coverage without missed targets.
Shield and healing application at Shanty Town or The Orchard benefits from pre-match preparation. Stockpile mini shields or medkits before heading to these locations, as finding sufficient healing items on-site can be unreliable. Deploy healing items strategically behind cover while monitoring the surrounding area for enemy players attracted by the activity.
Just as class selection impacts challenge approach in Fortnite, proper Class Guide for Battlefield 6 demonstrates how role specialization affects mission completion efficiency in team-based shooters.
Maximizing challenge efficiency requires both strategic planning and in-game execution excellence. Begin each session by reviewing your remaining objectives and grouping them by geographical proximity. This approach minimizes travel time between locations and allows multiple challenge completions per match.
Avoid common pitfalls like attempting high-competition challenges during peak playing hours or neglecting to utilize Team Rumble mode for safer objective completion. Many location-specific challenges become significantly easier in this respawn-enabled game mode where elimination pressure is reduced.
Advanced players should focus on challenge combinations – completing multiple objectives simultaneously through careful route planning. For example, visiting Holly Hedges for teddy bears while simultaneously applying healing items if needed, or hitting spy bases while eliminating any henchmen encountered along the route.
Time investment varies by challenge type: location-specific objectives typically require 15-25 minutes, while elimination-based challenges may span multiple matches depending on player skill and luck factors.
Storm The Agency Challenges
- Land at The Agency
- Survive Storm Circles (10)
- Open a faction locked chest at different Spy Bases (3)
- Swim over hatches at The Agency (5)
- Eliminate a Henchman at different Safe Houses (3)
Open A Faction Locked Chest At Different Spy Bases
Spy bases represent key strategic locations that have been integral to the Season 2 map design since launch. Unlike their covert counterparts, these installations are clearly marked as named points of interest, making them significantly easier to locate compared to hidden safe houses. The most prominent spy bases include The Grotto, The Rig, and The Yacht, which serve as ideal starting points for this objective. Each facility contains multiple faction-restricted containers that require proper authentication to access.
To unlock these specialized chests, players must first utilize phone booth disguise stations to assume the appropriate faction identity. This temporary transformation grants access to the faction-specific loot containers. Strategically, every major spy base features a nearby phone booth, ensuring minimal travel time between activation and loot acquisition.
Eliminate A Henchman At Different Safe Houses
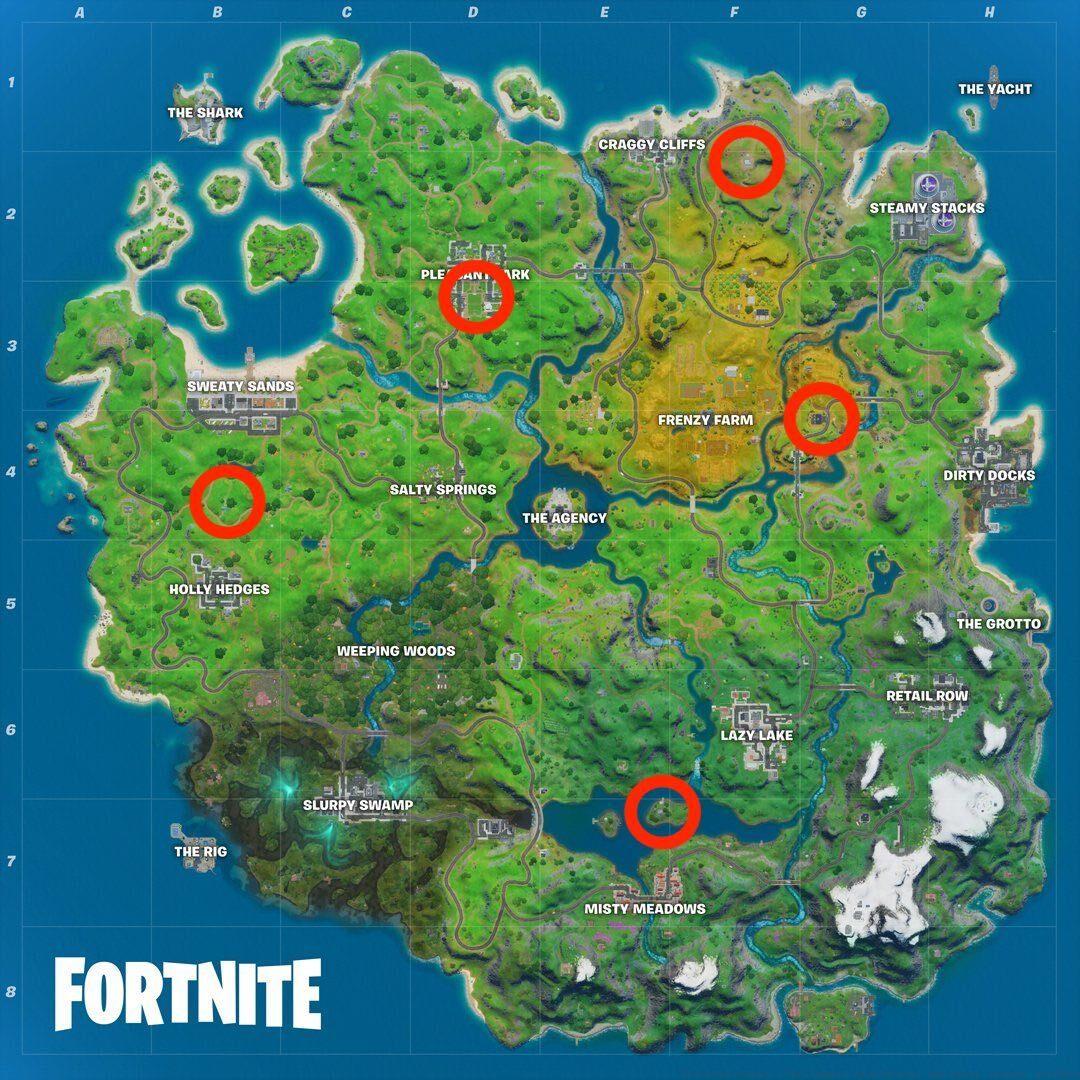
Fortnite Safe House locations
Shadow faction safe houses have maintained consistent map presence throughout Season 2, though their inconspicuous architecture presents significant identification challenges. These covert installations deliberately mimic standard residential structures externally, but experienced players can identify subtle architectural anomalies that reveal their true nature. Confirmation occurs when encountering the characteristic AI henchmen patrols that defend these locations, requiring careful approach tactics and situational awareness. Our comprehensive map above pinpoints exact safe house coordinates to streamline your mission progress.
Location Domination (Week 12 Overtime Challenges)
- Eliminate players or Henchmen at The Rig
- Search ammo boxes at Sweaty Sands
- Eliminate players at or Henchmen at The Shark
- Search chests at Craggy Cliffs
- Place top 10 after landing at Frenzy Farm
- Collect wood at Weeping Woods
- Destroy Teddy Bears at Holly Hedges
- Apply Shield or Healing items at Shanty Town or The Orchard
- Damage players at Salty Springs
- Catch weapons at Misty Meadows
Destroy Teddy Bears At Holly Hedges

Teddy Bear locations map
Following the initial Location Domination series that featured gnome destruction missions, Week 12 introduces teddy bear elimination tasks at Holly Hedges. Similar to previous Overtime challenge structures, this objective features progressive XP milestones that scale with your destruction count. The flexibility of completing this across multiple sessions eliminates pressure, allowing methodical progression through the residential area.
Apply Shield Or Healing Items At Shanty Town Or The Orchard
Shanty Town and The Orchard locations map
This medical supply utilization challenge requires locating two specific unmarked map areas. The Orchard occupies the northern perimeter of Frenzy Farm within grid coordinate F3, while Shanty Town positions itself immediately north of The Rig in sector B6. Both locations lack explicit map labeling, making spatial awareness crucial for efficient completion. Our detailed positional mapping above provides exact coordinates for both target zones.
Location Domination (Week 11 Overtime Challenges)
- Eliminate players or Henchman at Pleasant Park
- Open chests locked by an ID scanner at The Grotto
- Throw Henchmen overboard at The Yacht
- Destroy Gnomes at Camp Cod or Fort Crumpet
- Damage players at The Agency
- Collect metal at Hydro 16 or Compact Cars
- Search ammo boxes at Lazy Lake
- Search chests at Retail Row
- Catch fish at Slurpy Swamp
- Place top 10 after landing at Dirty Docks
Destroy Gnomes At Camp Cod Or Fort Crumpet
Fortnite Camp Cod and Fort Crumpet locations
Coinciding with Fortnite’s covert No Right to Bear Arms mission that involves disarming both gnomes and bears simultaneously, Epic Games released this complementary Overtime gnome destruction challenge. This mission structure differs from standard weekly objectives by incorporating multiple achievement tiers with corresponding XP rewards. Fort Crumpet offers superior efficiency for completion due to concentrated gnome distribution and adequate quantity for reaching all seven milestone thresholds. Reference our positional guide above for precise area identification.
Deadpool Challenges
- Find Deadpool’s letter to Epic Games
- Don’t thank the bus driver
- Find Deadpool’s milk carton
- Find Deadpool’s chimichangas around HQ
- Find Deadpool’s toilet plunger
- Destroy toilets (3)
- Find Deadpool’s katanas (2)
- Deal damage to opponents’ structures (10,000)
- Find Deadpool’s stuffed unicorn
- Visit the Red, Yellow, Green, Blue, and Purple Steel Bridges
- Find Deadpool’s big black marker
- Deface 3 Ghost or Shadow recruitment posters
- Find Deadpool’s 2 pistols
- Enter a phone booth or port-a-potty to become the Super-est of Superheroes
- Find Deadpool’s pool floaty
- Dance at Deadpool’s Yacht party
- Find Deadpool’s Shorts
- Salute Deadpool’s Pants
Find Deadpool’s Shorts
Week 9 introduces additional Deadpool cosmetic rewards contingent upon successful challenge completion. The initial objective requires locating Deadpool’s distinctive shorts concealed within the primary headquarters environment, specifically positioned on the armchair furniture in Midas’ personal chamber. The subsequent Week 9 Deadpool task involves performing a salute gesture toward Deadpool’s pants, which are situated atop a building structure on Sweaty Sands’ eastern sector. Upon proximity detection, interaction prompts will activate automatically.
Find Deadpool’s Pool Floaty
Consistent with previous weekly Deadpool challenge patterns, the Week 8 introductory task can be completed entirely within the headquarters interface. The pool floaty item resides on the flooring surface in Skye’s room, specifically in the lower right display quadrant. Simple selection interaction completes this phase, after which players must join an active match, navigate to the Yacht venue hosting Deadpool’s exclusive celebration event, and execute any dance emote to finalize both Week 8 challenges and acquire the unmasked Deadpool character skin.
Find Deadpool’s 2 Pistols
Week 7’s primary Deadpool challenge involves recovering both of Deadpool’s signature pistols. Following established precedent, these firearms remain accessible within the main headquarters area, eliminating match participation requirements. The initial weapon rests conspicuously beneath the challenge display interface table, while the secondary firearm positions itself adjacent to the weightlifting equipment in Meowscles’ room’s lower right corner.
Find Deadpool’s Katanas
The Week 4 Deadpool mission sequence commences with locating Deadpool’s iconic katanas. These bladed weapons maintain straightforward discovery parameters. The primary katana embeds itself within the mirror surface at Deadpool’s secret hideout location. Meanwhile, the secondary blade leans against the rear wall within the Upgrade Vault area. Successful completion of both Week 4 Deadpool objectives unlocks the exclusive Deadpool’s Katanas back bling cosmetic item.
Midas’ Mission (Week 10)
- Eliminate players with a shotgun, AR, and SMG (3)
- Search chests in different matches (7)
- Eliminate a player or Henchman with a Legendary or Boss weapon (3)
- Heal teammates with a Bandage Bazooka (200)
- Dance within 10 seconds of knocking a Henchman (3)
- Search different Golden Pipe Wrenches (5)
- Catch a fish while riding in a Choppa (3)
- Deal damage to players or Henchmen at the Yacht and The Agency in a single match (2)
- Visit The Agency, Hayman, and Greasy Graves in a single match
- Deal damage to Henchmen while disguised (100)
Search Different Golden Pipe Wrenches
Fortnite golden pipe wrenches locations
Mirroring previous Midas’ Mission challenge structures, Week 10 includes a specialized item collection mission focusing on golden pipe wrenches. These metallic tools distribute themselves strategically across the island landscape, consistently positioning near pipeline infrastructure and industrial zones. Our comprehensive mapping above details all golden pipe wrench positions. For enhanced navigation assistance, consult the precise coordinate specifications below:
- On top of Lockie’s Lighthouse in C1
- In front of the pipe statue in B6
- At the Pipeman landmark in D8
- Outside of Steamy Stacks in H2
- Western side of Dirty Docks in H4
Visit The Agency, Hayman, And Greasy Graves
Fortnite: Greasy Graves, The Agency, and Hayman locations
This multi-location navigation challenge requires visiting three specific map areas within a single match session. The Agency maintains straightforward identification as the central map landmark. However, Hayman positions itself adjacent to Frenzy Farm within grid coordinate E4, while Greasy Graves occupies the territory between Holly Hedges and Weeping Woods in sector C5. Consult our positional reference above for exact area coordinates.
Midas’ Mission (Week 9)
- Search chests in different named locations (5)
- Deal damage to players with Sniper Rifles (300)
- Upgrade a weapon to Legendary rarity at an Upgrade Bench
- Search a Llama, Legendary Chest, or Supply Drop (1)
- Deal damage to a Choppa with a passenger or pilot inside (100)
- Collect XP Coins (5)
- Carry a giant pink teddy bear found in Risky Reels 100m
- Search Midas’ golden llama between a junk yard, gas station, and RV campsite
- Gather intel during Spy Games Operation matches (10)
- Earn Survival, Combat, or Scavenger Gold Medals (1)
Collect XP Coins
XP Coins function as specialized experience point tokens that provide predetermined XP quantities based on their chromatic classification. While numerous specimens scatter throughout the island terrain, only five acquisitions are necessary for challenge completion. Casual gameplay typically yields incidental discoveries, though focused collection strategies significantly accelerate progress. Slurpy Swamp offers concentrated collection opportunities with one purple coin near the Slurp manufacturing facility and four green coins distributed throughout the surrounding marshland environment.
Search Midas’ Golden Llama Between A Junk Yard, Gas Station, And RV Campsite
Fortnite golden llama location map
Week 9’s challenge progression centers around Midas-themed objectives, including locating his distinctive golden llama concealed within a triangular area bounded by a junkyard, fueling station, and recreational vehicle campground. While visiting all three bounding locations isn’t mandatory, understanding their positional relationships facilitates efficient discovery. The designated junkyard corresponds to Compact Cars, a Season 2 landmark situated in grid coordinate G4, which also contains the specified gas station. The RV campsite positions itself immediately north in sector G3. Consequently, the golden llama hides within G3’s lower region, approximately equidistant from Frenzy Farm, Steamy Stacks, and Dirty Docks. Reference our positional guide above for precise coordinates.
Skye’s Adventure (Week 8)
Week 8’s Skye’s Adventure challenges
- Search chests at landmarks (10)
- Eliminate players with SMGs from within 15m (3)
- Hit 5 consecutive weak points while harvesting materials
- Fly a Choppa under the purple, red, and blue steel bridges
- Stoke a campfire, consume a Foraged Apple, and consume a Foraged Mushroom
- Land at The Shark and visit The Agency in the same match
- Hit pistol headshots on players or henchman (10)
- Search Skye’s Sword in a Stone found in high places (5)
- Block damage with a Kingsman (200)
- Bounce on Crash Pads in different matches (3)
Fly A Choppa Under The Purple, Red, And Blue Steel Bridges
Bridge locations map
Among Week 8’s more technically demanding challenges, this objective requires piloting a Choppa helicopter beneath three specifically colored steel bridges. The purple steel bridge positions north of Slurpy Swamp in grid coordinate C6; the red steel bridge situates south of Pleasant Park in sector D3; and the blue steel bridge lies east of Pleasant Park in E2. Our comprehensive bridge mapping above displays all chromatic bridge variants including your required targets.
Choppa helicopters remain readily available at most island helipad locations, with one particularly convenient spawn point in Pleasant Park near two necessary bridges. We recommend initial landing at Pleasant Park, acquiring a Choppa, and navigating beneath the blue and red bridges sequentially before proceeding to the purple bridge location.
Search Skye’s Sword In A Stone
Skye’s sword in a stone locations map
This collection challenge involves locating multiple instances of Skye’s sword embedded within stone formations. As the challenge description indicates, these artifacts typically occupy elevated terrain features like mountain summits and high plateaus. While only five discoveries are necessary for completion, our reconnaissance has identified at least nine specimens distributed across the island, providing ample selection flexibility. Our positional mapping above details all discovered sword locations.
Skye’s Adventure (Week 7)
Week 7’s Skye’s Adventure challenges
- Visit The Shark, Rapid’s Rest, and Gorgeous Gorge
- Search Chests at Spy Bases (7)
- Pull a player or Henchman with a Harpoon Gun (1)
- Visit Skye’s coastal campsites (3)
- Escape a Vault using a Secret Passage (1)
- Consume Foraged Items at Weeping Woods or The Orchard (10)
- Hide in a Creepin’ Cardboard at the Box Factory (1)
- Deal damage to players with SMGs or Pistols (400)
- Collect 75 of each material within 60 seconds after landing from the Battle Bus
- Mark an Uncommon, Rare, and Epic item (3)
Visit The Shark, Rapid’s Rest, And Gorgeous Gorge
The Shark, Rapid’s Rest, and Gorgeous Gorge locations
The introductory Skye’s Adventure challenge requires visiting three designated map locations. The Shark maintains obvious identification as the northwestern island in grid coordinate B1. Gorgeous Gorge positions itself between The Agency and Lazy Lake in sector E5, and Rapid’s Rest situates directly southeast in grid coordinate G6. Reference our comprehensive mapping above for precise area coordinates.
Hide In A Creepin’ Cardboard At The Box Factory
Box Factory location
Consistent with Season 2’s overarching espionage narrative, one of Week 7’s Skye’s Adventure challenges involves concealing yourself within Creepin’ Cardboard containers at the Box Factory installation. The primary difficulty involves locating the Box Factory structure itself, which features relatively nondescript architectural characteristics. However, its position southwest of Retail Row in grid coordinate G7 provides clear navigation parameters. The industrial facility contains numerous Creepin’ Cardboard boxes suitable for hiding interactions. Locate one, engage with it, and complete the challenge objective. Our positional reference above provides exact coordinates.
Travis Scott Astronomical Challenges (Limited Time)
- Dance for 10 seconds on the dance floor at the Yacht or Apres Ski
- Bounce off of different giant Astro heads
- Visit the stage north of Sweaty Sands
Bounce Off Giant Astro Heads
Fortnite Astro heads locations
Connecting with the exclusive Travis Scott Astronomical concert event occurring within Fortnite this week, Epic Games introduced a time-limited Astronomical challenge series. The most complex objective within this set requires rebounding off multiple giant Astro head structures, all positioned around Sweaty Sands where the musical performance takes place. Identification remains straightforward; these structures resemble enormous inflatable representations of Travis Scott’s facial features, making them highly conspicuous. Our exact positional mapping above details all Astro head locations.
Fortnite’s spy missions present a series of interconnected challenges that require strategic planning and precise execution. Unlike standard gameplay objectives, these tasks demand understanding of the game’s faction mechanics and map knowledge. Players must navigate both overt spy bases and covert safe houses while managing the risk-reward balance of high-value loot opportunities.
- Land At Lockie’s Lighthouse, Apres Ski, And Mount Kay
- Disguise Yourself Inside A Phone Booth In Different Matches
- Survive Storm Circles (10)
- Open a faction locked chest at different Spy Bases (3)
- Swim over hatches at The Agency (5)
- Eliminate a Henchman at different Safe Houses (3)
- Execute dance emotes for 10 continuous seconds on designated dance floors at either the Yacht or Apres Ski locations
- Successfully rebound from multiple oversized Astro head installations
- Navigate to the performance stage situated north of Sweaty Sands
- Eliminate opponents utilizing shotgun, assault rifle, and SMG weapons (3 total)
- Investigate treasure chests during separate match instances (7 required)
- Neutralize players or Henchman operatives employing Legendary or Boss-tier weaponry (3 eliminations)
- Visit The Shark, Rapid’s Rest, and Gorgeous Gorge – These locations form a triangular pattern on the map; completing them in sequence saves travel time
- Search Chests at Spy Bases (7) – Focus on less populated spy bases early in the match when competition is lighter
- Pull a player or Henchman with a Harpoon Gun (1) – The harpoon gun excels at close range; aim for center mass to ensure successful pulls
- Visit Skye’s coastal campsites (3) – These are typically found along the shoreline and often contain additional resources
- Escape a Vault using a Secret Passage (1) – Secret passages are usually marked by subtle environmental cues like cracked walls or loose bricks
- Consume Foraged Items at Weeping Woods or The Orchard (10) – Foraged items respawn quickly; establish a circuit between multiple spawn locations
- Search chests at Pleasant Park or Slurpy Swamp (10) – Focus on peripheral buildings first to avoid early confrontations
- Destroy opponent structures with Proximity Mines or Remote Explosives (20) – Deploy explosives at foundation points for maximum structural collapse
- Fish with explosives (3) – Target fishing spots near shoreline structures for combined objective progress
- Eliminate players at The Agency or Sweaty Sands (5) – Utilize high-ground positions and surprise attack angles
- Search ammo boxes in different named locations (7) – Plan route through multiple low-traffic named areas
- Use Decoy Grenades (5) – Deploy in building interiors to confuse opponents during searches
- Deal damage to players while riding in a Motorboat (200) – Use boat mobility to engage from unexpected water approaches
- Scan a Henchman in different matches (3) – Target isolated Henchmen near map edges for safer scanning
- Review weekly challenges and prioritize high-XP objectives first
- Plan efficient routes connecting multiple challenge locations in single matches
- Complete faction chest challenge by visiting The Agency, Shark, Rig, and Yacht
- Eliminate henchmen at different safe houses using silenced weapons and cover
- Finish Location Domination missions by destroying teddy bears and applying healing items
- Prioritize multi-location challenges in single matches to maximize efficiency
- Use disguise mechanics at phone booths before attempting faction-locked chests
- Reference location maps for hidden items and unmarked areas
- Complete headquarters-based Deadpool challenges without match entry to save time
- Combine weapon-specific elimination tasks with location-based objectives
- Land at The Grotto, The Rig, or The Yacht to locate spy bases
- Find and use phone booths near bases to obtain disguises
- Open 3 faction locked chests at different spy bases
- Identify safe houses using architectural clues and henchmen presence
- Eliminate henchmen at 3 different safe houses
- Collect Deadpool pistols from HQ challenge table and Meowscles’ room
- Retrieve katanas from Deadpool’s mirror and Upgrade Vault
- Bounce sequentially between 3+ Astro heads near Sweaty Sands
- Complete weapon eliminations by rotating shotgun/AR/SMG in combat
- Search 7 chests across multiple matches at low-traffic locations
- Land at Pleasant Park and secure a helicopter
- Fly beneath blue and red bridges, then proceed to purple bridge
- Collect five swords from high-altitude locations using optimized route
- Complete location visits while traveling between sword sites
- Search spy base chests and use harpoon gun on encountered enemies
- Plan landing route for Week 5 locations starting with Yacht, then Flopper Pond, finishing at Shipwreck Cove
- Gather explosive weapons before attempting structure destruction challenges
- Complete chest and ammo box searches in low-traffic matches early game
- Use motorboat hit-and-run tactics for damage dealing near shoreline combat zones
- Scan Henchmen in isolated locations across multiple matches
- Scout all three key locations in your first match to understand sightlines and approaches
- Select 2-3 complementary Assignments that align with your preferred combat locations
- Coordinate with your squad to balance class selection based on location control priorities
- Establish communication protocols for resource management and flank security
- Implement advanced positioning strategies to avoid common mistakes that compromise location control
Spy bases represent the most visible faction locations on the Fortnite map, having been established since Season 2’s launch. These designated points of interest contrast sharply with hidden safe houses through their obvious naming and map markers. The Grotto, The Rig, and The Yacht stand out as primary intelligence gathering locations, making them ideal starting points for your missions.
Every spy base contains multiple faction-secured containers that cannot be accessed through conventional means. The authentication process requires players to first utilize nearby disguise stations – typically phone booths positioned within close proximity to each facility. This security measure ensures only properly disguised operatives can claim the valuable contents within these restricted containers.
Strategic execution involves locating the nearest disguise station before approaching the chests. Most bases feature conveniently placed phone booths within 50-100 meters, minimizing exposure time between obtaining your disguise and accessing the restricted area. Plan your route to minimize encounters with other players during this vulnerable transition phase.
Shadow’s covert operations centers have maintained their presence across the island since the season commenced, though their concealed nature makes detection challenging for untrained operatives. These facilities expertly mimic ordinary structures externally, yet several distinguishing characteristics reveal their true purpose to observant players.
You’ll immediately confirm discovering a safe house when encountering clusters of AI-controlled security personnel patrolling the premises. Exercise extreme caution during approach, as these guards maintain constant vigilance and will aggressively respond to unauthorized presence. We’ve documented all known safe house positions on the tactical map displayed above for your operational planning.
Successful infiltration requires recognizing subtle architectural anomalies – slightly different window placements, unusual antenna arrays, or disproportionate security camera coverage. These installations typically feature reinforced structures and limited entry points compared to civilian buildings, forcing tactical consideration of engagement angles and escape routes.
Optimizing your challenge completion requires understanding the synergy between different mission objectives. For instance, you can combine phone booth disguises with safe house infiltrations in a single match by planning efficient routes between locations. This approach minimizes the number of games needed to fulfill all requirements while maximizing your survival chances.
Common mistakes include rushing disguise acquisition without proper area clearance, attempting henchmen eliminations without adequate weaponry, and neglecting storm circle positioning while focused on specific objectives. Advanced players should prioritize obtaining suppressed weapons before engaging safe house guards to avoid alerting additional enemies.
Time estimates for completing all spy missions range from 3-5 hours depending on your skill level and match conditions. The most time-efficient strategy involves landing at spy bases early game when player density is lower, then transitioning to safe house missions during mid-game phases when the storm has naturally reduced opponent concentrations in peripheral areas.
Week 7’s Deadpool challenge requires locating his signature pistols scattered throughout the headquarters area. Unlike standard battle royale objectives, these collectibles can be acquired without joining an actual match, saving valuable playtime. The initial pistol rests conspicuously beneath the seasonal challenge display table, while its counterpart sits adjacent to the weightlifting equipment in Meowscles’ training zone.
The Week 4 Deadpool assignment focuses on retrieving his iconic katanas through straightforward discovery. The primary blade protrudes dramatically from the central mirror within Deadpool’s personal quarters. Meanwhile, the secondary katana leans against the rear wall of the Upgrade Vault chamber. Successfully completing this objective alongside dealing 10,000 structural damage rewards players with the exclusive Deadpool’s Katanas back bling cosmetic.
Pro Strategy: Complete both weapon challenges during a single HQ visit to maximize efficiency. The pistol locations remain static throughout Week 7, while katanas persist from Week 4, allowing flexible completion timing.
Fortnite Astro heads positioning guide
Coordinating with the exclusive Travis Scott Astronomical concert event, Epic Games introduced temporary Astronomical challenges. The most engaging task demands bouncing across various colossal Astro heads concentrated around Sweaty Sands, the concert venue. These distinctive landmarks resemble massive inflatable renditions of Travis Scott’s facial features, ensuring high visibility. Consult the provided map visualization for precise Astro head coordinates and optimal navigation routes.
Advanced Technique: Chain multiple bounces consecutively by landing directly on adjacent Astro heads. The collision mechanics register each unique head contact separately, enabling rapid challenge completion within a single match when planned strategically.
Weapon Rotation Strategy: Rather than focusing on a single weapon type, systematically rotate between your shotgun, AR, and SMG during engagements. This approach naturally progresses all elimination requirements simultaneously while maintaining combat versatility.
Chest Search Optimization: Target less-contested landing zones like Weeping Woods or Dirty Docks to access multiple chests safely. Remember that chests opened in Team Rumble count toward progression, providing a lower-risk completion environment.
Legendary Weapon Tactics: Henchmen eliminate more easily than skilled players and frequently drop legendary weapons. Focus on infiltrating guarded locations early-game when Henchmen are less alert.
Helicopters are readily available at helipads scattered throughout the island, with Pleasant Park offering a particularly advantageous starting position. This location provides proximity to both the blue and red bridges, making it an ideal operational base. For optimal efficiency, begin by flying beneath the blue and red bridges first, then proceed to the more distant purple bridge to minimize travel time and fuel consumption.
When piloting helicopters, maintain low altitude when approaching bridges to ensure you successfully pass beneath them. Many players make the mistake of flying too high, requiring multiple attempts. Keep your approach angle shallow and maintain consistent speed to navigate these tight spaces effectively.
Skye’s sword in a stone locations map
The sword collection challenge requires you to locate five mystical blades embedded in stone formations across the island. These artifacts predominantly occupy elevated positions such as mountain peaks and high ridges, offering both strategic vantage points and challenging access routes. While the objective demands finding five swords, our exploration has revealed nine distinct locations, providing flexibility in your collection route and allowing you to avoid heavily contested areas.
Plan your sword-hunting route to incorporate other nearby challenges. Many sword locations are situated close to spy bases or coastal campsites, enabling you to complete multiple objectives in a single expedition. Prioritize swords that align with your overall mission path rather than chasing distant outliers.
Week 7’s Skye’s Adventure challenges
Advanced players should combine the foraging challenge with weapon upgrades from our BF6 Weapons Unlock Guide to maximize efficiency. The right class selection from our Class Guide can significantly impact your challenge completion speed.
Fortnite’s Week 5 location-based objectives present players with three distinct destination requirements that vary significantly in accessibility. The Yacht stands as the most straightforward target, positioned prominently within grid coordinate H1 as an unmistakable maritime vessel at the map’s central northern sector. This landmark’s visibility from multiple approach angles makes it ideal for quick completion runs.
Shipwreck Cove demands more sophisticated navigation skills, situated in the southeastern extremity within grid H7. This coastal wreckage zone features challenging terrain that requires careful movement planning. Meanwhile, Flopper Pond occupies a transitional position northeast of Holly Hedges in grid C5, blending natural water features with surrounding structures. Strategic landing patterns at these locations can dramatically reduce completion time while minimizing enemy encounters.
Week 4 introduces eight diverse challenge categories requiring specialized approaches for optimal completion. The chest search objective at Pleasant Park or Slurpy Swamp benefits from early-game deployment when competition for resources remains moderate. Destroying enemy constructions with Proximity Mines or Remote Explosives works best during mid-game siege scenarios where structural density increases.
Maximizing challenge completion efficiency requires understanding spawn patterns and player traffic flows. For location-based objectives like Week 5’s requirements, consider deploying during less popular game modes where destination congestion decreases significantly. The Yacht typically experiences moderate traffic throughout matches, making mid-game approaches most viable.
Common execution errors include attempting multiple challenges simultaneously without proper loadout preparation, landing directly on high-value targets without scouting, and neglecting escape routes when completing objectives in contested zones. Advanced players should coordinate challenge attempts with squad members to divide objectives while maintaining defensive coverage.
Time investment varies dramatically based on approach methodology. Strategic players can complete Week 5 location challenges in 2-3 matches (approximately 15-25 minutes), while disorganized approaches may require 5-7 matches (40-60 minutes). Always prioritize survival over aggressive challenge completion to maintain match progression.
Success in Battlefield 6 heavily depends on controlling key strategic positions across the expansive battlefields. Understanding the tactical advantages of each location will dramatically improve your team’s performance in Conquest mode and increase your chances of achieving Pax Armata – the ultimate victory condition representing total military dominance.
The Rig: Offshore Stronghold Tactics
The small island positioned off the southwest corner of the BF6 map offers unique strategic advantages that many players overlook. This naval outpost provides excellent sightlines for long-range engagements while serving as a resilient spawn point that’s difficult for enemy forces to assault. Advanced players utilize The Rig’s elevated positions to establish overwatch on nearby coastal objectives, making it crucial for controlling maritime approaches and preventing enemy flanking maneuvers through aquatic routes.
Agency Perimeter: Urban Warfare Excellence
Positioned in the central urban zone, the area outside of the Agency represents the heart of infantry combat in Battlefield 6. Mastering this location requires understanding vertical combat, close-quarters engagement distances, and effective use of urban cover. NATO forces that control this sector can effectively cut the map in half, disrupting enemy supply lines and spawn rotations between objectives.
The Grotto: Eastern Flank Security
Located at the easternmost extremity of the combat zone, The Grotto offers defensive advantages that can anchor your team’s flank. Its natural terrain features provide excellent concealment opportunities and multiple egress routes, making it ideal for establishing hidden spawn points and launching surprise counter-attacks against overextended enemy forces.
Battlefield 6 Assignments represent specialized challenges that unlock powerful weapons, equipment, and cosmetic rewards. Unlike previous titles, BF6 introduces dynamic Assignments that adapt to your playstyle while encouraging diverse combat roles within your NATO team composition.
Weapon Unlock Optimization Path
Strategic completion of weapon-focused Assignments should align with your preferred combat locations. For example, completing long-range weapon challenges works exceptionally well when controlling The Rig’s elevated positions, while close-quarters assignments progress faster during intense firefights around the Agency perimeter. Plan your session goals around 2-3 complementary Assignments to maximize progression efficiency without compromising your team’s objective control.
Class Specialization Strategies
Your class selection should complement both your current Assignments and the strategic needs of your team’s controlled locations. Assault specialists excel at capturing and defending the Agency’s tight interiors, while Recon units provide critical intelligence and suppression from The Rig’s overwatch positions. Engineering roles become invaluable when defending The Grotto’s fortified positions against vehicle assaults.
Team Coordination for Pax Armata
Achieving Pax Armata requires coordinated completion of team-oriented Assignments that often involve simultaneous control of multiple key locations. Establish clear communication protocols with your squad to coordinate assignment objectives while maintaining map control across all three critical sectors.
Avoid These Critical Positioning Errors
Many Battlefield 6 players undermine their effectiveness by committing predictable positioning mistakes. Overextending at The Grotto without proper flank security often results in isolated squads being eliminated before reinforcements can arrive. Similarly, neglecting to establish defensive perimeters around the Agency leaves your team vulnerable to enemy infiltration and back-capping maneuvers.
Resource Management Mastery
Effective ammunition, health, and equipment management separates competent players from elite operators in BF6. At resource-intensive locations like The Rig, establish resupply routes and communicate resource status with supporting teammates. Advanced players utilize the Weapons Unlock system to ensure they have appropriate tools for each location’s unique combat requirements.
Squad Composition Balance
Optimal squad construction varies significantly based on which locations your team controls. When dominating The Rig, prioritize reconnaissance and support roles to maintain surveillance and suppressive capabilities. For Agency control, assault and medic specialists provide the close-quarters dominance and sustainability needed for prolonged urban engagements. Reference our comprehensive Class Guide for detailed role-specific strategies that complement each strategic location.
Time-Efficient Challenge Completion
Most Assignments in Battlefield 6 can be completed within 2-3 focused gameplay sessions when employing strategic approaches. Plan your sessions around peak performance hours and coordinate with reliable squadmates to maximize your progression rate while working toward the prestigious Pax Armata achievement.
Action Checklist
No reproduction without permission:SeeYouSoon Game Club » Fortnite Season 2 Challenges: Safe Houses; Spy Bases; Gnomes; And More