TL;DR
- Complete three eliminations at specific Expedition Outpost locations marked by red bunkers and X-4 Stormwing planes
- Strategic positioning and early weapon acquisition dramatically increase elimination success rates
- Coordinate map navigation using grid coordinates and visual landmarks for efficient challenge completion
- Avoid common pitfalls like late rotations and poor loadout management to optimize your gameplay
- Combine combat tactics with resource management for maximum Battle Star earnings
Embark on your tactical journey through Fortnite’s evolving battlefield. While seasonal events like Christmas break create festive atmospheres, the competitive challenge ecosystem remains fully operational for dedicated players.
Currently in Season 7, Week 4, the latest challenge rotation presents fresh opportunities to accumulate Battle Stars through strategic gameplay. These objectives maintain the traditional division between free-access missions and premium Battle Pass exclusives. The current free-tier assignment requires precision eliminations at designated Expedition Outposts scattered across the island.
These specialized installations serve as military reconnaissance points, characterized by distinctive crimson bunker structures featuring global navigation symbols encircled by directional indicators. Their strategic importance is further emphasized by the consistent presence of X-4 Stormwing aircraft, which provide excellent aerial landmarks due to their high visibility profile. The mission parameters demand three successful enemy takedowns within these outpost perimeters.
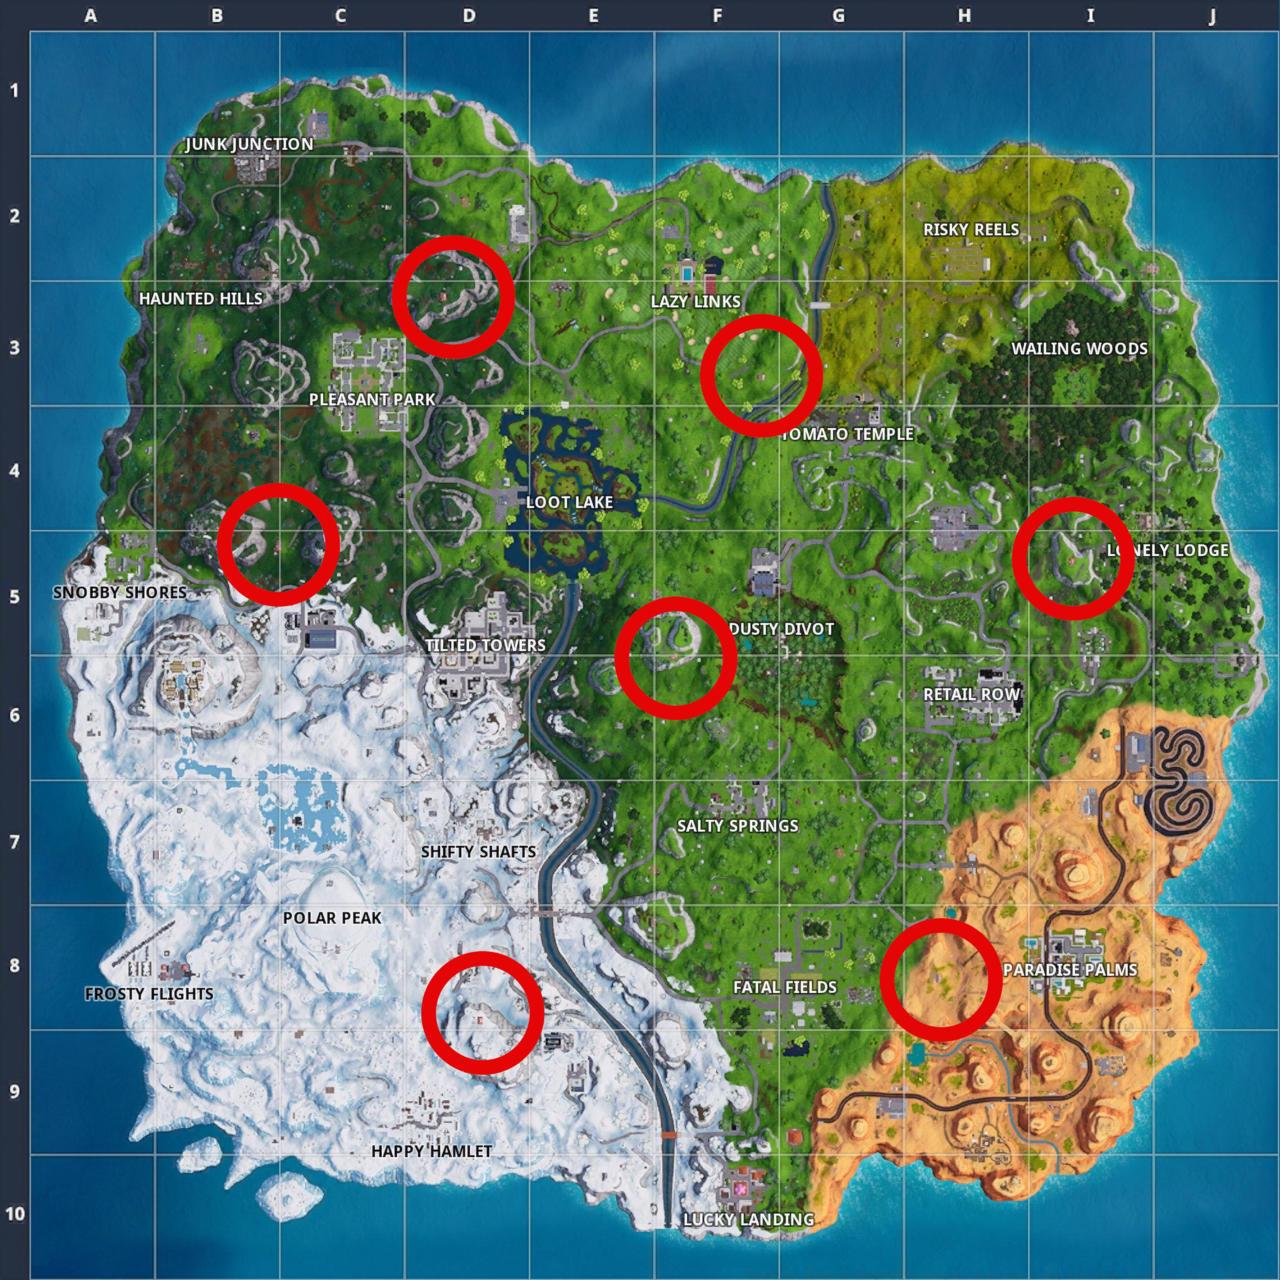
Mastering outpost navigation begins with understanding their precise geographical distribution. These installations follow deliberate placement patterns that balance accessibility with tactical complexity.
- Southern sector near Lazy Links (Grid F3) – Moderate traffic zone with multiple approach vectors
- Northeastern perimeter of Pleasant Park (Grid D3) – High-density combat area requiring careful positioning
- Southwestern flank of Pleasant Park (Grid C4) – Often overlooked location with strategic advantages
- Western approach to Dusty Divot (Grid F5) – Central positioning with variable player traffic
- Western proximity to Lonely Lodge (Grid I5) – Isolated location favoring stealth approaches
- Western sector of Paradise Palms – Hot drop zone requiring aggressive early-game tactics
Successful navigation requires understanding both macro-level map coordination and micro-level terrain advantages. Each outpost presents unique environmental factors that influence combat effectiveness and survival probability.
While reaching expedition installations presents minimal difficulty, securing eliminations demands sophisticated combat methodology. The critical differentiator lies in execution speed and tactical preparation.
Prioritize rapid deployment to capitalize on the premium loot containers typically stationed at these locations. Early arrival provides significant armament advantages, allowing you to engage opponents while they’re still acquiring basic weaponry. The loot quality gradient at outposts often includes rare and epic-tier weapons that create substantial power disparities between prepared and unprepared combatants.
Develop a systematic approach to outpost engagements: conduct perimeter reconnaissance before committing to full entry, establish elevated firing positions when possible, and maintain constant awareness of multiple engagement angles. Enemy players typically exhibit predictable behavioral patterns around these locations, including rushed looting procedures and limited situational awareness during initial minutes.
Advanced tactics include baiting techniques using the visible loot containers, creating ambush points along common approach routes, and utilizing the X-4 Stormwing aircraft as both cover and tactical vantage points. Understanding spawn timing and rotation patterns will further enhance your elimination efficiency.
Many players undermine their challenge progress through avoidable strategic errors. The most prevalent mistake involves delayed rotations to outpost locations, resulting in missed looting opportunities and disadvantageous combat scenarios.
Avoid the temptation to over-loot initial landing zones; instead, prioritize rapid transition to your target outpost. Time management becomes crucial – the first 90 seconds typically determine mission success or failure.
Optimal loadout preparation should focus on versatile weapon combinations rather than specialized setups. Shotgun and assault rifle pairings provide effective engagement coverage for both close-quarters outpost interiors and medium-range perimeter defense.
For players seeking to master Fortnite’s strategic depth, our Complete Guide provides comprehensive gameplay fundamentals. Weapon selection significantly impacts elimination efficiency – consult our Weapons Unlock guide for armament optimization. Additionally, proper Class Guide selection ensures your playstyle aligns with challenge requirements.
Action Checklist
- Plan your landing strategy targeting the least contested outpost based on battle bus trajectory
- Secure priority loot within first 60 seconds, focusing on close-to-medium range weaponry
- Establish defensive positioning with clear sightlines to outpost entrances
- Execute elimination opportunities as opponents approach or loot the outpost
- Rotate strategically between outposts if needed, monitoring storm positioning
No reproduction without permission:SeeYouSoon Game Club » Fortnite Expedition Outpost Locations — Week 4 Guide (Season 7) Master Fortnite Expedition Outpost strategies with location maps, combat tactics, and elimination techniques