TL;DR
- Pyromaniac quest unlocks automatically for leveled characters after next-gen update installation
- Pyro’s camp is located southeast of Listening Post Bravo on a hill with visible fire markers
- Combat requires energy weapons or armor-penetrating ammunition to counter Pyro’s defenses
- Plan for multiple transport trips due to the Hellfire Power Armor’s significant weight burden
- Transfer Hellfire components to an existing frame for immediate deployment capability
The formidable Hellfire Power Armor represents one of the most coveted protective gear additions available throughout the Commonwealth territories. This comprehensive walkthrough details the acquisition process for this exceptional equipment within Fallout 4’s expansive wasteland.
Introduced through the official next-generation enhancement package, the Pyromaniac mission previously existed as community-developed Creation Engine content before achieving canonical status. This assignment centers on securing the complete Hellfire Power Armor ensemble, an exceptionally resilient combat suit owned by the enigmatic figure known as Pyro. Understanding the Class Guide principles for loadout management can significantly enhance your approach to this encounter.
To obtain the complete Hellfire Power Armor configuration, you must eliminate Pyro through tactical engagement to claim his armored suit as salvage. The following sections provide exhaustive intelligence for successfully concluding the Pyromaniac operational directive.
For veteran operatives with advanced character progression, the Pyromaniac assignment automatically integrates into your mission log following next-generation patch implementation. New campaign initiates must reach specific narrative milestones before accessing this and other supplementary missions, including Echoes of the Past (rewarding Enclave-themed gear) and Speak of the Devil (providing additional Power Armor rewards).
Activate the Pyromaniac assignment within your mission tracking interface to receive navigation coordinates directing you toward the northeastern territorial sector. The destination waypoint appears immediately adjacent to the Listening Post Bravo reconnaissance facility, accessible via fast-travel mechanisms if previously discovered.
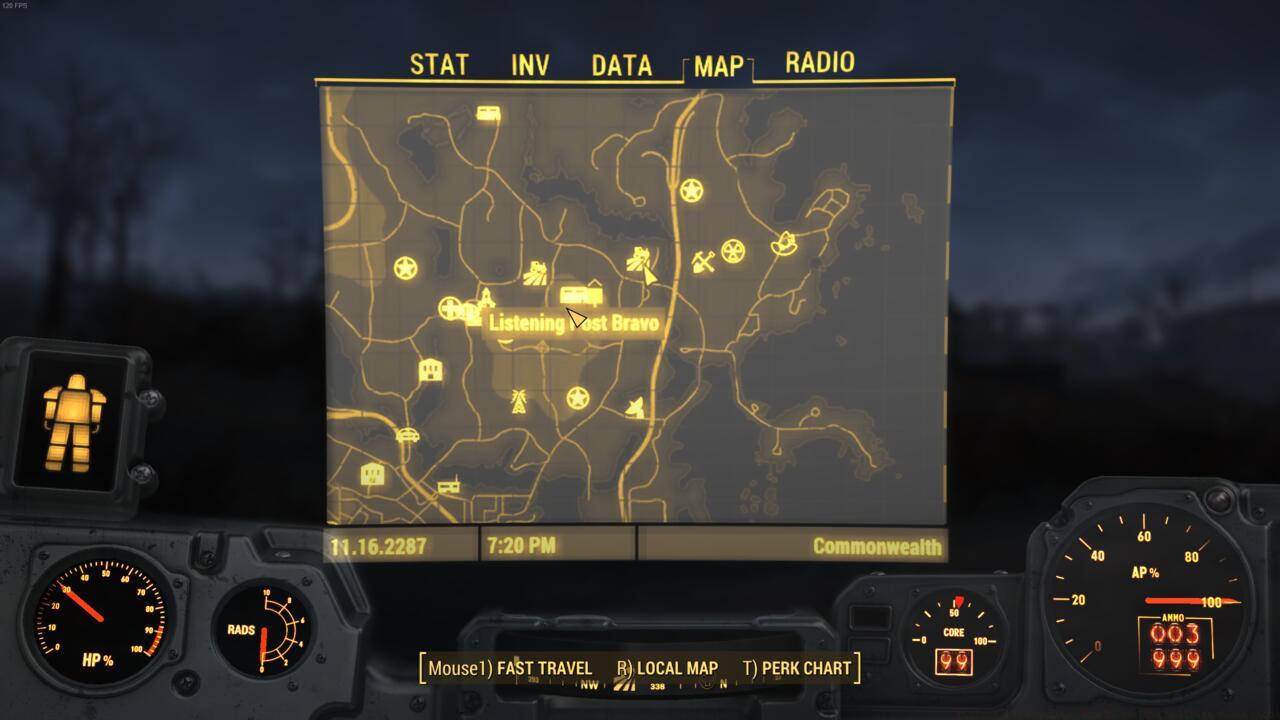
The location of Pyro
Using Listening Post Bravo as your primary navigational reference, proceed southeastward to identify a makeshift encampment positioned atop an elevated land formation featuring active combustion sources. The perimeter hosts multiple hostile entities, including Pyro himself adorned in the distinctive Hellfire Power Armor exoskeleton you must secure through tactical elimination.
Common Mistake: Many operatives underestimate the defensive capabilities of Pyro’s companions. Prioritize eliminating secondary targets before engaging the primary objective to avoid being overwhelmed by coordinated attacks.
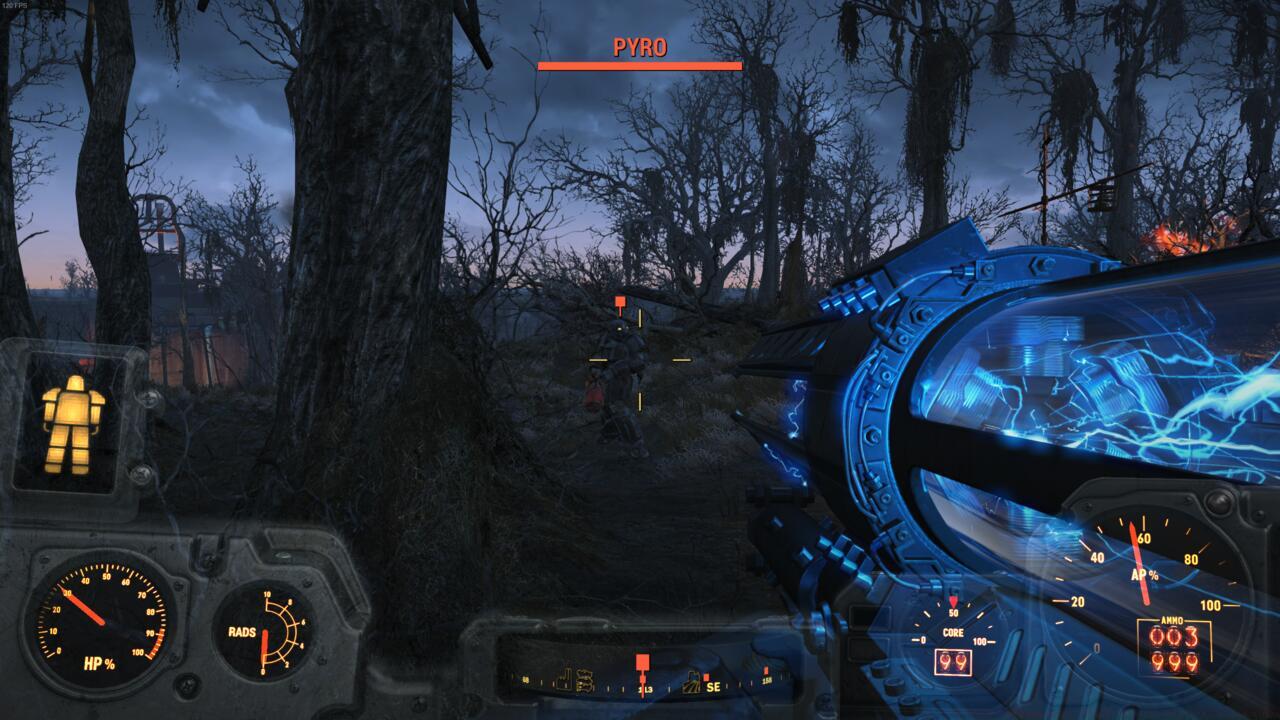
Battling Pyro at his camp
Confronting Pyro demands calculated engagement methodology rather than direct assault. The Hellfire Power Armor provides substantial damage resistance, necessitating specialized countermeasures. Deploy energy-based weaponry or armor-penetrating munitions to bypass his defensive capabilities efficiently. Utilize the elevated terrain for tactical positioning, employing long-range engagement to diminish his combat effectiveness before close-quarters confrontation.
Advanced Tactics: Experienced operatives can leverage the camp’s environmental hazards by positioning Pyro near explosive canisters or leading him into pre-placed mines. Coordinate your approach with insights from our Weapons Unlock guide for optimal armament selection.
Time Investment: Successful engagement typically requires 5-10 minutes depending on your character build and equipment quality.

Looting Pyro’s body for the Hellfire Power Armor
Given the substantial mass characteristics of Power Armor systems, expect to conduct multiple retrieval excursions to transport all components to your operational headquarters. While employing your own exoskeleton during the confrontation facilitates the engagement, a complete additional armor ensemble presents significant logistical challenges. My field testing necessitated three separate transport missions to relocate all Hellfire components to Sanctuary, though operational parameters may vary according to your strength attributes and inventory management protocols.
Upon successful transportation of all Hellfire Power Armor segments to your base installation, transfer the specialized components onto an existing Power Armor chassis framework. Following successful integration, you’ll possess a fully operational Hellfire Power Armor system prepared for Commonwealth deployment operations. For comprehensive strategic planning, consult our Complete Guide for additional tactical insights.
Optimization Tip: High-strength builds or those utilizing power armor carry weight perks can reduce transport trips. Consider temporarily storing components in nearby containers if carrying capacity proves insufficient.
Action Checklist
- Verify next-gen update installation and check quest log for Pyromaniac assignment
- Travel to Listening Post Bravo and navigate southeast to the hilltop encampment
- Eliminate secondary hostiles before engaging Pyro with energy weapons or armor-penetrating ammunition
- Collect Hellfire components and plan transportation logistics based on carrying capacity
- Transfer Hellfire parts to an existing power armor frame at your base
No reproduction without permission:SeeYouSoon Game Club » Fallout 4 Pyromaniac: How To Get The Hellfire Power Armor Complete guide to acquiring Hellfire Power Armor in Fallout 4 with strategic combat tips and inventory management