TL;DR
- Enigma Protocol is a high-level 3-player activity with strict timer mechanics requiring strategic coordination
- Access requires completing the Encoded Log quest by discovering hidden secrets on Nessus
- Timer extensions are crucial for success and require specific in-game actions to activate
- Optimal loadouts and team composition significantly impact completion success rates
- Advanced players should focus on route optimization and role specialization
Drawing from the Season of the Splicer, Enigma Protocol takes you back into the Vex Network, but your toughest adversary in this activity is its timer.
Alongside Destiny 2’s new expansion, The Final Shape, comes Echoes, the first of this year’s three Episodes. One of Echoes’ new activities is available from the start of the Episode, but the second, Enigma Protocol, requires uncovering some secrets on Nessus to access.
Enigma Protocol sends you back into the Vex Network, that strange, ethereal computer world that players first explored during the Season of the Splicer two years ago. It’s a tough, high-level activity for three players that has you constantly running against a timer; if the timer runs out, you have to start the activity over.
There’s a lot to know about Enigma Protocol, starting with how to unlock the mission through the Encoded Log quest. Here are all the details.
Gaining access to Enigma Protocol isn’t straightforward—it demands completing the Encoded Log questline first. This requires thorough exploration of Nessus to uncover specific hidden secrets that trigger the activity’s availability.
Begin by visiting Nessus and scanning for anomalous Vex data fragments scattered throughout the planetary zones. These fragments typically appear near major Vex structures and require careful environmental observation to locate. The quest involves multiple stages of data collection and decryption before the protocol becomes accessible.
Successfully unlocking Enigma Protocol provides not just access to the activity itself but also grants valuable intelligence about Vex network operations that can inform your strategies within the challenge.
The core challenge of Enigma Protocol revolves around its unforgiving timer system. Unlike traditional Destiny activities where you can proceed at your own pace, this mission imposes strict time constraints that demand efficient execution and strategic planning.
Timer extensions are available through specific actions within the activity. Successfully completing objective sequences, defeating elite Vex units with precision, and solving environmental puzzles can all add precious seconds to your countdown. Teams must coordinate these actions strategically rather than attempting them haphazardly.
Communication is paramount—designate roles for team members focusing on timer extension activities while others maintain forward momentum. The most successful squads typically assign one player specifically to timer management while the other two handle primary objectives.
For experienced Guardians seeking to master Enigma Protocol, several advanced techniques can dramatically improve success rates. Loadout optimization is crucial—favor weapons with high burst damage against Vex shields and abilities that provide mobility or area control.
Avoid common pitfalls like splitting up unnecessarily or prioritizing minor enemies over timer extension opportunities. Many failed attempts result from teams becoming distracted by non-essential combat instead of focusing on the primary objective progression.
Route optimization through the Vex Network environments can save valuable seconds. Study the layout during initial attempts and identify shortcuts or optimized paths between objective markers. Advanced players should memorize spawn patterns and pre-position for upcoming encounters.
Consider consulting our Weapons Unlock guide for insights on optimal gear selection that applies to challenging activities like this.
How To Unlock Enigma Protocol
While Enigma Protocol serves as a weekly repeatable activity throughout Echoes Act 1, access isn’t immediately granted. You’ll need to complete specific tasks for Failsafe, the primary vendor for this Episode. Begin by finishing the introductory Echoes mission, which automatically loads after completing The Final Shape campaign. If you skip this initially or return later, locate the mission node on the Nessus Director screen to initiate the process.
Following the introductory mission and your initial experience with the new Breach Executable activity, revisit Failsafe. She will eventually provide a new quest titled Encoded Log. Acquire this quest and examine its description carefully: It indicates that Hidden agents have detected unusual activity on Nessus, particularly within the Well of Echoes location.
The Well of Echoes resides in The Tangle area. Transmat into the location and sparrow over to the large cylindrical structure on the western edge. Enter the structure and continue descending until you encounter a teleporter. Beyond this teleporter, the path continues downward until you confront numerous enemies. A shielded Minotaur leads these forces, and you’ll observe Vex cubes floating in the air that must be eliminated to render the Minotaur vulnerable.
Continue eliminating enemies and damaging the Minotaur until the room clears completely. This action opens access to a ground-level opening whose bottom remains invisible. Descend through this opening and proceed through the underground passageways until you reach the Enigma Protocol mission flag.
Once you locate and activate this mission flag, Enigma Protocol becomes permanently accessible from the HELM screen on your Director, eliminating the need for repeated journeys to this location.
How Enigma Protocol Works And How To Extend The Timer
Enigma Protocol distinguishes itself from typical Destiny 2 activities through its unique time-based structure. Rather than focusing on straightforward combat encounters requiring specific enemy eliminations or resource collection, it functions as a race through the Vex Network where your primary adversary is the countdown clock. The activity alternates between extended platforming sequences and objective-focused arena battles designed to impede your progress.
Crucially, with the exception of one significant boss encounter before completion, Enigma Protocol emphasizes speed over combat engagement. Most segments require rapid objective completion or area traversal, making stopping to eliminate every enemy counterproductive. Certain points mandate combat pauses, but these always feature specific requirements demanding swift execution.
Shoot these golden security nodes to add 30 seconds to your timer. There will be three in each distinct area of Enigma Protocol.
Understanding timer mechanics represents the most critical knowledge for Enigma Protocol success. Upon activity entry, you’ll receive a timer counting down from one minute. The environment shifts to red when your remaining time drops below 60 seconds, signaling increasing urgency (it remains green otherwise). You can extend your timer through two primary methods: First, by destroying yellow diamond constructs concealed throughout each activity room, each providing an additional 30 seconds; and second, by eliminating specialized Harpies called Archival Timekeepers that appear in combat arenas. You’ll identify Timekeeper Harpies by their spawn location within white domes requiring destruction before engagement. Prioritize locating and eliminating Timekeepers whenever they materialize, as they similarly add 30 seconds to your timer. These typically manifest during the middle and/or conclusion of arena-based activity segments.

Watch for a message that notifies you an Archival Timekeeper has spawned, then find its white dome and kill it.
When combat avoidance remains possible, maintaining forward momentum proves advantageous. Equip powerful weaponry capable of eliminating enemies and destroying time-extending nodes from moderate distances, such as The Call or machine guns. Additionally, carry equipment that can rapidly dismantle Detain bubbles if you become trapped, or eliminate the drones generating them before they impact you.
Elevating your Power level as close to 2005 as achievable, or participating with high-level teammates (who can boost your Power level via the new Fireteam Power system) represents prudent preparation. While death carries no penalty beyond time expenditure, enemies within this activity present significant threats, particularly if underpowered. You’ll value the enhanced survivability gained by maximizing your Power level before attempting Enigma Protocol.
Enigma Protocol Encounters
Upon entering Enigma Protocol, you’ll progress through a consistent sequence of encounters, at least currently. This rotation may change weekly or with each new Episode Act, requiring potential guide updates if modifications occur. Currently, here’s the comprehensive encounter breakdown.
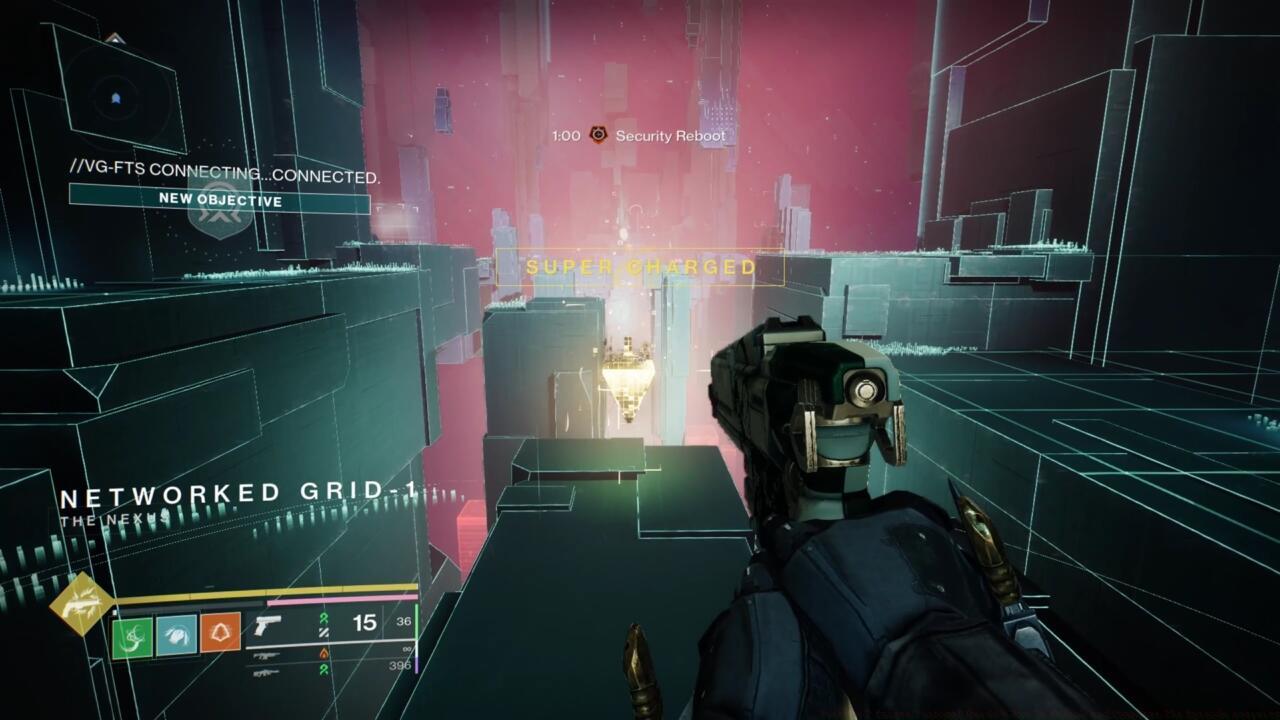
Networked Grid-1
Networked Grid-1 is a straight shot to the portal, so avoid getting caught up fighting enemies if you can.
Your initial Enigma Protocol experience begins with Networked Grid-1, an extended linear platforming pathway. Your objective involves traversing this area to reach the distant portal awaiting you. You materialize directly before the initial yellow security-weakening node that extends your timer. Two additional nodes exist within this space, typically concealed beneath sightlines or around corners, so conduct thorough searches while advancing toward the exit. After eliminating all nodes, you’ll receive a “Zone security cleared!” notification confirming no additional nodes remain for discovery.
As previously noted, comprehensive enemy elimination proves unnecessary here; instead, target only obstructing or particularly hazardous foes. Exercise caution around the Minotaur and Harpies positioned near the exit portal, as they present considerable danger.
Experimental Grid-1
Charge the orange balls in these Vex Charging Pools to fill the meter at the top of your screen, then dunk the balls in the waiting receptacles in the center of the arena.
After exiting Networked Grid-1’s portal, you’ll encounter your first objective arena. Progression halts here until objective completion, though enemy elimination remains secondary; disregard them when possible, or concentrate exclusively on particularly dangerous adversaries.
Upon arena entry, you’ll observe an orange sphere illuminated within a light column awaiting collection. This constitutes the primary objective—one teammate must secure this sphere and energize it to maximum capacity, monitored by the Radiolite Circuit Charge meter appearing upon acquisition. Charge the sphere by positioning yourself within light wells, though these periodically relocate, necessitating movement. The sphere retains its charge even if carriers perish and drop it, so if descent occurs, promptly retrieve and continue charging.
Once the meter reaches full capacity, deposit the sphere into one of the two central room receptacles. This activates a Vex launcher transporting you to subsequent areas. Note that three additional security nodes exist here for timer extension. An Archival Timekeeper typically spawns in this location as well, providing additional 30-second increments upon elimination.
Positioning yourself with your back to the entry door, the Vex launcher advancing you will appear on the left near the entrance, projecting you backward along your entry trajectory.
Networked Grid-2
The second Networked Grid segment presents another platforming sequence, though considerably more complex than its predecessor. As customary, three security nodes await discovery during transit. Velocity proves crucial here, though exercise patience and precision with jumps, as several platforms present significant hazards. Falls and fatalities typically incur minimal penalties, though occasional respawns position you substantially further back than anticipated, forcing repeated coverage of identical terrain and consuming valuable time.
The route may twist confusingly, so if direction becomes unclear, seek pathways circumventing blind corners or ledges positioned above and behind you. You’ll traverse two separate portals, with the second transporting you to your next objective arena.
Experimental Grid-2
Throw the orange balls at the shielded Harpies to complete this encounter.
This arena emphasizes combat more significantly than preceding or subsequent encounters. Your objective involves eliminating nine shielded Harpies floating centrally within the room. Achievement requires destroying Goblin groups appearing in three distinct waves: initial spawns centralize, subsequent waves manifest left, and final waves appear right. Maintain vigilance, as Harpies and Minotaurs support these groups, presenting collective dangers.
Upon Goblin elimination, they’ll drop additional orange spheres. Collect one and propel it toward a shielded Harpy to eliminate it. You’ll receive three spheres at each of the three locations, totaling nine.
As previously, three security nodes require destruction here, and an Archival Timekeeper spawns partially through objective completion. Eliminate all targets to optimize your available time.
After all Harpies perish, a Vex portal materializes centrally, enabling continued advancement.
Bridge-1
The subsequent area combines platforming elements with sparrow racing tracks. Follow the platforming route until observing a forward-floating ring featuring a central silver diamond. Shoot the diamond to generate the underlying track. Descend and automatic sparrow mounting occurs. During traversal, target white track sections to accelerate velocity.
Look for the security node right when you land, on your right.
Two of the three security nodes in this zone reside within the platforming segment. Locate the initial node to your right immediately upon Bridge-1 entry; the second positions behind you upon landing after utilizing two Vex launchers. The final security node locates on the track’s right side where architectural columns create separation.
Race toward the track’s conclusion to receive your initial respite and first Enigma Protocol reward chest.
Archival Grid-1
This chamber provides temporary relaxation, as timer progression pauses during your presence. You’ll obtain a central room chest, and interaction with surrounding white Vex Constructs enables data collection that (somewhat) advances this storyline and activity. The room’s far end presents two alternatives: a Vex portal permitting continuation with Rally flag placement capability, and a green control node enabling activity reboot from inception if dissatisfied with your performance. Several motivations exist for this action. Primarily, if dissatisfied with remaining time, restart from this point with partial achievement rewards and attempt complete runs anew. Additionally, farming this initial chest provides faster reward acquisition than full completions, particularly when seeking new Episode weapon configurations.
Additionally, two Enigma Protocol-linked Triumphs essential for Episode seal acquisition exist, including eliminating all security nodes during a single run and finishing complete runs within 18 minutes. If pursuing either objective and already perceiving run failure likelihood, the reboot function permits retries without completing compromised attempts.
Archival Grid-1 also functions as an optimal withdrawal point for players unwilling to commit to entire runs, similar to last season’s Coil activity allowing player departure at specific checkpoints. You may experience player attrition here as individuals exit, making reboot approaches preferable to continuation under suboptimal circumstances. All three fireteam members must consent to reboot for restart initiation.
Networked Grid-4
This constitutes another traversal segment. Ascend into the circular initial area. Numerous enemies populate this location, so while excessive engagement remains undesirable, partial elimination may facilitate safer progression. A Vex Hydra awaits immediately ahead, and subsequent corridors contain laser arrays requiring clearance through jumping. As customary, three security nodes await discovery during transit.
Another security node that’s right in front of you when you arrive.
Experimental Grid-3
This represents another enemy-filled chamber where combat proves largely unnecessary beyond eliminating particularly troublesome foes. Instead, your task involves collecting 20 pink Motes of Encrypted Golden Age Data. To acquire these, examine the substantial central scaffolding structure. There you’ll observe pink bulb formations resembling tree fruit—similar to Breach Executable objectives. Shooting these bulbs releases pink motes, making their destruction your primary concentration.
Shoot these pink bulbs hanging from the Vex architecture. You need to pick up 20 of the pink Motes these drop.
As usual, three additional security nodes exist here, primarily distributed along peripheries and above sightlines. Another Archival Timekeeper may spawn here before departure, so eliminate it if manifestation occurs.
The Experimental Grid-3 exit portal leads to another extended platforming section characterized by substantial gaps and narrow pathways. Exercise caution regarding enemies positioned along routes, particularly at landing zones following jumps or launcher usage. Search for three additional security nodes during progression.
Experimental Grid-4
This constitutes the activity’s primary boss confrontation: an enormous Vex Minotaur designated Ainigmatos, the Indecipherable Proto-Mind. This adversary presents combat challenges, featuring numerous minor enemies inflicting damage while you assault the boss, who possesses substantial health and teleports throughout the arena. Maintain mobility and avoid excessive engagement with lesser enemies or suffering their concentrated attacks; weapons like rocket launchers demonstrate considerable effectiveness for rapid damage infliction, as do burst Supers such as Golden Gun.
Ainigmatos can be tough to kill quickly, thanks to the fact it moves around a big arena filled with smaller threats.
The strategic approach here involves utilizing arena power-ups to gain advantages, particularly the Shield enhancement boosting damage resistance, and the Super augment providing substantial Super charge increments. Note that these don’t regenerate, so acquire them only when necessary to prevent wasteful consumption.
With a coordinated three-person team demonstrating proficiency, Ainigmatos doesn’t present extreme difficulty, though the encounter may consume considerable time due to extensive mobility. Search for three security nodes here, along with Archival Timekeepers periodically appearing near your initial arena entry point. Eliminate these to maintain timer levels.
Following Ainigmatos’s defeat, maintain defensive readiness. You’ll observe the timer continues progression—you still require return to an Archival Grid chamber for activity conclusion and reward acquisition. A portal manifests centrally within the room, so traverse it rapidly for your final challenge.
Networked Grid-3
Despite numbering inconsistencies, you’ll descend onto another sparrow racing track to exit the Vex network before expulsion. All security nodes in this zone position along the track. The initial node locates immediately adjacent to your track starting position; the second positions on the right side of the column just beyond your starting point; and the third situates atop a column immediately following a ramp, so activate speed boosters ensuring sufficient elevation to successfully strike it during crossing.
Go to the right side of this column to hit the security node.
Accelerate to the track’s termination to reach activity completion, where you’ll receive another reward chest and opportunity to interact with another Vex construct.
Hit the speed booster just ahead of this ramp so you can get enough air to hit the security node on the other side of the gap.
Now that you’ve bested Enigma Protocol, check out the rest of our Destiny 2 coverage at our Final Shape guides hub, and read our review of The Final Shape.
Advanced Strategies and Loadout Optimization
For players seeking to optimize their Enigma Protocol performance, several advanced strategies can significantly improve completion times and success rates. Understanding spawn patterns for Archival Timekeepers allows for preemptive positioning—they typically appear near the center or rear of arenas during objective completion phases. Communication proves essential for coordinating ball charging in Experimental Grid-1, with one player dedicated to security node destruction while others handle objective progression.
Loadout optimization should prioritize versatility and range capabilities. Scout rifles and pulse rifles excel at eliminating security nodes from safe distances, while machine guns provide effective crowd control during mandatory combat segments. Consider equipping weapons with demolitionist perks for grenade regeneration during platforming sections where ability usage remains limited.
The Fireteam Power system introduces crucial advantages for underleveled players. Teaming with guardians at Power level 2005 can elevate your combat effectiveness by approximately 15%, making challenging encounters substantially more manageable.
For Triumph hunters pursuing the “All Nodes Cleared” achievement, develop systematic search patterns: always check above and behind structures, particularly in Networked Grid segments where nodes often conceal themselves on upper platforms or reverse sides of architectural elements.
Common mistakes include over-engagement with non-essential enemies, missing obvious security node placements near spawn points, and failing to coordinate Archival Timekeeper eliminations. Successful teams typically complete full runs in 12-15 minutes with optimal strategies, while the sub-18 minute Triumph allows reasonable margin for error.
While Enigma Protocol represents a weekly repeatable activity throughout Act 1 of Echoes, initial access requires completing specific preparatory steps. You’ll need to undertake several tasks for Failsafe, who serves as the primary vendor for this episode. Begin by finishing the Echoes introductory mission, which automatically loads upon logging in after completing The Final Shape campaign. Should you bypass this content initially or return later, locate the mission start node on your Nessus Director screen to initiate the process.
Following the introductory mission and your initial experience with the new Breach Executable activity, revisit Failsafe at the HELM. She will eventually provide a new quest titled Encoded Log. Acquire this quest and carefully review its description, which indicates that Hidden operatives have detected anomalous activity on Nessus, particularly within the Well of Echoes zone.
The Well of Echoes resides within The Tangle region. Transmat into the area and utilize your sparrow to reach the large cylindrical structure positioned on the western boundary. Proceed inside and continue descending through the environment until encountering a teleporter. Beyond this transport mechanism, the pathway continues downward until you confront numerous hostile units. A shielded Minotaur commands these forces, accompanied by floating Vex cubes that must be eliminated to render the Minotaur vulnerable to damage.
Continue eliminating adversaries and damaging the Minotaur until you’ve cleared the chamber completely. This accomplishment opens access to a ground-level opening whose depths remain invisible from your vantage point. Descend into this aperture and advance through the subterranean passageways until reaching the Enigma Protocol mission marker.
Once you’ve discovered and activated this mission flag, Enigma Protocol becomes permanently accessible from the HELM interface on your Director, eliminating the need for repeated journeys to this location.
Enigma Protocol distinguishes itself from most other Destiny 2 engagements through its unique structural design. Rather than presenting a conventional combat scenario requiring specific enemy elimination counts or resource collection, it essentially functions as a timed race through the Vex Network where your primary adversary is the clock itself. The activity alternates between extended platforming sequences and objective-focused arena encounters designed to impede your progress.
Crucially, with the exception of a significant boss confrontation preceding the activity’s conclusion, Enigma Protocol emphasizes mobility over combat. The majority of your effort involves racing to accomplish objectives or traverse zones, and pausing to engage every enemy you encounter actually hampers your success. While certain points mandate combat pauses, these segments always feature specific completion requirements that you should address as rapidly as possible.
Destroy these golden security nodes to gain 30 additional seconds on your timer. Three nodes appear in each distinct Enigma Protocol zone.
The most critical knowledge for mastering Enigma Protocol involves comprehending the timer mechanics. Upon activity entry, you begin with a 1-minute countdown timer. The environment shifts to red coloration when your remaining time drops below 60 seconds, signaling escalating urgency (it maintains green coloration otherwise). However, you can prolong your available time through two methods: First, by destroying yellow diamond constructs concealed throughout each activity room, each providing an extra 30 seconds; and second, by eliminating specialized Harpies called Archival Timekeepers that materialize in combat arenas. You’ll identify Timekeeper Harpies by their spawn location within white protective domes that must be breached before you can damage them. Consistently prioritize locating and destroying Timekeepers whenever they appear, as each elimination also contributes 30 seconds to your timer. They typically manifest during the middle and/or conclusion of any arena-based activity segment.
Monitor for notification messages announcing Archival Timekeeper spawns, then locate their white domes and eliminate them promptly.
Seasoned players recognize that efficient pathing through platforming sections can save 10-15 seconds per major area. Common errors include over-committing to unnecessary combat engagements and missing strategically positioned security nodes. For optimization, consider consulting our comprehensive Class Guide to select mobility-enhanced subclasses that facilitate rapid traversal.
Advanced strategy involves memorizing node spawn locations across multiple runs. Typically, security nodes occupy elevated positions or hidden alcoves requiring brief detours. The time investment for these detours (usually 3-5 seconds) proves worthwhile for the 30-second reward. Timekeepers present higher priority targets since they often appear along your primary route, though their protective domes require additional firepower to breach quickly.
Successful completion typically requires 12-15 minutes for inexperienced players, while optimized runs can achieve sub-10-minute completions. Weapon selection significantly impacts efficiency – prioritize weapons with high burst damage for Timekeeper elimination and reliable add-clear capabilities for mandatory combat sections. For detailed weapon recommendations, explore our Weapons Unlock guide for optimal loadout configurations.
Team coordination dramatically improves success rates, with designated roles for node hunting, Timekeeper elimination, and objective completion. Communication regarding timer status and emergency procedures when time runs critically low can mean the difference between victory and failure. For comprehensive strategic overviews, our Complete Guide offers additional insights into advanced fireteam tactics.
Upon entering the initial combat zone, your fireteam will immediately notice a glowing orange sphere suspended within a radiant energy column. This Radiolite Circuit ball represents your primary objective – a designated teammate must secure possession and initiate the charging sequence. The Radiolite Circuit Charge meter materializes on your HUD once you’ve claimed the artifact, providing real-time feedback on energy accumulation progress.
Strategic positioning within designated light wells accelerates the charging process significantly, though these energy sources periodically relocate to different arena positions. Advanced teams should assign a dedicated ball carrier while others provide covering fire and monitor well transitions. Crucially, the accumulated charge persists even if the carrier falls in combat, allowing quick recovery without progress loss. Teams should immediately retrieve dropped spheres to maintain momentum.
Once the Radiolite Circuit Charge reaches maximum capacity, your team must deposit the energized sphere into one of two central receptacles. This activation triggers a Vex translocation device that progresses your fireteam to the subsequent challenge area. Three additional security nodes await destruction in this chamber, each extending your available time. An Archival Timekeeper typically spawns during this phase – eliminating this priority target grants an additional 30 seconds, often making the difference between success and failure.
Positioning awareness proves critical for efficient transitions. With your orientation toward the entry portal, the Vex launcher apparatus positions itself along the left perimeter near your point of entry. This translocation gateway projects your fireteam back along your original approach vector.
The subsequent Networked Grid segment introduces substantially more complex traversal challenges compared to earlier platforming sections. While maintaining forward momentum remains essential, precision jumping takes precedence over raw speed. Three security nodes require identification and destruction throughout this navigation sequence.
Many platforming segments feature deceptively narrow pathways and precarious landing zones. Although fatal missteps typically don’t incur severe penalties, unpredictable respawn points can sometimes place you significantly further back than anticipated, forcing tedious retracing of previously covered terrain. This backtracking consumes precious seconds that could determine mission success.
The route frequently incorporates confusing twists and elevation changes. When disoriented, systematically scan for alternative pathways that circumvent blind corners or elevated ledges positioned above and behind your current location. Your journey progresses through two distinct Vex portals, with the final gateway transporting your fireteam to the next objective arena.
Expert navigation involves anticipating platform sequences and maintaining consistent movement rhythm. Consider assigning your most agile fireteam member as pathfinder while others provide directional callouts. The Class Guide offers valuable insights on optimizing mobility for different character builds.
Successfully eliminating shielded Harpies requires precise application of charged orange spheres to complete this combat encounter.
This engagement arena introduces significantly more intense combat than previous or subsequent sections. Your objective focuses on destroying nine energy-shielded Harpy units floating in the chamber’s central area. To accomplish this, your fireteam must eliminate waves of Vex Goblins that spawn in three distinct phases.
The engagement sequence unfolds with the initial goblin wave emerging from the room’s center, followed by subsequent spawns from left and right flank positions. Exercise extreme caution as these units receive support from additional Harpy attackers and a formidable Minotaur, creating dangerous combat scenarios when enemies concentrate their fire.
Upon defeating goblin combatants, they relinquish additional orange energy spheres. Secure one of these artifacts and accurately projectile it against a shielded Harpy to instantly dismantle its protective barrier and destroy the unit. Each spawn location provides three spheres, totaling nine available projectiles matching the number of shielded targets.
Similar to earlier phases, three security nodes require elimination within this combat space, and an Archival Timekeeper manifests during objective progression. For comprehensive strategic planning, consult our Complete Guide for additional combat insights.
Systematically eliminate all priority targets to maximize your available time allocation. Once all shielded Harpy units are destroyed, a Vex portal materializes in the room’s central area, enabling your fireteam to advance toward subsequent challenges. Proper Weapons Unlock progression can significantly enhance your combat effectiveness in these engagements.
Exiting Experimental Grid-3 presents an extended platforming sequence characterized by substantial chasms and confined walkways. Remain vigilant for hostile units positioned along your route, especially at landing zones following jumps or launcher usage. Scan the environment for three additional security nodes strategically placed throughout this segment.
Advanced players should employ a technique called ‘staggered advancement’ – clearing enemies from potential landing spots before committing to long jumps. The narrow pathways demand precise movement control; consider adjusting your sensitivity settings for better platforming accuracy. Common mistakes include rushing through sections and failing to check above and below pathways for hidden threats.
This encounter represents the activity’s primary challenge: confronting Ainigmatos, the Indecipherable Proto-Mind, a massive Vex minotaur commander. The engagement proves demanding due to numerous lesser combatants inflicting damage while you target the boss, who possesses substantial health reserves and frequently teleports throughout the combat zone. Maintain constant mobility and avoid becoming entangled with minor enemies or suffering concentrated fire from them; armaments such as rocket launchers demonstrate exceptional effectiveness for delivering rapid damage bursts, similar to high-impact Super abilities like Golden Gun.
Ainigmatos presents elimination difficulties primarily because it traverses an expansive battlefield populated with secondary hazards.
The strategic approach involves utilizing combat enhancements distributed around the arena, specifically the Shield buff that amplifies damage resistance, and the Super charge that provides significant ability energy. Crucially, these resources do not regenerate, so activate them only during critical moments to prevent inefficient utilization.
With a coordinated three-person fireteam maintaining situational awareness, Ainigmatos becomes manageable to defeat, though the engagement may prove lengthy due to its persistent relocation. Identify three security nodes within this area, along with Archival Timekeepers that materialize intermittently near your initial entry point. Eliminate these temporal guardians to preserve your activity timer.
Professional tactics include assigning specific roles: one player focuses on add control, another handles boss damage, while the third manages power-up timing. The boss employs a predictable teleportation pattern – study its movement to anticipate positions and pre-aim your attacks. Average completion time for skilled teams ranges from 8-12 minutes, while newcomers may require 15-20 minutes.
Upon Ainigmatos’s defeat, maintain combat readiness. You’ll observe the timer continues counting down—you must return to an Archival Grid chamber to conclude the activity and claim rewards. A dimensional gateway materializes at the arena’s center; traverse this portal promptly to face your ultimate trial.
Regardless of numbering peculiarities, you’ll descend onto an additional sparrow racing course to exit the Vex network before expulsion. Every security node in this region resides along the track. The initial node positions adjacent to your starting location; the secondary node locates on the right flank of the pillar immediately ahead; and the tertiary node perches atop a column just beyond an incline, so engage the velocity amplifier to ensure sufficient altitude to secure it during traversal.
Navigate to the right aspect of this pillar to activate the security node.
Accelerate to the course’s terminus to reach the activity conclusion, where you’ll receive an additional rewards cache and the chance to interface with another Vex entity.
Activate the acceleration booster immediately preceding this ramp to obtain adequate lift to reach the security node positioned across the divide.
Optimization tip: Approach ramps at a 45-degree angle for maximum air control. The escape sequence typically requires 2-3 minutes for completion, with security node collection adding approximately 30-45 seconds. Advanced players can shave 20-30 seconds off these times through perfect boosting and line selection. For comprehensive loadout strategies, consult our BF6 Weapons Unlock Guide to maximize your damage potential.
Action Checklist
- Complete Encoded Log quest by finding hidden data fragments on Nessus
- Assemble fireteam with complementary class abilities and communication setup
- Optimize loadout for Vex combat with arc weapons and mobility enhancements
- Practice timer extension mechanics in initial attempts before serious completion runs
- Memorize optimal routes and spawn patterns for efficiency
- Complete Encoded Log quest from Failsafe to unlock activity
- Prioritize security node destruction in each new area
- Equip long-range weapons and burst damage supers
- Use Archival Grid-1 as strategic checkpoint for farming or restarting
- Coordinate Archival Timekeeper eliminations with teammates
- Complete Echoes intro mission and Encoded Log quest from Failsafe
- Navigate to Well of Echoes in The Tangle and activate mission flag
- Memorize 3 security node locations in each zone
- Prioritize Archival Timekeeper elimination over regular enemies
- Optimize loadout for mobility and burst damage capabilities
- Assign dedicated ball carrier and support roles in initial arena
- Destroy all security nodes in each phase for maximum time extension
- Prioritize Archival Timekeeper elimination for 30-second bonuses
- Coordinate team positioning during platforming for efficient navigation
- Manage goblin waves systematically while preserving balls for shielded Harpies
- Clear landing zones before committing to platforming jumps
- Assign team roles (add control, boss damage, power-up management)
- Conserve Shield and Super power-ups for critical damage phases
- Prioritize Archival Timekeeper elimination to maintain timer
- Use 45-degree approach angles on sparrow ramps for optimal node collection
No reproduction without permission:SeeYouSoon Game Club » Destiny 2 Enigma Protocol Guide – How To Unlock And Complete The Episode Activity