TL;DR
- Armor must reach level 9 before transmog becomes available for that specific piece
- Transmog can be performed anywhere via the inventory menu without visiting blacksmiths
- You maintain original gear stats while adopting any previously acquired armor appearance
- Mix-and-match combinations allow complete visual customization across armor slots
- Early game planning for transmog saves significant resources and time later
The transmogrification system in God of War Ragnarok represents a significant evolution from the 2018 installment, offering unprecedented control over Kratos’ visual presentation while maintaining the statistical benefits of your equipped gear. This feature addresses one of the most requested quality-of-life improvements from veteran players who want both optimal performance and aesthetic satisfaction.
Building upon the foundation established in the previous game where equipment collection and stat enhancement were central progression elements, Ragnarok introduces this fashion-forward system that decouples appearance from functionality. The core principle remains that statistical advantages stay bound to your actively equipped armor pieces, but now you can overlay any visual style from armor you’ve previously obtained throughout your journey.
This guide contains light gameplay spoilers regarding system mechanics.
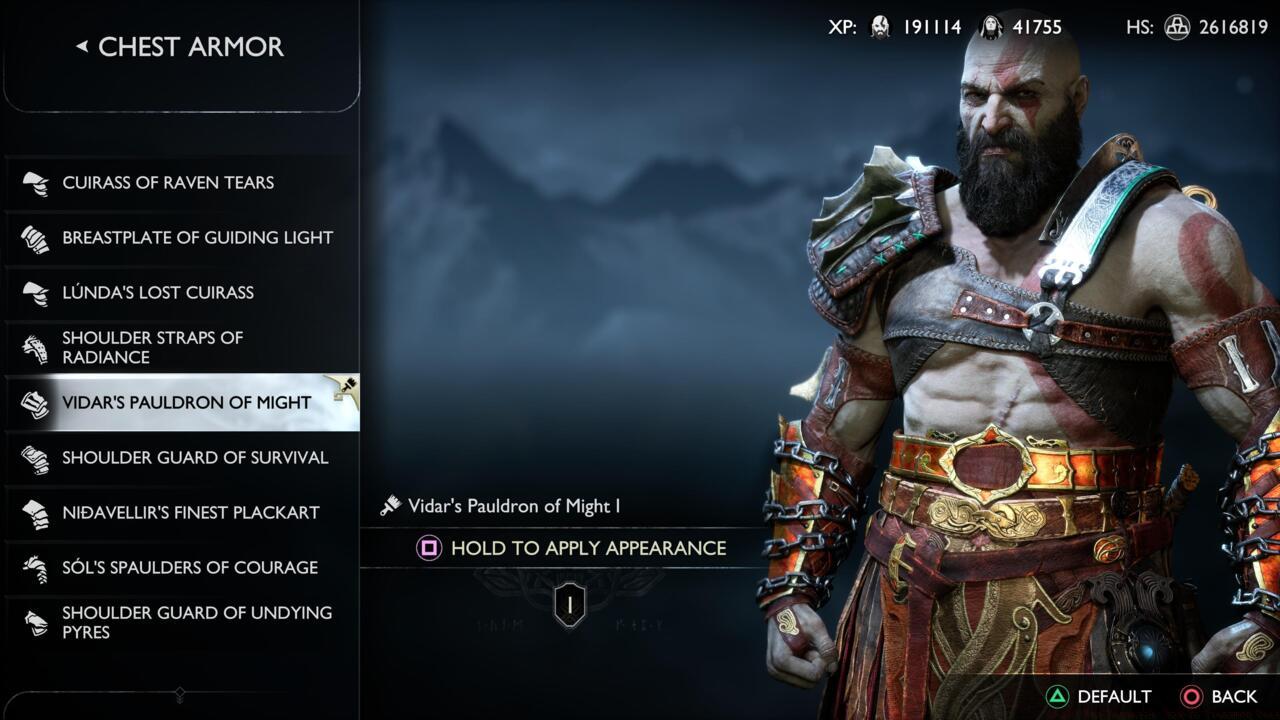
Visual customization interface showing the Square button prompt for appearance modification.
To activate transmogrification capabilities for any armor piece, you must first maximize its upgrade level to 9. This requires gathering specific crafting components through exploration, combat rewards, and side quest completion, then visiting any forge location for the enhancement process. The strategic benefit here is that once any armor reaches its maximum potential, you gain permanent access to apply its visual template to other pieces, creating a growing library of aesthetic options.
The streamlined process eliminates the need for blacksmith visits—Brok and Sindri’s services aren’t required for cosmetic alterations. To initiate appearance modification, access your inventory screen and navigate to the armor section, then select Chest, Wrist, or Waist equipment slots. Identify the specific max-level gear you wish to visually transform, where an “Edit Appearance” indicator confirms eligibility. Engage the Square button to enter the customization interface where all previously acquired armor styles for that slot type become available for selection.
Once you’ve chosen your preferred visual design from the available options, maintain pressure on the Square button to finalize the transmogrification. This instant application means you can experiment with different combinations during gameplay pauses without interrupting your adventure flow.
The true power of Ragnarok’s transmog system emerges through strategic mix-and-match approaches across all three armor slots. You can combine the visual intensity of late-game legendary armor with the sleek profile of early-game gear, creating truly unique combinations that reflect your personal style preferences. This flexibility extends to creating thematic builds—perhaps blending Norse mythology aesthetics with Spartan warrior elements for a distinctive Kratos representation.
Common mistakes include overlooking lower-rarity armor that may have appealing visual designs worth preserving through transmog. Many players focus exclusively on legendary equipment, missing opportunities to catalog versatile appearance options from uncommon and rare gear encountered during early and mid-game progression. Another frequent error involves unnecessary resource expenditure upgrading armor solely for its appearance rather than focusing on stat-optimal pieces for enhancement.
For optimization, prioritize upgrading stat-efficient armor first to unlock its visual template, then apply that appearance to your actively used gear. This approach ensures you’re not wasting precious resources on suboptimal equipment just for cosmetic purposes. The system smartly remembers every armor piece you’ve ever acquired, so even if you’ve sold or dismantled equipment, its visual template remains permanently available in your transmog library.
After mastering appearance customization, consider expanding your capabilities through challenging content like the Muspelheim trials, which offer exclusive visual designs and powerful enhancement materials. For players interested in similar progression systems, our Weapons Unlock guide explores comparable customization mechanics in other gaming environments.
Action Checklist
- Identify stat-optimal armor pieces for primary upgrading to level 9
- Gather required upgrade materials through exploration, quests, and combat
- Visit any forge to maximize armor level, unlocking its visual template permanently
- Access inventory menu, navigate to armor slots, and locate max-level pieces
- Press Square on eligible gear, browse available styles, and apply preferred appearance
- Experiment with cross-slot combinations to create unique visual presentations
No reproduction without permission:SeeYouSoon Game Club » God Of War Ragnarok: How To Transmog Gear Master God of War Ragnarok's transmog system to customize Kratos' appearance while optimizing gear stats