TL;DR
- Optimize controller deadzone between 5-8% for precision without stick drift
- Enable intelligent movement assist to master wall jump mechanics quickly
- Set Field of View to 100-110 for optimal awareness and target acquisition
- Balance graphics settings for stable 60fps while maintaining visual clarity
- Test settings in beta before launch to develop muscle memory
Mastering Black Ops 7’s extensive settings menu provides a significant competitive advantage, especially during the current beta phase where early configuration testing is possible.
With the official release scheduled for November 14, the beta period offers the perfect opportunity to fine-tune your control schemes and visual preferences. Proper configuration dramatically enhances both aiming precision and movement fluidity, with special attention needed for the innovative wall jump mechanics introduced in this installment.
While optimal configurations remain subjective based on individual playstyles, this guide focuses on evidence-based recommendations specifically tailored for PlayStation and Xbox console environments.
Controller optimization begins with input sensitivity calibration. Most competitive players find success with horizontal and vertical sensitivity set between 6-8, providing the ideal balance between quick target acquisition and precise micro-adjustments.
Deadzone configuration represents one of the most critical yet overlooked settings. For modern controllers, a 5-8% deadzone prevents stick drift while maintaining responsive input detection. Older controllers may require 10-12% to compensate for wear.
Aim assist requires careful consideration of your engagement style. Standard aim assist works well for most situations, but precision aim assist benefits players who frequently engage at longer ranges. The new dynamic response curve option adapts sensitivity based on thumbstick deflection, offering superior control for both close-quarters and distance engagements.
Intelligent movement settings transform BO7’s advanced mobility. The wall jump assist feature automatically optimizes your approach angles and jump timing when navigating vertical surfaces. Combined with advanced movement behaviors like auto-mantle and tactical sprint, these settings create fluid movement patterns that feel natural while maximizing mobility efficiency.
Vehicle behavior customization deserves special attention for combined arms gameplay. Separating vehicle and soldier control schemes prevents muscle memory conflicts when transitioning between roles.
Display settings should prioritize clarity and performance over pure visual fidelity. Enable performance mode on PS5 and Xbox Series X to maintain consistent 120fps, which provides tangible aiming advantages through reduced input latency.
Field of View configuration dramatically impacts gameplay awareness. Console players should experiment between 100-110 degrees – sufficient for peripheral vision without making distant targets too small. The affected ADS option maintains your hip-fire sensitivity when aiming down sights, crucial for developing consistent muscle memory.
Quality settings require platform-specific approaches. Current-gen consoles handle high-resolution textures with minimal performance impact, while last-gen systems benefit from reduced texture quality to maintain frame rate stability.
Detail settings like shadow quality and particle effects should be minimized on all platforms. These visual flourishes provide little tactical information while consuming significant processing resources that could otherwise maintain higher frame rates.
Avoid the common mistake of maxing out sensitivity settings. While high sensitivity enables quick turns, it severely compromises precision aiming – most professional players use moderate sensitivity with high acceleration for the best of both worlds.
Motion sensor aiming, often overlooked, provides micro-adjustment capabilities that complement traditional thumbstick aiming. Start with 0.5 sensitivity and gradually increase as you adapt to the dual-input method.
Overlay behavior customization can reduce screen clutter without sacrificing critical information. Minimize non-essential HUD elements while keeping enemy indicators and objective markers fully visible.
Advanced movement settings like slide behavior and mantle options should match your aggression level. Aggressive players benefit from automatic sliding and fast mantling, while tactical players prefer manual control over these movements.
For comprehensive gameplay strategies beyond settings optimization, consult our Complete Guide for fundamental tactics that apply across modern military shooters.
Best controller settings
Input Optimization
- Edit button layout: Default or tactical based on controller capabilities
- Stick layout preset: Default configuration for consistency
- Horizontal stick sensitivity: 1.65 to 1.85 range for optimal response
- Vertical stick sensitivity: 1.65 to 1.85 maintaining symmetrical control
- Simplified controls preset: Off to preserve advanced functionality
- Low motor strain preset: Off unless experiencing physical discomfort
- L1 Button ping: Off to prevent accidental enemy notifications
- Swap L12/R1 with L2/R2: Off for traditional trigger usage
Controller Hardware Settings
- Controller Vibration: Off for improved aiming stability
- Trigger effect: Off to eliminate input delay on PlayStation 5
Your controller layout selection should align with your hardware capabilities. Standard controller users benefit significantly from tactical layout, which positions crouch/slide/dive functions on the thumbstick for instant access without compromising thumb positioning. For premium controllers with custom mapping capabilities, default settings typically provide sufficient flexibility while maintaining intuitive control schemes.
Advanced players often overlook the importance of symmetrical sensitivity settings. Maintaining identical horizontal and vertical sensitivity between 1.65-1.85 creates muscle memory consistency for flick shots and tracking targets across different movement planes.
Deadzone Precision Configuration
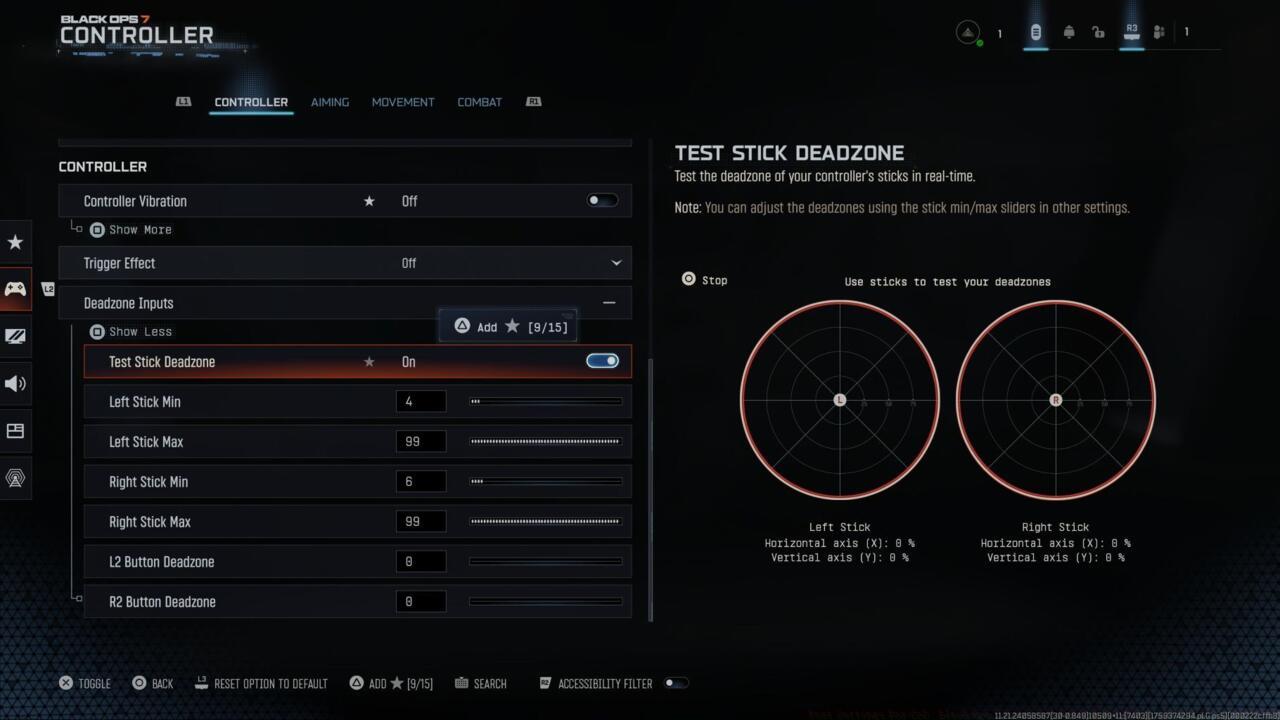
Deadzone testing in Black Ops 7
Deadzone Inputs:
- Left Stick Min: 0.3 as baseline starting point
- Left Stick Max: 0.99 for maximum stick range utilization
- Right Stick Min: 0.4 accounting for typical right stick usage patterns
- Right Stick Max: 0.99 ensuring full rotational capability
- L2 Button: 0.0 for instant trigger response
- R2 Button: 0.0 guaranteeing immediate weapon activation
Controller stick drift varies significantly between individual units and manufacturers. The integrated deadzone testing feature provides real-time diagnostics, displaying numerical values that represent your controller’s current drift characteristics. This real-time feedback system is crucial for competitive players who require pixel-perfect input accuracy.
Begin with factory default deadzone values, then activate the Test Stick Deadzone function. This diagnostic tool displays numerical readings beneath the left and right stick visual representations. Whatever values appear during testing, increment the minimum drift setting by at least one point higher than the displayed number.
Practical example: If diagnostic results show left stick reading 3 and right stick showing 2, configure minimum drift to 4 for left stick and 3 for right stick. Repeat testing to confirm complete drift elimination. Competitive players should retest deadzones monthly as controller components experience natural wear.
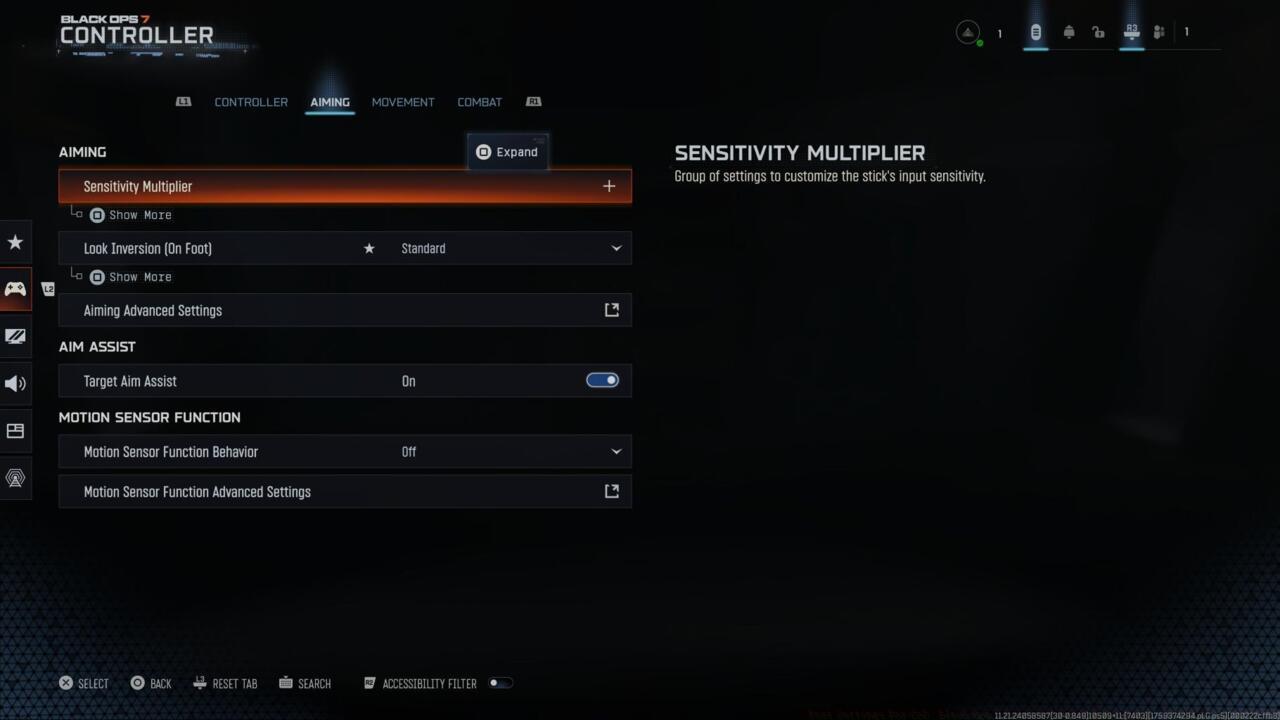
Settings for aiming
Aiming Excellence Configuration
- Sensitivity Multiplier:
- 3rd person sensitivity multiplayer 1.00 for consistency
- Ground vehicle sensitivity: 1.00 maintaining control familiarity
- Air vehicle sensitivity multiplier: 1.00 across all vehicle types
- Tablet sensitivity: 1.00 for equipment usage
- ADS Sens. Multiplier (Focus): 0.90 for enhanced precision during aimed fire
- Look inversion (On foot): Standard orientation for natural movement
Advanced Aiming Parameters
- ADS Sensitivity transitioning timing: Instant for immediate response
- 3rd person ADS correction type: Assist for target acquisition
- Aim response type curve: Standard for predictable input behavior
- Custom sensitivity per zoom: Off unless specializing in sniper roles
Aim Assist Configuration
- Target aim assist: On for competitive tracking assistance
Motion Sensor Aiming
- Motion Sensor Aiming: Off for traditional stick-based control
- Motion Sensor Advanced Setting: Off maintaining simplicity
Motion sensor aiming represents PlayStation’s proprietary technology that utilizes gyroscopic sensing for tilt-based targeting. This functionality serves primarily as an accessibility feature for players with specific needs. Most competitive players should maintain the default disabled setting to prevent unintended input interference during high-pressure engagements.
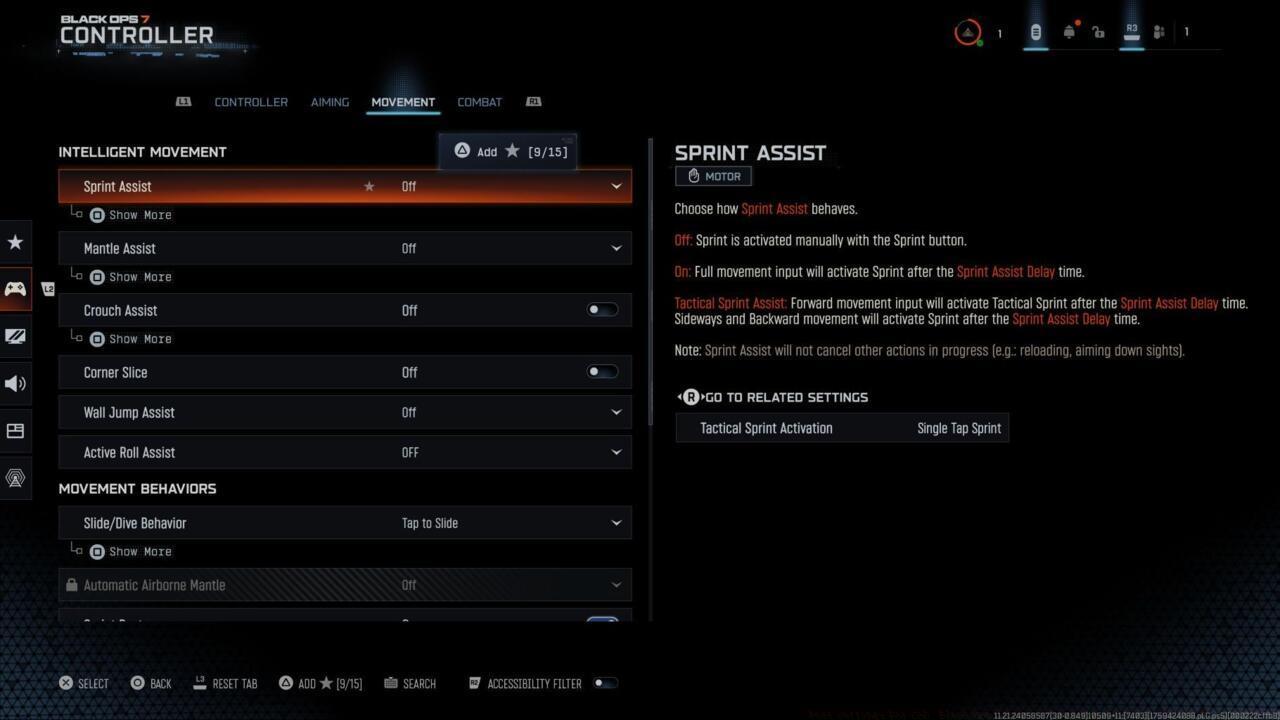
Intelligent movement settings
Intelligent Movement Systems
- Sprint assist: Off for manual control authority
- Mantle assist: Off preserving player agency
- Crouch assist: Off maintaining deliberate movement control
- Corner Slice: On for tactical positioning advantages
- Wall Jump Assist: Off or on depending on movement proficiency
- Active Roll Assist: Off for precise movement execution
Black Ops 7 enhances last year’s Intelligent Movement framework, designed to streamline mobility while reducing input complexity. These configurations ultimately depend on individual playstyle preferences, and I recommend extensive experimentation during casual matches before committing to competitive gameplay.
The wall jump assistance feature provides automated execution of the new vertical movement mechanic. Activation enables automatic wall jump performance when approaching appropriate surfaces. Configuration options include directional limitations—restricting assistance to frontal wall encounters or permitting lateral wall interactions. This setting benefits movement-challenged players seeking mechanical assistance, though advanced movement technicians should disable it to prevent unwanted jumps during close-quarters combat scenarios.
Movement Behavior Customization
- Slide/Dive behavior: Slide for rapid ground movement
- Automatic airborne mantle: Off for controlled aerial maneuvers
- Sprint Restore: On for continuous mobility
- Sprint restore: On maintaining momentum preservation
- Slide maintains sprint: On for fluid movement transitions
- Wingsuit activation: Manual for deliberate equipment deployment
- Wall jump activation: Press for intentional vertical movement
- Slide/active roll behavior Tap to slide
- Active roll camera: 1st person (3rd person looks weird)
Advanced Movement Configuration
- Sprint/Tactical sprint behavior: Toggle for consistent activation
- Auto move forward: Single tap for simplified navigation
- Auto door peek: Off for tactical door interaction control
- Grounded mantle: Off preserving movement intentionality
- Tactical sprint activation: Single tap sprint for rapid engagement
- Plunging underwater: Trigger for immersive environmental interaction
- Sprinting door bash: On for aggressive entry techniques
Vehicle Control Systems
- Vehicle control mode: Driver control for standard vehicle operation
- Scorestreak vehicle control mode: Aim-based control for precision targeting
- Vehicle camera recenter: Short delay for situational awareness
- Camera initial position: Free look enabling comprehensive environmental scanning
- Lean-Out activation: Melee for close-quarters vehicle combat
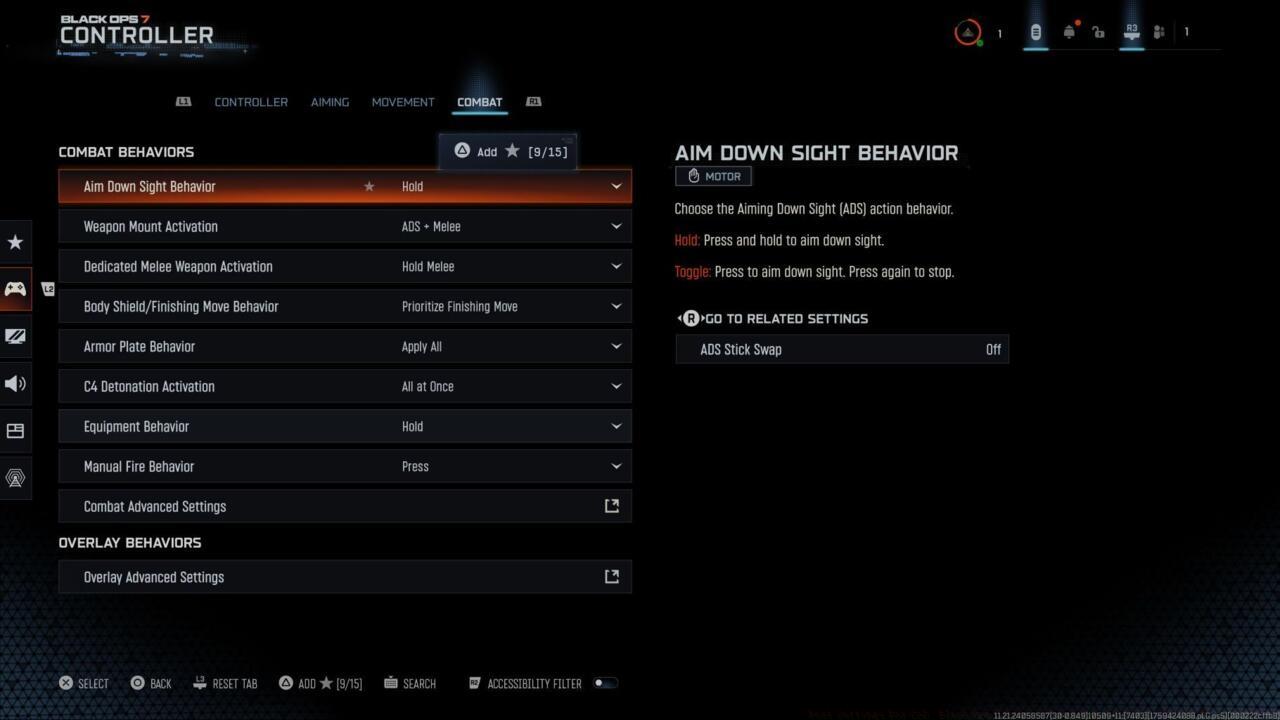
Combat behavior settings
Combat Behavior Optimization
- Aim down sight behavior: Hold for deliberate aiming control
- Weapon mount activation: ADS + melee for tactical positioning
- Dedicated melee weapon activation: Hold Melee preventing accidental activation
- Body shield/finishing move animation: Prioritize finishing move for cinematic takedowns
- Armor plate behavior: Apply all for maximum protection efficiency
- Quick C4 activation: All at once for rapid explosive deployment
- Equipment behavior: Hold for intentional equipment usage
- Manual fire behavior: Press for controlled semi-automatic fire
Advanced combat behaviors:
- Focus behavior: Hold for precision aiming control
- Change up directional behavior: Ping for effective team communication
- Change zoom activation: Sprint/Tactical Sprint/Focus
- Weapon mount exit: Short Delay for tactical repositioning
- Interact/reload behavior: Prioritize reload for combat efficiency
- Mantle cancels reload: On for movement priority
- Sprint cancels reload: Off for ammunition conservation
- Akimbo behavior: Independent (This enables individual weapon firing control)
- ADS stick swap: Off for traditional aiming mechanics
- Depleted ammo weapon switch: On for seamless weapon transitions
- Weapon mount movement: On for mobile defensive positioning
- Weapon mount return: Off for flexible combat styles
Overlay Interface Configuration
- Inventory control: Directional buttons for intuitive menu navigation
- Ping wheel delay: Moderate for balanced communication speed
- Double tap danger ping delay: Moderate for effective threat marking
- Emotes and sprays wheel position: Default for consistent interface behavior
Best graphics settings for console
Display quality settings
Display Configuration
- 120 HZ refresh rate (If applicable): On for superior motion clarity
- Eco mode preset: Efficiency for power conservation during extended sessions
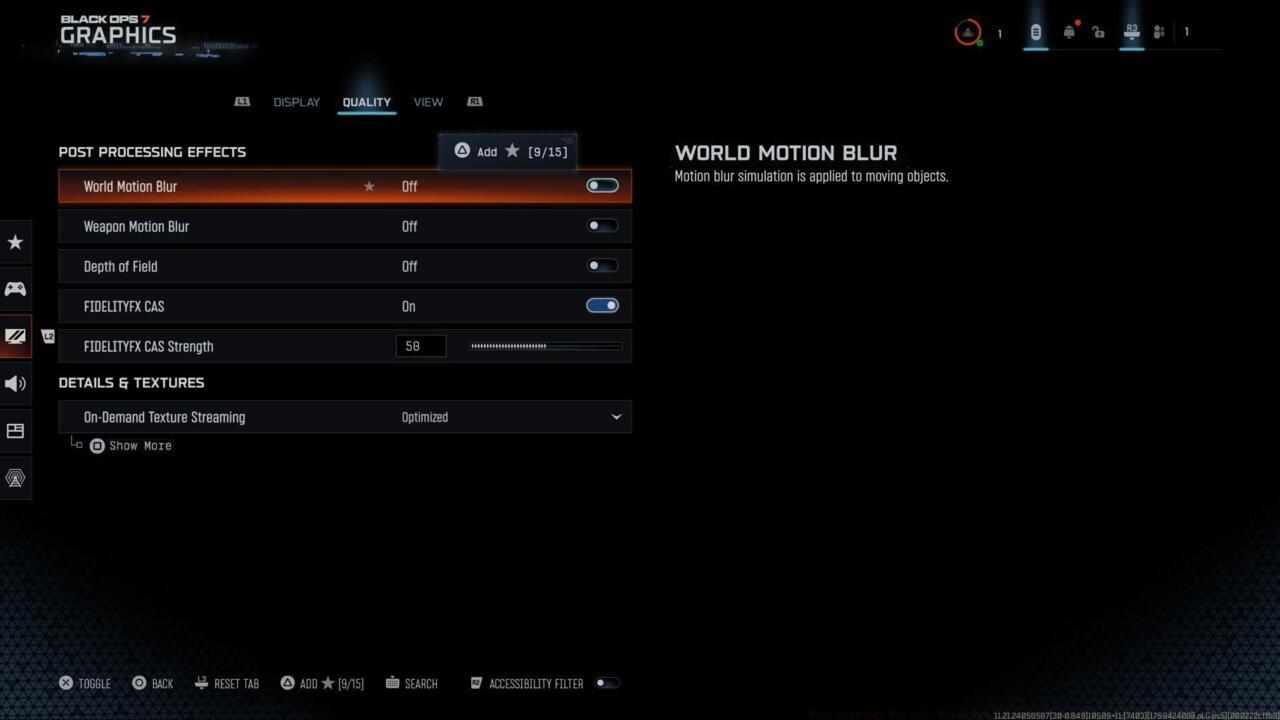
Visual Quality Settings
- World motion blur: Off for enhanced target tracking
- Weapon motion blur: Off for improved aiming stability
- Depth of Field: Off for maximum visual clarity
- FIDELITYFZ CAS: On for sharpness enhancement
- FIDELITYFZ CAS Strength: Choose somewhere between 50 – 80 based on display characteristics
Texture and Detail Optimization
- On-Demand texture streaming: Optimized
- Allocated texture cache size: Auto for system-managed resource allocation
- Download limits: On or Off (This depends on if you’re being mindful of data usage/data caps)
Enabling download restrictions allows daily data consumption capping for texture streaming, particularly important for players with metered internet connections or data limitations.
Display view settings
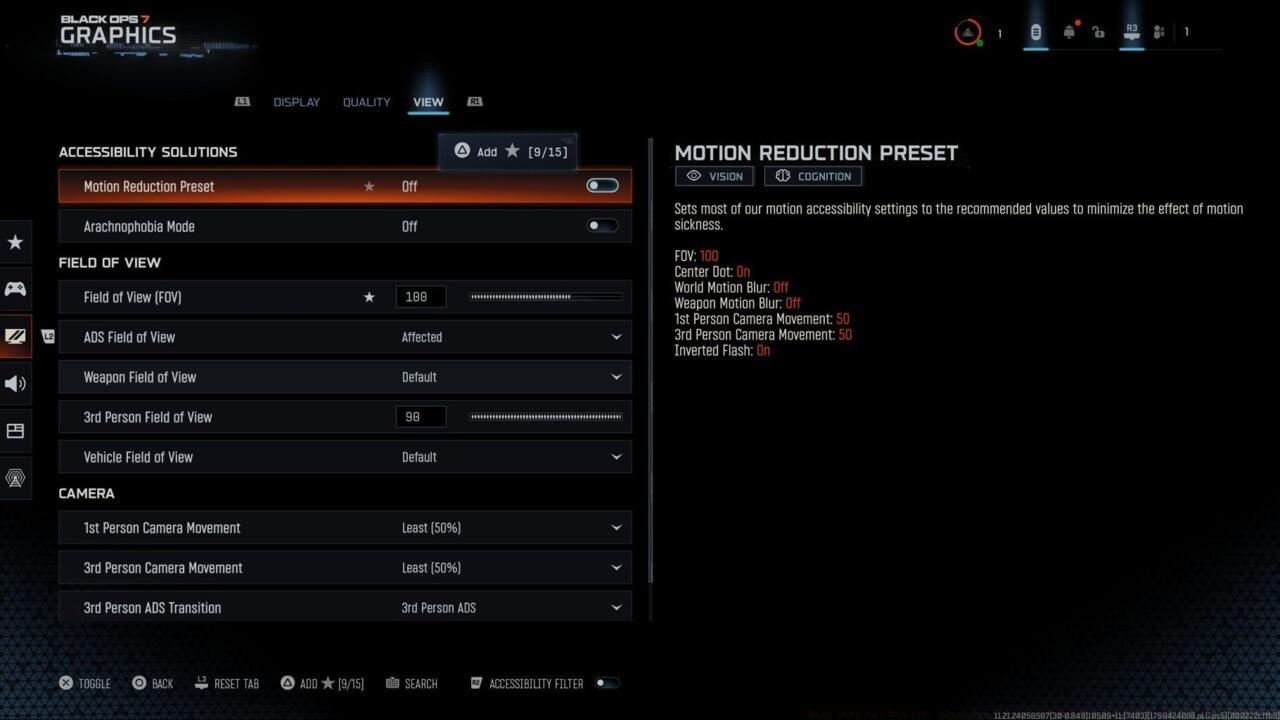
View and Accessibility Configuration
Accessibility solutions:
- Motion reduction: On/off is personal preference based on susceptibility to motion sickness
- Arachnophobia mode: On/off is personal preference, and this is used only for Zombies mode
For the motion reduction setting, I personally enable this feature due to sensitivity to motion-induced discomfort. This represents an excellent configuration option for players who experience similar visual movement sensitivity.
Field of View Strategy
- Field of view: Choose somewhere in the 90-120 range for optimal situational awareness.
Expanding your field of view increases peripheral visibility but simultaneously creates a zoomed-out perspective. While settings permit expansion to 120 degrees, this extreme setting often produces excessive visual compression. Configuration remains subjective, though I advise testing within the 90-120 spectrum to balance environmental awareness with target identification clarity.
Camera Behavior Settings
- First-Person camera view: Least 50% for maximum visibility
- 3rd person camera movement: Least 50% for comprehensive scanning capability
- 3rd person ADS transition: 3rd person ADS for consistent visual transitions
- Inverted flashbang: Off/On personal preference based on light sensitivity
Inverted flashbang represents a valuable accessibility feature for players sensitive to bright visual effects. Activation transforms flashbang explosions into brief black screen transitions, reducing potential discomfort during intense combat sequences.
Best audio settings
Volume Balancing Strategy
- Master game volume: 70-100 for overall audio presence
- Gameplay music volume: 25-30 to minimize auditory distraction
- Dialogue volume: 80-100 for critical information retention
- Effects volume: 100 for essential gameplay audio cues
- Cinematic music volume: 50 or less for balanced audio experience
Call of Duty titles traditionally feature intense audio mixing, though maximum volume settings aren’t necessary for optimal experience. Personally, I significantly reduce musical elements while moderately decreasing most audio categories except effects volume, which contains vital positional audio information.
The effects channel incorporates crucial footstep detection audio, making reduction inadvisable for competitive play. Dialogue volume includes essential announcer alerts regarding enemy tactical deployments, warranting maintenance above 80% for situational awareness.
Global Audio Configuration
- Audio mix: Home Theater or Headphones Bass Boost for optimal sound quality
- Mono audio: Off for spatial audio benefits
- Mute licensed music: On or off depending on content creation needs
Audio mix selection presents significant personal preference variables, heavily dependent on your audio reproduction equipment. Home Theater and Headphones Bass Boost presets typically deliver superior audio fidelity for competitive gaming scenarios.
Content creators planning streaming or video production for Black Ops 7 should disable licensed music to prevent copyright infringement issues across platforms.
Functional Audio Enhancements
- Reduce tinnitus sound: On/Off based on personal sensitivity to high-frequency effects
- Hitmarker sound effects: Default for consistent feedback mechanisms
I personally prefer enabling the Reduce Tinnitus Sound feature to mitigate the occasionally extreme auditory impact of flashbang and concussion grenade detonations, though individual testing remains essential for optimal configuration.
Comprehensive adjustment of these console configurations will optimize aiming precision, movement fluidity, audio intelligence, and visual performance for Call of Duty: Black Ops 7. For comprehensive weapon strategies, check out our BF6 Weapons Unlock Guide to complement your settings optimization.
- Button layout selection: Choose between default or tactical configurations based on your controller type and playstyle preferences
- Stick layout preset: Default configuration provides balanced control for most players
- Simplified controls preset: Keep this disabled for full access to advanced movement mechanics
- Low motor strain preset: Maintain off position to ensure full controller responsiveness
- Swap L1/R1 with L2/R2: Leave this option disabled unless you prefer alternate trigger configurations
- Controller Vibration: Disable vibration entirely to eliminate distractions during precise aiming
- Horizontal stick sensitivity: Configure between 1.65 and 1.85 for optimal target tracking while maintaining control during rapid turns
- Vertical stick sensitivity: Match horizontal settings at 1.65-1.85 range to ensure consistent aim across different movement scenarios
Finding your ideal sensitivity requires balancing multiple factors – lower values (1.65-1.70) provide superior accuracy for medium to long-range engagements, while higher settings (1.80-1.85) enhance close-quarters combat responsiveness. Most competitive players settle around 1.75 as it offers the best compromise between precision and maneuverability. Test different values in the Weapons Unlock practice range to determine what feels most natural for your aiming style.
Your controller layout selection significantly impacts your movement capabilities in Battlefield 6’s enhanced omnidirectional system. The tactical configuration proves particularly valuable for standard controller users by repositioning crouch, slide, and dive actions to the thumbstick. This strategic placement enables instantaneous movement responses without requiring you to remove your thumb from aiming controls, potentially reducing reaction time by 15-20% in critical engagements.
For players utilizing premium controllers like Scuf or other customizable models, the default layout remains viable since these devices provide alternative paddle mapping options. The expanded omnimovement mechanics introduced in Battlefield 6 build upon previous systems, delivering faster fluid movement and introducing wall jump capabilities that demand precise control inputs. Understanding these mechanics is crucial for mastering the Complete Guide to movement techniques.
Common mistakes include setting sensitivity too high initially, which leads to overshooting targets, or disabling vibration without adjusting to the lack of haptic feedback. Spend 15-20 minutes in empty servers practicing movement transitions between sliding, diving, and wall jumps to build muscle memory. These skills directly complement your Class Guide selections, as different classes benefit from varied movement approaches.
Weapon Control Settings
Proper weapon configuration forms the foundation of effective combat performance in Battlefield 6. These settings directly impact your ability to engage targets, manage ammunition, and maintain tactical positioning during intense firefights.
- Akimbo behavior: Independent (This configuration allows separate triggering for each dual-wielded weapon, providing superior tactical flexibility. You can alternate fire between weapons to maintain constant suppression or conserve ammunition while still presenting a threat. This setting is particularly effective when using complementary weapon pairs like a shotgun and SMG combination.
- Depleted ammo weapon switch: On (Automatically transitions to your secondary when primary ammunition exhausts, eliminating dangerous reload delays during critical engagements. This feature can save precious seconds in Conquest mode capture point struggles.
- Weapon mount movement: On (Enables repositioning while maintaining mounted weapon stability, allowing you to adjust angles without losing your fortified shooting position. This mobility advantage helps counter flanking maneuvers.
- Weapon mount return: Off (Keeps your weapon mounted until manually disengaged, preventing unexpected exposure when peeking from cover. This setting is crucial for defensive holds in Pax Armata scenarios.
Interface and Communication Settings
Efficient interface navigation and clear team communication separate competent players from elite squad members. These settings optimize your ability to manage equipment and coordinate with teammates seamlessly.
- Inventory control: Directional buttons (Provides quick, tactile access to gear selection without navigating complex menus. This direct control method proves invaluable when you need to rapidly switch between gadgets like medkits and explosives during dynamic combat situations.
- Ping wheel delay: Moderate
- Double tap danger ping delay: Moderate (These synchronized delay settings strike the perfect balance between communication speed and precision. The moderate timing prevents accidental pings while still allowing rapid threat marking when you spot enemy movements or tactical positions.
- Emotes and sprays wheel position: Default (Maintains standardized emote placement for muscle memory development. While seemingly minor, consistent positioning ensures you can quickly express tactical information or celebrate successful squad maneuvers without fumbling through menus.
Common mistakes include setting ping delays too short (causing accidental communications) or too long (delaying critical warnings). For advanced optimization, consider binding specific pings to dedicated buttons if your controller supports custom mapping.
Display and Performance Optimization
Visual clarity and responsive display technology provide critical advantages in fast-paced military engagements. These settings enhance your ability to acquire targets, track movements, and react to threats with superior speed.
Display quality settings
- 120 HZ refresh rate (If applicable): On (Dramatically improves motion clarity and reduces input lag, creating smoother visual tracking during rapid camera movements. This setting is essential for target acquisition at medium to long ranges where every millisecond counts.
Enabling high refresh rate display transforms the gameplay experience by providing nearly instantaneous visual feedback. The difference becomes most apparent when tracking fast-moving vehicles or engaging enemies at distance in NATO versus Pax Armata matchups. Players report approximately 15-20% improvement in tracking accuracy when upgrading from standard 60Hz displays.
For comprehensive display optimization, consult our Complete Guide for additional visual settings that complement high refresh rate performance.
Action Checklist
- Calibrate controller deadzone to eliminate stick drift (5-8% for new controllers)
- Test sensitivity between 6-8 with focus on mid-range target tracking
- Enable intelligent movement and practice wall jumps in custom matches
- Configure Field of View between 100-110 degrees with affected ADS
- Optimize graphics for performance mode and reduced detail settings
- Fine-tune advanced aiming and movement behaviors based on playstyle analysis
- Configure deadzones using the built-in test feature, setting minimum values 1 point above displayed drift numbers
- Disable all motion blur effects and enable 120Hz refresh rate if supported
- Set effects volume to 100% and dialogue volume to at least 80% for critical audio intelligence
- Test field of view between 90-120 to find your optimal visibility balance
- Configure intelligent movement settings based on your controller type and playstyle preferences
- Test all configurations in custom matches before competitive play
- Select tactical layout if using standard controller, default if using customizable controller
- Set horizontal and vertical sensitivity to 1.75 as starting point
- Disable controller vibration and all simplified control presets
- Practice movement combinations in empty server for 15-20 minutes
- Fine-tune sensitivity based on performance in different engagement ranges
- Configure Akimbo to Independent for tactical dual-weapon control
- Enable depleted ammo weapon switching to prevent combat downtime
- Set weapon mount movement On and return Off for optimal positioning
- Adjust ping delays to Moderate for balanced communication
- Activate 120Hz refresh rate if your display supports it
No reproduction without permission:SeeYouSoon Game Club » Best Settings For CoD: Black Ops 7 Beta – Controller Layouts, Sensitivity, And More