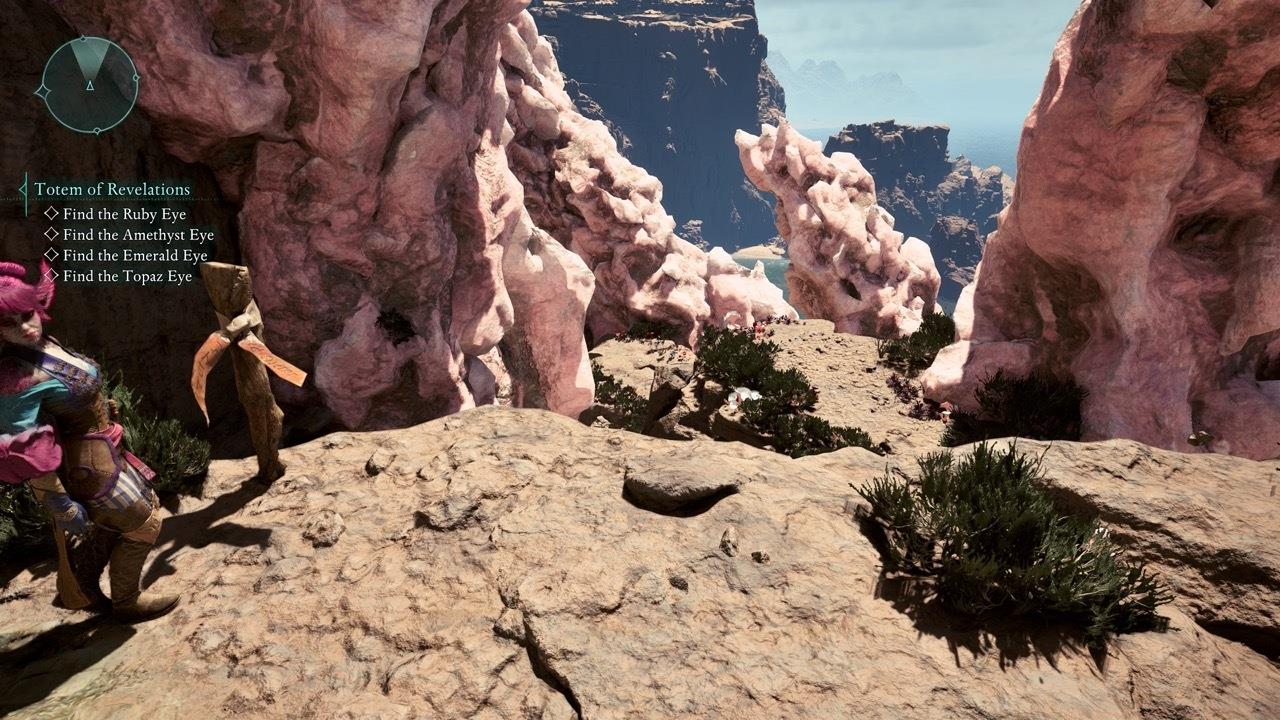
TL;DR
- All seven Totem of Revelations pieces can be collected in any order throughout Shatterscarp
- Purchase location hints from Thirdborn barkeep but no map markers provided
- Totem Base found in Shrine to Wael cave via southwestern coastal path
- Multiple eyes require underwater access, climbing, or environmental navigation
- Complete assembly provides permanent passive bonuses when activated at your camp
Embark on a comprehensive treasure hunt across Shatterscarp to locate all components of the powerful Totem of Revelations. This ancient artifact, when fully assembled and activated at your camp, grants significant passive bonuses that enhance your character’s capabilities throughout your Avowed journey.
Each distinct region within the Living Lands contains unique totems offering specialized benefits. The Shatterscarp totem system consists of six mystical eyes and one central base piece strategically hidden across diverse environments. For strategic planning assistance, consider purchasing cryptic notes containing one-sentence clues from the barkeep stationed in Thirdborn settlement, though be aware these hints won’t automatically populate your map with waypoints.
Critical Gameplay Insight: The seven totem components can be acquired in completely flexible sequence without progression restrictions.
When approaching totem collection, experienced players recommend systematic area exploration rather than random searching. The Complete Guide offers additional exploration strategies that apply well to this treasure hunt.
The foundational Totem Base rests within the Shrine to Wael, positioned in Shatterscarp’s southwestern quadrant along the coastal cliffs. This spiritual site houses the central component necessary for assembling the complete Totem of Revelations.
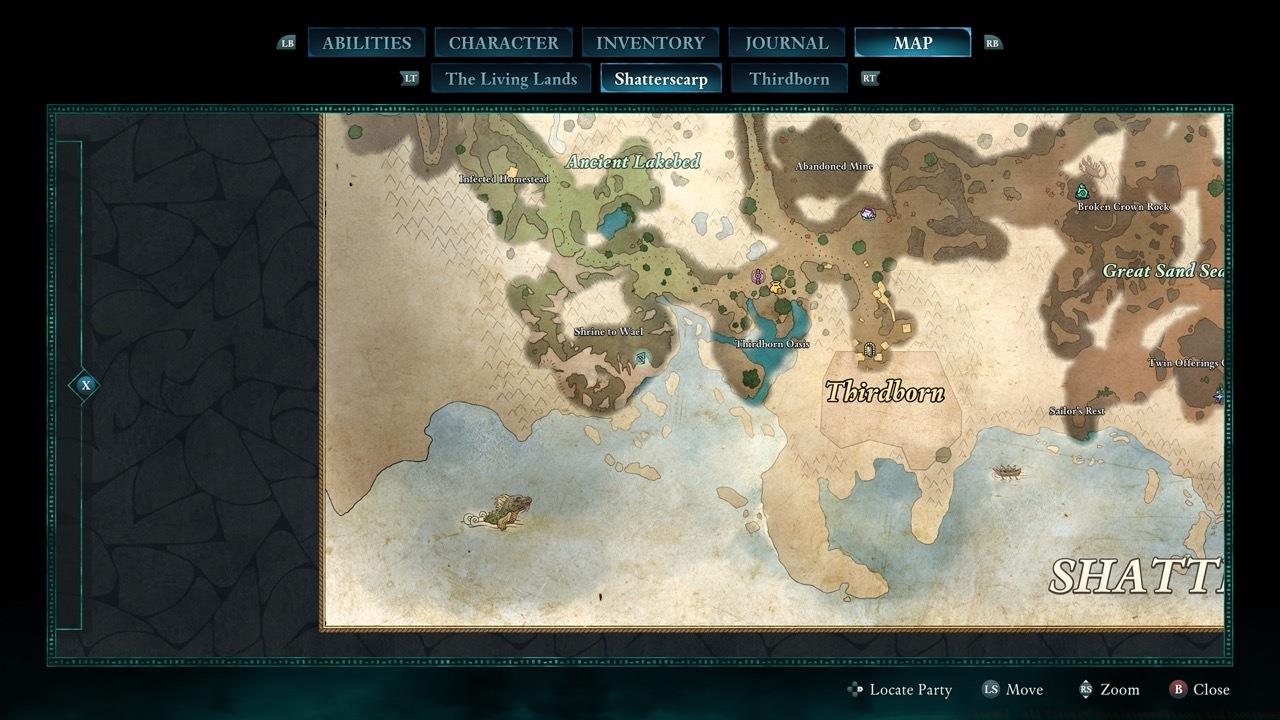
Identify the Shrine to Wael landmark in the southwestern coastal region to begin your search.
Navigate toward the shrine’s southern perimeter to discover the concealed cave entrance. This natural opening leads to the underground chamber containing the totem foundation.
Circle around the shrine’s southern edge to locate the hidden cave access point.
Initiate your descent from the elevated cliff outlooking the ocean, carefully navigating downward along the rock pathway. This initial positioning provides optimal vantage for the route ahead.
Proceed through this narrow passageway to reach the main cave system interior.
Traverse around the rear cliff face to encounter an opening into a vibrantly colored cave with pink mineral flows. The path remains straightforward without confusing branches—continue advancing until accessing the inner cavern where the Totem Base awaits upon a ceremonial altar.
The Totem Base rests securely within the Shrine of Wael’s underground chamber.
Pro Tip: Before entering the cave, ensure you have adequate inventory space and consider visiting during daylight hours for better visibility in the unlit interior sections.
The Ruby Eye represents another discoverable component located within the same Shrine to Wael complex, offering efficient two-piece collection from a single location.
The Ruby Eye awaits discovery inside the Shrine to Wael’s expanded cavern network.
Track the distinctive pink crystalline formations leading toward a compact tunnel passage that ultimately guides you to the Ruby Eye’s resting place.
Follow the glowing pink mineral deposits to locate the narrow corridor containing the Ruby Eye.
Acquire the Ruby Eye either by direct collection from the ground surface or through peaceful interaction with the guardian ward entity.
Strategic Insight: Engaging with the ward diplomatically may provide additional lore context and potentially other rewards, while direct collection offers faster acquisition for players focused solely on totem completion.
Common Mistake: Many players overlook the ward interaction option, missing potential narrative depth and supplementary bonuses available through conversation.
Journey toward the Ancient Lakebed’s southeastern sector to locate the Amethyst Eye, positioned conspicuously within a solemn gravesite setting.
The Amethyst Eye resides in the southeastern portion of the Ancient Lakebed environment.
Discover the Amethyst Eye positioned atop a prominent rock formation adjacent to ancient burial markers.
Environmental Clue: The gravesite arrangement provides visual context for the area’s history while serving as a clear landmark for navigation purposes.
Advanced Tip: The rock formation housing the Amethyst Eye also offers strategic high ground for surveying surrounding territories, making this location doubly valuable for exploration and combat preparation.
The Topaz Eye awaits discovery within Leviathan’s Hollow, an area characterized by massive skeletal remains and submerged passages.
Locate the Topaz Eye within the distinctive Leviathan’s Hollow region.
Enter through the colossal mouth structure and submerge to access the interior chamber housing the totem piece.
After emerging from the aquatic passage, ascend to the summit of the structure depicted above, then descend the stairway located behind this building.
Climb to the building’s peak then proceed downward via the rear staircase.
Retrieve the Topaz Eye from its position on a table surface, conveniently located near an important side quest objective item.
Efficiency Strategy: Combine Topaz Eye retrieval with the associated side quest to maximize time investment and narrative progression. The Weapons Unlock guide provides additional context for optimizing your equipment during such dual-purpose expeditions.
Time Estimate: Allow 15-20 minutes for the complete Leviathan’s Hollow exploration, including underwater navigation and structural climbing components.
The Emerald Eye resides within Shark’s Teeth ruins, specifically in the northern section of this ancient architectural complex.
Find the Emerald Eye in the northern sector of Shark’s Teeth ruins.
The Emerald Eye rests atop the statue clearly visible in this reference image.
Retrieve the Emerald Eye from the summit of this incomplete stone sculpture.
Architectural Analysis: The partially constructed statue provides both a visual landmark and accessible climbing route, demonstrating the developers’ intentional environmental design for navigation.
Common Pitfall: Players often attempt to reach the statue from the front; the most reliable approach involves scaling from the rear where erosion has created natural handholds.
Character Build Consideration: This location may require adequate climbing proficiency or alternative mobility solutions depending on your chosen Class Guide specialization, so plan accordingly based on your current capabilities.
The Agate Eye awaits within Sand Sea Ruins, though critically note this piece is located in the exterior ruins area rather than the interior dungeon bearing the same designation.
Discover the Agate Eye within Sand Sea Ruins’ exterior sections, not the underground dungeon complex.
Navigate northward from the primary ruins and utilize scattered debris and temporary scaffolding structures to ascend onto the roof of the central circular building.
Travel north from the ruins and employ the fragmented structures and construction frameworks to reach the primary circular building’s upper level.
The Agate Eye rests upon a table surface situated on the second story within the principal ruins structure.
Scaffolding Route Tip: The most stable path begins from the eastern side where the scaffolding connects most securely to the building facade.
Optimization Strategy: Complete this retrieval during daytime hours when visibility is optimal for identifying the most secure climbing route.
The Sapphire Eye lies submerged within the compact Oasis water feature located in Shatterscarp’s southeastern corner.
Locate the Sapphire Eye within the small Oasis pool situated in Shatterscarp’s southeastern extremity.
Dive beneath the surface to discover the eye component positioned adjacent to a skeletal remnant within the modest pond.
Skeletal Marker Significance: The nearby skeleton serves as both atmospheric element and practical navigation reference point for underwater retrieval.
Advanced Technique: Use the skeleton as a directional marker—the Sapphire Eye typically rests within 5-7 meters of this bony landmark.
Common Error: Players frequently overlook the necessity of deep diving in this location; the eye isn’t visible from the water’s surface.
Optimize your totem piece collection with these professional gaming strategies developed through extensive Shatterscarp exploration experience.
Optimal Route Planning: Begin with the Shrine to Wael to acquire both Totem Base and Ruby Eye simultaneously, then proceed counter-clockwise around the region to minimize backtracking and travel time between locations.
Time Management: A complete collection run typically requires 45-60 minutes for experienced players, while newcomers should budget 75-90 minutes accounting for exploration and navigation learning curves.
Common Pitfalls to Avoid:
- Attempting to enter Sand Sea Ruins dungeon instead of the exterior ruins
- Overlooking the ward interaction opportunity in Shrine to Wael
- Underestimating underwater navigation requirements
- Neglecting to purchase barkeep hints in Thirdborn
- Attempting statue climbing from incorrect angles
Inventory Preparation: Ensure you have at least 7 available inventory slots before beginning collection to avoid unnecessary return trips to storage.
Pro-Level Insight: The passive bonuses from the complete Totem of Revelations significantly enhance exploration capabilities, making this collection effort doubly valuable for subsequent gameplay segments.
Action Checklist
- Purchase location hints from Thirdborn barkeep for strategic planning
- Navigate to Shrine to Wael in southwest Shatterscarp
- Collect Totem Base and Ruby Eye from Shrine to Wael interior
- Systematically visit each eye location following optimal counter-clockwise route
- Return to camp and activate complete Totem of Revelations for passive bonuses
No reproduction without permission:SeeYouSoon Game Club » Avowed – All Totem Of Revelations Pieces And Locations Complete guide to finding all seven Totem of Revelations pieces in Shatterscarp with expert strategies