TL;DR
- Raider Hatches provide faster extraction than elevators or trains when you have the required key
- Four strategic locations exist on Dam Battlegrounds, with additional hatches on unlocked maps
- Repair involves interacting with glowing yellow pipes and automatically grants extraction keys
- Always use free loadouts during repair missions to prevent gear loss from unexpected deaths
- Hatch keys remain in inventory for future use, enabling quick escapes during dangerous situations
Discover how to efficiently repair Raider Hatches and leverage them for rapid extraction from combat zones. These specialized escape routes offer significant tactical advantages for prepared operators.
While most players rely on conventional extraction methods like elevators, trains, or air shafts (varying by map), Raider Hatches deliver a substantially quicker return to Speranza when equipped with a Raider Hatch Key. These unique escape mechanisms become available through the Hatch Repair assignment, which requires successful hatch restoration for completion. Understanding their strategic placement can dramatically improve your extraction success rates.
Extraction isn’t mandatory for finishing Hatch Repairs, though the quest conveniently facilitates immediate departure if desired. Seasoned operators consistently deploy with complimentary loadouts to safeguard valuable equipment and weapons from potential mission failures.
When prepared to undertake Hatch Repairs, implement the following comprehensive strategies to locate and restore these valuable escape routes effectively.
The initial phase of Raider Hatch restoration involves strategic positioning. Fortunately, Dam Battlegrounds contains multiple hatch installations, with optimal selection determined by your initial spawn point. The four primary locations provide coverage across the combat zone, enabling operators to select the most accessible option based on current position or exploration progress.
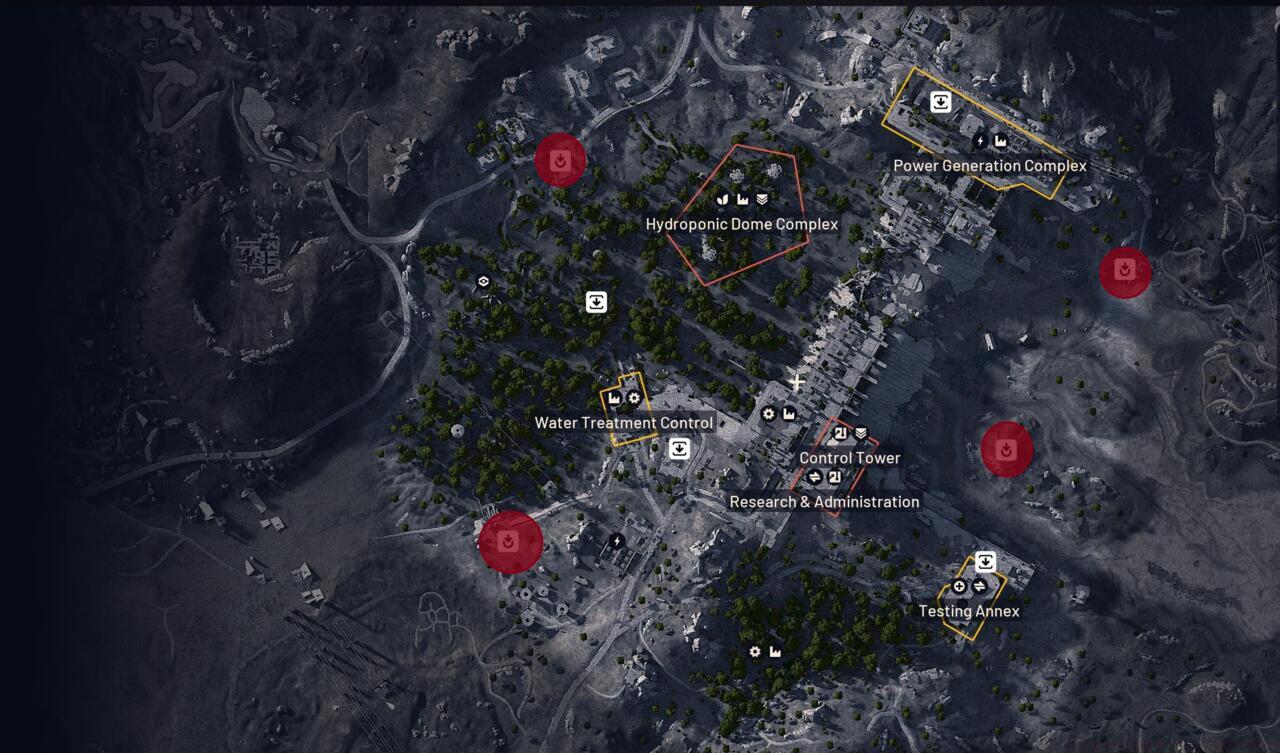
Raider Hatch locations on Dam Battlegrounds
These escape mechanisms appear across all operational maps, though this guide concentrates on Dam Battlegrounds for accessibility reasons. This battlefield becomes immediately available to all recruits, whereas additional maps require completion of specific match quotas before unlocking. For comprehensive battlefield navigation strategies, consult our Complete Guide to maximize your tactical awareness.
Upon reaching a Raider Hatch, restoration proves remarkably straightforward. Operators must engage with the protruding pipeline assembly, which emits a distinctive yellow glow indicating interactive capability. This visual cue ensures easy identification even during high-intensity combat situations.
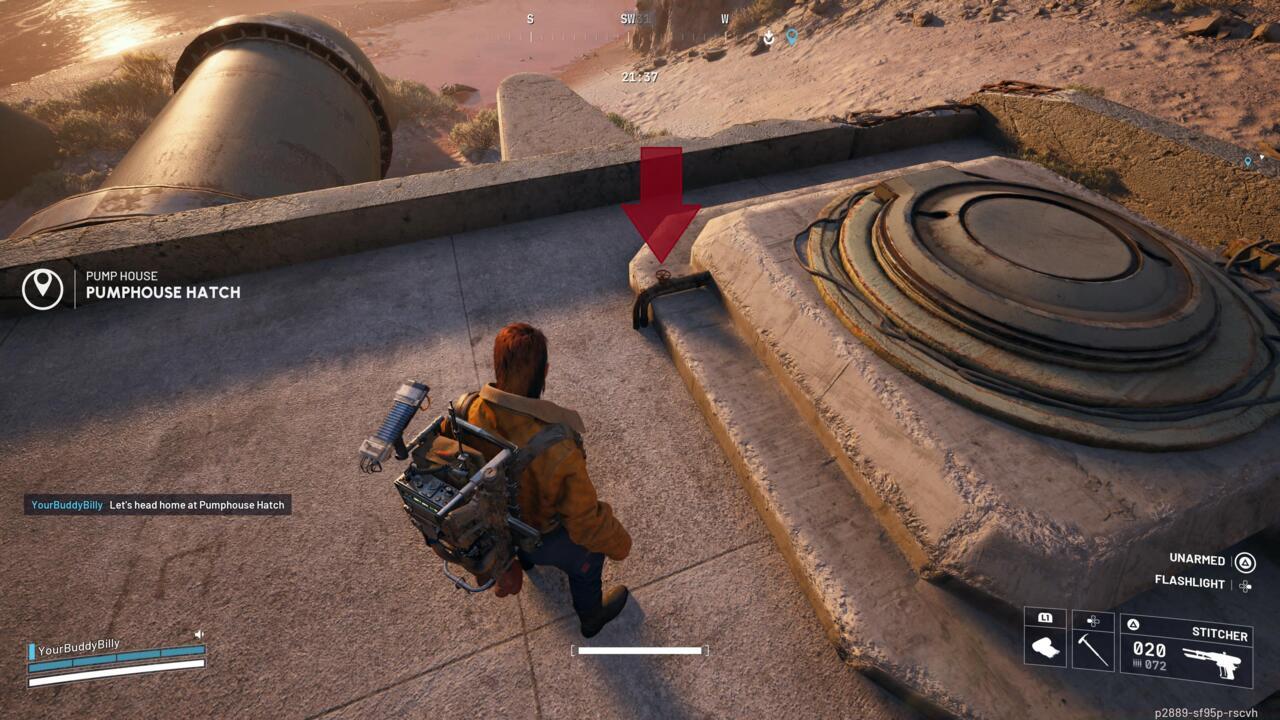
Repair the Raider Hatch by interacting with this pipe.
Successful completion triggers the appearance of a supply container adjacent to the hatch, containing a Raider Hatch Key. These permanent inventory items facilitate emergency extraction through any operational hatch network. Mission completion doesn’t necessitate immediate key usage, allowing continued exploration, though they provide invaluable emergency evacuation options when facing overwhelming opposition. For optimal loadout configuration to complement hatch strategies, explore our Weapons Unlock guide for equipment recommendations.
Experienced operators recommend several optimization techniques for Raider Hatch utilization. Always approach hatches from covered positions, as the repair animation leaves you temporarily vulnerable. Time your repairs during relative lulls in enemy activity, typically following successful area clearance. The entire repair process generally requires 15-20 seconds, making timing crucial during hostile encounters.
Avoid these frequent errors: attempting repairs without scouting surrounding areas first, carrying valuable equipment during initial repair missions, and forgetting that keys remain permanently in your inventory for future deployments. For advanced tactical approaches, our Class Guide provides specialized strategies for different operator roles.
Strategic hatch usage becomes particularly valuable during Conquest operations where rapid repositioning can determine match outcomes. The hatch network integrates seamlessly with NATO extraction protocols, providing reliable fallback options when primary extraction points become compromised. These systems represent key components of the Pax Armata strategic infrastructure.
Remember that Raider Hatch Keys don’t expire, making them worth acquiring early. Store them for critical situations where conventional extraction proves too dangerous or distant. This preparation separates novice operators from battlefield veterans.
Action Checklist
- Deploy with free loadout to protect valuable gear during repair missions
- Identify nearest hatch location based on spawn point using map intelligence
- Clear surrounding area before initiating repair to avoid interruption
- Interact with glowing yellow pipe to complete repair and receive key
- Store Raider Hatch Key for emergency extraction during future deployments
No reproduction without permission:SeeYouSoon Game Club » Arc Raiders Hatch Repairs Quest Guide Master Raider Hatch locations and repairs to unlock faster extraction methods in Arc Raiders