TL;DR
- EVO Shields removed from loot pool, replaced by Shield Cores tied to player progression
- Legend Upgrades offer 100+ new abilities with strategic customization options
- Shield-swapping remains viable but requires different tactical approaches
- EVO Points earned through combat now determine both shield level and ability unlocks
- New system rewards aggressive play and strategic ability combinations
The elimination of EVO Shields from ground loot represents one of Season 20’s most transformative changes, fundamentally altering how players approach shield management and combat progression. This shift, coupled with the introduction of 100 distinct Legend Upgrade abilities, has created both confusion and exciting new strategic possibilities for the Apex Legends community.
Apex Legends Season 20: Breakout delivers a comprehensive overhaul to Respawn Entertainment’s battle royale formula. Beyond the complete Ranked Mode redesign and streamlined crafting mechanics, the removal of traditional EVO Shields and implementation of Shield Cores alongside the Legend Upgrades system stands as the season’s defining feature. These interconnected systems create a more personalized progression experience that rewards player skill and strategic decision-making.
The integrated shield mechanics and Legend Upgrades work synergistically, presenting players with 100 fresh Legend abilities while removing traditional shield looting. This raises critical tactical questions: Does shield-swapping maintain its viability? Which new abilities complement specific playstyles? How do Shield Cores integrate into existing combat strategies? Whether you’re a seasoned competitor or recently joined the Games, our comprehensive analysis will guide you through mastering this complex yet rewarding new meta.
- Are EVO Shields permanently eliminated from gameplay?
- What exactly constitutes a Shield Core and how does it function?
- How has shield-swapping evolved in this new system?
- What methods generate EVO Points most efficiently?
- What EVO Point thresholds determine shield progression levels?
- How do Legend Upgrades operate and what strategic advantages do they provide?
The Legend Upgrades system introduces unprecedented customization depth, offering two distinct ability choices at specific progression milestones. Each Legend now features unique upgrade paths that can dramatically alter their combat effectiveness and team utility. Understanding these options is crucial for maximizing your strategic advantage.
Shield Cores serve as the foundation of the new progression system, replacing traditional shield looting entirely. Your shield level now advances exclusively through EVO Point accumulation from combat performance, damage dealing, and objective completion. This creates a more skill-based progression system that rewards aggressive, strategic gameplay rather than random loot distribution.
Shield-swapping remains a viable tactic but operates differently within the new framework. Instead of exchanging shields with ground loot, players now interact with specialized Shield Core stations or eliminated opponents’ Shield Cores. This maintains the fast-paced combat flow while adding strategic depth to shield management decisions.
EVO Points accumulate through multiple combat activities: dealing damage to opponents, securing eliminations, assisting teammates, and completing match objectives. The most efficient method involves balanced aggression—dealing consistent damage while maintaining positioning awareness to avoid premature elimination.
Shield progression follows specific EVO Point thresholds: Level 1 to 2 requires 150 points, Level 2 to 3 needs 450 points, and Level 3 to 4 demands 900 points. These milestones coincide with Legend Upgrade availability, creating dual progression incentives.
Legend Upgrades function as tiered ability enhancements available at shield Levels 2 and 3. Players select from two options at each tier, allowing for strategic customization based on team composition, current match situation, and personal playstyle preferences.
Mastering the new meta requires understanding optimal EVO Point generation strategies. Focus on dealing consistent damage rather than elimination hunting—each 100 damage dealt provides substantial EVO Points while maintaining safer positioning. Early-game aggression against similarly-equipped opponents yields the fastest progression, but requires careful risk assessment.
Common mistakes include over-prioritizing shield progression at the expense of positioning, neglecting Legend Upgrade synergies, and misjudging shield-swapping opportunities. Avoid these pitfalls by maintaining situational awareness and coordinating upgrade selections with your team’s overall strategy.
Advanced players should experiment with ability combinations that complement their Shield Core progression. For example, Legends with defensive abilities might prioritize upgrades that enhance shield regeneration, while aggressive assault characters could select damage-boosting options. This class-specific approach maximizes your effectiveness throughout the match.
The removal of EVO Shields from the loot pool fundamentally shifts early-game dynamics. No longer can players find instant shield upgrades through lucky loot discoveries—progression now directly reflects combat performance and strategic decision-making.
Understanding progression systems in modern shooters helps contextualize these changes. Like other tactical shooters, Apex Legends now emphasizes skill-based advancement over random loot distribution, creating a more competitive environment.
For players transitioning from other tactical shooters, the new system shares similarities with progression-based enhancements found in contemporary military shooters, though implemented with Apex’s distinctive hero-shooter mechanics.
The Evolution Beyond EVO Shields
The traditional EVO Shield system has undergone a complete transformation in Apex Legends’ battle royale mode. While the core concept remains similar in Mixtape Mode, the main battle royale experience now features Shield Cores as permanent fixtures on each Legend. This fundamental change eliminates the ability to spot purple body shields through walls using Loba’s Black Market ability, level up shields for teammates, or quickly grab fresh shields during intense firefights.
Every player now begins matches with a Level 1 white/Common-tier Shield Core providing two pips of damage protection. As you accumulate EVO Points through various gameplay actions, your Shield Core automatically levels up, transforming from Level 1 to Level 2 blue/Rare-tier with three pips. The system automatically replenishes the new protection pip over several seconds, unlike the previous EVO Shield system that required manual Shield Cell usage after leveling.
When eliminated and subsequently respawned, players return with their previous Shield Core level intact. However, their deathbox now contains a crucial item: the Shield Core, representing their progression level at time of elimination.
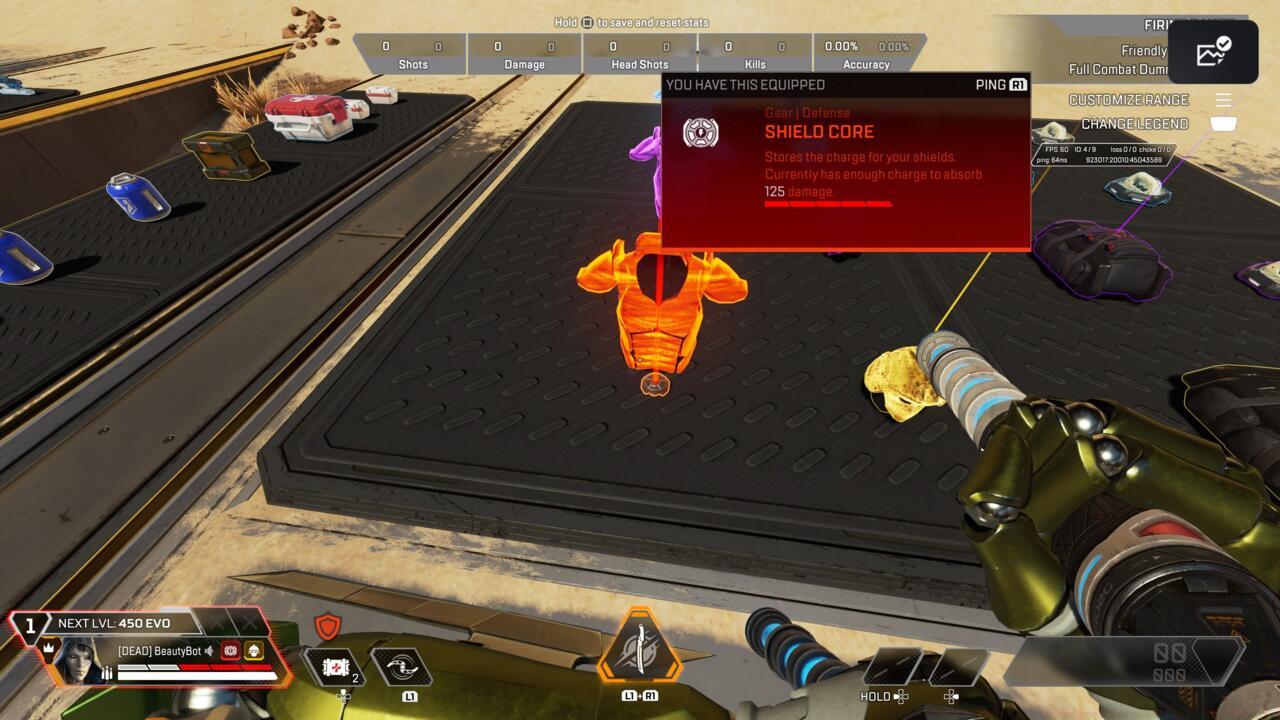
Shield Cores represent the new progression system, completely replacing traditional EVO Shields in the loot economy.
Shield Core Mechanics Deep Dive
Upon eliminating an opponent and accessing their deathbox, you’ll discover a Shield Core positioned where EVO Shields previously appeared. Defeating an enemy with red EVO Shield progression yields a red Level 4 Shield Core. However, if you’re currently equipped with a blue Level 2 Shield Core and acquire a higher-tier version, the extra protection pips gradually diminish over 30 seconds, operating similarly to Conduit’s temporary shield enhancement ability.
Modern Shield Swapping: Risk vs Reward
Shield swapping remains a viable tactical option, though it now carries significantly higher risks during combat engagements. The process requires stopping movement, opening a deathbox interface, locating the Shield Core, and equipping it—all while potentially under enemy fire. This calculated risk provides only temporary protection unless you’re looting an identical-level Shield Core to your damaged one, which permanently restores your shield to maximum capacity.
You can still manually remove your Shield Core and provide it to a teammate, though this offers limited utility. The transferred protection lasts merely 30 seconds before reverting to their Legend’s current Shield Core level. The era of upgrading body armor through Replicators or distributing enhanced shields to less experienced teammates has concluded.
Mastering EVO Point Acquisition
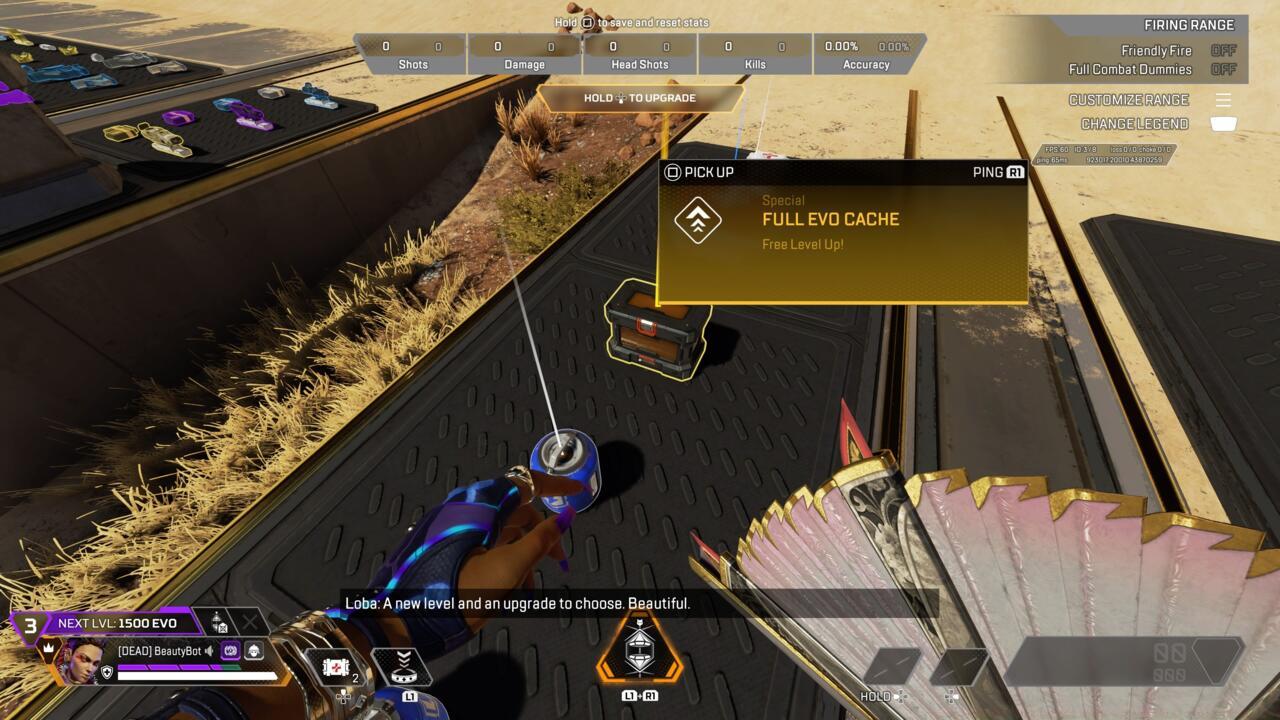
EVO Caches provide immediate Shield Core progression boosts.
While dealing damage to opponents represents the most straightforward method for earning EVO Points (EP), damaging PvE enemies like Prowlers also contributes toward your total. For Support-class specialists and players preferring strategic positioning over aggressive engagements, numerous alternative EP acquisition methods exist—several of which provide collective squad benefits similar to the previous Crafting Materials system.
Individual EVO Points accumulate through these primary methods:
- Inflicting damage on enemy combatants
- Securing knockdowns (Eliminating opponents with superior Shield Core levels grants “Underdog XP” bonuses)
- Assisting in teammate eliminations
- Executing finisher moves
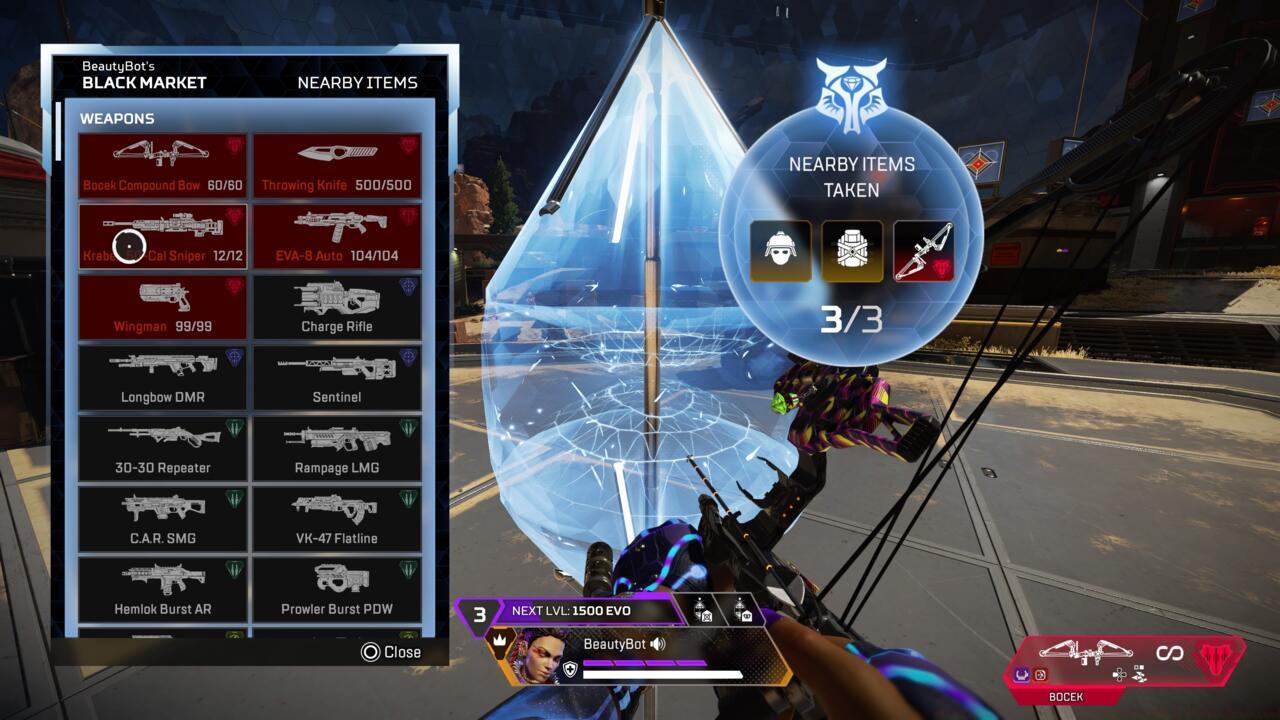
- Collecting EVO Caches (Located in Care Packages, Vaults, and other high-value loot zones)
EVO Caches present significant challenges to locate but offer substantial rewards by instantly advancing your Shield Core to the subsequent level.
Squad-shared EVO Points become available through:
- Damaging PvE creatures (Carthage Spiders, Prowlers, Bloodhound’s Trials locations, etc.)
- Completely eliminating enemy squads
- Reviving incapacitated squad members (+100 EP)
- Respawning eliminated teammates
- Utilizing Class-specific map interactions like Survey Beacons and Ring Consoles (+50 EP)
- Interacting with EVO Harvesters
EVO Harvesters materialize randomly across all maps shortly after match commencement, with activation alerts provided to players. They’ve effectively supplanted Crafting Material containers while functioning similarly. Each activated EVO Harvester provides every squad member with 350 EP.

Shared EVO Points reward team coordination and strategic gameplay.
Shield Core Progression Requirements
The specific EP thresholds necessary for achieving each Shield Core advancement level are detailed below:
- Level 1: 0 EP (All players commence matches at Level 1)
- Level 2: 450 EP
- Level 3: 1,350 EP
- Level 4: 2,000 EP
Legend Upgrades: Customizable Combat Enhancements
The innovative Legend Upgrades framework provides players selection between two options from four total Legend-specific enhancements that deliver combat advantages and enable personalized gameplay approaches. Each Legend Upgrade remains active exclusively for the current match duration, eliminating concerns about selecting suboptimal upgrades since different choices become available in subsequent matches.
When advancing your Shield Core from Level 1 (white/Common-tier) to Level 2 (blue/Rare-tier), you’ll encounter your first Legend Upgrade decision. For instance, at Level 2 progression, Loba selects between enhancing her tactical Burglar’s Best Friend bracelet’s throwing height and distance, or extending her Black Market Boutique ultimate ability’s operational range.
Lifeline’s advanced upgrades introduce game-changing tactical possibilities.
Upon accumulating sufficient EP to progress from Level 2 to Level 3 (purple/Epic-tier), another strategic choice emerges. Lifeline, for example, chooses between transforming her next Care Package into a Supply Drop, or obtaining a single-use self-revive capability—marking the first appearance of this mechanic since the Legendary Knockdown Shield’s self-revive enhancement was removed during Season 14.
No further Legend Upgrades become accessible when a Shield Core achieves Level 4 (red/Mythic) status. This design decision likely aims to prevent the Legend Upgrades system from becoming excessively dominant or easily exploited. The combined benefits from previous Shield Core enhancements alongside the red Shield Core’s five protection pips should sufficiently provide players substantial combat superiority.
Comprehensive Legend Upgrades Catalog
Every Legend now possesses four distinct Legend Upgrades for selection, meaning the updated system introduces precisely 100 new enhancements and improvements for player experimentation. Each character’s specific Legend Upgrades are detailed below:
Bangalore
Bangalore Level 2: Big Bang: See nearby ordnance through walls and on deathboxes OR Ultimate Cooldown+: Reduce ultimate cooldown by 60 seconds.
Bangalore Level 3: Cover Me: Auto-Ping enemies who trigger Double Time OR Refuge: Regenerate HP while inside Smoke.
Fuse Level 2: Big Bang: See nearby ordnance through walls and on deathboxes OR Scar Tissue: Take 50% less damage and no slow effects from The Motherlode.
Fuse Level 3: Knuckle Hustler: Short speed boost on successful Knuckle Cluster hit OR Wreckless: Take 25% less explosive damage.
Ash
Ash Level 2: Murder Machine: Call out the number of squads within 150 meters after a squad wipe OR One Minute to Live: Using Passive ability tracks enemy position on map for 60 seconds.
Ash Level 3: Greedy Snare: Arc Snare remains in play for 24 seconds and can catch multiple enemies OR Twin Snares: Gain an Arc Snare charge.
Mad Maggie
Mad Maggie Level 2: Fire Ball: Wrecking Ball catches fire and explodes in thermite OR Shots Shots Shots: Auto-Reload shotguns on knock.
Mad Maggie Level 3: Big Drill: Increase depth and width of tactical ability by 50% OR Drillslinger: Gain a Riot Drill charge; reduce active duration by 25%.
Ballistic
Ballistic Level 2: Ammuvision: See relevant ammo types in deathboxes OR Care Package Insight: Reveal the most valuable item in Care Packages.
Ballistic Level 3: Extra Bullet: Gain a Smart Bullet charge OR Lasting Bullet: Smart Bullet duration is tripled.
Pathfinder
Pathfinder Level 2: Field Research: Gain access to Survey Beacons OR Ringmaster: Gain access to Ring Consoles.
Pathfinder Level 3: Down and Away: Grapple cooldown reset on knock OR Zipline Zen: Take 25% less damage while riding energized Ziplines.
Wraith
Wraith Level 2: Sixth Sense: Passive warns when nearby squad count increases OR Tactical Cooldown: Reduce tactical ability cooldown by 5 seconds.
Wraith Level 3: Fast Phase: Reduce tactical wind-up by 20% OR Ultimate Cooldown+: Reduce ultimate ability cooldown by 60 seconds.
Octane
Octane Level 2: Thick Skin: Take 25% less Stim damage OR Wreckless: Take 25% less explosive damage.
Octane Level 3: Airborne Agility: Change directions with the Launch Pad double-jump OR Mad Hops: Gain an extra Launch Pad charge.
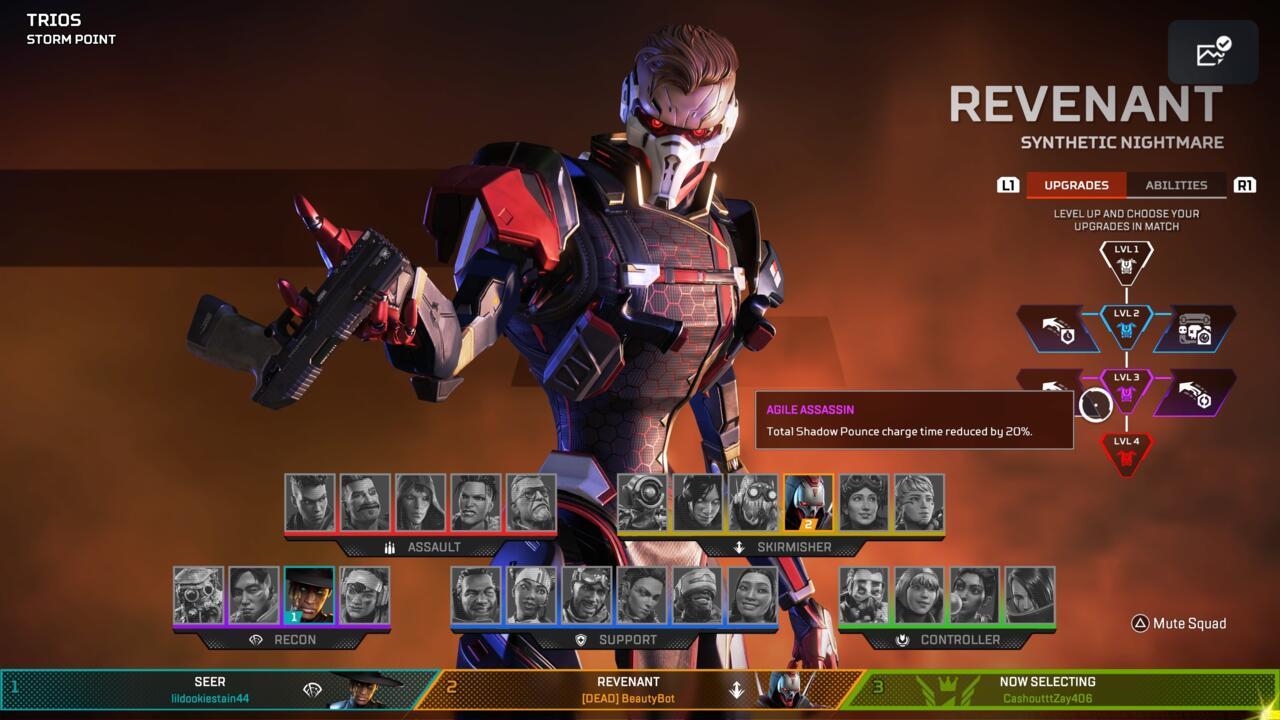
Revenant
Revenant Level 2: Murder Machine: Call out the number of squads within 150 meters after a squad wipe OR Tactical Cooldown: Reduce tactical cooldown by 5 seconds.
Revenant Level 3: Agile Assassin: Total Shadow Pounce charge time reduced by 20% OR Grim Leaper: Shadow Pounce cooldown reset on knock.
Horizon
Horizon Level 2: Battery Collection: Shield Battery count shown above deathboxes OR Big Bang: See nearby ordnance through walls and on deathboxes.
Horizon Level 3: Tactical Cooldown: Reduce tactical cooldown by 5 seconds OR ultimate Cooldown: Reduce ultimate cooldown by 30 seconds.
Valkyrie
Valkyrie Level 2: Aerial Expert: Increased horizontal Jetpack speed and acceleration OR Afterburners: Launch 15% higher with Skyward Dive.
Valkyrie Level 3: Full Coverage: Widen Missile Swarm pattern from 4×3 to 3×5 OR Full Tank: Increase Jetpack fuel by 25%.
Bloodhound
Bloodhound Level 2: Raven’s Blessing: White Ravens charge ultimate ability by 25% when activated OR Tactical Cooldown: Reduce tactical cooldown by 5 seconds.
Bloodhound Level 3: Odin’s Glare: Double the duration of tactical’s full-body highlight OR Taste of Blood: Gain 25 HP on knocks while ultimate is active.
Crypto
Crypto Level 2: Tactical Cooldown+: Reduce tactical cooldown by 10 seconds OR Ultimate Cooldown: Reduce Ultimate cooldown by 30 seconds.
Crypto Level 3: Network Expansion: Increase Neurolink and EMP range by 25% OR Network Traffic: Deploying Crypto’s drone calls out squads in the area.
Seer
Seer Level 2: Long View: Increase passive and tactical ability range to 75m OR Racing Hearts: Faster movement when using passive ability.
Seer Level 3: Artist’s Reach: Increase the throw range of ultimate ability by 20 meters OR Focus Scan: Increase tactical ability scan duration by 1.5 seconds.
Vantage
Vantage Level 2: Ringmaster: Gain access to Ring Consoles OR Ultimate Reload: Ultimate Accelerants grant +2 bullets.
Vantage Level 3: Bat Bounce: Improved tactical ability’s double-jump OR Sharpshooter: Refresh tactical on hits with ultimate ability.
Gibraltar
Gibraltar Level 2: Fresh Start: Allies are revived with 50 HP OR Shots Shots Shots: Auto-Reload shotguns on knocks.
Gibraltar Level 3: Baby Bubble: Reduce tactical size and cooldown by 25% OR Bubble Bunker: Increase tactical ability’s lifetime by 4 seconds.
Lifeline’s advanced tactical options significantly impact team survivability.
Lifeline
Lifeline Level 2: Rapid Response: Increase Revive speed by 20% OR Tactical Cooldown+: Reduce tactical ability’s cooldown by 10 seconds.
Lifeline Level 3: Gift Wrapped: Next Lifeline Care Package is a Supply Drop OR Last Stand: Gain a one-time use self-revive ability.
Mirage
Mirage Level 2: Miracle Worker: Allies are revived with health regen up to 75 HP OR More Me: Gain an additional ultimate ability decoy; reduce ultimate cooldown by 30 seconds.
Mirage Level 3: Bamboozle Bonus: Refresh tactical ability on successful Bamboozles OR Me Two: Gain a tactical decoy charge.
Newcastle
Newcastle Level 2: Swift Shield: Increase Mobile Shield speed to weapon sprint speed OR Thick Shield: Mobile Shield segments gain 250 HP.
Newcastle Level 3: Miracle Worker: Allies are revived with health regen up to 75 HP OR Stronghold: Gain +250 Castle Wall HP; extend energized barrier duration to 2 minutes.
Conduit
Conduit Level 2: Battery Collection: Shield Battery count shown above deathboxes OR Radiant Transfer: Increase tactical range by 10 meters.
Conduit Level 3: Bigger Jam: Each Jammer’s damage radius increased by 10% OR Split Charge: Gain a tactical charge but halve shield regen duration.
Loba
Loba Level 2: High Value: Increase tactical’s height and range OR Market Expansion: Increase Black Market Boutique’s range by 25%.
Loba Level 3: Shopping Spree: Loba can take an extra item from her Black Market OR Tactical Cooldown: Reduce tactical cooldown by 5 seconds.
Loba’s enhanced looting capabilities provide significant team advantages.
Caustic
Caustic Level 2: Parabolic Force: Increase Tactical throw range by 75% OR Particle Diffuser: Increase ultimate ability’s area of effect by 50%.
Caustic Level 3: Breathe It In: Regenerate HP while enveloped in Nox Gas OR Residual Toxins: Nox Vision persists for longer.
Wattson
Wattson Level 2: Falling Stars: Pylon interceptions spawn Arc Stars at its base OR Fresh Start: Allies are revived with 50 HP.
Wattson Level 3: Power Pylon: Double ultimate ability’s HP and shield regeneration capacity OR Split Circuit: Place up to 2 Pylons with half the shield regeneration capacity and use Ultimate Accelerants twice as fast.
Rampart
Rampart Level 2: Bandolier: Carry extra ammo per stack OR Ultimate Cooldown: Reduce ultimate ability cooldown by 30 seconds.
Rampart Level 3: Amped Reloads: Reload faster with Sheila or when behind Amped Cover OR Ramped Up: Improves mobile Sheila handling and spin-up time by 20%.
Catalyst
Catalyst Level 2: Long Cast: Increase Spike throw range by 40% OR Sister Spikes: Increase max number of active Spikes by one.
Catalyst Level 3: Long Veil: Increase ultimate ability length by 15 meters OR Resilient Veil: Increase ultimate ability lifetime by 5 seconds.
The essential components for mastering the updated Shield Core framework and comprehensive Legend Upgrades involve dedicated practice and systematic experimentation. We strongly advise conducting trial sessions within the recently updated Firing Range to develop understanding of which enhancements complement each other effectively, and which options align optimally with your individual gameplay approach.
For additional Season 20 insights, explore our exclusive interview with lead Apex Legends narrative designer Ashley Reed providing behind-the-scenes perspectives on Legend development, examine all complimentary rewards included in the new 5th Anniversary Collection Event and Breakout battle pass progression system, and remain informed about ongoing Apex Legends developments throughout the season.
The traditional EVO Shield system has undergone a complete overhaul in Apex Legends’ battle royale mode, though they maintain similar functionality in Mixtape Mode. This fundamental change eliminates previous tactics like spotting colored shields through walls using Loba’s Black Market ability, manually upgrading shields for teammates, or quickly grabbing fresh shields during intense firefights.
Players now begin each match with an integrated Level 1 white shield providing two damage protection pips. Your shield evolves as you accumulate EVO Points through various combat and support activities. Once you reach sufficient EVO Points, your shield automatically upgrades to a blue Level 2 shield with three protection pips. Unlike the old EVO Shield system that required manual recharging after leveling up, the new system automatically refills the additional pip over several seconds. While developers call this “Legend leveling” due to the permanent attachment, it’s actually the Shield Core that progresses.
When eliminated and subsequently respawned, players return with their previous shield level intact. However, they now leave behind a crucial item in their deathbox: a Shield Core.
Shield Cores have completely replaced EVO Shields in the core gameplay loop, though they don’t appear in standard loot pools except within the Firing Range training environment.
When you eliminate an opponent and access their deathbox, you’ll discover a Shield Core positioned where EVO Shields previously resided. Defeating an enemy with a maximum-level red EVO Shield yields a corresponding Level 4 red Shield Core. However, if you’re currently using a blue Level 2 shield and acquire a higher-tier core, the extra protection pips gradually diminish over 30 seconds, functioning similarly to Conduit’s temporary shield enhancement ability. Monitor your temporary overshield status by observing the shield indicator that appears above your selected healing item in the HUD after equipping the Shield Core.
Shield swapping remains a valid tactical approach, though it now carries significantly higher risks—particularly during active combat situations. You must pause movement, open the deathbox interface, locate the Shield Core, and equip it while ideally avoiding incoming fire. This presents substantial danger for what amounts to temporary defensive benefits. However, if you loot a Shield Core matching your current damaged shield level, your protection permanently restores to maximum capacity.
You can still detach your Shield Core and transfer it to teammates, though this offers limited utility since it only provides 30 seconds of enhanced protection before reverting to their Legend’s base shield level. The era of upgrading body shields through Replicators or distributing enhanced shields to less experienced teammates has concluded.
EVO Caches provide immediate Shield Core level advancement when discovered.
Dealing damage to opponents represents the most straightforward method for earning EVO Points (EP), and engaging PvE enemies like Prowlers also contributes to your progression. For players who typically select Support-class Legends or adopt less aggressive tactical approaches, numerous alternative EP acquisition methods exist—some of which can be collectively shared among squad members, reminiscent of the previous Crafting Materials distribution system.
Individual EVO Points accumulate through these primary channels:
Combat Performance: Every point of damage dealt to enemies (including PvE creatures) contributes to your EP total. Headshots and knockdowns provide bonus point multipliers.
Support Actions: Reviving teammates, respawning allies, and providing defensive cover all generate substantial EVO Points.
Objective Play: Capturing survey beacons, securing ring consoles, and completing team-based objectives reward consistent EP gains.
Survival Time: Remaining alive during later game phases automatically grants passive EP accumulation.
Mastering the new Shield Core system requires understanding several critical strategic nuances. The 30-second temporary shield duration creates narrow windows for aggressive pushes, requiring precise timing coordination with your squad. Many players mistakenly prioritize shield swapping over maintaining positional advantage, often resulting in preventable eliminations.
Optimal Shield Swap Timing: Only attempt shield swaps when you have clear cover or teammate protection. The animation time leaves you completely vulnerable.
Team Coordination: Designate one player as the primary shield swapper during engagements while others provide covering fire.
Progression Prioritization: Focus on dealing consistent damage early game rather than seeking eliminations, as damage alone sufficiently progresses your shield. For comprehensive team strategies, consult our Class Selection Guide to optimize your squad composition.
Advanced players should note that shield levels directly influence engagement decisions. A Level 3 shield against Level 2 opponents provides approximately 25% more effective health, fundamentally changing fight selection calculus.
Battlefield 6 introduces a revolutionary progression system where each Legend character gains access to four distinct enhancement tiers called Legend Upgrades. These specialized abilities unlock as your Shield Core accumulates EVO points through combat performance and objective completion.
At the maximum Level 4 progression (designated as red/Mythic tier), no further Legend Upgrades become available. This intentional design limitation prevents ability stacking from creating overpowered combinations that could disrupt game balance. The development team carefully calibrated this cap to maintain competitive integrity while still rewarding player progression.
The Mythic Shield Core itself delivers substantial combat advantages with five damage absorption pips, complementing previously acquired upgrades to create a formidable battlefield presence. This tier represents the culmination of your character’s evolution throughout the match.
Each Battlefield 6 character now possesses four Legend Upgrades, creating a total of 100 new tactical options across the roster. This expansion dramatically increases build diversity and allows for highly specialized combat roles within your squad composition.
Bangalore Level 2: Big Bang: Detect nearby explosive ordnance through solid surfaces and within deathboxes OR Ultimate Cooldown+: Decrease ultimate ability recharge timer by 60 seconds for more frequent tactical strikes.
Bangalore Level 3: Cover Me: Automatically mark enemies who activate your Double Time ability OR Refuge: Gradually restore health points while concealed within smoke screen coverage.
Fuse Level 2: Big Bang: Identify adjacent explosives through walls and loot containers OR Scar Tissue: Suffer 50% reduced damage and avoid movement impairment from The Motherlode ultimate.
Fuse Level 3: Knuckle Hustler: Receive temporary movement speed increase upon successful Knuckle Cluster impact OR Wreckless: Experience 25% decreased explosive damage from all sources.
Ash Level 2: Murder Machine: Automatically announce squad count within 150-meter radius after eliminating an enemy team OR One Minute to Live: Utilizing your passive capability marks adversary positions on the tactical map for one minute duration.
Ash Level 3: Greedy Snare: Arc Snare persists for 24 seconds with multi-target capture potential OR Twin Snares: Obtain an additional Arc Snare charge for increased crowd control.
Mad Maggie Level 2: Fire Ball: Wrecking Ball ignites and detonates in thermite upon impact OR Shots Shots Shots: Automatically reload all shotgun weapons after knocking down opponents.
Mastering Legend Upgrades requires understanding how each ability interacts with your preferred playstyle and team dynamics. For aggressive players, upgrades like Knuckle Hustler provide crucial mobility advantages during engagements, while defensive specialists benefit more from damage reduction perks such as Wreckless.
Avoid these common mistakes: Don’t prioritize ultimate cooldown reductions if you rarely use your character’s ultimate ability. Similarly, area denial upgrades like Greedy Snare lose value on highly mobile compositions that rarely hold positions.
Advanced players should coordinate upgrade selections with their squad’s overall class composition to create complementary ability combinations. A team with multiple area control Legends benefits significantly from coordinated upgrade paths that enhance their collective zone dominance.
Time investment for mastering upgrade combinations varies significantly. Basic competency with 2-3 preferred Legends requires approximately 15-20 hours, while comprehensive understanding of all 100 upgrades typically demands 40+ hours of gameplay experimentation.
For deeper strategic insights, consult our comprehensive Battlefield 6 guide covering advanced tactics and meta strategies.
The Battlefield 6 perk system introduces strategic depth through tiered upgrades that fundamentally alter how each class operates on the battlefield. Understanding these progression paths is crucial for maximizing your effectiveness in various Conquest scenarios and completing challenging Assignments efficiently.
Each character receives meaningful choices at Levels 2 and 3, forcing players to make strategic decisions based on team composition, map layout, and current match conditions. This system replaces traditional linear progression with meaningful build diversity.
Common mistake: Many players automatically choose the first option without considering team needs. Always assess your squad’s composition before selecting perks to ensure balanced capabilities across your NATO team.
Newcastle Level 3: Miracle Worker transforms you into a combat medic specialist, allowing revived teammates to regenerate health up to 75 HP – perfect for aggressive pushes where sustained firepower matters. Alternatively, Stronghold provides +250 Castle Wall HP and extends energized barrier duration to 2 minutes, creating nearly impenetrable defensive positions during Pax Armata events.
Strategic insight: Choose Miracle Worker when your team lacks medics, but opt for Stronghold when defending objectives in tight urban environments. The barrier extension proves invaluable for holding capture points against overwhelming enemy forces.
Advanced tip: Coordinate with support players who can replenish your defensive structures faster. The extended barrier duration allows for more aggressive positioning during final objective defenses in BF6 game modes.
Conduit Level 2: Battery Collection displays Shield Battery counts above deathboxes, providing crucial intelligence for resource management in prolonged engagements. The alternative Radiant Transfer increases tactical range by 10 meters, significantly improving your area denial capabilities.
Conduit Level 3: Bigger Jam expands each Jammer’s damage radius by 10%, creating larger area denial zones. Split Charge provides an additional tactical charge but halves shield regeneration duration – a high-risk, high-reward option for aggressive players.
Optimization advice: Battery Collection excels in squad play where resource sharing is coordinated, while Radiant Transfer benefits solo players focusing on area control. At Level 3, consider your playstyle: consistent area denial versus burst tactical capability.
Common pitfall: Players often underestimate the value of Battery Collection’s intelligence gathering. Knowing enemy shield resources can determine engagement outcomes in Battlefield 6 firefights.
Loba Level 2: High Value increases your tactical’s height and range, improving mobility and positioning options. Market Expansion boosts Black Market Boutique’s range by 25%, allowing safer looting from covered positions.
Loba Level 3: Shopping Spree enables taking an extra item from her Black Market (total of 3 items), while Tactical Cooldown reduces bracelet cooldown by 5 seconds for enhanced mobility.
Strategic decision: High Value synergizes with Tactical Cooldown for mobility-focused builds, while Market Expansion pairs perfectly with Shopping Spree for maximum team resource generation. The third item acquisition fundamentally changes how you approach loot distribution in squad play.
Advanced tactic: Use Shopping Spree to quickly equip your entire squad with optimal loadouts from a single Black Market deployment, dramatically reducing time spent on resource gathering during Assignments.
Time estimate: Proper perk selection can reduce loot gathering time by 30-45 seconds per engagement, providing significant tempo advantages in fast-paced Conquest matches.
Caustic Level 2: Parabolic Force increases Tactical throw range by 75%, enabling gas trap placement in previously inaccessible areas. Particle Diffuser expands ultimate ability’s area of effect by 50%, creating massive denial zones.
Caustic Level 3: Breathe It In provides HP regeneration while in Nox Gas, offering sustained combat capability. Residual Toxins extends Nox Vision duration for improved situational awareness.
Selection strategy: Parabolic Force excels on maps with verticality and hard-to-reach positions, while Particle Diffuser dominates in close-quarters indoor environments. The Level 3 choice depends on whether you prioritize survivability or intelligence gathering.
Common mistake: Players often choose Breathe It In but fail to utilize the regeneration effectively. Position yourself at gas trap edges to maintain line of sight while benefiting from healing effects.
Wattson Level 2: Falling Stars causes Pylon interceptions to spawn Arc Stars at its base, creating additional defensive measures. Fresh Start revives allies with 50 HP, providing immediate combat readiness after revival.
Wattson Level 3: Power Pylon doubles ultimate ability’s HP and shield regeneration capacity for fortified positions. Split Circuit allows placing up to 2 Pylons with half shield regeneration each while using Ultimate Accelerants twice as fast.
Strategic analysis: Falling Stars provides area denial synergy with your fences, while Fresh Start offers superior team sustainability. At Level 3, Power Pylon creates an nearly indestructible defensive point, while Split Circuit offers tactical flexibility across multiple areas.
Advanced optimization: With Split Circuit, position Pylons to cover different approach angles rather than clustering them. The accelerated Ultimate Accelerant usage enables more frequent Pylon deployment throughout BF6 matches.
Team composition tip: Fresh Start becomes exponentially more valuable when paired with multiple assault players who frequently push aggressively and take heavy damage.
Mastering Battlefield 6‘s perk system requires understanding how your choices impact not just your performance but your entire squad’s effectiveness in Conquest operations. Each decision should align with your team’s overall strategy and the specific demands of each match scenario within the Pax Armata conflict.
Pro recommendation: Create multiple loadouts for each character tailored to different map types and team roles. Urban environments often benefit from different perk combinations than open-field engagements.
For comprehensive strategies covering all aspects of BF6 gameplay, consult our Complete Guide which includes detailed weapon and class synergies.
Remember that perk effectiveness varies significantly based on your NATO team composition. Coordinate with squadmates to ensure balanced capabilities across your entire team.
Action Checklist
- Practice dealing consistent damage (75-150 per engagement) for optimal EVO Point generation
- Experiment with different Legend Upgrade combinations in Firing Range
- Coordinate upgrade selections with teammates to create synergistic ability combinations
- Master new shield-swapping mechanics at Shield Core stations
- Analyze your shield progression rate and adjust aggression levels accordingly
- Practice Shield Core mechanics in Firing Range for 15-20 minutes
- Focus on earning Shared EVO Points through team actions for faster squad progression
- Test Legend Upgrade combinations with 2-3 different Legends
- Master strategic shield swapping timing during combat scenarios
- Develop Legend-specific upgrade strategies based on your preferred playstyle
- Focus on dealing consistent damage early match to accelerate shield evolution
- Practice shield swapping in controlled environments before attempting in combat
- Coordinate with teammates for covering fire during shield swap attempts
- Monitor temporary shield duration via HUD indicator to time aggressive pushes
- Utilize EVO Caches whenever possible for instant shield level advancements
- Analyze your main Legend’s upgrade tree and identify synergies with your preferred weapons
- Experiment with both upgrade options at Levels 2 and 3 in training mode
- Coordinate upgrade selections with your squad to create complementary ability combinations
- Review our weapons unlock guide to pair optimal loadouts with your chosen upgrades
- Track your EVO point accumulation patterns to optimize upgrade progression timing
- Analyze team composition before selecting perks to fill capability gaps
- Create at least two loadout variations for each character for different scenarios
- Test perk combinations in training mode to understand their practical applications
- Coordinate with squadmates to ensure balanced perk distribution across team roles
- Review our Weapons Unlock Guide to understand how perks interact with specific weapon loadouts
No reproduction without permission:SeeYouSoon Game Club » Apex Legends – All Legend Upgrades And Shield Cores Explained