TL;DR
- Four altars require charging using Riju’s Lightning Strike ability
- Mirror reflection mechanics are essential for solving most puzzles
- Strategic beam alignment between multiple statues creates chain reactions
- Each room introduces progressively complex light manipulation challenges
- Proper enemy elimination and trap navigation are crucial for success
Conquer the intricate Lightning Temple puzzles in The Legend of Zelda: Tears of the Kingdom with this comprehensive strategy guide. This challenging dungeon represents a critical segment of the Gerudo regional questline where you’ll leverage Riju’s unique electrical abilities to overcome environmental obstacles.
The Lightning Temple Puzzle sequence unfolds within the temple’s interior after you’ve battled Queen Gibdo and her minions while navigating various traps through predominantly linear sections. The culmination occurs in the Room of Ascension, serving as the primary puzzle-solving arena where your spatial reasoning and combat skills will be thoroughly tested.
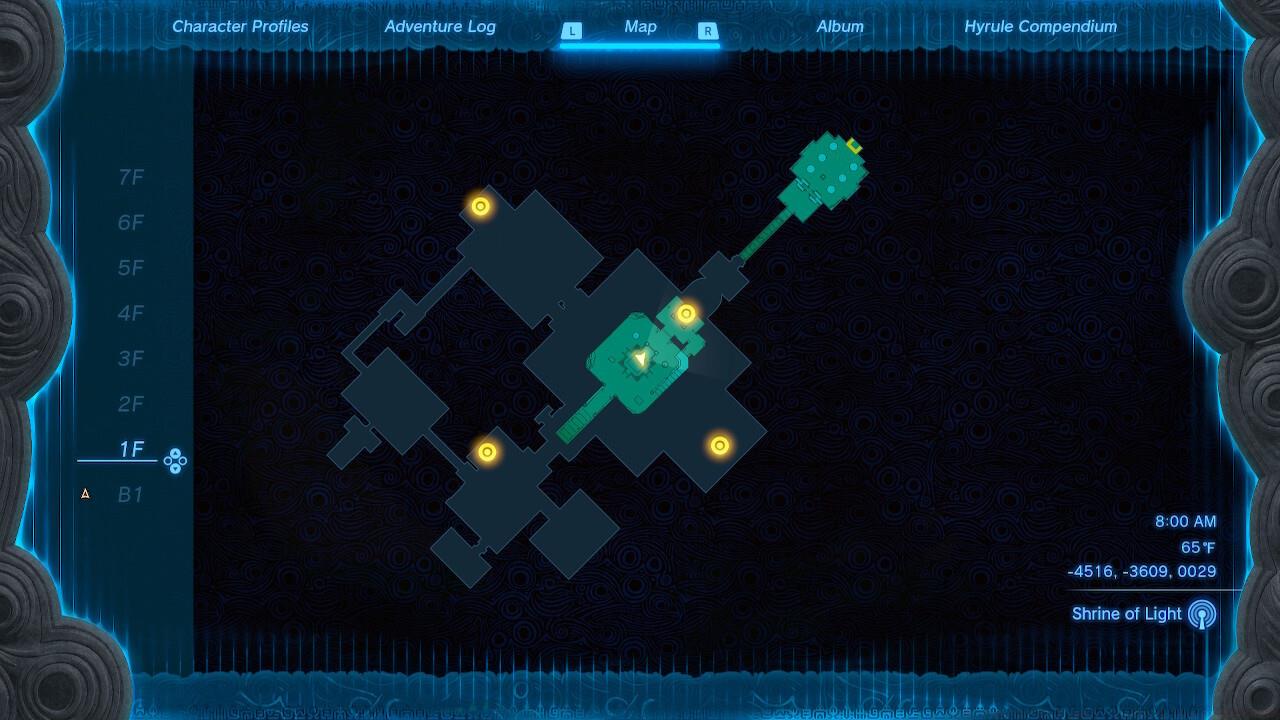
Lightning Temple map
Pro Tip: Before entering the temple proper, ensure you have ample arrows and healing items. The confined spaces and aggressive enemies make resource management crucial for success. Many players underestimate the combat intensity between puzzle segments.
As visible in the reference image, four distinct altars await activation through Riju’s Lightning Strike technique. The initial altar presents the most straightforward challenge, requiring strategic repositioning of stone blocks away from the central platform area.
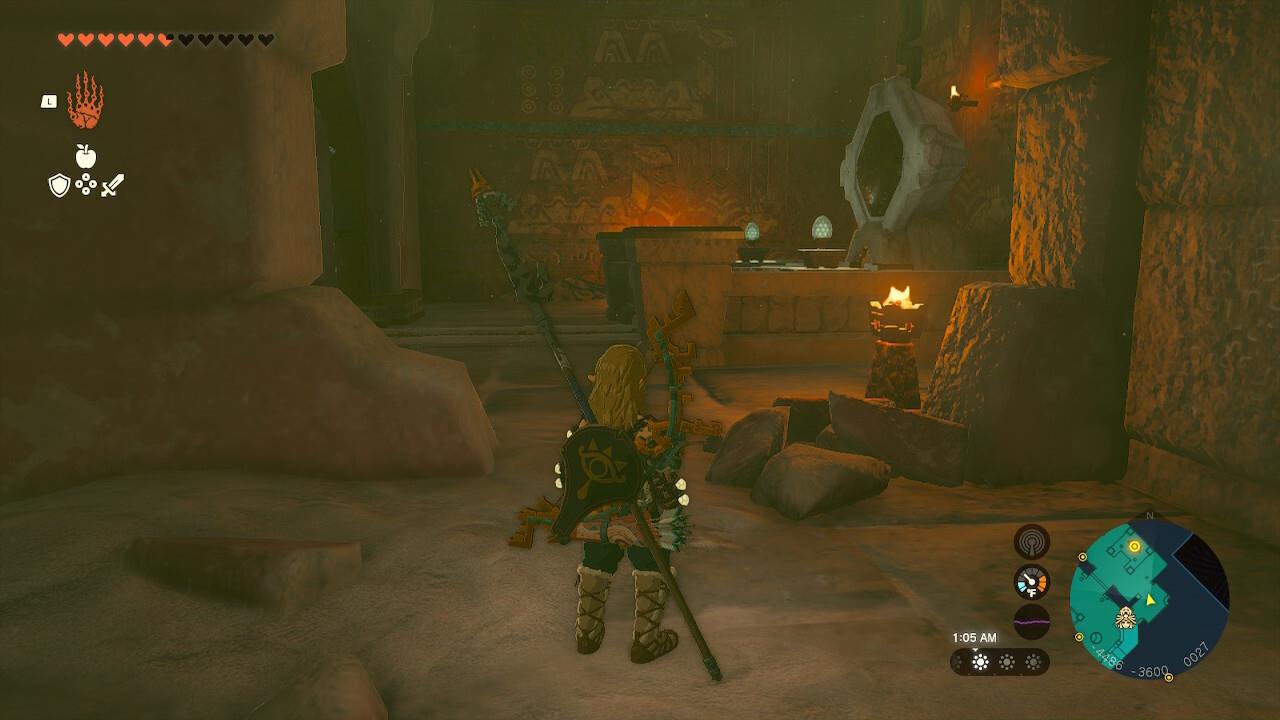
1F altar
Common Mistake: Players often attempt to move blocks using Ultrahand without first surveying the entire area. Take a moment to identify all movable objects and their potential positions before committing to any specific arrangement.
Advanced Technique: Position blocks to create makeshift platforms or barriers that can provide tactical advantages during subsequent enemy encounters.
The remaining three altars within the Zelda: Tears of the Kingdom Lightning Temple Puzzle emphasize sophisticated sunlight beam redirection and mirror reflection systems. Consequently, you must relocate the ground-level block to access thermal updrafts transporting you to the fifth floor, where a narrow wall aperture reveals the Room of Natural Light.
This compact chamber contains multiple Mirror apparatuses for sunlight redirection. Initially, ensure the primary beam exits the room and strikes the closest statue. Every statue on this level features its own integrated Mirror system.
Room of Natural Light
Time-Saving Strategy: Experienced players complete this section in approximately 8-12 minutes by pre-planning mirror placements before activating the central light source.
Mechanics Insight: The mirror reflection system operates with realistic physics – angles of incidence equal angles of reflection. Understanding this principle will help you predict beam trajectories more accurately.
While oriented toward the initial statue, glance toward your right side. Verify that the originating beam can impact a target zone adjacent to the right-side statue. You may adjust its positioning as needed. Once properly aligned, the beam should strike a receptor plate on the opposing wall.
Access the chamber and eliminate the Construct adversaries. Destroy the light-emitting bulb as well to eradicate the Gibdo hostiles. Upon completion, utilize fire sources to elevate the hot air balloon, ensuring you transport a Mirror device (several available behind supporting columns). Direct the beam onto the plate to dismantle the obstruction, enabling Lightning Strike activation on the altar.
Left: Light beam direction; Right: Room of Offered Light
Combat Optimization: Prioritize destroying the light bulb before engaging Constructs, as this prevents Gibdo reinforcements from spawning during the encounter.
Proceeding with the established light configuration, re-enter the Room of Natural Light and acquire another Mirror. Transport it to the right-side statue. Reorient it to target the opposing statue (specifically the left-side statue when approaching from the Room of Natural Light). The beam will impact an elevated plate accessible via thermal updraft, so activate Ascend on the ceiling segment proximate to the receptor.
Within this area, you’ll encounter a depression featuring flame-emitting hazards. Carefully navigate through this zone, then discharge the altar using Riju’s specialized ability.
Left: Light beam direction; Right: Room of Light and Flame
Trap Navigation: The flame traps operate in predictable patterns. Observe their activation cycles for 10-15 seconds before attempting passage to identify safe movement windows.
Ultimately, return to the Room of Natural Light and secure an additional Mirror. Considering the pre-established light network, execute these sequential steps:
- Remove the Mirror from the right-side statue. Subsequently, rotate and attach it facing the rear statue (when approaching from the Room of Natural Light).
- Transport your secondary Mirror to the back statue. While maintaining Ultrahand control, reposition and reorient it to intercept the beam originating from below.
- This action unlocks the ultimate chamber. Within, employ substantial rock formations to obstruct the advancing spiked wall mechanisms.
- At the corridor’s terminus, descend through a compact opening where the beam emanates. Utilize a Mirror to eliminate the walkway obstruction.
- Ascend once more and deploy another Mirror to project the beam completely to the plate at the spiked wall corridor’s end.
- Discharge the altar with Riju’s activated ability.
Left: Light beam direction; Right: Room of Light and Shade
Multi-Mirror Strategy: This represents the temple’s most complex light puzzle. Advanced players recommend setting up all mirrors before activating the final beam sequence to minimize backtracking.
Following successful activation of all altars, you’ll conclude the Zelda: Tears of the Kingdom Lightning Temple Puzzle. The remaining action involves interacting with the central mechanism, which will transport you to the summit. There, you’ll confront and defeat the Queen Gibdo boss in the culminating encounter.
The Legend of Zelda: Tears of the Kingdom incorporates numerous intricate systems and gameplay elements to master. For additional guidance, consult our comprehensive guides hub covering weapon systems, character progression, and advanced combat techniques.
Boss Preparation Tip: Before activating the final device, ensure you have at least 5-7 healing items and elemental arrows. Queen Gibdo employs devastating area-of-effect attacks that require quick recovery and strategic positioning.
Action Checklist
- Activate 1F altar by moving blocks using Ultrahand
- Access Room of Natural Light via updraft and align initial beam
- Complete Room of Offered Light by redirecting beam and using hot air balloon
- Solve Room of Light and Flame using ceiling Ascend and flame trap navigation
- Master Room of Light and Shade with multi-mirror setup and spiked wall defense
- Activate all altars and prepare for Queen Gibdo boss fight
No reproduction without permission:SeeYouSoon Game Club » Zelda: Tears Of The Kingdom – Lightning Temple Puzzle Guide Master the Lightning Temple puzzles with strategic mirror mechanics and Riju's lightning powers in Zelda: Tears of the Kingdom