A comprehensive guide to efficiently farm High-quality Pelt in Monster Hunter Rise by targeting specific small monsters.
Understanding High-quality Pelt: Usage & Acquisition
High-quality Pelt serves as a crucial crafting component in Monster Hunter Rise, essential for forging and upgrading specific weapons and armor pieces that offer distinct advantages in battle.
This premium material is indispensable for progressing your gear, but sourcing it differs from typical monster part farming.Unlike scales or fangs from large monsters, High-quality Pelt is harvested from smaller, non-hostile creatures, requiring a shift in hunting strategy. This unique sourcing method often catches players off guard, leading to unnecessary time spent searching in the wrong places.Mastering the acquisition of such materials is key to efficiently gearing up, much like understanding the spawn mechanics for other rare resources in the game.This guide will provide a complete roadmap for locating your targets and maximizing your collection rate.
- How to get High-quality Pelt in Monster Hunter Rise
- Kelbi location in Monster Hunter Rise
- Anteka location in Monster Hunter Rise
 Capcom
High-quality Pelt can be harvested from Kelbi and Anteka. High-quality Pelt is harvested exclusively from High Rank Kelbi and Anteka. The drop rates are significantly different: Kelbi present a 45% chance per carve, while Anteka offer an 18% chance. This variance is critical for planning efficient farming sessions.
Pro Tip: Always check your Hunter’s Notes after encountering a monster to confirm material drop rates. For small monsters like Kelbi, you must carve them after a capture or kill to receive materials.
Consequently, focusing your efforts on Kelbi is the most statistically sound approach to stockpiling High-quality Pelt quickly.
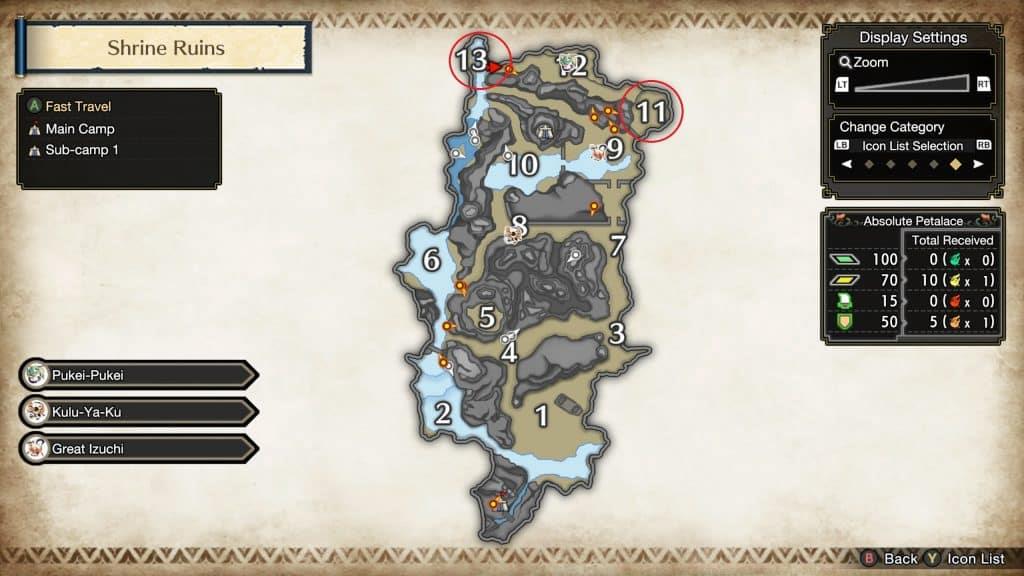
Optimal Kelbi Farming Strategy in Shrine Ruins
 Capcom
Kelbi have the highest chance of dropping High-quality Pelt. The primary Kelbi habitats are zones 11 (the central forest plateau) and 13 (the ancient shrine area) within the Shrine Ruins map. A crucial prerequisite is that these docile creatures are only present during High Rank Quests and Expeditions. You must complete the main story’s Low Rank content and reach Hunter Rank 4 or above to unlock this tier and access these spawns.
Common Mistake: Many players waste time searching for Kelbi in Low Rank expeditions. Confirm you’ve selected a High Rank quest from the hub before departing.
Farming Optimization: Use a weapon with wide, sweeping attacks like a Long Sword or Switch Axe to dispatch groups of Kelbi quickly. The Skill “Carving Pro” (from the Tigrex armor set) prevents knockbacks while carving, saving valuable seconds per run. Launch an Expedition rather than a timed quest for unlimited farming time. Fast-travel between the two zones via the map to check respawns efficiently.
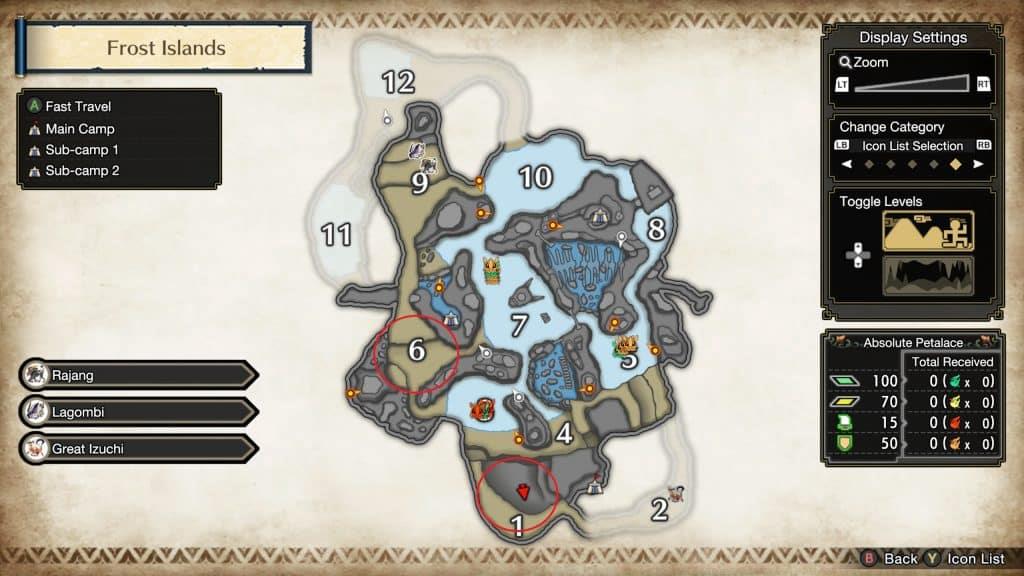
Anteka Farming Guide for Frost Islands
 Capcom
Anteka have a lower chance of dropping High-quality Pelt. Anteka herds roam areas 1 (the icy shores) and 6 (the frozen caverns) of the Frost Islands. Due to their substantially lower 18% drop chance, farming Anteka is less time-efficient than targeting Kelbi. This method is best used if you are simultaneously hunting for other Frost Islands-exclusive materials, like certain ores or endemic life.
Strategic Consideration: If you need both High-quality Pelt and, for example, Freezer Sacs from a Goss Harag also in the Frost Islands, a multi-target farming route becomes viable. Otherwise, the Shrine Ruins Kelbi route is superior for Pelt-only farming.
Behavior Note: Anteka are more skittish than Kelbi and may flee if attacked unsuccessfully. Using a ranged weapon or a fast, precise melee weapon like Dual Blades can ensure clean kills before they scatter.
Advanced Farming Techniques & Pro Tips
Beyond knowing where to look, mastering the farming process involves preparation and avoiding common errors.
Loadout Optimization: Equip armor skills that enhance your farming speed. Carving Pro (Tigrex) is top-tier. Speed Sharpening or protective skills like Divine Blessing can reduce downtime. Bring Psychoserums or have your Palico/Palamute set to Gathering type to help locate creatures on the map.
Route Planning: In Shrine Ruins, start in Base Camp, fast-travel to Sub-camp 1 (near zone 11), clear the Kelbi, then run or wirebug to zone 13. After clearing zone 13, open your map and fast-travel back to Base Camp or Sub-camp 1—this often triggers a partial respawn. Repeat this loop.
Common Pitfalls to Avoid:
1. Farming in Low Rank: Double-check your quest rank.
2. Inefficient Weapon Choice: Slow weapons like Great Sword are poor for dispatching multiple small targets.
3. Ignoring Multi-quest Rewards: Complete Optional Subquests during your expedition for bonus rewards.
4. Not Using Buddies: Your Palico and Palamute can attack and distract Kelbi/Anteka, grouping them for easier AOE attacks.
With this strategic approach, you can systematically gather all the High-quality Pelt needed for your crafting projects. For more in-depth strategies on mastering Monster Hunter Rise’s economy and material systems, explore our other comprehensive guides.
No reproduction without permission:SeeYouSoon Game Club » Where to find High-quality Pelt in Monster Hunter Rise – all locations A comprehensive guide to efficiently farm High-quality Pelt in Monster Hunter Rise by targeting specific small monsters.