TL;DR
- Complete quest with just 3 Mossberries but collect all 7 for maximum rewards
- Five berries in Mosshome region, one in Weavenest Atla, one in late-game Memorium
- Druid’s Eyes amulet generates silk when hit – crucial resource management tool
- Advanced movement techniques required for several hidden Mossberry locations
- Bonus Rosaries awarded for each extra Mossberry, with final upgrade at 7 berries
Mastering the Berry Picking Wish represents one of the earliest and most rewarding side quests available in Hollow Knight: Silksong. This comprehensive guide provides detailed navigation strategies and advanced collection techniques to maximize your rewards from this engaging NPC interaction.
Throughout your journey across Pharloom, you’ll encounter numerous characters offering unique challenges. The Druid of Mosshome presents what many consider the most accessible wish – gathering Mossberries from various regions. These glowing green fruits serve multiple purposes beyond the initial quest completion, making thorough collection highly beneficial for progression.
The quest mechanics operate on a tiered reward system: only three Mossberries are required for basic completion, but substantial additional benefits await those who locate all seven specimens. Understanding this system early helps prioritize exploration efforts effectively.
To activate the Berry Picking Wish, navigate to the elevated sections of Mosshome where the Druid resides. His sanctuary occupies a compact cavern positioned immediately right of the Silkspear ability shrine. A conveniently placed bench adjacent to his location allows for health restoration and ability management between exploration sessions.
Engaging in dialogue with the Druid unlocks the quest in your journal. Pharloom contains exactly seven Mossberries scattered across its diverse regions, though the quest officially concludes upon delivering any three specimens. Each additional berry beyond the minimum requirement provides incremental bonuses, creating compelling reasons for thorough exploration.
Many players naturally discover their initial Mossberries while traversing Moss Grotto during early game progression. However, several require advanced movement capabilities or occur in late-game zones, demanding strategic planning for efficient collection.
The Mosshome territory – encompassing both Bone Bottom and Moss Grotto sub-zones – hosts the majority of available Mossberries. Strategic navigation through these interconnected areas proves essential for efficient collection. We’ve documented each location with precision on the accompanying map visualization.
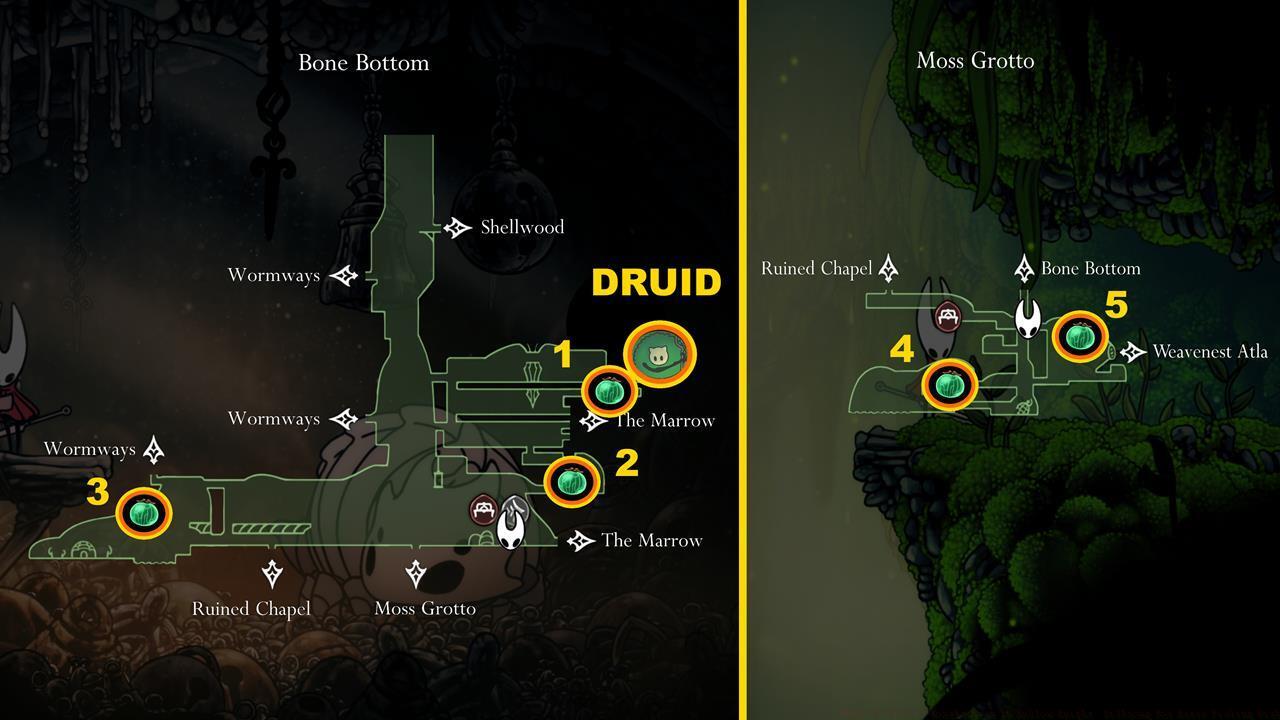
Strategic mapping reveals optimal Mossberry collection routes throughout Mosshome.
- Mossberry #1: Positioned directly below the Druid’s cavern, this specimen requires careful environmental observation. Descend from his location and identify the partially obscured passage along the right wall. Within the subsequent chamber, eliminate the aerial enemy circling the platform to secure the berry.
- Mossberry #2: Located within the connective tunnel system linking the Druid’s domain with Bone Bottom settlement. Another flying creature carries this fruit – dispatch it promptly to claim your reward.
- Mossberry #3: Venture leftward through Bone Bottom’s expansive chambers. This Mossberry demands precise platforming across elevated ledges to reach the airborne host.
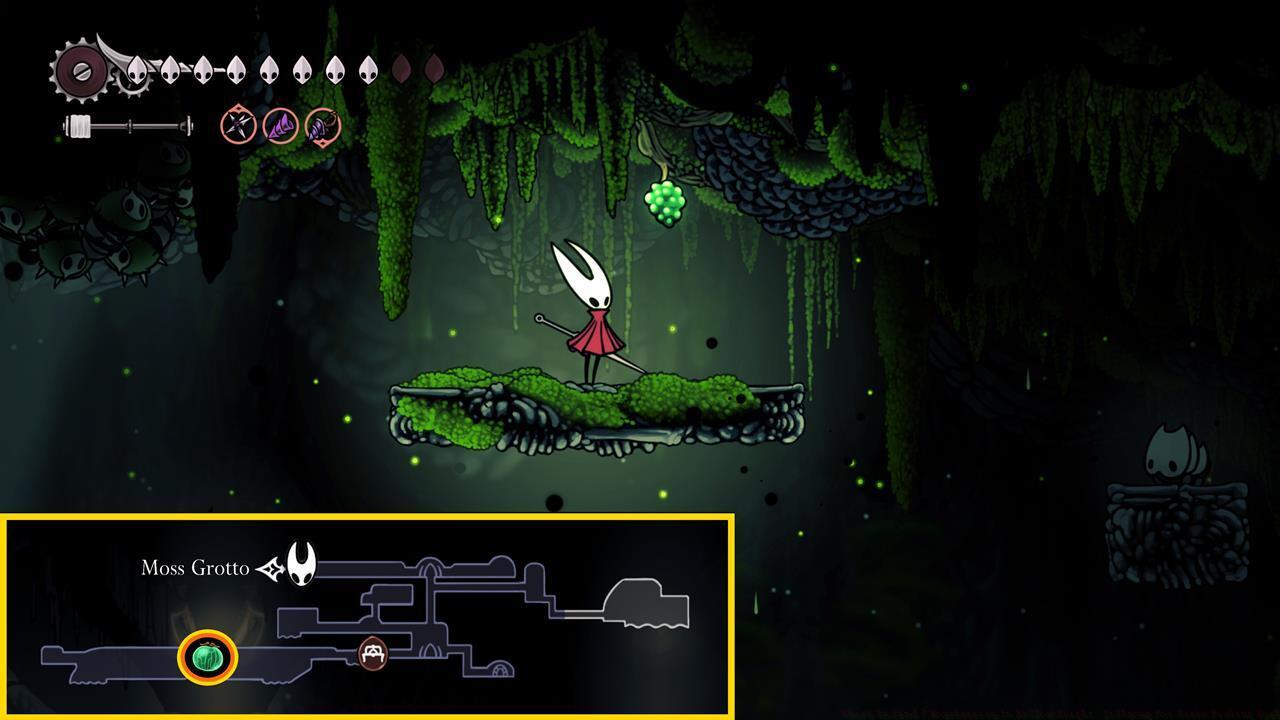
- Mossberry #4: Accessible during initial Moss Grotto exploration, this specimen sits visibly atop a central platform in one of the earliest rooms. No special abilities required for acquisition.
- Mossberry #5: Situated in Moss Grotto’s later sections during ascent along the right map segment. Positioned at the summit of the largest chamber adjacent to the cocoon-style gateway. Execute downward aerial strikes on nearby flying enemies to generate upward momentum, then perform upward attacks to dislodge the berry.
Pro Tip: Mastering the pogo technique proves essential for several Mossberry acquisitions. Practice downward attacks on enemies and environmental hazards to develop consistent momentum control.
Weavenest Atla access requires specific ability acquisition and boss confrontation.
The cocoon-style barrier referenced earlier functions as the entry point to Weavenest Atla. Gaining passage demands victory over a formidable opponent in Bellhart, rewarding you with the Needolin capability. This newfound power enables Needle weapon deployment before the sealed gateway.
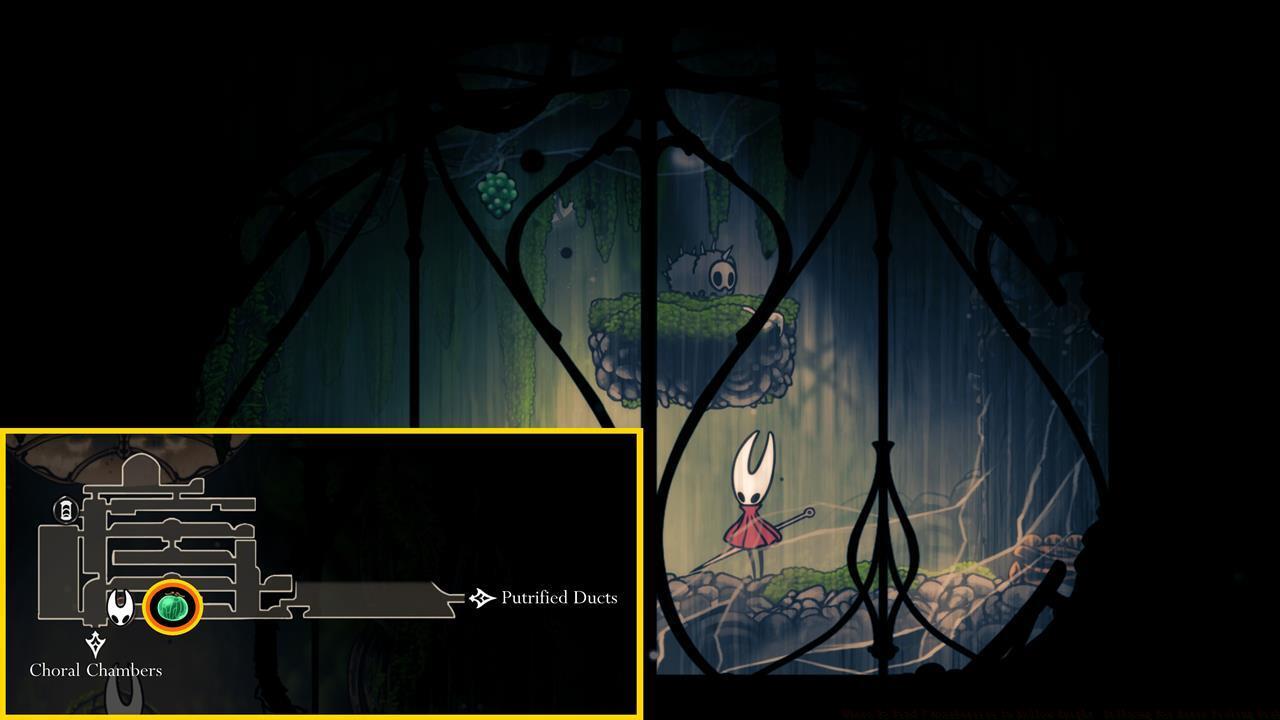
Upon entering Weavenest Atla, immediately utilize the descending teleporter. Proceed leftward to activate the bench for respawn point establishment. Navigate the aquatic section, identifying the concealed left passage. Either engage or evade hostile creatures within the corridor until you spot the luminous fruit suspended from the ceiling.
Navigation Insight: The submerged tunnel contains multiple aggressive enemies. Consider utilizing hit-and-run tactics or ability combinations to clear the path efficiently while conserving health resources.
Memorium access represents late-game content requiring specific mobility enhancement.
The ultimate Mossberry resides within Citadel’s Memorium sub-zone. Entry becomes possible only after securing the Faydown Cloak double jump functionality. This advanced movement capability unlocks previously inaccessible regions.
From the Memorium entrance, trace the circular route back toward the initial level corridor. Enemy types here mirror those encountered in Mosshome, suggesting evolutionary connections between regions. Either combat or bypass these adversaries while progressing leftward until encountering the ceiling-suspended fruit adjacent to a grub creature.
Advanced Strategy: Memorium’s layout encourages methodical exploration. The looping pathway design contains multiple hidden chambers worth investigating beyond the primary Mossberry objective.
Upon delivering your third Mossberry to the Druid of Mosshome, you receive the Druid’s Eyes accessory. This remarkably valuable item automatically generates silk – your most critical resource – whenever enemy attacks connect. Equip this amulet at any bench location, though early game accessory slot limitations necessitate strategic equipment decisions.
The incremental reward structure provides bonus Rosaries for every Mossberry beyond the initial three. Presenting the seventh and final berry triggers amulet enhancement, significantly boosting its functional capabilities.
Resource Management Tip: The Druid’s Eyes amulet fundamentally alters combat resource economics. Weaving this into your loadout strategy early enables more aggressive ability usage throughout challenging encounters.
For players seeking comprehensive completion, our Class Guide offers additional strategic frameworks for optimizing your character build around acquired accessories.
Action Checklist
- Locate Druid in upper Mosshome near Silkspear shrine
- Collect 3 Mossberries from Mosshome for basic quest completion
- Defeat Bellhart boss to unlock Needolin and access Weavenest Atla
- Acquire Faydown Cloak for Memorium access
- Return all 7 Mossberries for maximum amulet enhancement
No reproduction without permission:SeeYouSoon Game Club » Where To Find 7 Mossberries In Hollow Knight: Silksong For Berry Picking Wish Complete guide to finding all 7 Mossberries and maximizing rewards from the Druid of Mosshome quest