TL;DR
- Iron requires defeating The Elder boss and exploring Sunken Crypts in Swamp biomes
- Essential preparation includes Bronze armor, poison resistance, and proper weapon selection
- Sunken Crypts contain Scrap Iron deposits that must be mined with antler pickaxe
- Processing requires Smelter, Kiln, and Level 2 Forge upgrades
- Iron unlocks superior weapons, armor, and progression to the next biome boss
Securing Iron in Valheim represents a significant progression milestone that demands thorough preparation and strategic planning. Unlike earlier resources, Iron acquisition is gated behind specific biome progression and boss encounters, making it one of the game’s first major resource barriers.
Before venturing into Iron-rich territories, you must establish solid gear foundations through Meadows and Black Forest biome progression. The Swamp biome, where Iron resides, introduces substantial difficulty spikes with dangerous environmental hazards and formidable enemies. Expect to encounter poison-wielding Blobs that can rapidly deplete your health, along with Draugr archers capable of delivering devastating ranged attacks if you’re caught unprepared.
Optimal preparation involves crafting full Bronze armor sets, which provide essential protection against Swamp threats. After defeating Eikthyr, the Meadows boss, you’ll obtain Hard Antlers essential for creating your first pickaxe. This tool enables Tin mining near water sources and Copper extraction within Black Forest deposits. Combining these metals at your Forge creates Bronze, which when paired with leather components, yields armor significantly superior to basic Leather or Troll hide alternatives.
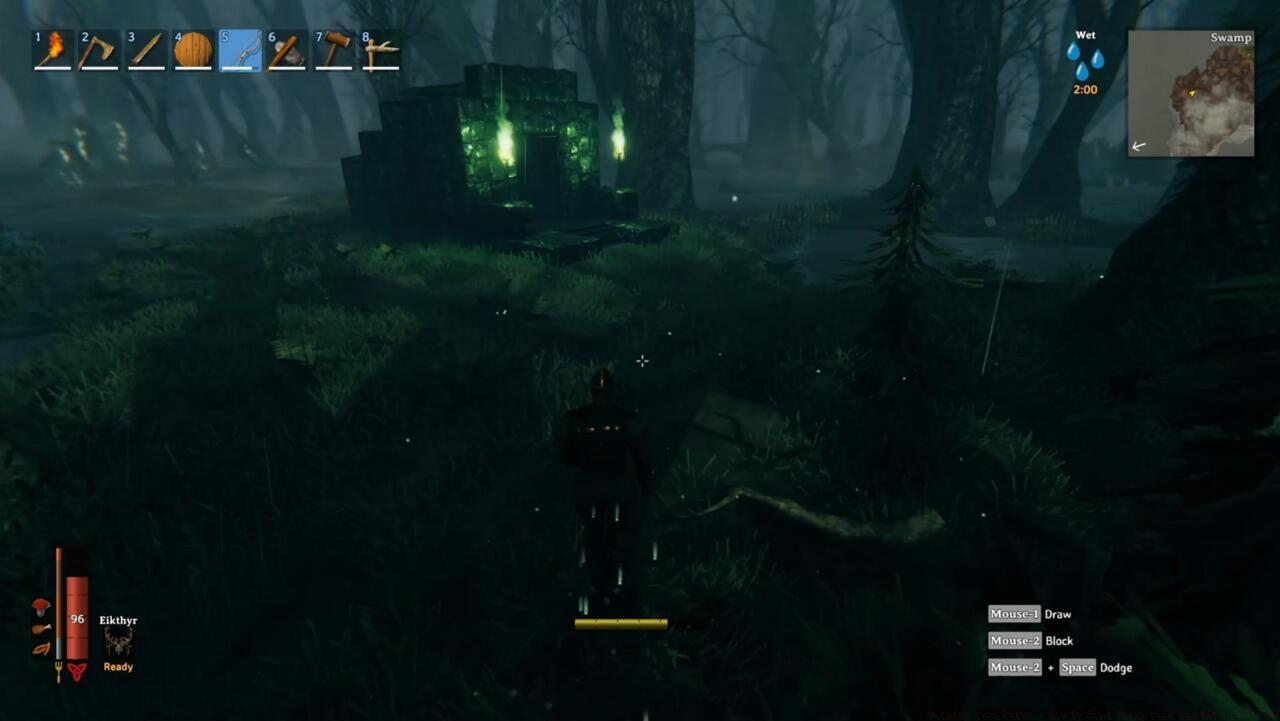
Beyond defensive gear, prioritize acquiring Bronze weaponry and a Finewood bow for effective combat. Once properly equipped, begin scouting for Swamp biomes along coastal regions, identifiable by their distinctive dark, murky terrain with sparse vegetation and challenging navigation conditions. Your primary targets within these areas are Sunken Crypt dungeon structures, though initial access remains blocked until you secure specific key items.
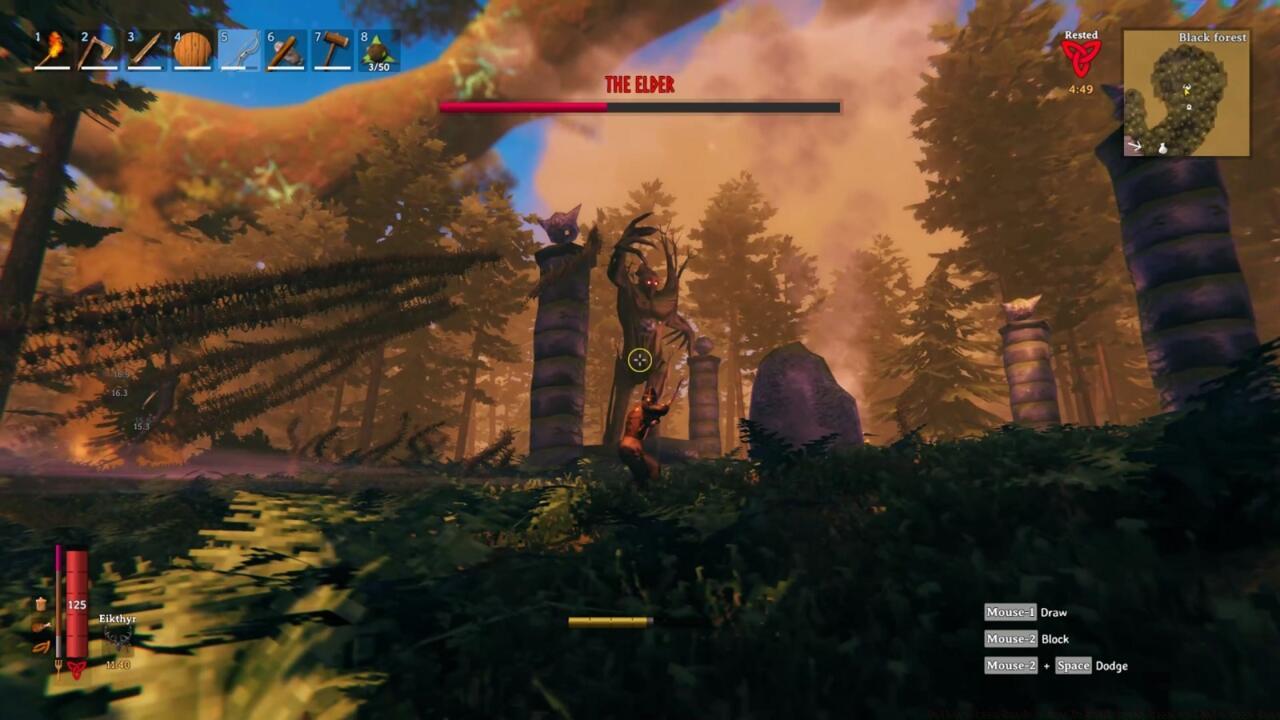
The Elder guards the essential Swamp Key required for accessing Iron-rich dungeon locations.
With Bronze armor and enhanced weaponry secured, your next critical objective involves confronting The Elder, the formidable Black Forest boss. This encounter serves as the gateway to Iron acquisition and represents one of Valheim’s first major combat challenges. Locating The Elder’s summoning altar requires investigating rune tablets typically discovered within underground Burial Chambers or near collapsed stone tower ruins scattered throughout the Black Forest.
Strategic preparation for this battle should include fire arrows, health potions, and clearing the surrounding area of additional enemies that could complicate the fight. The Elder employs devastating area-of-effect root attacks and long-range vine strikes, making mobility and environmental awareness crucial for survival. Consider constructing a small fortified platform nearby for safe retreat and arrow resupply during the encounter.
Successfully defeating The Elder rewards you with the crucial Swamp Key, an item absolutely necessary for accessing Sunken Crypts where Scrap Iron deposits await. This key not only unlocks your path to Iron but also provides access to Bonemass, the Swamp biome boss and your subsequent progression target. Many players underestimate the preparation needed for this encounter, so allocate at least 30-45 minutes for proper setup and execution.
Sunken Crypts remain the exclusive source for Iron acquisition during mid-game progression.
Armed with your newly acquired Swamp Key, return to previously marked Sunken Crypt locations within Swamp biomes. These dungeon entrances are readily identifiable by their distinctive green-burning torches flanking iron gate barriers. Before entering, ensure you have adequate inventory space, your antler pickaxe, and sufficient healing items for the challenges within.
Sunken Crypts present maze-like layouts filled with muddy scrap piles that conceal valuable Iron deposits. These dungeons host Draugr enemies in greater numbers and varieties than surface Swamps, including elite variants capable of overwhelming unprepared adventurers. The confined spaces limit mobility, making shield usage and careful positioning essential for survival.
Mining Scrap Iron requires your antler pickaxe and yields approximately 2-5 Iron scraps per muddy pile, though deposit sizes vary significantly. A typical Sunken Crypt contains 20-40 scrap piles, potentially yielding 60-120 Iron scraps per full clearance. Common mistakes include entering without poison resistance mead, neglecting to repair tools beforehand, and underestimating the dungeon’s sprawling nature—always carry a hammer for emergency workbench placement.
Advanced players should prioritize crypts located near Swamp edges for easier resource transportation. Consider establishing a small forward base with storage chests and portals near productive crypt clusters to optimize farming efficiency.
Processing Iron requires multiple production structures including Smelter, Kiln, and upgraded Forge facilities.
Transforming raw Scrap Iron into usable metal requires establishing comprehensive processing infrastructure at your base. Essential components include a Smelter for converting scraps into Iron bars, a Kiln for charcoal production to fuel the smelting process, and a Forge upgraded to at least Level 2 for crafting advanced equipment.
Iron unlocks substantial gear upgrades including the Iron Sword, Iron Mace, and Iron Armor set, all providing significant stat improvements over Bronze alternatives. The Iron Atgeir offers exceptional crowd control capabilities, while the Huntsman Bow provides superior ranged performance. For defensive options, the Iron Tower Shield delivers outstanding blocking potential against Swamp enemies.
Strategic crafting prioritization should focus on weapons first, followed by armor pieces, and finally utility items. The Iron Pickaxe represents a crucial upgrade that dramatically improves mining efficiency for all subsequent resource gathering activities. Many players benefit from consulting comprehensive weapon guides like our BF6 Weapons Unlock Guide for similar progression planning approaches.
Beyond immediate combat applications, Iron enables construction of superior tools and base defense mechanisms. The metal’s versatility extends to crafting Longships for enhanced ocean travel and wind manipulation tools that significantly improve sailing efficiency between biomes.
Action Checklist
- Craft Bronze armor and weapons from Black Forest resources
- Locate and defeat The Elder boss to obtain Swamp Key
- Explore Swamp biomes and mark Sunken Crypt locations
- Clear Sunken Crypts and mine Scrap Iron deposits
- Establish Smelter, Kiln, and Level 2 Forge at your base
- Craft Iron weapons, armor, and tools for biome progression
No reproduction without permission:SeeYouSoon Game Club » Valheim Iron Guide – How To Find Scrap Iron And Make Iron Gear Complete guide to finding and using Iron in Valheim with essential preparation strategies and crafting tips