TL;DR
- Hidden treasures appear as invisible containers requiring specific detection techniques
- Systematic grid-based exploration prevents missing valuable hidden items
- Different game zones contain unique treasure types based on progression level
- Audio and visual cues significantly improve treasure discovery efficiency
- Advanced players can optimize routes to collect all treasures in minimal time
Mastering the art of discovering concealed rewards in Super Mario RPG requires understanding the game’s unique hidden container system. These special items don’t appear as standard visible objects but exist as transparent interactive points scattered throughout various game environments.
As you advance through the main storyline, you’ll gain access to increasingly complex locations, each potentially housing multiple hidden caches. The game deliberately places these invisible containers in areas that reward thorough exploration rather than straightforward progression.
The treasures themselves range from consumable recovery items to rare equipment and special collectibles that enhance your party’s capabilities. Learning to identify the subtle environmental clues that indicate hidden treasure locations will dramatically improve your collection rate.
Implementing methodical search patterns proves crucial for comprehensive treasure discovery. Divide each area into imaginary grid sections and thoroughly investigate every potential hiding spot, paying particular attention to unusual wall textures, floor patterns, or isolated spaces that might conceal containers.
Many players make the critical error of rushing through areas without proper scanning techniques. The most common oversight involves failing to check corners, behind obstacles, and elevated platforms where treasures frequently reside. Developing a consistent search rhythm prevents these costly misses.
Seasoned adventurers recommend utilizing audio cues—subtle sound differences when moving near hidden items—to pinpoint exact locations. Combine this with visual environmental anomalies for maximum detection efficiency. Planning your exploration route to minimize backtracking can save substantial time while ensuring no location goes unchecked.
Early game zones typically feature simpler hidden treasure placements, often near storyline progression points or just off the main path. These initial discoveries help players learn detection mechanics while providing valuable early-game resources.
Mid-campaign locations introduce more sophisticated hiding techniques, with treasures concealed in multi-level areas, behind moving obstacles, or requiring specific character abilities to access. Understanding each zone’s unique design philosophy helps predict likely treasure positions.
Endgame and optional areas contain the most valuable hidden items but employ advanced concealment methods. These often require combining multiple detection techniques and may involve puzzle-solving elements beyond simple exploration. For comprehensive character development, consult our Class Guide to understand how discovered treasures complement different playstyles.
How to Get the Signal Ring
The Signal Ring is your most valuable treasure hunting tool, available for purchase in Moleville’s item shop once you’ve progressed sufficiently in the main storyline. This essential equipment emits audible signals when hidden treasures are nearby, dramatically reducing the time spent searching random locations. Many players miss this item early game, forcing them to backtrack extensively later. The ring costs 500 coins, making it an affordable investment that pays dividends throughout your adventure. Pro tip: Purchase multiple rings for your entire party to maximize detection range and efficiency during exploration phases.
How to Keep Track of All Hidden Treasures You’ve Found
Maintaining a comprehensive treasure log is crucial for completionists. Create a manual checklist divided by regions, or use the in-game map markers if available in your version. Many hidden treasures contain rare accessories, powerful weapons, or unique items that can’t be obtained elsewhere. Common tracking mistakes include forgetting to document treasures found during story progression or overlooking re-visitable areas. Advanced players recommend taking screenshots of each treasure location and organizing them in a dedicated folder for reference. This systematic approach ensures you won’t waste hours re-checking previously cleared areas.
Mushroom Kingdom Hidden Treasures
The starting area contains several easily missed treasures that provide valuable early-game advantages. Search behind buildings, inside seemingly decorative pots, and beneath suspicious floor patterns. One particularly clever placement involves a treasure hidden in plain sight near the castle gates that requires specific timing to access. These treasures often contain coins, healing items, and occasionally rare badges that enhance character abilities. Time estimate: 15-20 minutes for thorough exploration. Optimization tip: Complete this region’s treasures before advancing too far in the story to avoid unnecessary backtracking later.
Bandit’s Way Hidden Treasure
This treacherous path hides treasures that require careful platforming and enemy avoidance. Look for treasures concealed behind environmental obstacles and within enemy encampments. The most challenging treasure here is protected by a mini-boss encounter that tests your combat skills. Rewards include powerful early-game weapons and special items that can’t be purchased elsewhere. Common pitfall: Rushing through this area without methodical searching causes players to miss well-camouflaged treasure spots. Pro strategy: Use ranged attacks to clear enemies from treasure areas before attempting collection.
Rose Town Hidden Treasures
This picturesque village conceals treasures that blend seamlessly with the floral environment. Examine flower beds, behind merchant stalls, and within the town’s central fountain mechanism. Rose Town’s treasures typically include status-curing items, rare crafting materials, and character-specific equipment. The most valuable treasure here requires solving an environmental puzzle involving the town’s water system. Time investment: 20-25 minutes for comprehensive searching. Advanced technique: Return after story events as new treasures may become accessible with additional abilities.
Forest Maze Hidden Treasures
The labyrinthine Forest Maze presents the most challenging treasure hunt in this region, with treasures hidden behind false walls, within tree hollows, and along hidden pathways. Navigation challenges make systematic searching essential – consider mapping your route to avoid disorientation. These treasures contain powerful magic-enhancing items and accessories that provide elemental resistances. Common error: Getting distracted by the maze’s complexity and missing subtle visual cues indicating treasure locations.
Pipe Vault Hidden Treasures
This vertical exploration area hides treasures that require precise jumping and pipe navigation skills. Check inside pipe openings, on hidden ledges, and behind moving platforms. The Pipe Vault’s treasures often include experience-boosting items and rare recipes for powerful gear. Estimated completion time: 30-35 minutes due to the area’s vertical nature. Optimization strategy: Use characters with high jump abilities to access hard-to-reach treasure locations more efficiently.
Yo’ster Isle Hidden Treasure
This secluded island contains treasures that reflect its aquatic theme, hidden within coral formations, beneath sandy patches, and inside underwater caves accessible with proper equipment. These treasures typically provide water-based combat advantages and swimming-related abilities. The most complex treasure here involves coordinating with island inhabitants to unlock a multi-stage puzzle. Reward analysis: Yo’ster Isle treasures offer unique benefits for aquatic combat scenarios and exploration.
Booster Pass Hidden Treasures
The mountainous pass conceals treasures along its treacherous paths and within rock formations. Many require specific story progression or character abilities to access. These treasures contain mountain-climbing gear, cold-weather equipment, and mining-related items. Time estimate: 25-30 minutes accounting for environmental hazards. Strategic approach: Use the Class Guide principles to select party members with terrain-appropriate skills for more efficient treasure hunting.
Booster Tower Hidden Treasures
This vertical challenge hides treasures on multiple floors, often requiring backtracking with new abilities. Check behind movable objects, within architectural details, and on hidden balconies. These treasures often include tower-specific keys and progression items that can’t be obtained elsewhere. Common mistake: Attempting to collect all treasures in one visit rather than returning with enhanced capabilities.
Marrymore Hidden Treasure
The wedding-themed town contains treasures integrated into its ceremonial decorations and architecture. Examine floral arrangements, within gift boxes, and behind ceremonial structures. Marrymore’s treasures typically provide social interaction benefits and ceremony-related items. Advanced tip: Coordinate treasure hunting with Complete Guide strategies for systematic completion across all game areas.
Mastering Super Mario RPG’s Hidden Treasure System
Super Mario RPG’s Hidden Treasures represent one of the game’s most rewarding optional challenges, requiring players to jump and strike invisible blocks scattered across every major region. These elusive containers contain valuable items, Frog Coins, and special equipment that significantly enhance your gameplay experience. The detection mechanics rely heavily on the Signal Ring, which provides visual notifications in the top-right corner when treasures are nearby, even if equipped on inactive party members. Additionally, a dedicated NPC systematically tracks your collection progress, providing crucial feedback throughout your journey.
Acquiring the Essential Signal Ring
Securing the Signal Ring early is paramount for efficient treasure hunting. This critical item resides in the Mushroom Kingdom’s item shop basement, where an NPC will challenge you to demonstrate your jumping prowess. Successfully hitting the invisible block that appears will earn you this indispensable tool. Pro tip: Equip the ring on a character you don’t frequently use in battle, as it functions from any party slot.
Strategic equipment management: Keep the Signal Ring on a reserve character to maintain detection capabilities without sacrificing combat effectiveness.
Monitoring Your Collection Progress
For comprehensive tracking of your Super Mario RPG Hidden Treasure discoveries, advance through the main storyline until reaching Monstro Town. Navigate to the elder’s residence (the first building on your right upon arrival), then ascend to the second-floor chamber. The treasure mimic NPC stationed here provides real-time updates on your current count versus the total available. This room also houses a starfish enabling you to play the third tune in Melody Bay, providing additional incentive to visit regularly.
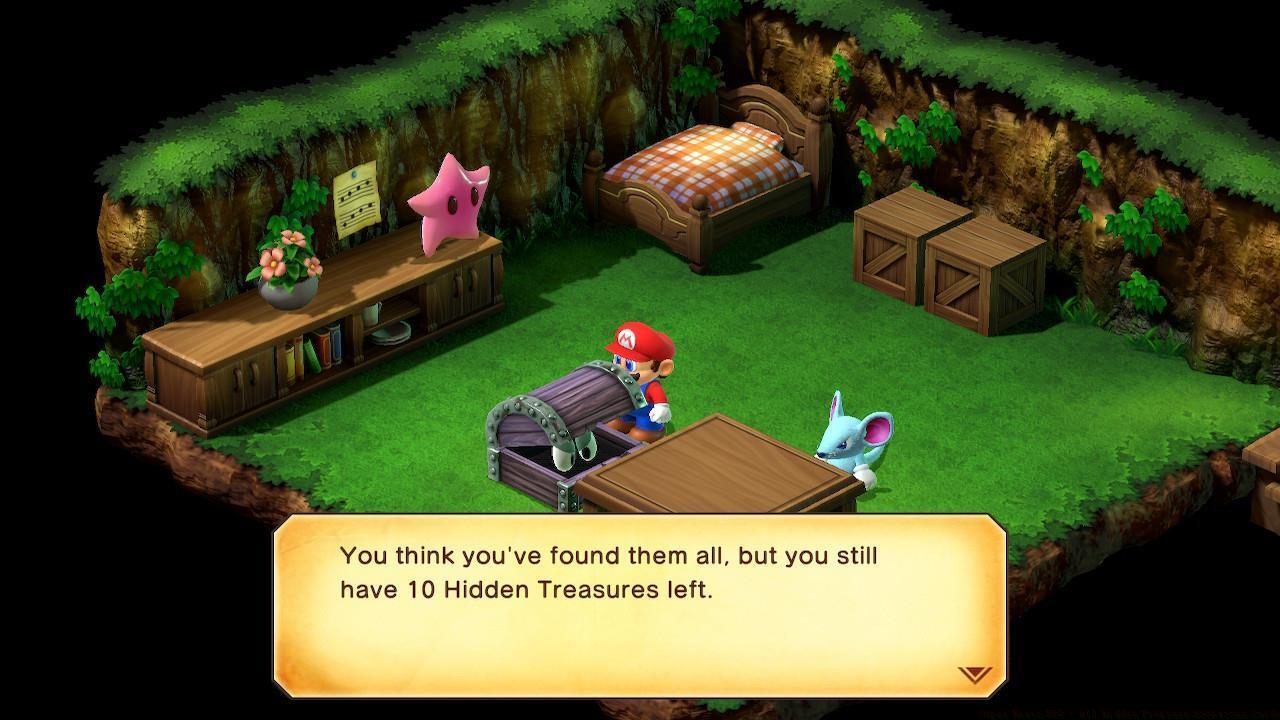
The treasure mimic offers crucial verification, preventing unnecessary backtracking by confirming when areas are fully cleared.
Mushroom Kingdom Region Treasures
Our systematic Super Mario RPG Hidden Treasures guide organizes discoveries by geographical region, beginning with the foundational Mushroom Kingdom and Bandit’s Way areas where players first learn treasure hunting mechanics.
Mushroom Kingdom Hidden Treasures
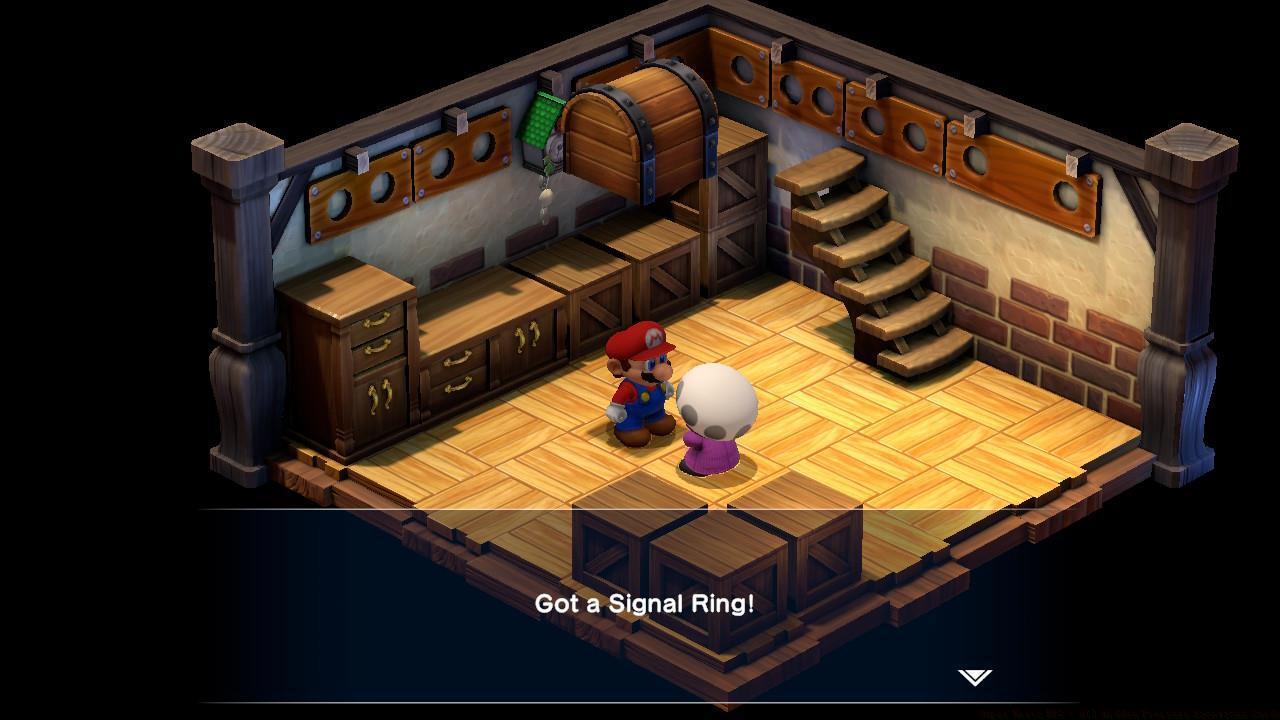
- Hidden Treasure #1: The inaugural Hidden Treasure awaits in the item shop basement, integrated into the NPC’s tutorial that grants you the Signal Ring.
- Hidden Treasure #2: The second concealed container occupies the same chamber. Patiently await the NPC’s relocation to the corner, then utilize his head as a platform to reach the block.
- Hidden Treasure #3: This discovery necessitates conversing with the castle chancellor and rendezvousing with Mallow outside. With Mallow recruited, return to the castle corridor and mount the patrolling guard to access the ledge housing this invisible block.


Strategic positioning: Hidden Treasures #1 and #2 (left) require NPC manipulation, while #3 (right) demands specific story progression.
Bandit’s Way Hidden Treasure
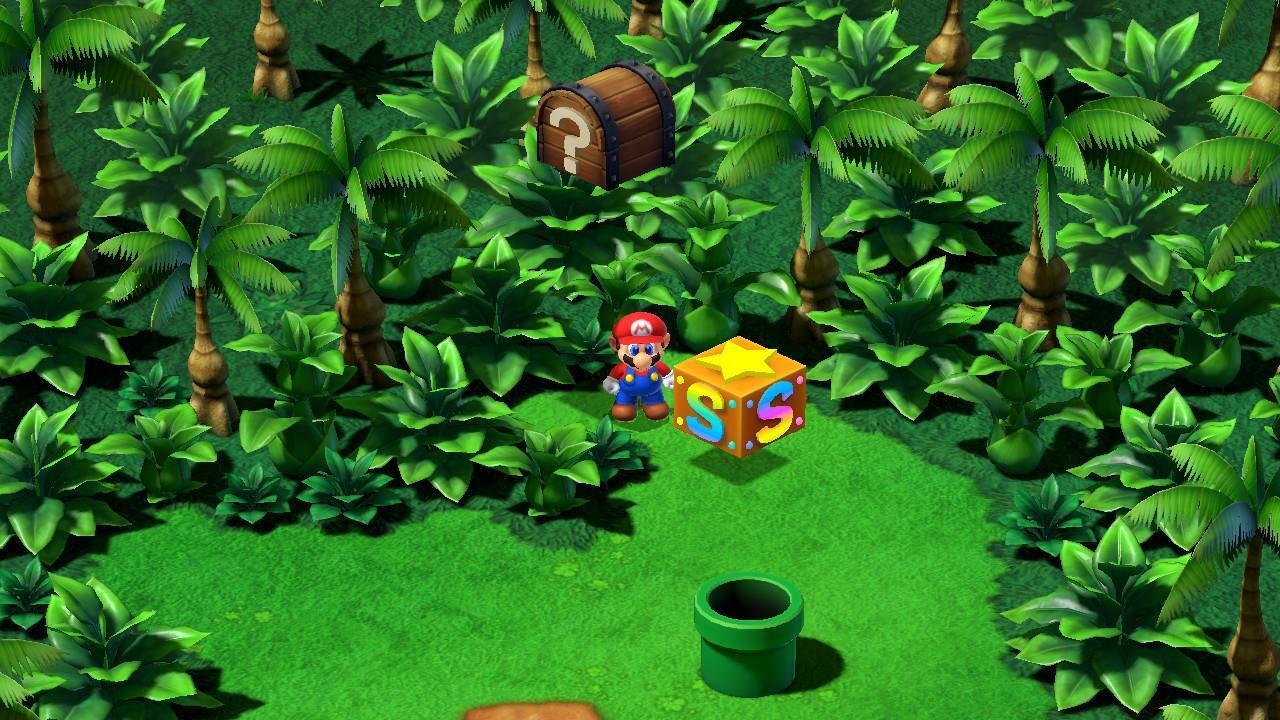
- Hidden Treasure #4: Bandit’s Way contains a solitary Hidden Treasure. Progress through the level until encountering a red flower adjacent to a purple flower. Mount the red blossom and execute a diagonal right-facing jump to strike the mid-air floating block.
Environmental awareness: This treasure demonstrates how level elements like flowers can serve as essential platforms for reaching elusive blocks.
Tadpole Pond Region Exploration
Our pursuit of Super Mario RPG Hidden Treasure blocks continues in the Tadpole Pond region, specifically targeting Rose Town, Forest Maze, and Pipe Vault locations.
Rose Town Hidden Treasures
- Hidden Treasure #5: Access the item shop and vault onto the shelf behind the merchants. Note that an additional block exists in this room, accessible by scaling exterior boxes to enter via the chimney.
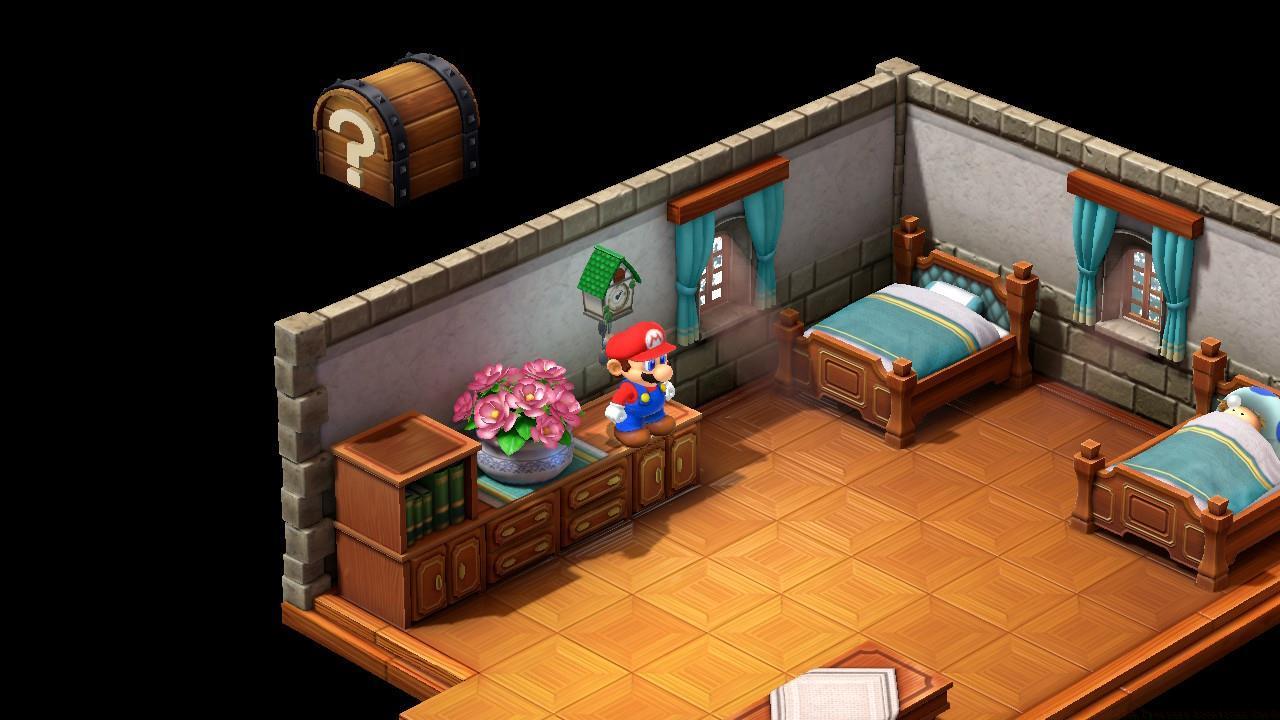
- Hidden Treasure #6: Proceed to the isolated hilltop dwelling and await the Toad NPC’s approach. Then, utilize its head as a stepping stone to scale the edge. Enter the residence and leap while positioned on the second-floor bedroom bed to reveal this chest.

Advanced navigation: These treasures teach players to think vertically and utilize NPCs as mobile platforms.
Forest Maze Hidden Treasures
- Hidden Treasure #7: Six Hidden Treasures await discovery in the Forest Maze, demanding thorough exploration. The initial block occupies the left side of an entrance clearing.
- Hidden Treasure #8: Traverse the subterranean section and emerge from a tree trunk. Inspect the left-hand corner for this invisible container.

These initial discoveries establish the pattern for Forest Maze exploration.
Shortly thereafter, you’ll encounter an area featuring multiple Wiggler enemies entering and exiting tree trunks. Three additional Hidden Treasures await in underground caverns accessible through specific stumps.
This complex area represents one of the game’s most challenging treasure hunting segments.
- Hidden Treasure #9: Descend the right-side tree trunk (nearest the entrance path). The block resides near the spring returning you to the surface.
- Hidden Treasure #10: Choose the left trunk in the second row. The container sits slightly north of the underground spring, though curiously it provides no tangible reward.
- Hidden Treasure #11: Advance to the Wiggler area’s terminus where a solitary tree trunk awaits. Descend and proceed to the tunnel’s end, locating a slumbering Wiggler. Maneuver behind it and jump to tag this chest.
- Hidden Treasure #12: The final Forest Maze Hidden Treasure requires mounting a Wiggler, which will catapult you to another above-ground section. Complete the Forest Maze objective by following Geno’s exit route. Upon reaching the save point, navigate to the southern clearing (not proceeding to the subsequent screen) to find this block.


Systematic exploration: From left to right: Hidden Treasures #9, 10, 11, and 12.
Pipe Vault Hidden Treasures
- Hidden Treasures #13 and 14: Two Hidden Treasures inhabit the Pipe Vault area within the same chamber. Advance until encountering a section containing multiple gold coins, a Frog Coin, and a terminal spring. Leap at one extremity of this area to unveil a platform enabling access to the upper ledge.
- A standard item block occupies the far end.
- The initial invisible block neighbors the recently revealed yellow platform.
- The secondary invisible block situates between the first treasure and the distant block.

Environmental puzzle: This room challenges players to identify which blocks are visible versus hidden.
Yo’ster Isle and Moleville Regions
These Super Mario RPG Hidden Treasures populate the Yo’ster Isle and Moleville territories, specifically within Booster Pass, Booster Tower, and Marrymore locations.
Yo’ster Isle Hidden Treasure
- Hidden Treasure #15: Continue deeper through Pipe Vault to access Yo’ster Isle. Upon arrival, position yourself proximate to the save point and execute an upward jump.
Strategic positioning: This treasure demonstrates the importance of checking areas around save points.
Booster Pass Hidden Treasures
- Hidden Treasure #16: Near the Booster Pass entrance, observe a plateau featuring a solitary bush. Ascend the plant and jump again.
- Hidden Treasure #17: Within the same vicinity, proceed to the subsequent rock formation with segmented ledges (just beyond the Lakitu). Position yourself on the upper-left corner and leap upward.


Environmental navigation: Hidden Treasure #16 (left) and #17 (right) demonstrate how to utilize environmental elements as platforms.
Booster Tower Hidden Treasures
- Hidden Treasure #18: Progress further until reaching a compact chamber requiring ledge climbing while Snifits continuously spawn. The block occupies the upper corner.
- Hidden Treasure #19: Eventually, employ a Thwomp to access a section with multiple ledges, Snifits, and additional enemies. One invisible block resides in the lower-left corner.
- Hidden Treasure #20: At the midway point of this same section, a narrow gap awaits. Enter and jump upward to receive a Frog Coin reward.


Combat integration: From left to right: Hidden Treasures #18, 19, and 20.
- Hidden Treasure #21: The final two Hidden Treasures occupy the same chamber, which conveniently houses a save point. First, navigate to the hallway’s opposite side. Stand in the corner housing the lower ledge and jump upward.
- Hidden Treasure #22: Next, utilize the yellow ledges and jump to ascend the existing block (above the save point). Once positioned on the item block, execute an additional jump to reveal this Hidden Treasure.

Vertical exploration: Hidden Treasure #21 (left) and #22 (right) require multi-level platforming techniques.
Marrymore Hidden Treasure
- Hidden Treasure #23: Navigate to the Marrymore inn and access the second-floor bedroom. Ascend the taller bookshelf to tag this container.
Architectural exploration: This treasure emphasizes checking interior spaces and utilizing furniture as platforms.
Star Hill and Land’s End Regions
Our search continues for Super Mario RPG Hidden Treasure blocks in the Star Hill and Land’s End territories. Beyond Land’s End proper, we also address those in Sunken Ship, Belome’s Temple, Monstro Town, and Bean Valley.
Sunken Ship Hidden Treasure
- Hidden Treasure #24: This requires completing the Sunken Ship puzzles and defeating the King Calamari boss to progress. During exploration, encounter a chamber housing a Mario doppelgänger. Avoid interaction, as this initiates combat. Instead, observe how the clone replicates your movements. The objective involves jumping on the clone’s head to strike the invisible “J” block, which simultaneously reveals the Hidden Treasure. Subsequently, manipulate the clone’s positioning to acquire the treasure.

Advanced puzzle mechanics: This treasure introduces complex NPC manipulation requiring strategic movement planning.
Land’s End Hidden Treasures
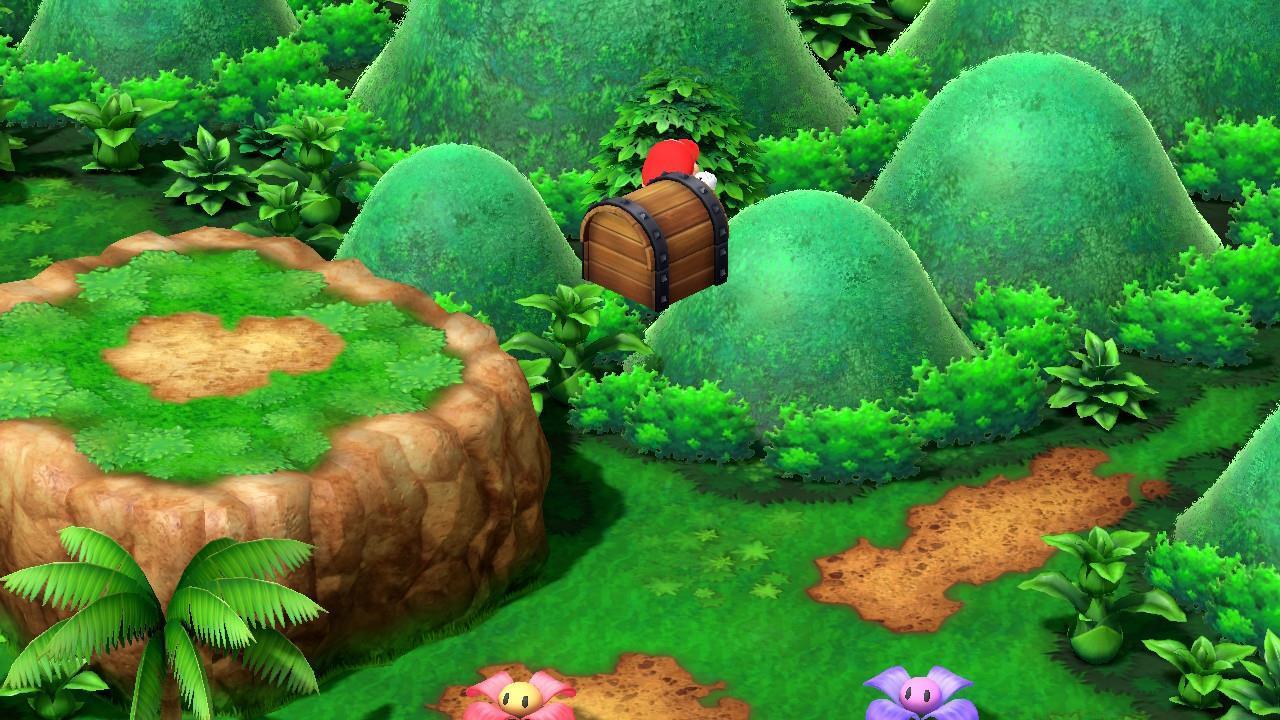
- Hidden Treasure #25: On the initial Land’s End screen, employ a cannon to reach a yellow platform. Await its ascent, then jump upward.
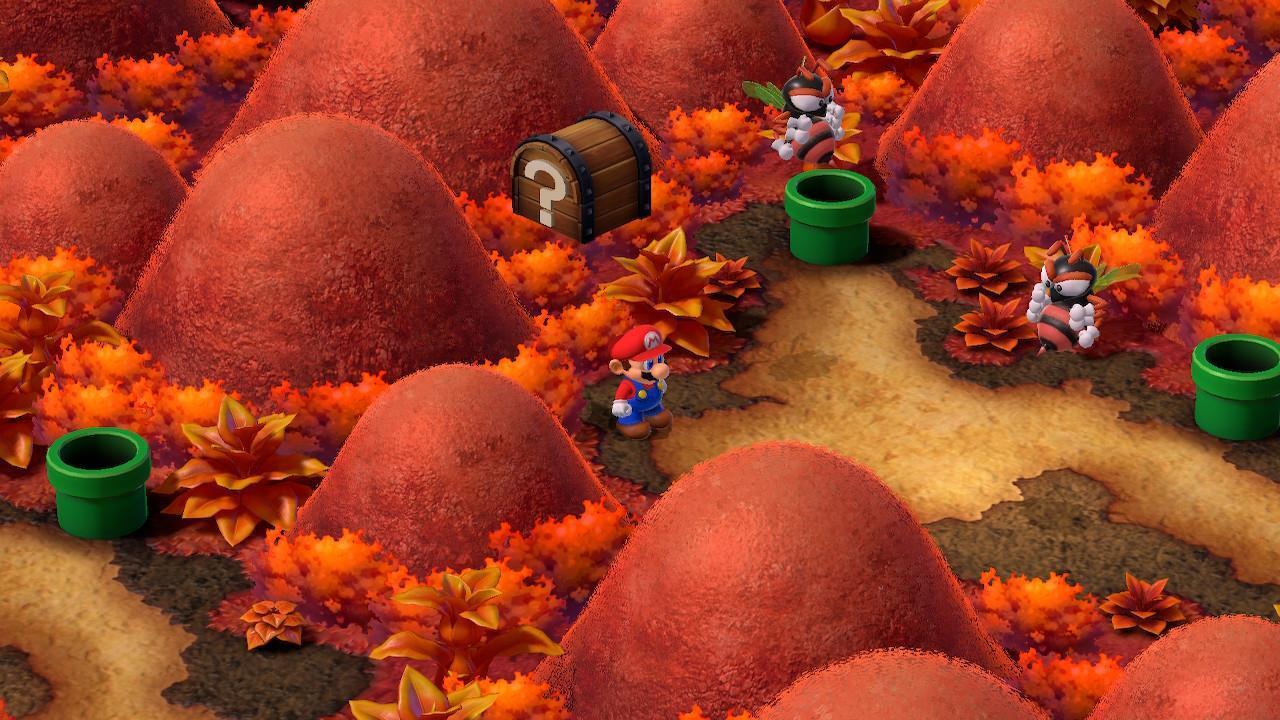
- Hidden Treasure #26: On the subsequent Land’s End display, launch yourself from a cannon to descend into a pit on the subsequent hill. Eliminate the kobold adversaries, then leap when positioned at the pit’s edge. This action reveals another yellow platform. Return to the cannon to access the aforementioned platform, enabling ascent to the rock formation’s summit. The Hidden Treasure occupies the left corner.
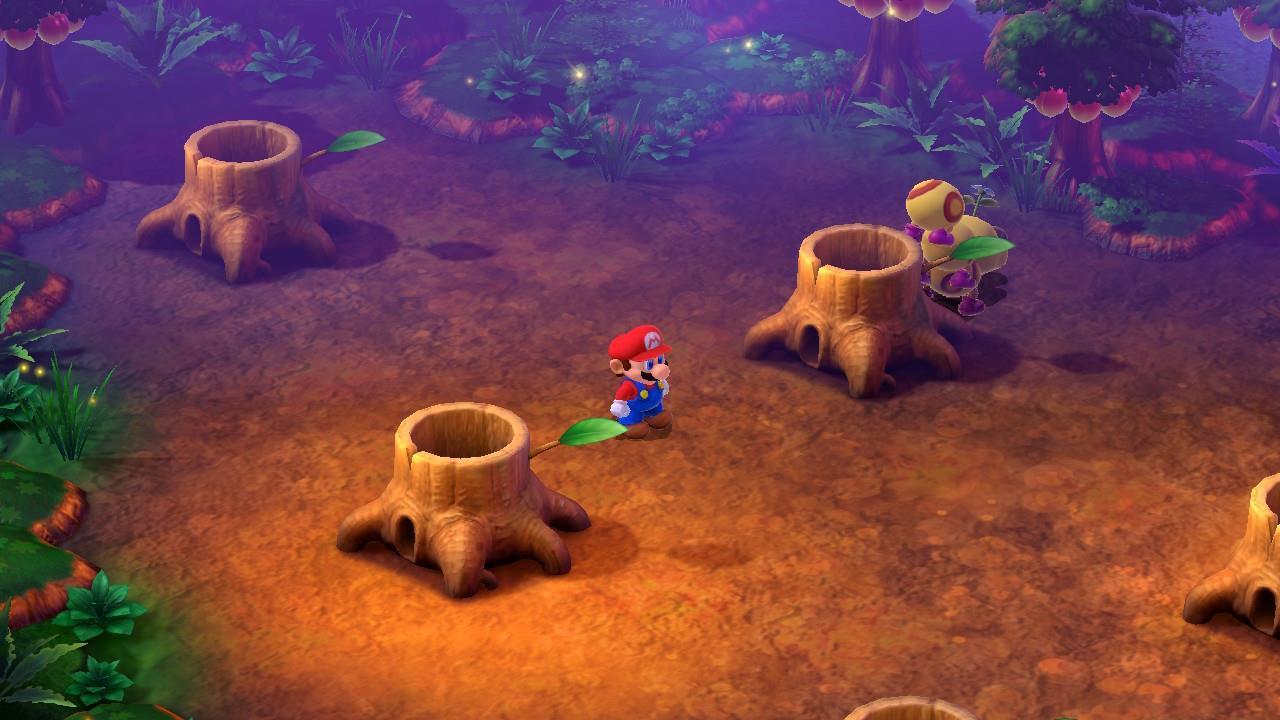
- Hidden Treasure #27: Proceeding further, discover yourself in a grassy expanse featuring multiple red and purple blossoms. Execute a jump between the second and third purple flower to tag this block.
- Hidden Treasure #28: Continue beyond the purple flowers to locate a rock pillar containing an aperture. Position yourself adjacent and jump upon observing emerging smoke. This action draws Mario into a subterranean area. Advance to the tunnel’s terminus where a kobold enemy awaits to tag this container.


Environmental mastery: From left to right: Hidden Treasures #25, 26, 27, and 28.
Belome’s Temple Hidden Treasures
- Hidden Treasures #29 and 30:Both Belome’s Temple Hidden Treasures reside within the same vicinity. Advance until passing the section requiring statue strikes to ascertain your fortune. The subsequent chamber contains two chests:
- Ascend the ledges and vault onto the floating block (rotation during jumping may facilitate proper landing).
- Descend the staircase and face the wall’s indented corner, then execute an upward jump.


Precision platforming: Hidden Treasures #29 (left) and #30 (right) demonstrate advanced movement requirements.
Monstro Town Hidden Treasure
- Hidden Treasure #31: Access the final chamber in Monstro Town’s lower section, then execute an upward jump while positioned in the left-hand corner (adjacent to the flowering bush).
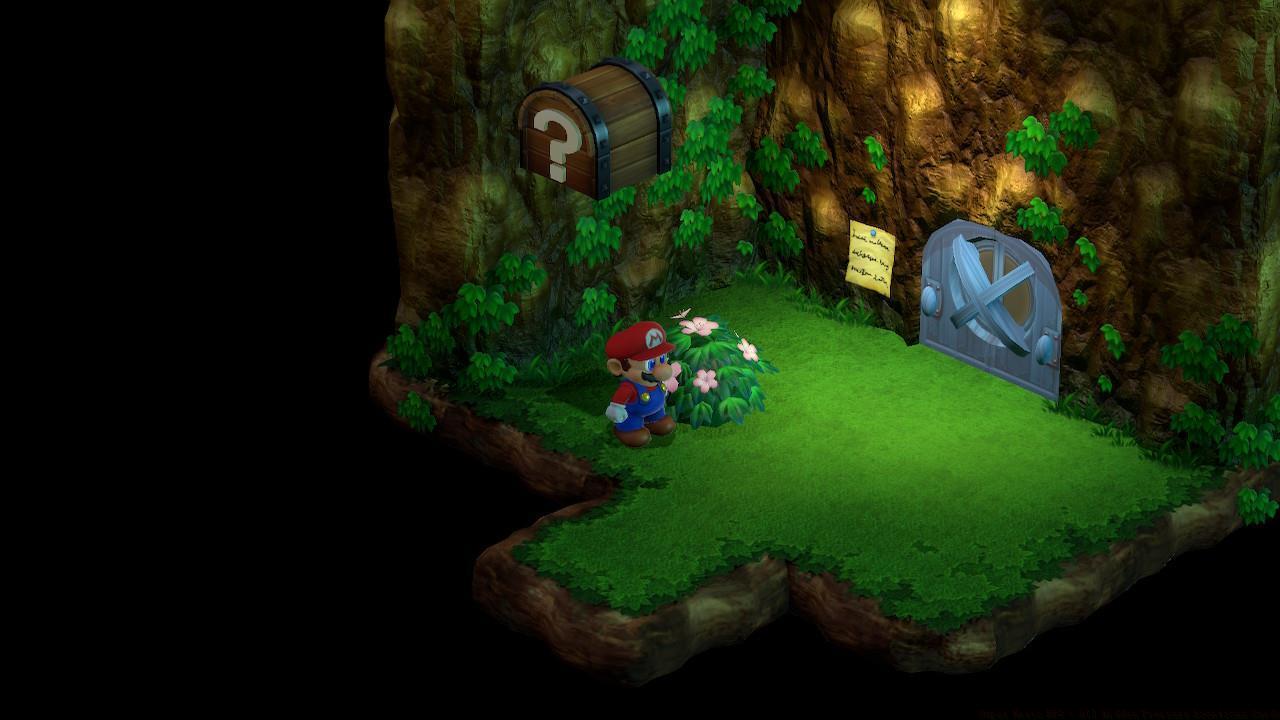
Thorough exploration: This treasure reinforces the importance of checking every room, even in familiar locations.
Bean Valley Hidden Treasures
- Hidden Treasure #32: Upon entering Bean Valley, select the right-side pipe, then proceed to the corner in the screen containing two bees.
This initial Bean Valley treasure establishes the area’s exploration pattern.
Beyond this section, observe an area featuring five pipes housing juvenile Piranha Plants. A Shy Guy randomly circulates while irrigating them. The objective involves awaiting the Shy Guy’s hydration of the Piranha Plants in the bottom-right and right-hand positions. Once the Piranha Plants achieve full maturity, vanquish them in combat to access the subterranean areas.
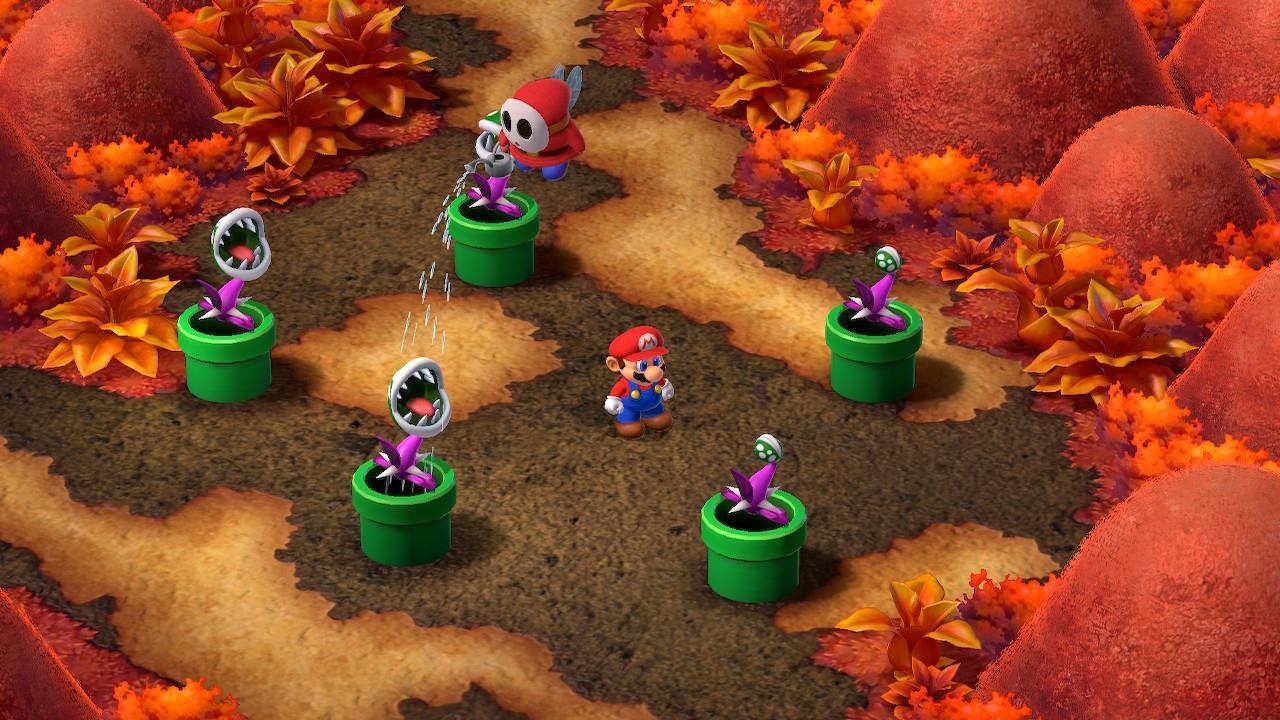
Advanced enemy manipulation: This section teaches players to influence NPC behavior patterns to progress.
- Hidden Treasure #33: Utilize the bottom-right pipe and execute a jump slightly left of the existing block and spring.
- Hidden Treasure #34: Employ the right-hand pipe and jump near the room’s edge to the right of the spring.

Subterranean exploration: Hidden Treasure #33 (left) and #34 (right) require accessing underground areas through specific pipes.
Nimbus Land and Bowser’s Keep Regions
The concluding Super Mario RPG Hidden Treasures inhabit the Nimbus Land and Bowser’s Keep territories. Nimbus Land contains multiple discoveries, while Bowser’s Keep offers a solitary final treasure.
Nimbus Land Hidden Treasures
- Hidden Treasure #35: Enter the Nimbus Land item shop and utilize the brown containers behind the merchant.
- Hidden Treasure #36 and #37: Upon securing castle entry, advance further until reaching the left wing featuring descending staircases. A avian enemy and Jawful occupy this area:
- The initial chest positions directly above the Jawful’s station, necessitating its elimination.
- The secondary chest resides within a narrow gap in the chamber’s darkened portion. Though appearing at the screen’s edge, passage remains possible.


Strategic combat integration: The locations of Hidden Treasure #35 (left), as well as #36 and #37 (right).
- Hidden Treasure #38: Acquire Castle Key 1 from villagers in the chamber beyond the Jawful, then employ it to access the main corridor room. Defeat Birdo to reach the wing’s upper section. Once positioned there, ascend the existing item block.
- Hidden Treasure #39: This Hidden Treasure materializes exclusively after vanquishing Valentina and Dodo, thereby liberating the royal family. Return to the primary corridor (featuring three portals, one previously leading to the Birdo encounter). Position yourself in the far-left corner and jump to tag this container.

Post-boss discoveries: The locations of Hidden Treasure #38 (left) and #39 (right) demonstrate how major story events unlock additional treasure opportunities.
Bowser’s Keep/Weapon World Hidden Treasure
- Hidden Treasure #40: The ultimate Hidden Treasure in Super Mario RPG awaits discovery in Weapon World, significantly following completion of all Bowser’s Keep puzzles. Advance deeper into the zone until encountering a save point within a compact chamber. The invisible container positions immediately adjacent to the save point.
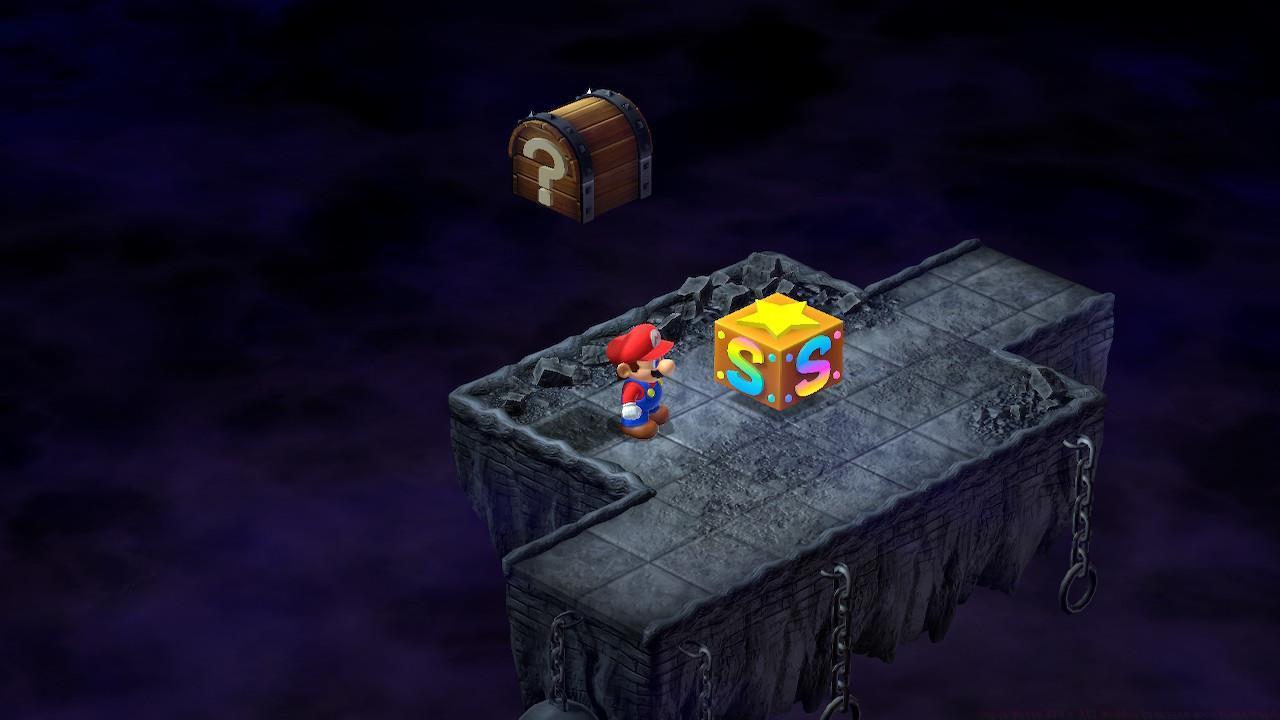
Final challenge: This treasure represents the culmination of your treasure hunting journey.
This comprehensive guide covers all Hidden Treasures in Super Mario RPG. Remember to consult the treasure mimic NPC in Monstro Town should verification of completion become necessary. Regarding additional content potentially overlooked, definitely pursue supplementary activities, including the Melody Bay tadpole puzzles and the flags of the 3 Musty Fears.
Super Mario RPG’s Hidden Treasures represent one of the game’s most engaging collection challenges, requiring players to master specific interaction mechanics. These elusive items remain completely invisible until you execute a precise jump directly on their concealed locations. Unlike standard collectibles, they don’t appear through normal exploration and demand specialized detection methods.
The Signal Ring serves as your primary detection tool, creating an essential gameplay advantage when equipped. What makes this item particularly valuable is its flexibility – it functions effectively even when assigned to characters not currently in your active party. When you approach a Hidden Treasure location, the game displays a subtle notification in the top-right corner, alerting you to the proximity of concealed loot. This system prevents frustrating random searching and transforms treasure hunting into a strategic activity.
Beyond simple collection, the game incorporates comprehensive progress tracking through dedicated NPC interactions. A specific character meticulously counts every Hidden Treasure you discover during your adventure, providing valuable feedback on your completion rate. This tracking mechanism becomes increasingly important as you progress toward 100% game completion.
Acquiring the Signal Ring marks your official initiation into serious treasure hunting. This crucial item resides in Mushroom Kingdom’s item shop basement, accessible once you’ve progressed sufficiently in the main storyline. The acquisition process involves an interactive sequence where an NPC challenges you to demonstrate your jumping prowess.
When you engage with the basement NPC, they’ll explicitly request that you perform a jump. Executing this action triggers the appearance of an invisible block, demonstrating the game’s clever integration of tutorial elements into natural gameplay. The NPC then rewards your successful demonstration with the Signal Ring, establishing both the item’s importance and its acquisition method.
Equipment management proves critical for efficient treasure hunting. Ensure at least one character in your roster permanently carries the Signal Ring, as its passive detection capability works regardless of party composition. Many players make the mistake of frequently swapping equipment, potentially missing treasure notifications during transitions between areas.
Monitoring your Hidden Treasure collection requires visiting Monstro Town during the mid-game progression. Navigate to the elder’s residence, identifiable as the first building on the right upon entering the village. The second floor houses the dedicated tracking NPC who provides exact counts of your discovered treasures.
This treasure mimic character offers invaluable assistance by reporting your current collection status and indicating how many treasures remain undiscovered. Their feedback becomes increasingly crucial as you approach complete collection, helping identify which regions still require exploration.
The tracking room contains an additional interactive element – a starfish that enables you to play the third tune in Melody Bay, connecting treasure progression with other game content. This thoughtful design encourages comprehensive exploration and rewards thorough players with multiple gameplay benefits.
Our guide organizes Super Mario RPG Hidden Treasures using a regional categorization system, beginning with Mushroom Kingdom and Bandit’s Way locations. This structured approach ensures methodical collection while minimizing backtracking and missed opportunities.
These initial treasures establish important gameplay patterns: looking beyond obvious surfaces, utilizing NPC positioning, and mastering the jump-and-hit mechanic. Success here builds confidence for more complex treasure discoveries in later regions.
Advanced players should note that certain treasures require specific character abilities or story progression. Don’t waste time attempting to access areas beyond your current capabilities – the Signal Ring will still detect them, allowing you to mark locations for later return visits.
Booster Pass presents some of the most challenging hidden treasure locations in the game, requiring precise platforming skills and strategic navigation. These invisible blocks contain valuable rewards including Frog Coins and power-ups that significantly enhance your gameplay experience. Understanding the area layout and enemy patterns is crucial for efficient treasure collection.
Before embarking on your treasure hunt, ensure you’ve mastered basic jumping mechanics and have adequate health reserves. The Booster Pass area features multiple environmental hazards and persistent enemy spawns that can complicate your search efforts.
Hidden Treasure #16 (left) and #17 (right) share proximity in this initial sector, allowing efficient collection within 30-45 seconds when executed properly.
From left to right: Hidden Treasures #18, 19, and 20 represent progressively difficult finds in this hazardous zone.
Hidden Treasure #21 (left) and #22 (right) share this terminal room, allowing strategic use of the save point between attempts for risk-free practice.
For optimal efficiency, plan your route to collect treasures #16-17 first, then proceed directly to the Snifit room for #18. Use the Thwomp section for #19-20, and finish with the save room for #21-22. This route minimizes backtracking and enemy encounters.
Avoid the common mistake of rushing jumps – each treasure requires precise positioning. Advanced players can collect all six treasures in 12-15 minutes with practiced execution. Consider reviewing our Complete Guide for broader navigation strategies that complement treasure hunting.
Understanding enemy spawn mechanics is crucial – Snifits have predictable firing patterns that can be exploited during your jumps. The Lakitu in the early section can be avoided by staying on lower platforms until ready for treasure #17.
As you progress through Super Mario RPG’s later stages, locating hidden treasures becomes increasingly challenging yet rewarding. These final collectibles (#35-40) require advanced navigation skills, boss battle proficiency, and careful exploration of previously inaccessible areas. Successfully finding all hidden treasures significantly enhances your gameplay experience and provides valuable items for the endgame content.
Visual references clearly indicate the positions of Hidden Treasure #35 on the left side, alongside #36 and #37 situated on the right. These spatial relationships help prevent overlooking adjacent containers.
The spatial arrangements for Hidden Treasure #38 (left positioning) and #39 (right positioning) become clearly visible once you’ve met the prerequisite conditions for each.
Upon reaching Weapon World, merely one hidden treasure remains uncollected, marking the culmination of your treasure hunting journey.
Congratulations on nearing completion of all Super Mario RPG’s hidden treasures! Ensure you consult the treasure mimic non-player character in Monstro Town to verify whether you’ve missed any containers during your exploration. For players seeking comprehensive gameplay completion, we highly recommend undertaking additional activities including the Melody Bay tadpole puzzles and locating the flags of the 3 Musty Fears to fully experience everything the game offers.
Action Checklist
- Systematically scan each new area using grid-based search patterns
- Listen carefully for audio cues and watch for visual anomalies indicating hidden containers
- Document discovered treasure locations and types for future reference
- Revisit earlier areas with new abilities to access previously unreachable treasures
- Cross-reference your collection with online resources to identify missed opportunities
- Purchase Signal Ring from Moleville item shop (500 coins)
- Systematically explore Mushroom Kingdom region treasures
- Navigate Tadpole Pond areas with attention to environmental details
- Complete Yo’ster Isle and Moleville region treasure hunts
- Return to previously visited areas with new abilities for missed treasures
- Acquire Signal Ring from Mushroom Kingdom item shop basement
- Equip Signal Ring on reserve character to maintain detection capabilities
- Visit Monstro Town treasure mimic NPC regularly to track progress
- Systematically clear each region following the numbered sequence
- Complete story progression to unlock post-boss treasures
- Return to previously visited areas after major story events
- Acquire Signal Ring from Mushroom Kingdom item shop basement
- Permanently equip Signal Ring on one character (active or reserve)
- Visit Monstro Town elder’s house second floor to establish tracking
- Collect first two treasures in item shop basement using advanced jumping
- Systematically clear treasures region by region using detection notifications
- Locate plateau bush and execute double jump for Treasure #16
- Navigate to segmented rock formation past Lakitu for Treasure #17
- Progress to Snifit room and reach upper corner for Treasure #18
- Use Thwomp to access lower-left corner for Treasure #19
- Find narrow gap at section midpoint and jump for Frog Coin (Treasure #20)
- Navigate to save room opposite corner for Treasure #21
- Use yellow ledges to reach block above save point for Treasure #22
- Defeat Jawful and collect treasure #35 from overhead platform
- Navigate dark room crevice to locate treasures #36 and #37
- Acquire Castle Key 1 from villagers and defeat Birdo for treasure #38
- Complete main story to unlock treasure #39 in three-door corridor
- Finish Bowser’s Keep puzzles and find final treasure #40 near Weapon World save point
- Verify completion with Monstro Town NPC and explore additional content
No reproduction without permission:SeeYouSoon Game Club » Super Mario RPG – All Hidden Treasure Locations Guide