TL;DR
- Retrieve the astrolabe from the library vending machine using precise arm navigation sequences
- Study the star map in B8 briefing room to understand planetary positions and Heimat’s orbital path
- Match Heimat’s position on the astrolabe with its current orbital location on the star map
- Record planetary alignments when Heimat matches the astrolabe configuration
- Execute the final alignment using the central button to complete the workers’ quarters puzzle
- Avoid common mistakes like incorrect arm positioning and premature planetary configuration
Mastering celestial navigation in Signalis requires strategic puzzle-solving approaches that challenge conventional gaming logic.
The workers’ quarters section presents an extended survival horror experience with multiple interconnected challenges. After securing all necessary keys, restoring audio recordings, and investigating personal correspondence, you’ll acquire an astrolabe and discover its designated placement location. This represents the culminating challenge of the workers’ quarters sequence, designed as the most complex puzzle requiring astronomical insight.
Successful resolution demands celestial observation skills, specifically planetary positioning analysis. While securing personal items contradicts traditional astrolabe functionality, the mysterious containment device justifies this unconventional application within the game’s narrative framework.
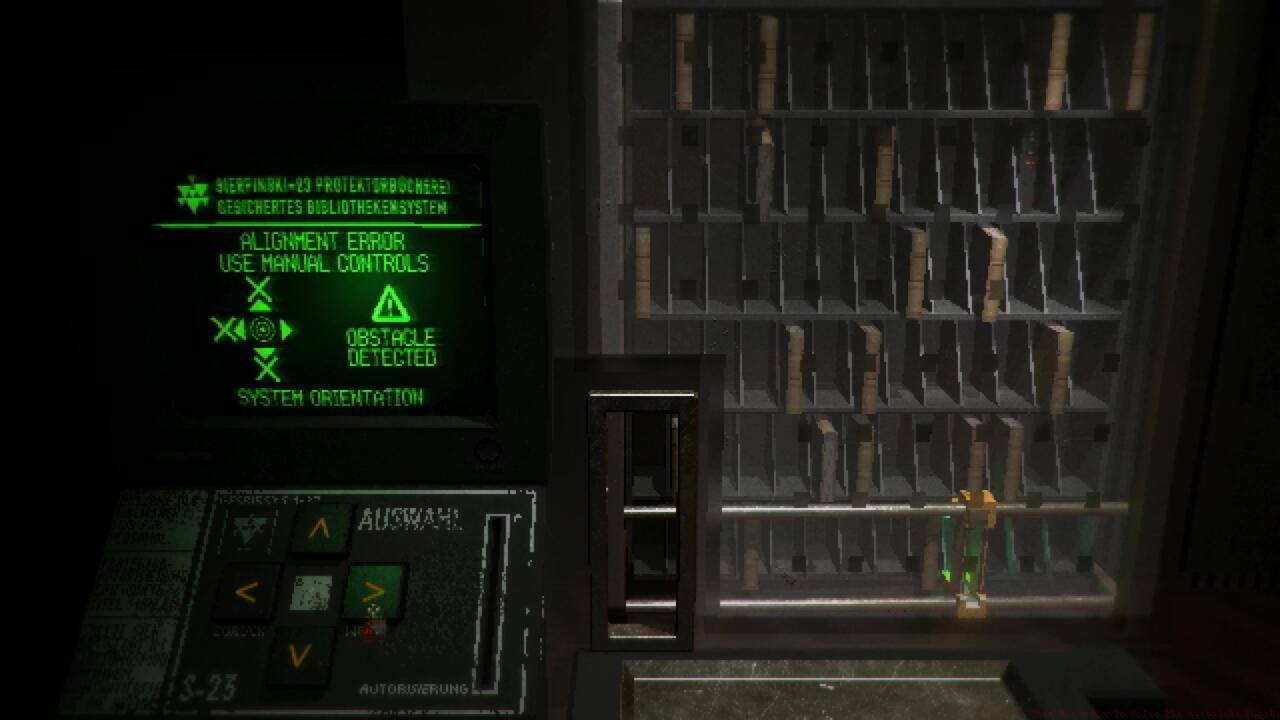
Locate the astrolabe within the library area, accessible after obtaining the library key from post office box 512. Upon entry, you’ll encounter a distressed Kolibri Replika, but the critical element is the specialized vending apparatus. This machine doesn’t contain consumables but houses the astrolabe, representing an unusual vending inventory selection.
Retrieving the astrolabe requires mechanical precision rather than simple coordinate input. With automated systems deactivated, manual arm manipulation becomes necessary. The arm mechanism moves continuously until encountering physical obstructions. To successfully retrieve the astrolabe, navigate the arm through a complete circuit around the vending machine, returning to the base position and approaching from the underside.
Require detailed navigation coordinates? Execute this sequence: Right, up, left, up, left, down, left, down, right, down, right, down, right, up, right, up.
Exercise caution to prevent mechanical entrapment during the retrieval process.
Maintain precision during arm navigation to avoid mechanical complications.
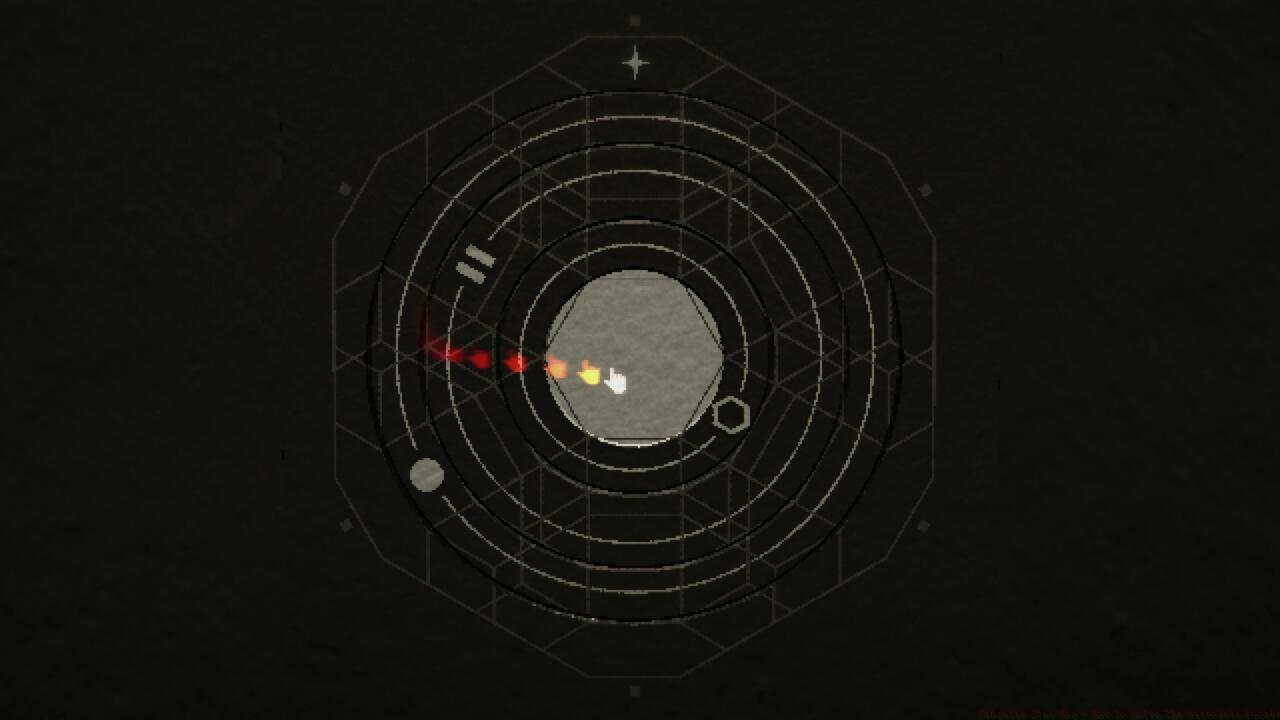
Whether examining the astrolabe initially or inserting it into Adler’s study container, the interface may appear confusing initially. The device displays a central star symbol, substantial activation mechanism, and three rotational discs positioned between them. Understanding this celestial interface is crucial for puzzle progression.
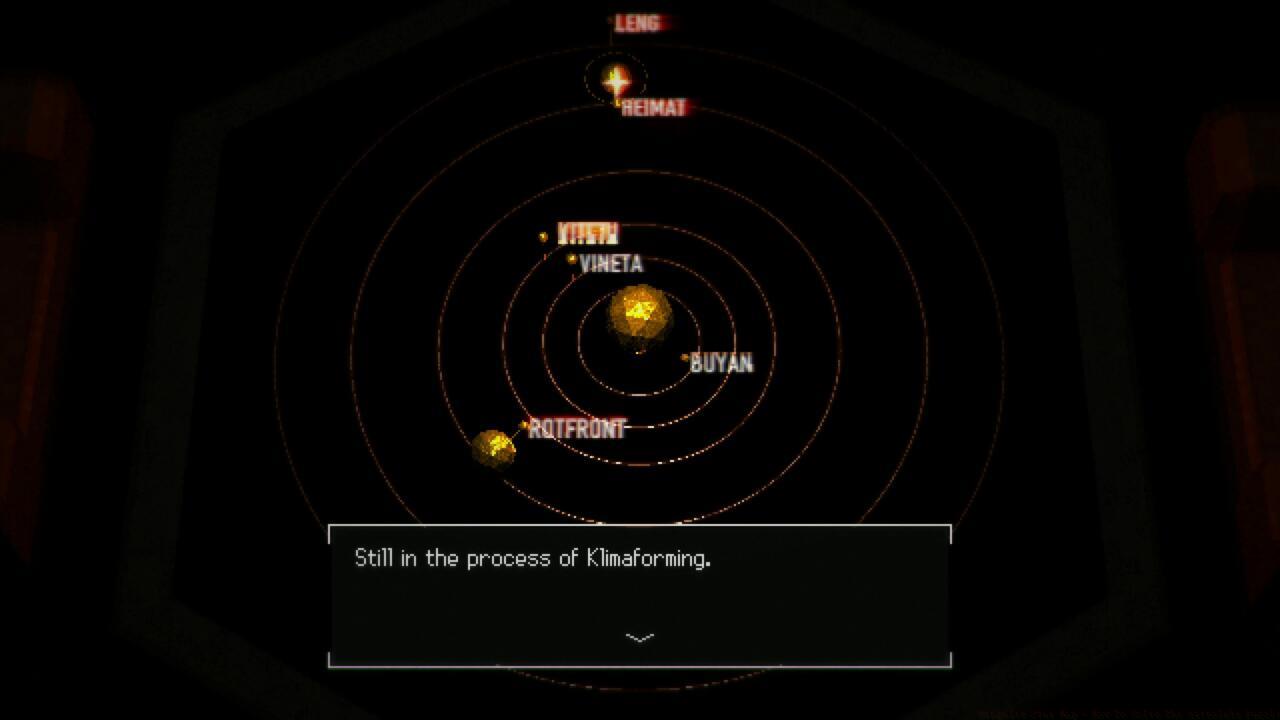
The solution requires visiting the briefing chamber on the southern section of level B8. This location contains a comprehensive stellar cartography display. The primary clue for this puzzle involves recognizing that Heimat appears identically to the star symbol on the astrolabe’s upper section. The essential strategy involves allowing Heimat to progress through its orbital cycle until it aligns with the astrolabe’s depiction, then documenting the positions of other celestial bodies at that specific alignment.
Historical planetary classification standards have evolved significantly over time.
Celestial body classification systems provide context for astronomical navigation challenges.
The planetary alignment phase requires meticulous observation and precise configuration. Begin by thoroughly studying the star map in the B8 briefing room, paying particular attention to Heimat’s distinctive triangular configuration. This celestial body serves as your primary reference point for the entire alignment process.
Monitor Heimat’s orbital progression until it perfectly matches the representation on your astrolabe device. At this critical alignment moment, immediately document the positions of all other visible planets relative to Heimat’s location. This snapshot of celestial positioning provides the necessary data for configuring the astrolabe’s rotational discs.
Common errors include attempting planetary configuration before achieving perfect Heimat alignment or misinterpreting secondary planetary positions. Advanced players should note that planetary movements follow predictable patterns, allowing for anticipation of alignment windows rather than continuous monitoring.
Once you’ve recorded the correct planetary positions, return to Adler’s study and insert the astrolabe into its designated container. Configure the three rotational discs to match the planetary alignment you documented. The final step involves activating the central button mechanism to complete the sequence.
Activation of the central mechanism is crucial for finalizing the celestial alignment process.
Time investment for mastering this puzzle typically ranges from 15-25 minutes for first-time attempts, reducing to 5-10 minutes with practice and pattern recognition.
Action Checklist
- Retrieve library key from post office box 512 and access the library area
- Navigate vending machine arm using sequence: Right, up, left, up, left, down, left, down, right, down, right, down, right, up, right, up
- Study B8 briefing room star map and identify Heimat’s triangular configuration
- Monitor Heimat’s orbit until it matches astrolabe depiction, then record planetary positions
- Configure astrolabe discs to match recorded planetary alignment
- Activate central button mechanism to complete the celestial puzzle
No reproduction without permission:SeeYouSoon Game Club » Singalis Star Map – How To Solve The Astrolabe Puzzle Master Signalis' celestial puzzles with expert strategies for astrolabe retrieval and planetary alignment