Master Osa’s tactical shield deployment and weapon strategies for maximum team impact in Rainbow Six Siege
Osa: Rainbow Six’s Revolutionary Shield Attacker
Operation Crystal Guard introduces Osa, bringing unprecedented tactical flexibility to Rainbow Six Siege’s attacking lineup with her innovative transparent shield technology.
Seeking a game-changing shield operator who redefines offensive playmaking? Osa delivers strategic depth through her unique Talon-8 transparent shields, enabling calculated site pushes with visual awareness traditional shields lack.
The concept of an attacker wielding deployable shields initially appears contradictory, but Osa’s implementation creates fascinating new tactical dimensions. As Rainbow’s 31st attacker, this Croatian operative introduces defensive utility to offensive play without sacrificing mobility. Her two-speed, two-armor rating positions her perfectly between frontline fragger and support roles. Unlike Montagne’s total coverage or Blitz’s flash-focused approach, Osa’s transparent Talon-8 Shields maintain situational awareness while providing crucial protection. This flexibility, combined with substantial firepower, makes her exceptionally versatile across various engagement scenarios. Before deploying Osa in ranked matches, understanding her nuanced playstyle through comprehensive guidance ensures you maximize her potential from Operation Crystal Guard’s launch.
 Ubisoft
Osa revolutionizes attacker capabilities with transparent deployable shields in Operation Crystal Guard.
Osa’s Loadout: Weapons and Equipment Breakdown
While Osa’s arsenal may not feature the flashiest new weapons, it provides reliable performance with established Siege favorites that complement her unique playstyle perfectly. She accesses Thermite’s 556XI assault rifle or Jackal’s PDW9 SMG as primary options. The 556XI stands out for its manageable recoil pattern and consistent damage output, making it ideal for sustained engagements where shield placement creates firing opportunities. Meanwhile, the PDW9’s high rate of fire and generous magazine capacity excels in close-quarters situations where rapid target acquisition matters most.
Her secondary PMM pistol provides exceptional stopping power when ammunition runs dry or quick weapon swaps are necessary. For gadget selection, Stun Grenades offer strategic versatility despite Claymores typically providing more consistent value. The stuns create temporary disorientation perfect for pushing contested areas or countering defensive setups like Aruni’s Surya Gates. Understanding when to deploy stuns versus maintaining shield coverage separates proficient Osa players from exceptional ones. 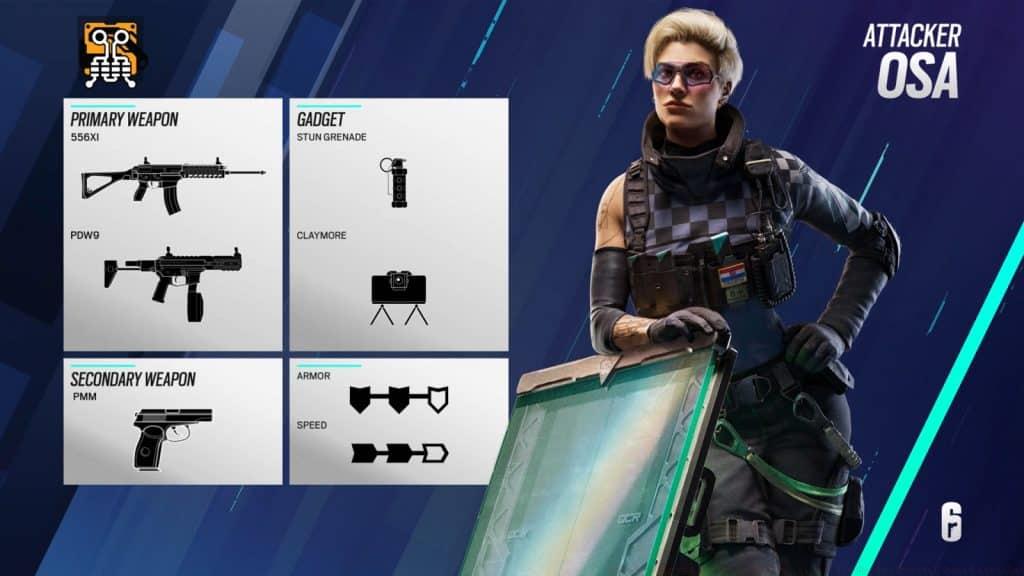
Advanced Shield Deployment Strategies
Deployable shields serve dramatically different purposes on attack versus defense, but Osa’s Talon-8 Shields create unique opportunities during critical round phases. Their most impactful application involves securing defuser plants by establishing protected planting zones. As Osa, prioritize early site penetration to position shields where teammates can plant safely behind transparent coverage. Unlike Montagne or Blitz who can plant while maintaining personal protection through backward positioning, Osa cannot store shields on her back during the planting animation. This limitation makes proactive shield deployment essential—either holding the shield manually in front of planting allies or deploying it completely to create stationary cover.
Advanced Technique: Rappel positioning with shields creates exceptionally strong post-plant scenarios. Deploying Talon-8 Shields while rappelling outside windows establishes protected angles that defenders struggle to challenge without exposing themselves. However, remain vigilant for defender runouts during these setups, as your positional commitment creates vulnerability. The transparency allows maintaining visual contact with potential flank routes while covering the defuser.
 Ubisoft
Strategic rappel shield placement creates dominant post-plant control but requires runout awareness.
Breaking Onto Site with Osa’s Kit
Osa’s equipment enables methodical site penetration with substantial safety margins when utilized correctly. Though lacking literal explosives, her tactical approach creates explosive opportunities through calculated positioning. Defenders cannot penetrate her shields with gunfire, allowing crouched advances similar to Blitz entries minus the flash capability. This methodical approach works exceptionally well when combined with stun grenades for temporary area denial.
Rainbow Six Siege Operator tier list (Y10S4)
Best Assault Rifle loadouts in Black Ops 6 Season 5
Black Ops 6 players sleeping on fast-killing LMG that absolutely “melts”
Baiting Technique: Luring defenders into engaging your shield before swiftly transitioning to your 556XI creates easy elimination opportunities and generates man-advantages. The critical factor involves mastering the swap timing between shield and weapon, as this transition period represents your greatest vulnerability window. Practice the weapon switch rhythm in controlled environments before attempting high-stakes engagements. Successful Osa players utilize the shield to control engagement timing, forcing defenders to commit to unfavorable fights or concede map control.
 Ubisoft
The handheld shield option enables Montagne/Blitz-style protection with enhanced visibility.
Maintaining Utility and Avoiding Early Deaths
This fundamental principle applies universally across operators but carries amplified importance for Osa due to her utility-dependent nature. Most of her strategic value manifests during post-plant scenarios, making early elimination without shield deployment devastating for your team’s round success. Ensure you deploy at least one of your two shields during the early or mid-round, even if simply positioning it on a window while rappelling to create safe sightlines for teammates. This proactive approach guarantees some utility value regardless of survival outcome.
Common Mistake Avoidance: Many Osa players hesitate to deploy shields early, saving them for “perfect” situations that rarely materialize. Instead, use your first shield to secure map control during the execute phase and retain the second for plant protection or emergency coverage. This balanced approach maximizes impact throughout the round rather than banking on late-round opportunities. Osa joins the roster with Operation Crystal Guard, available on the Test Server starting August 18 for tactical experimentation before live deployment.
No reproduction without permission:SeeYouSoon Game Club » Rainbow Six Osa guide: loadouts, tips & tricks for Crystal Guard attacker Master Osa's tactical shield deployment and weapon strategies for maximum team impact in Rainbow Six Siege