TL;DR
- Pool 2 unlocks between Collection Levels 222-474 with game-changing cards like Jubilee and Hobgoblin
- Control decks focus on disruption while aggro strategies emphasize card advantage and power scaling
- Each archetype requires specific timing, positioning, and adaptation to counter popular meta decks
- Flexibility in card substitutions ensures consistent performance across different matchups
- Advanced tactics include predicting opponent moves and optimizing energy curve efficiency
Marvel Snap’s second collection phase introduces strategic depth with fewer but more impactful cards than previous pools. Unlocking occurs between Collection Levels 222 and 474, bringing powerful additions that significantly alter gameplay dynamics.
The transition to Pool 2 marks a critical evolution in your Marvel Snap journey. Cards like Jubilee and Hobgoblin represent substantial power spikes that can dominate matches when utilized correctly. Understanding these cards’ synergies and counters becomes essential for climbing the ranked ladder effectively.
Strategic planning for Pool 2 should focus on energy curve optimization and anticipating common opponent strategies. Many players struggle with the increased complexity, but mastering these decks provides a solid foundation for future collection levels. For comprehensive gameplay fundamentals, check our Complete Guide to build core competencies.
Control archetypes in Marvel Snap borrow concepts from traditional card games, focusing on restricting opponent options while maintaining board presence. The Floodgates strategy specifically targets resource denial and location lockdown to secure victories.
This deck utilizes minimal 1-Cost cards, with Iceman serving as the primary early-game disruption. His ability to increase a random card’s cost by one energy can disrupt opponent combos and timing significantly. When paired with Scorpion, you create cumulative disadvantage by reducing power across multiple cards in their hand.
Storm represents the deck’s namesake mechanic, flooding locations to prevent further card plays after the next turn. This forces opponents to either abandon the location or overcommit resources prematurely. Strategic pairing with Lizard creates early pressure that compounds the location denial strategy.
Shang-Chi provides crucial removal capability, destroying enemy cards with 9 or more power at his location. He serves as the perfect counter to buff-heavy strategies that rely on cards like Kazar, Blue Marvel, and Iron Man for power accumulation.
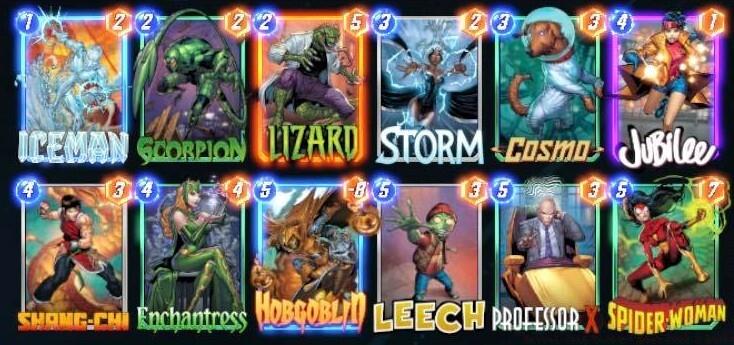
Ferocious Floodgates Decklist
Jubilee stands as one of Pool 2’s most defining cards. Her reveal ability pulls any card from your deck to join her location, creating unexpected power spikes. Deploying her on turn four can summon game-changing cards like Leech or Hobgoblin, either neutralizing opponent card abilities or applying massive negative power early.
The deck’s high-cost concentration requires careful resource management. If struggling with early turns, consider substituting Professor X and/or Cosmo for lower-cost alternatives like Sunspot or Ebony Maw to improve consistency. Understanding weapon synergies from our Weapons Unlock guide can provide additional strategic insights for resource allocation.
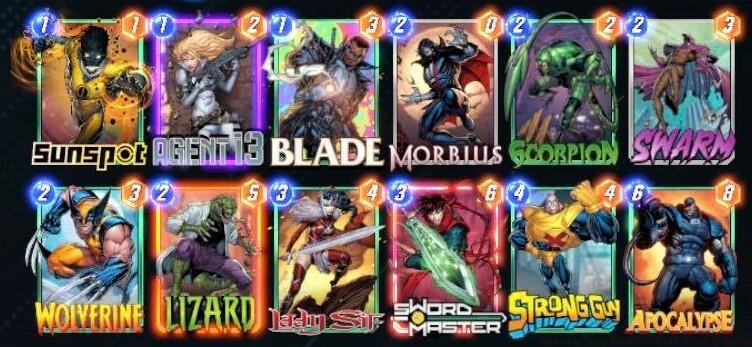
The Ruthlessness archetype combines Pool 1 On Reveal mechanics with new Pool 2 additions to create overwhelming board presence through card advantage and power scaling.
Agent 13 generates random cards for your hand, potentially providing access to unowned cards that can create unexpected win conditions. This card generation mechanic introduces variance that can bypass conventional counter strategies.
Deploying Okoye early remains crucial for maximizing her deck-wide power buff. While each +1 power increment seems minor individually, the cumulative effect across multiple cards creates substantial power advantages by game’s end.

Revealing Ruthlessness Decklist
Optimal sequencing involves playing Okoye before your key power cards to maximize the buff value. Many players underestimate the long-term impact of distributed power increases, focusing instead on immediate big plays.
Advanced tactics include holding Agent 13 for turns when you have spare energy, ensuring you don’t sacrifice board development for card generation. The strategic depth resembles class selection in our Class Guide, requiring understanding of when to value tempo versus value generation.
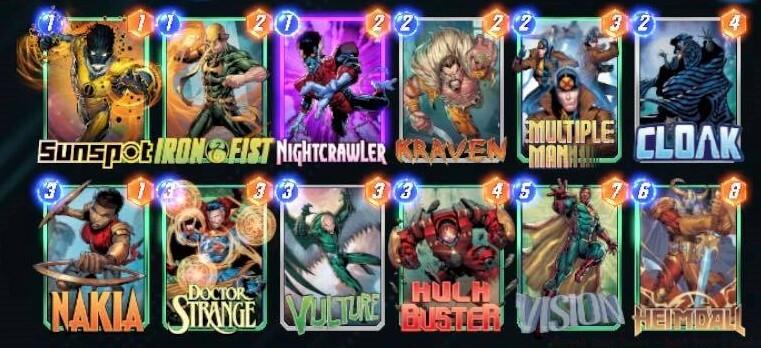
Discard strategies leverage intentional card removal to activate powerful synergies and combo sequences. This high-risk, high-reward archetype requires precise calculation and prediction of discard outcomes.
Discardian Discord Decklist
The deck engine revolves around cards that benefit from or enable discard mechanics. Proper resource management ensures you discard the right cards at the optimal times to maximize value.
Common mistakes include discarding key combo pieces prematurely or failing to account for the random nature of some discard effects. Mitigate these risks by including redundant combo pieces or cards that benefit from being in the discard pile.
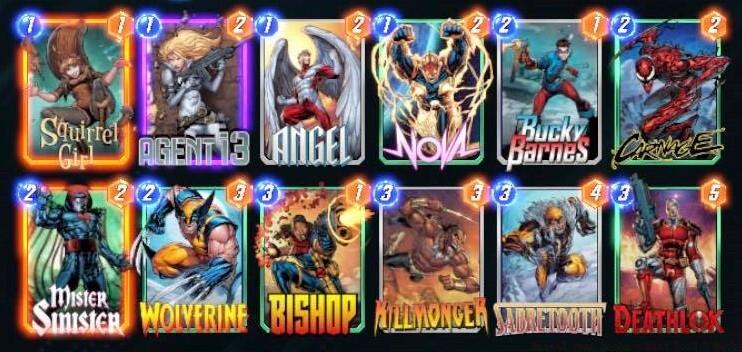
Movement-based decks capitalize on positional advantages and location-specific bonuses. This archetype requires foresight in card placement and anticipation of future board states.
Magnificent Movement Decklist
Strategic mobility allows you to contest multiple locations while minimizing commitment to any single one. This flexibility makes movement strategies particularly effective against predictable opponent plays.
Optimal setup involves establishing early presence while preserving movement options for later turns. Many players overcommit to initial locations, reducing their adaptability as the game progresses.
Destruction-focused decks utilize removal and board-clearing effects to maintain control. This archetype excels at disrupting opponent strategies while building toward powerful finishers.
Devastating Destruction Decklist
Effective destruction strategies require understanding common meta decks and anticipating their key cards. Timing your removal to maximize value while preserving your own win conditions separates average from expert players.
Counter play adaptation involves recognizing when to hold destruction effects for maximum impact versus using them for tempo advantages.
Action Checklist
- Analyze your current collection and identify missing Pool 2 key cards
- Practice Floodgates disruption timing against bot matches
- Master Ruthlessness card sequencing in friendly matches
- Experiment with deck substitutions to address personal playstyle gaps
- Analyze match replays to identify timing and positioning errors
No reproduction without permission:SeeYouSoon Game Club » Marvel Snap Decks – Best Pool 2 Decks Master Pool 2 Marvel Snap with expert strategies, deck optimizations, and advanced gameplay tactics