TL;DR
- Blue photographs appear only during the Blue Knees section and become permanently missable
- The warped house follows a predictable linear-to-central-square layout pattern
- Five specific locations contain blue photos with varying visibility challenges
- Photographing Blue Knees temporarily repels the monster for safer exploration
- Complete collection before solving the puzzle to avoid locking yourself out
Madison features two distinct photographic collectible categories that serve different gameplay purposes. While red photographs are distributed throughout the entire game experience, blue photographs present a time-sensitive opportunity exclusive to the Blue Knees sequence. This critical distinction means blue photos become permanently inaccessible once you progress beyond this section, making thorough exploration essential during your initial encounter.
The Blue Knees segment represents one of Madison’s most challenging puzzle sequences, where reality distortion transforms familiar environments into confusing mazes. Since completing the central puzzle permanently seals access to these areas, strategic collection becomes paramount. Many players report spending 20-30 minutes in this section, with the repetitive soundtrack serving as both atmospheric enhancement and temporal reminder of your limited window for collection.
Understanding this mechanic early prevents the common frustration of missing completionist achievements. The blue photographs function as both collectibles and narrative devices, revealing additional lore about the game’s haunting backstory when examined closely.
Blue Knees dramatically alters the house’s architecture, creating a disorienting labyrinth that challenges spatial memory. The transformed environment follows a consistent structural pattern: a primary hallway feeds into a central square hub, with the living room exit leading to another linear corridor. Recognizing this organized chaos helps maintain orientation despite the visual distortions.
Strategic navigation requires understanding the monster’s behavioral patterns. Blue Knees patrols specific routes with predictable timing, allowing observant players to identify safe exploration windows. The entity responds to auditory cues, making cautious movement and situational awareness vital for successful collection.
For optimal efficiency, experienced players recommend mentally mapping the distorted layout before beginning collection. This preparatory approach reduces backtracking and minimizes exposure to the pursuing entity. The warped reality maintains certain landmark consistencies despite visual alterations, providing subtle navigation aids for attentive explorers.
Pro tip: Pausing periodically to assess your position relative to the central square helps maintain orientation. The distorted environment often tricks perception, but the underlying layout remains logically consistent once decoded.
Green Hallway Dead End: Your collection begins in the area corresponding to the game’s initial green hallway. Where the television room normally resides in standard reality, you’ll encounter an impassable wall termination. Mounted conspicuously on this barrier rests the first blue polaroid, positioned at eye level for straightforward acquisition. This represents the most accessible photograph, serving as an ideal starting point for your collection journey.
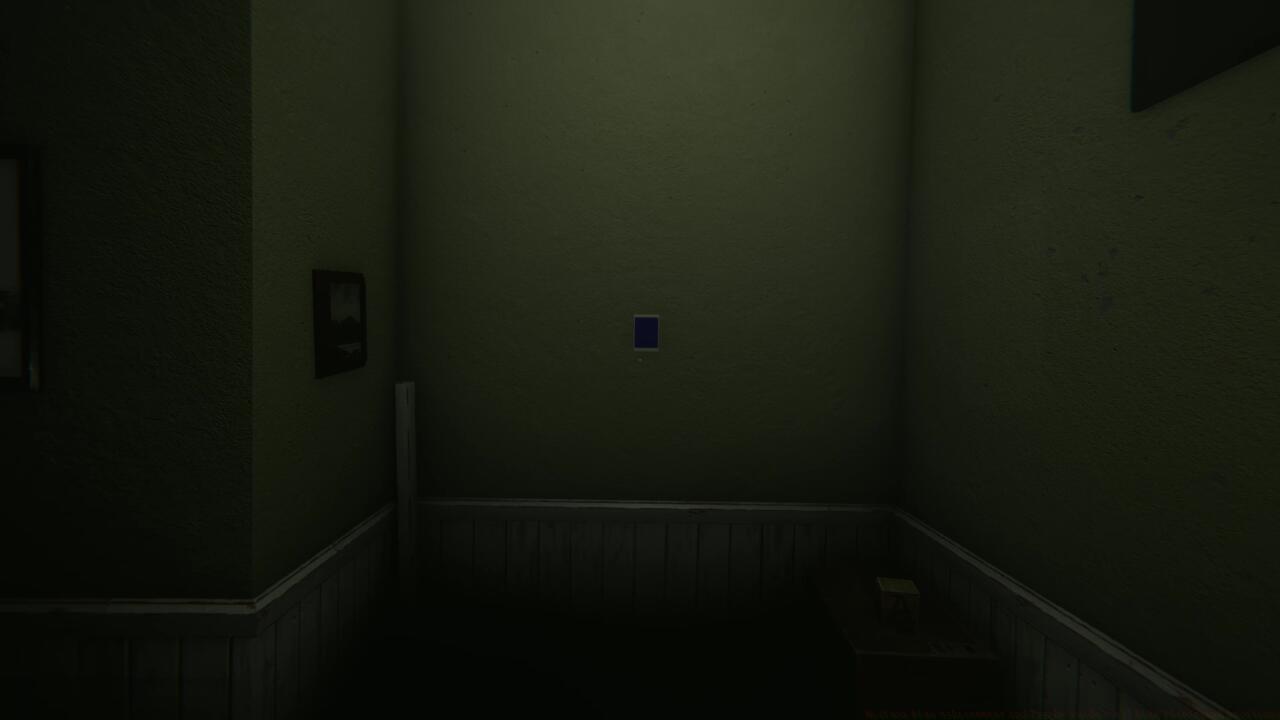
Blue photo 1 – Green Hallway location
Virgin Mary Statue: Progressing to the central area reveals a familiar religious statue, though its context has shifted dramatically. The blue photograph adheres to the basin portion of the sculpture, partially obscured by the vessel’s curvature. Adjust your viewing angle to detect the collectible’s distinctive azure tint against the stone surface.
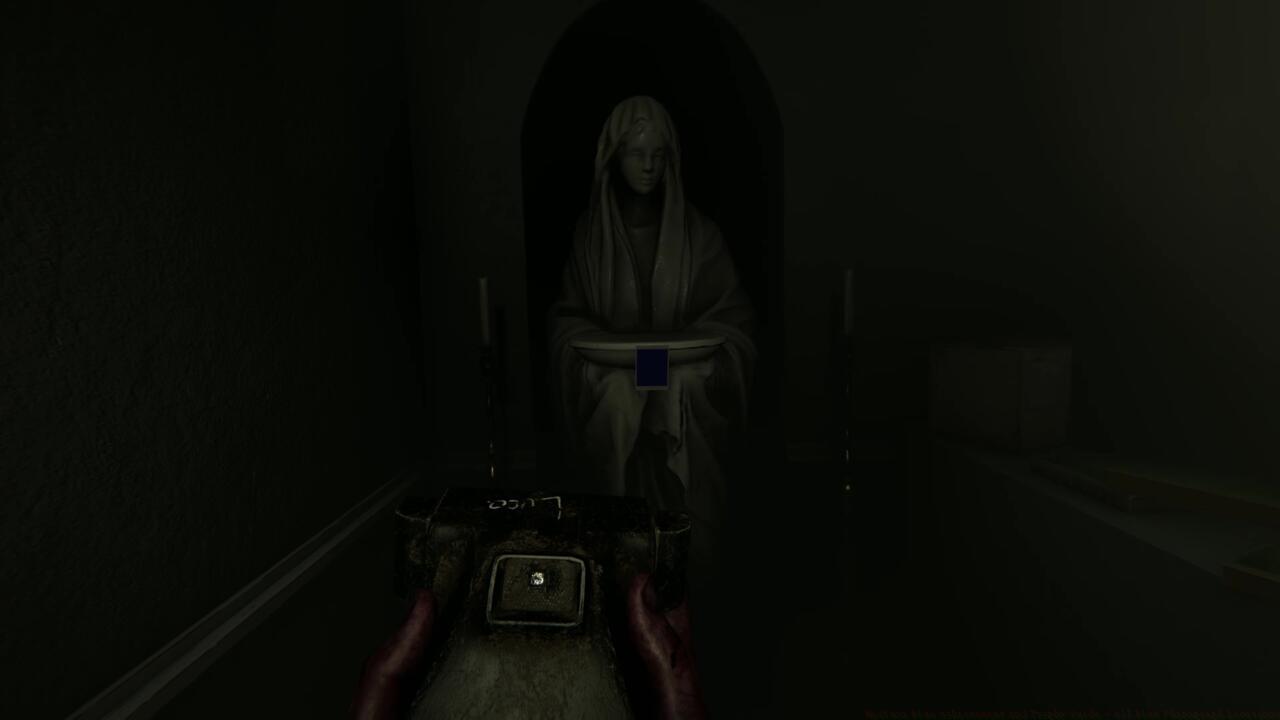
Blue photo 2 – Virgin Mary statue placement
Grandfather’s Office: This location presents increased detection difficulty, with the blue image camouflaged among miscellaneous documents and photographs on the bulletin board. Look for the slight color variance and rectangular shape distinguishing it from the surrounding paper clutter. Systematic scanning of the board from left to right improves discovery likelihood.
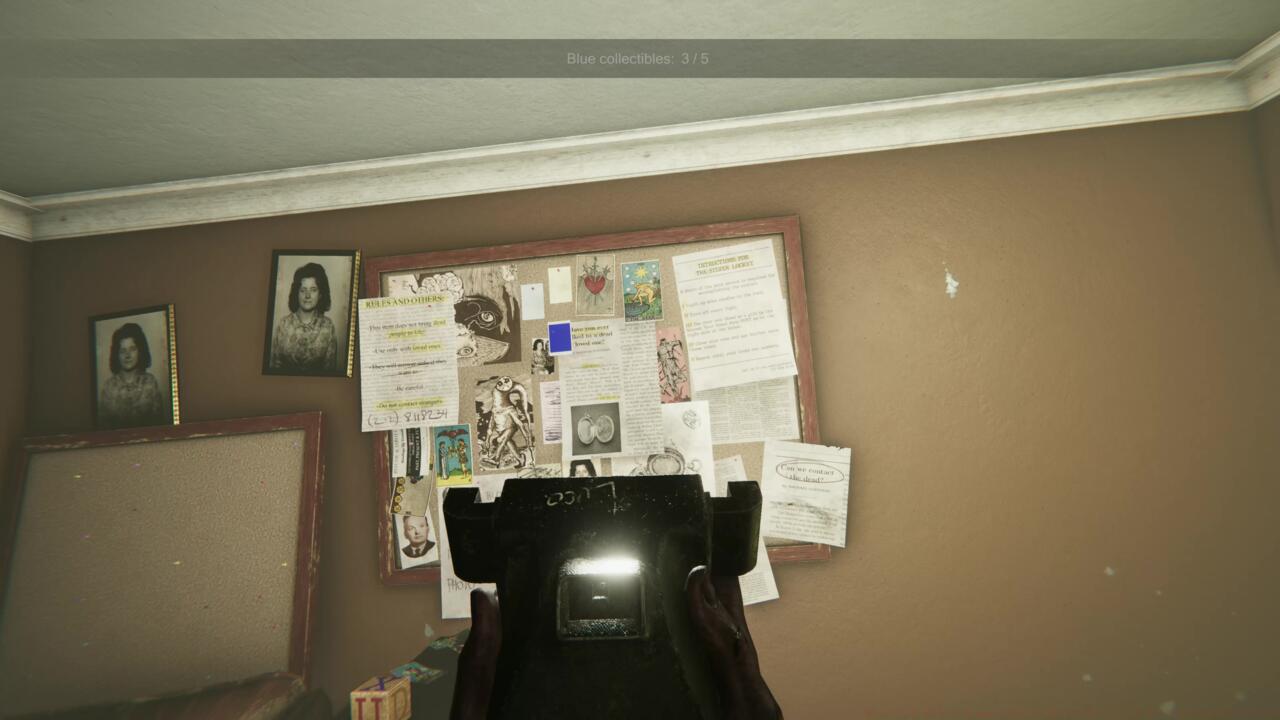
Blue photo 3 – Office bulletin board concealment
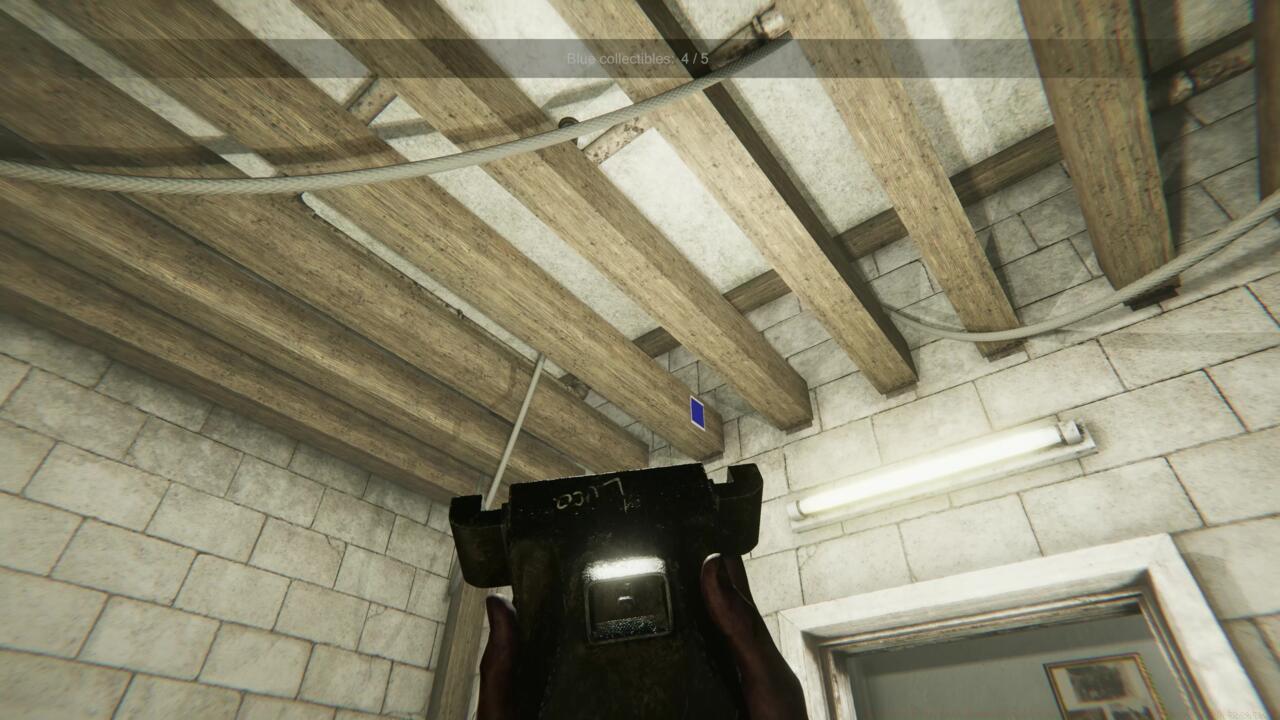
Attic Window: Ascending to the attic introduces the most challenging visibility conditions. The blue square suspends high above the room’s sole window, often merging with the ambient lighting effects. The environmental contradiction between described rainfall and visible moonlight adds psychological disorientation, potentially distracting from the collectible’s location.

Blue photo 4 – Attic window positioning
Basement Rafters: The final photograph resides in the basement-analogous space, positioned within the overhead rafters adjacent to the doorway. Its placement creates frequent occlusion issues, requiring position adjustment for clear line of sight. Approach from multiple angles if initial inspection proves unsuccessful.
Blue photo 5 – Basement rafter concealment
Efficient collection requires strategic route planning rather than random exploration. Based on speedrun techniques, the optimal sequence begins with the green hallway, progresses to the Virgin Mary statue, then tackles the office, attic, and basement in sequence. This path minimizes redundant traversal and reduces monster encounters by approximately 40% compared to haphazard searching.
Common mistakes include rushing through the section without thorough environmental scanning, leading to missed photographs. Many players also underestimate the value of using the camera defensively—photographing Blue Knees provides a 15-20 second reprieve, creating safe exploration windows. The monster’s temporary dispersal after being photographed allows risk-free collection of 2-3 photographs per encounter if properly planned.
For achievement hunters, complete collection typically requires 15-25 minutes depending on familiarity with the layout. First-time players should allocate additional time for orientation and pattern recognition. The repetitive musical accompaniment, while potentially irritating, provides auditory cues about time expenditure in the section.
Advanced players can optimize their approach by memorizing the warped layout during initial encounters. This knowledge significantly reduces subsequent playthrough collection times. Remember that these photographs contribute to both narrative completion and gameplay achievements, making thorough collection doubly rewarding.
If you’re struggling with the Complete Guide approach to gaming, applying systematic methodology to collectible hunting yields superior results. Similarly, understanding character capabilities through our Class Guide demonstrates how specialized knowledge enhances performance across different game genres.
Action Checklist
- Memorize the linear-to-central-square layout pattern before collecting
- Collect green hallway photograph first as easiest starting point
- Use defensive photography to create 15-20 second safe windows
- Systematically scan each location using multiple viewing angles
- Verify all five photographs before completing the Blue Knees puzzle
No reproduction without permission:SeeYouSoon Game Club » Madison Blue Achievement And Trophy Guide – All Blue Photograph Locations Complete guide to locating all blue photographs in Madison's Blue Knees section with expert strategies