TL;DR
- Salvaging converts unwanted gear into crafting materials at blacksmith locations marked by anvil icons
- Different rarities yield specific materials – commons give rawhide, rares provide Veiled Crystals and ores
- Imprinted legendary items become permanently unsalvageable after occultist modifications
- Use bulk salvage buttons to quickly clear inventory while preserving legendary items automatically
- Strategic salvaging outperforms selling for players focused on crafting and gear upgrades
When your inventory overflows with subpar equipment in Diablo 4, salvaging presents a compelling alternative to simply vending your items. This strategic choice transforms clutter into valuable crafting components rather than temporary gold gains.
Sanctuary constantly showers adventurers with diverse loot drops, from mundane gear to coveted legendary artifacts. While every player dreams of discovering that perfect build-defining weapon, reality dictates that most acquisitions won’t make the cut. Faced with this equipment surplus, you confront a fundamental decision: convert items to immediate currency through selling or dismantle them into materials for future crafting endeavors.
The salvaging versus selling dilemma hinges on your current priorities. Gold proves essential for repairs and vendor purchases, while crafting materials become invaluable for upgrading your best gear and enchanting properties. Early-game players often benefit more from gold accumulation, whereas endgame adventurers typically find greater value in material stockpiling.
To dismantle your unwanted gear, seek out blacksmith establishments scattered throughout Sanctuary’s settlements. These vital services appear on your mini-map as distinctive anvil symbols, ensuring easy navigation even in unfamiliar territories.
Upon interacting with any blacksmith, the salvage interface immediately presents itself as the default screen. The layout features a prominent crimson hammer emblem positioned to the left, with your complete inventory displayed opposite. Activation requires manually selecting this hammer icon, which transforms your cursor into a demolition tool ready for targeted item destruction.
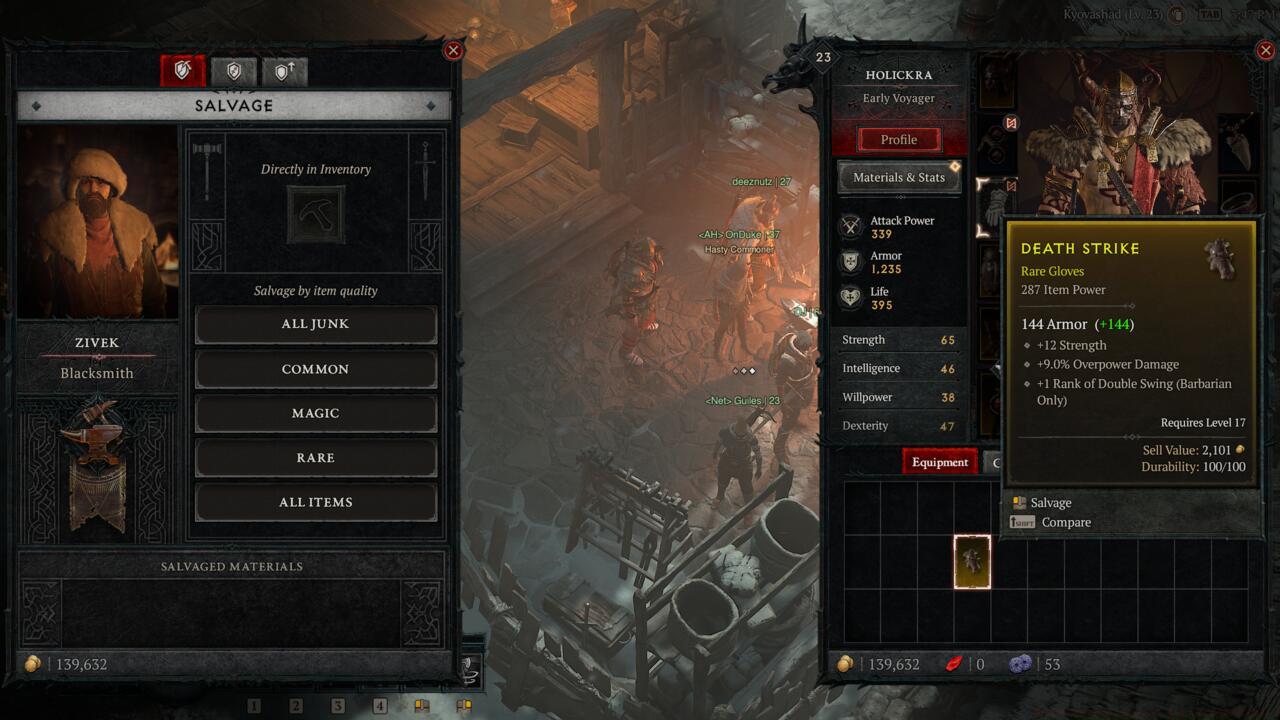
Visual reference of the salvage interface showing hammer icon and inventory layout
Pro tip: Plan your blacksmith visits around other town activities to minimize backtracking. Combine salvaging sessions with stash access, vendor sales, and waypoint usage for optimal efficiency. Advanced players often establish routes that incorporate multiple service providers in single trips.
Salvaging rewards vary dramatically based on item quality and type. Common white items typically yield basic rawhide, while magic (blue) gear provides upgraded leather and occasional ore fragments. Rare (yellow) equipment decomposition generates valuable Veiled Crystals alongside iron chunks and silver ore – materials crucial for high-tier crafting.
The salvage results panel at the screen’s bottom-left quadrant provides immediate transparency about acquired materials. This lets you assess whether specific items warrant salvaging versus selling based on current material needs.
Material acquisition strategy: Focus on salvaging items that provide resources you’re actively lacking. If you’re low on Veiled Crystals, prioritize rare items; if leather is your bottleneck, target common and magic armor pieces. This targeted approach maximizes the efficiency of your inventory management time.
While most equipment qualifies for dismantling, one significant exception exists: legendary items modified through aspect imprinting become permanently exempt from salvaging. This restriction applies whether the aspect originated from your Codex of Power or extracted from another item.
Once you’ve customized a legendary piece at the Occultist, your options permanently shift to equipping, stashing, or vending – salvaging becomes impossible. This irreversible transformation emphasizes the importance of carefully considering which legendaries warrant aspect application.
Common mistake: Players often imprint aspects on mediocre legendary items early game, only to regret this decision later when better bases emerge. Consider holding aspects until you acquire near-perfect legendary items worthy of permanent modification.
Beyond individual item processing, blacksmiths offer bulk salvaging options through specialized buttons beneath the primary hammer icon. These functions enable mass dismantling of junk, common, magic, and rare categories with single commands. The comprehensive “All Items” selection conveniently excludes legendary equipment, providing safety against accidental destruction of prized artifacts.
Optimization technique: Regularly use the “All Items” button during endgame farming sessions to quickly clear inventory space while preserving potential upgrades. This approach significantly reduces management time between dungeon runs.
Advanced players should develop salvaging rhythms aligned with their play patterns. Hardcore farmers might salvage after every 2-3 nightmare dungeons, while casual players could process inventory at each login/logout. Establishing consistent habits prevents inventory overflow and ensures steady material accumulation.
For comprehensive gaming strategies beyond salvaging, explore our Complete Guide to master complex game systems. Weapon enthusiasts should consult our Weapons Unlock resource, while class specialization seekers will benefit from our detailed Class Guide for optimal character development.
Action Checklist
- Locate blacksmith via anvil icon on mini-map
- Analyze current material needs before salvaging decisions
- Use bulk salvage buttons matching your current inventory composition
- Verify legendary items for aspect imprinting before salvaging attempts
- Establish regular salvaging routine aligned with your play frequency
No reproduction without permission:SeeYouSoon Game Club » How To Salvage Weapons And Gear In Diablo 4 Master Diablo 4 salvaging mechanics to optimize your gear management and resource collection strategies