TL;DR
- Access button mapping through Settings > Accessibility or Quick Settings for faster access
- Customize every button on Pro Controller or Joy-Cons with simple A-button selections
- Utilize back buttons as secondary inputs without replacing original functions
- Save multiple presets for different game genres and playstyles
- Avoid common configuration errors that can impact gameplay performance
Taking command of your controller’s configuration puts you in the driver’s seat of your gaming experience. Try repeating that phrase rapidly—it’s trickier than it appears!
Given that we dedicate countless hours to interacting with game controllers through button inputs, it’s absolutely essential to personalize this interface for maximum comfort and efficiency. The Nintendo Switch 2’s comprehensive button remapping functionality enables you to exchange any button assignment for another, serving both accessibility needs and personal preference requirements. This guide will walk you through mastering controller button customization on your Switch 2 system.
Accessibility Advantages: Button remapping proves particularly valuable for gamers with physical limitations or mobility challenges. By repositioning complex button combinations to more accessible locations, you can significantly reduce hand strain and improve reaction times. Many competitive players utilize this feature to gain mechanical advantages in fast-paced gaming scenarios.
To reconfigure your button assignments on Switch 2, begin by accessing your console’s Settings menu from the main home screen interface. Once inside Settings, navigate downward and choose the Accessibility option. Within this section, select the Modify Button Mapping feature to commence customization.
Pro Tip: Remember that you can activate the Modify Button Mapping via Quick Settings toggle within the Accessibility menu. As indicated by its name, this integrates the button mapping option into Quick Settings, accessible by pressing and holding the Home button on your controller. This approach can dramatically accelerate and simplify the remapping procedure.
After selecting Modify Button Mapping, specify which controller you wish to personalize, then choose Adjust Controller Mapping from the available selections. The subsequent interface permits complete customization of every input on both Pro Controller and Joy-Con configurations. Simply press the A button on any button option presented and designate your preferred alternative assignment.
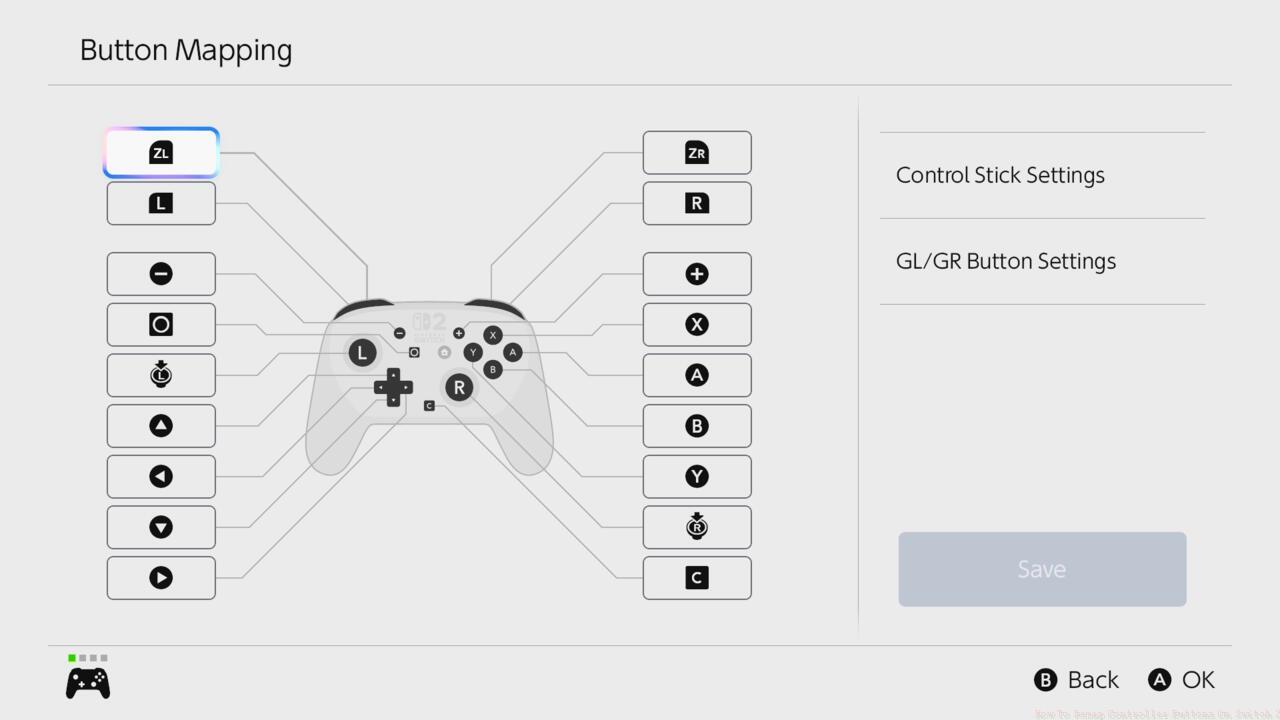
Personalize your controller inputs according to your specific preferences and requirements.
You can choose Control Stick Configuration on the right-hand side of the display to exchange your left and right analog sticks, which provides particular assistance for certain left-handed gamers. Furthermore, you can select GL/GR Button Configuration to allocate functions to these two rear buttons exclusively available on Pro Controller models. Assigning a command to one of these buttons doesn’t eliminate the standard input—it simply functions as an additional method to execute that action, rendering it an excellent selection for frequent maneuvers like evasive jumps or rapid weapon cycling.
Returning to the primary Button Mapping interface, you possess the capability to store and retrieve configuration presets, enabling seamless transitions between different setups tailored to various gaming titles. Should you ever become dissatisfied with your controller configuration, you can opt for Restore Default Controller Mapping to revert to factory settings instantly.
Advanced Technique: For competitive gaming sessions, consider creating specialized presets for different game genres. First-person shooters benefit from quick-access weapon swap buttons, while platformers perform better with jump and action commands positioned for rapid response. Racing games often work best with acceleration and brake functions mapped to trigger buttons for more intuitive control.
Optimal Button Layout Strategies: When remapping buttons, prioritize placing frequently used actions on buttons that require minimal thumb movement. This reduces fatigue during extended gaming sessions and improves reaction times. For multiplayer games like Battlefield 6 Complete Guide, consider mapping squad commands to easily accessible buttons for seamless team coordination.
Avoid These Configuration Errors: Many users make the mistake of creating overly complex layouts that they can’t remember during intense gameplay. Start with simple swaps and gradually build complexity. Another common error is failing to test new configurations in actual gameplay scenarios before committing to them.
Accessibility Considerations: For gamers with limited mobility, position critical functions on buttons that require less pressure or smaller range of motion. The Switch 2’s remapping system works exceptionally well with BF6 Weapons Unlock sequences often requiring rapid button combinations—consider spreading these across multiple fingers rather than concentrating on thumb-only inputs.
Game-Specific Recommendations: Different genres demand distinct control schemes. For tactical shooters referenced in our BF6 Class Selection Guide, prioritize mapping class-specific abilities to consistent locations across different character types. This muscle memory development significantly improves gameplay performance over time.
Action Checklist
- Navigate to Settings > Accessibility > Modify Button Mapping
- Enable Quick Settings access for one-tap remapping
- Select controller type and customize primary button assignments
- Configure control stick orientation and back button functions
- Create and save game-specific presets for different genres
- Test configurations in actual gameplay and refine based on performance
No reproduction without permission:SeeYouSoon Game Club » How To Remap Controller Buttons On Switch 2 Master Nintendo Switch 2 button remapping for enhanced gaming comfort and accessibility