TL;DR
- Nintendo Switch 2 requires microSD Express cards, not standard microSD cards used in original Switch
- Game transfer happens automatically during initial setup after save data migration completes
- Virtual Game Cards with blue icons indicate SD card storage, black icons show undownloaded content
- Use System Settings to manually move games between internal and external storage
- Always purchase compatible microSD Express cards separately as they’re not included with console
Expand your gaming library with proper storage solutions that ensure optimal performance and quick access to your favorite titles.
Storage management becomes crucial when building your game collection on any modern console. While the Nintendo Switch 2 includes built-in internal storage, most players quickly discover they need additional capacity, particularly when migrating extensive libraries from previous Nintendo Switch systems. Understanding the storage architecture helps prevent common installation errors and ensures smooth gameplay experiences.
The Nintendo Switch 2 demands a specific type of storage media—microSD Express cards—which differ significantly from standard microSD cards compatible with the original Switch. These advanced cards offer substantially faster data transfer speeds, reducing loading times and improving overall system responsiveness. During initial console configuration, the system will automatically detect when you need to insert the appropriate storage card.
Proper installation begins with locating the concealed card slot on your Nintendo Switch 2 unit. You must carefully lift the integrated stand positioned on the rear panel of the console. The dedicated microSD Express card port sits discreetly on the bottom-right section of the device frame.
The system provides helpful visual guidance throughout this process. If you’re uncertain about exact placement, simply select the “How to insert” option displayed on your screen during setup. This activates an interactive tutorial showing precise insertion points and proper orientation for your storage card.
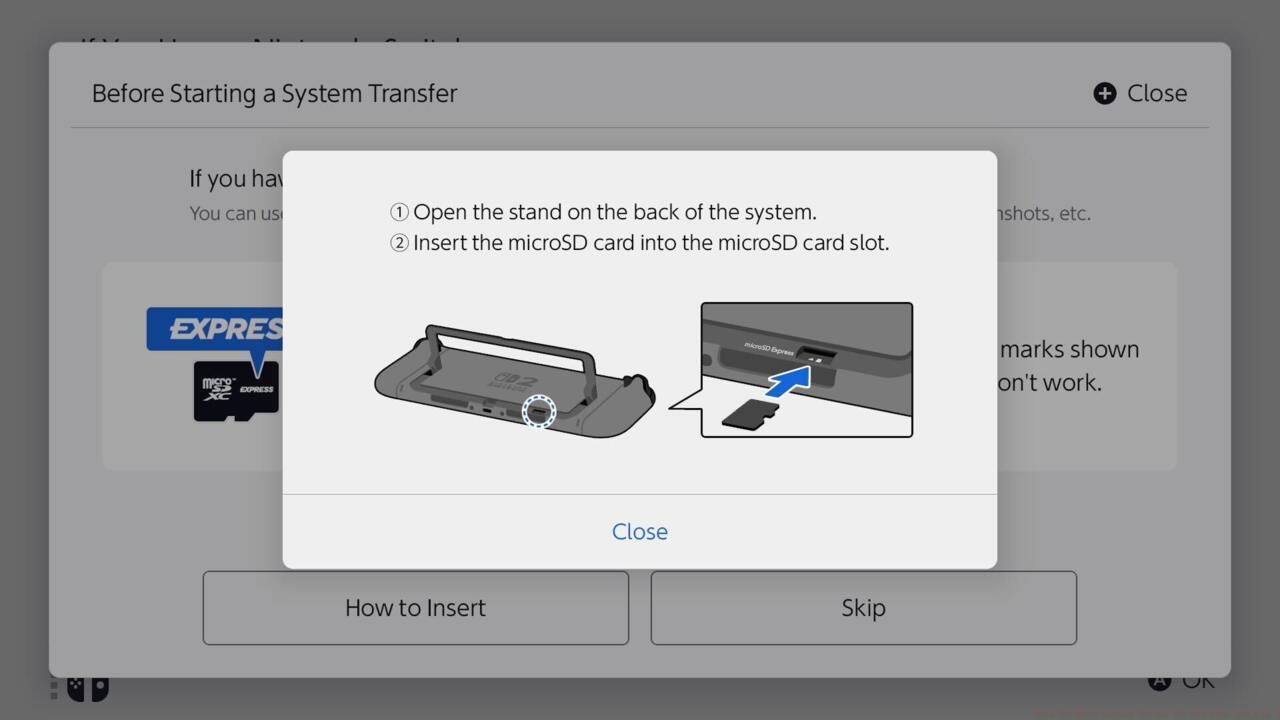
The microSD card slot is under the stand.
Insertion technique matters—gently push the card until it clicks into place, ensuring full contact with the internal connectors. Avoid forcing the card, as improper installation can damage both the card and console slot. The concealed placement protects your storage media during handheld use and transportation.
Once your save data and captured screenshots successfully transfer to the new system, the Nintendo Switch 2 initiates automated game migration to your expanded storage. This streamlined process eliminates manual downloading hassles for previously owned content.
All compatible titles already present in your Nintendo account library will begin downloading automatically once you access the home screen. The system prioritizes games based on your play history and recently accessed content, though you can manually adjust download priorities in system settings.
Transfer times vary significantly based on your internet connection speed and the total data volume being moved. Large game collections may require several hours, during which you can still use the console for other functions. Monitor progress through the notifications panel to ensure completion.
Purchased game software—whether acquired through Nintendo eShop or other digital storefronts—automatically integrates into your personalized collection of Virtual Game Cards. Access this digital library by selecting the Virtual Game Cards icon positioned at the bottom section of your home screen interface.
Your complete software collection appears here, allowing you to selectively choose which games to download onto your microSD Express card. The system provides clear visual indicators: a distinctive blue icon displayed in the bottom-right corner of each Virtual Game Card confirms successful SD card installation. Cards showing black icons represent content not yet downloaded to your local storage.
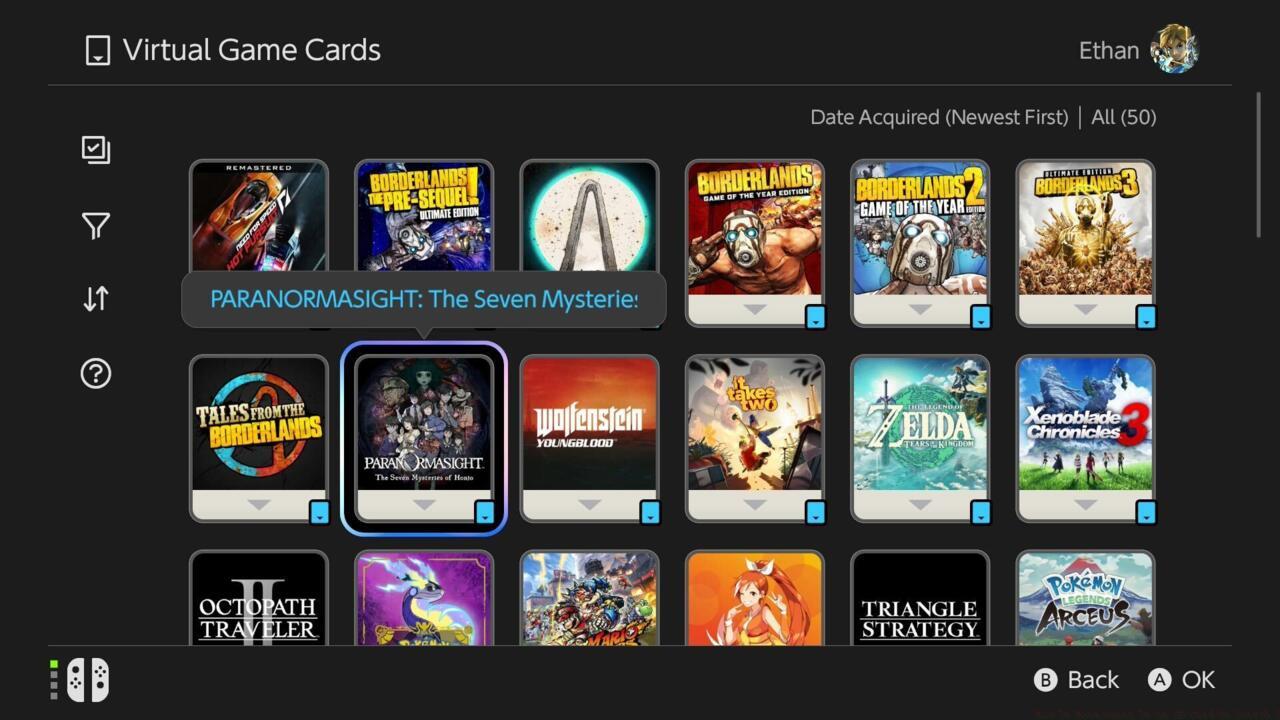
The Virtual Game Card library contains your games and other software.
Organization features let you sort your Virtual Game Cards by various criteria including purchase date, play time, or alphabetical order. This streamlined management system simplifies finding specific titles within large collections, similar to how our Class Guide helps organize gameplay strategies in other titles.
For games already installed on your Switch 2’s internal memory, accessing the System Settings menu provides granular control over storage allocation. Navigate downward to Data Management, then choose the Move System/microSD Express Card Data function for precise control.
This interface enables selective transfer of games and applications between system memory and your external storage card. The system displays storage usage statistics for both locations, helping you make informed decisions about what to move where. Consider keeping frequently played games on internal storage for fastest loading times.
Important restrictions apply: you cannot relocate software while it’s actively running or during ongoing download processes. The system will warn you if attempted transfers violate these constraints, preventing potential data corruption issues. For comprehensive system management, reference our Complete Guide for additional optimization strategies.
Purchase considerations: microSD Express cards ship separately from Nintendo Switch 2 consoles, requiring independent acquisition alongside any additional accessories you might need. Invest in cards from reputable manufacturers to ensure compatibility and reliability.
Performance optimization involves strategic placement of games based on play frequency. Keep multiplayer titles and games with frequent loading screens on internal storage for optimal performance. Single-player adventures and less frequently played titles work well on external storage.
Avoid common mistakes like removing the SD card during active transfers or using incompatible storage media. These errors can cause data loss or system instability. Always properly eject through system settings before physical removal. For weapon-specific storage considerations in other games, check our Weapons Unlock guide for specialized tips.
Regular maintenance includes periodically checking card health through system diagnostics and backing up critical save data to cloud storage. These practices ensure your gaming experience remains uninterrupted by storage-related issues.
Action Checklist
- Purchase compatible microSD Express card from reputable manufacturer
- Lift rear stand and insert card into bottom-right port until it clicks
- Complete system setup and save data transfer process
- Monitor automatic game downloads through Virtual Game Cards interface
- Use System Settings to manually optimize game placement between storage locations
- Verify blue icons on Virtual Game Cards confirm successful SD card installation
No reproduction without permission:SeeYouSoon Game Club » How To Move Games To An SD Card On Switch 2 Complete guide to expanding Nintendo Switch 2 storage with microSD Express cards and game management