Master the complete Leaper takedown strategy with optimized loadouts, positioning tactics, and loot collection in Arc Raiders
Understanding the Leaper Threat
The Leaper in Arc Raiders represents one of the most challenging mechanical adversaries you’ll encounter, ranking as the second-largest ARC boss in the game’s current roster. These formidable enemies patrol multiple map locations, typically stationed as guardians protecting high-tier loot zones and critical mission objectives. While skilled players can sometimes bypass them using alternative routes, mastering Leaper takedowns becomes essential for accessing premium resources and completing specific quest chains.
Essential Loadout Preparation
Proper equipment preparation separates successful Leaper engagements from failed attempts. Your explosive arsenal should include either 4 Blaza Grenades or 10 Light Impact Grenades as baseline requirements. For players seeking maximum efficiency, Wolfpack grenades deliver superior damage output and can be discovered during exploration or manufactured at workshop stations.
Beyond explosive weaponry, your survival kit must contain Herbal Bandages and a Shield Recharger to manage health depletion and shield regeneration. These medical items prove crucial when engagements extend longer than anticipated or when positioning errors occur. Advanced players often supplement with additional healing items to accommodate unexpected battle developments.
Read more: Where to find Spaceport Control Tower key in Arc Raiders
Combat Strategy and Weak Points
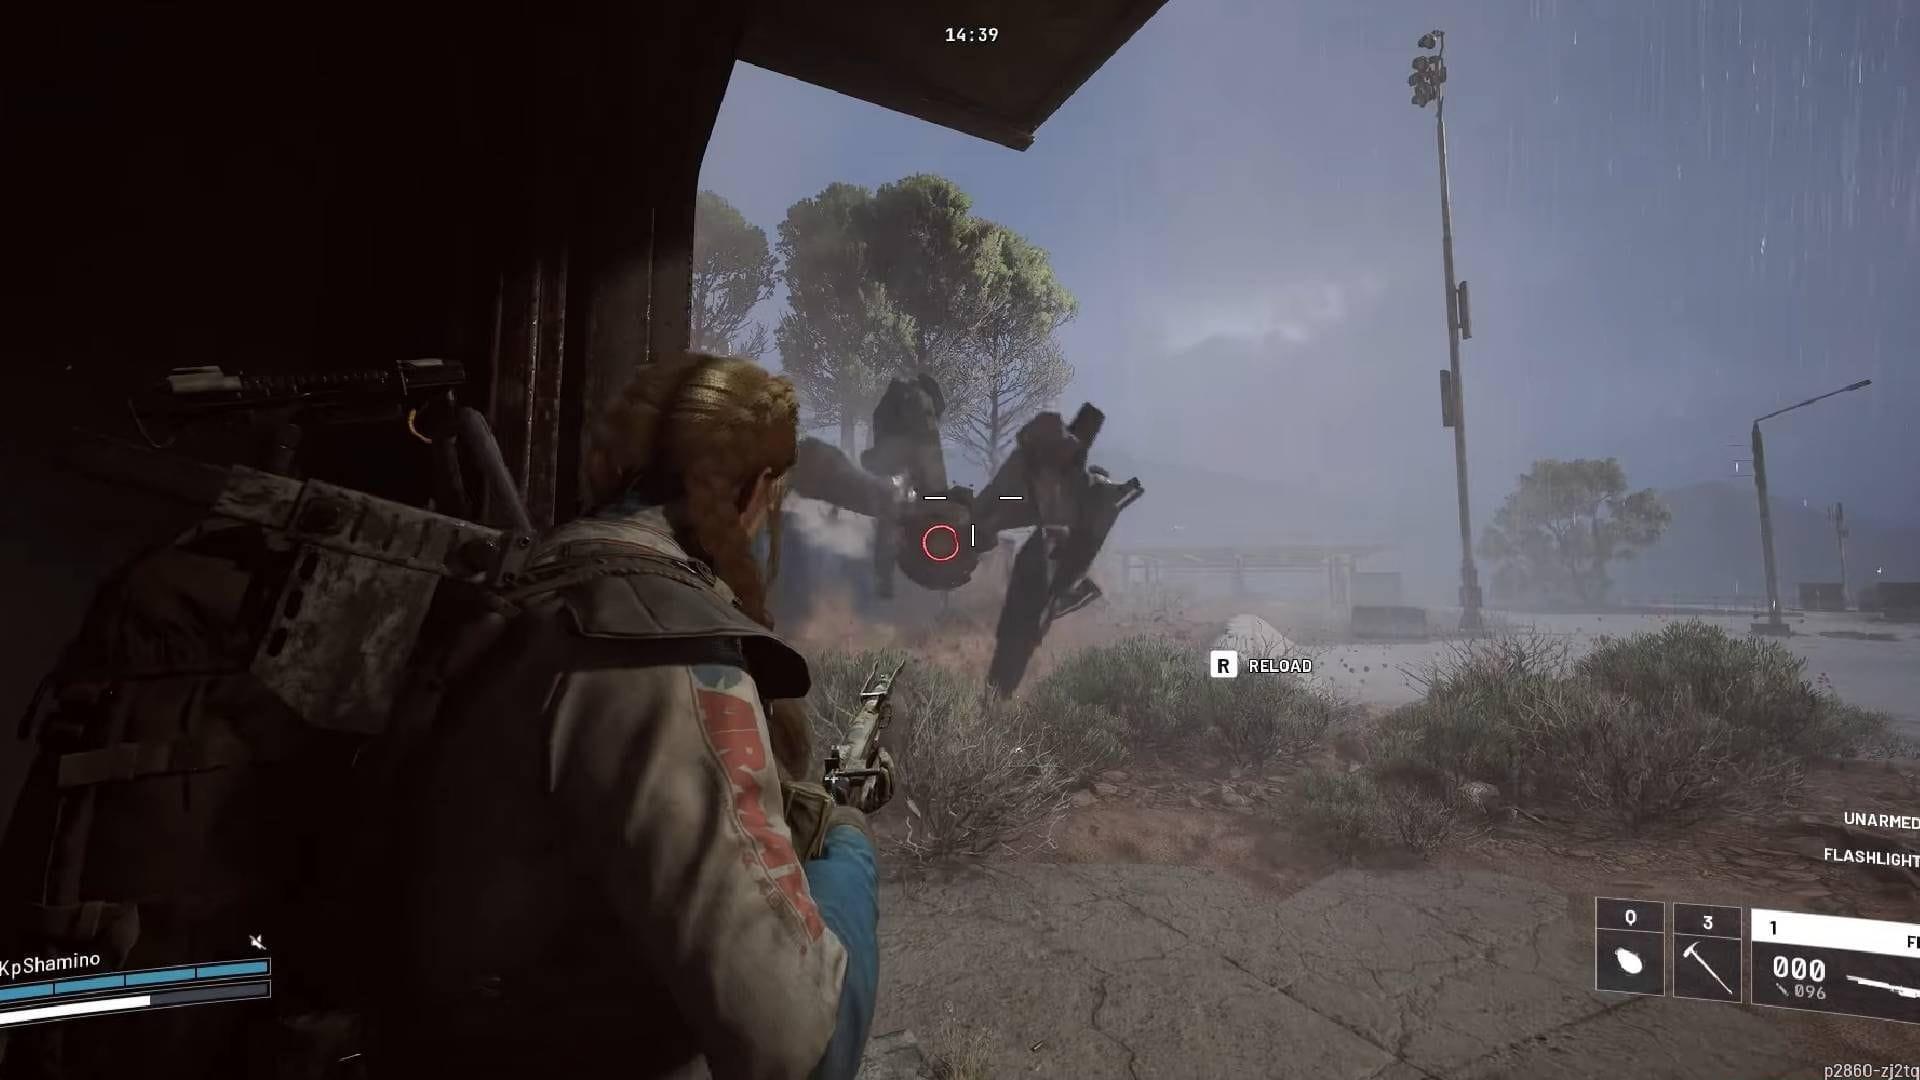
Successful Leaper elimination hinges on precise weak point targeting. The Leaper’s primary vulnerability lies in its massive arms, which generate its powerful leaping attacks. Striking these limbs consistently immobilizes the mechanical beast, creating extended vulnerability windows. Secondary targeting should focus on its ocular sensor (the distinctive red circular component), which delivers substantially higher damage compared to body shots.
Engagement initiation requires careful environmental assessment. Before alerting the Leaper, identify protective structures like large containers, rock formations, abandoned buildings, or compact rooms that provide reliable cover during its assault phases. Once positioned advantageously, draw its attention with ranged fire, then commence grenade deployment as it closes distance.
Maintain extreme situational awareness throughout the encounter. When the Leaper initiates its signature leap, immediate evasive movement and cover utilization becomes critical to avoid significant health depletion. The mechanical giant experiences a brief reset period after landing, creating precious seconds for counter-attacks. This recovery window represents your prime opportunity for concentrated grenade strikes to systematically degrade its structural integrity.
Also read: How to complete Mixed Signals quest in Arc Raiders
Advanced Combat Execution
While sheltered behind adequate cover, the Leaper’s bulky frame and massive arms limit its offensive capabilities against well-protected positions. Use this defensive advantage to administer healing when necessary without disengaging from the combat cycle. Repeat this systematic approach throughout the engagement:
This methodical strategy enables relatively straightforward elimination within several minutes. While grenades serve as your primary damage source, ammunition depletion shouldn’t cause panic. After initial explosive volleys, the Leaper typically sustains substantial damage, allowing transition to heavy-caliber weapons like the Ferro rifle. Continue focusing fire on previously identified weak points while maintaining the established combat rhythm to secure final elimination.
Common tactical errors include premature engagement without proper cover identification, inefficient grenade consumption during non-vulnerability windows, and failure to utilize the full recovery period after Leaper attacks. Advanced players optimize damage by synchronizing explosive throws with the exact moment the Leaper completes its reset animation.
Post-Combat Rewards
Upon achieving victory, immediately approach the disabled mechanical frame for resource collection. Each component yields specific crafting materials and upgrades:
These materials represent valuable progression resources for weapon enhancements and equipment crafting. Exercise caution during the looting process, as the destroyed ARC unit undergoes a volatile core destabilization sequence. Maintain safe distance during the final explosion to avoid unnecessary health reduction after successfully defeating the mechanical threat.
Check out the links below for more such guides:
No reproduction without permission:SeeYouSoon Game Club » How to defeat Leaper in Arc Raiders Master the complete Leaper takedown strategy with optimized loadouts, positioning tactics, and loot collection in Arc Raiders