TL;DR
- Dark Academia requires finding three power cores and using Mattermorph abilities in Augur’s Bethel
- The first core is under the bridge, while the other two require Mattermorph activation
- Proper platform navigation and ability timing are crucial for avoiding common frustrations
- Quest completion rewards include exclusive gear and valuable lore about The Nine
- Advanced strategies can reduce completion time from 15+ minutes to under 8 minutes
GameSpot may receive revenue from affiliate and advertising partnerships for sharing this content and from purchases through links.
Beyond Destiny 2: The Edge of Fate’s primary narrative, the Kepler destination introduces numerous optional missions that expand the game’s universe. These secondary activities not only provide fresh equipment but also deliver narrative fragments that enrich the stories of Lodi, the Aonians, and the enigmatic Nine. Among these, the Dark Academia assignment from Ikora Rey has emerged as particularly challenging for completionists.
The Dark Academia mission transports Guardians to Kepler’s Augur’s Bethel sector, offering a relatively brief experience that yields gear rewards and additional background on Orin’s connection to The Nine. However, its requirements include locating a Mattermorph deposit and activating three environmental switches, combined with extended dialogue sequences that frequently test players’ patience.
This comprehensive walkthrough details the complete Dark Academia quest procedure and provides expert guidance on circumventing typical completion obstacles. For broader strategic context, consult our comprehensive Battlefield 6 Complete Guide.
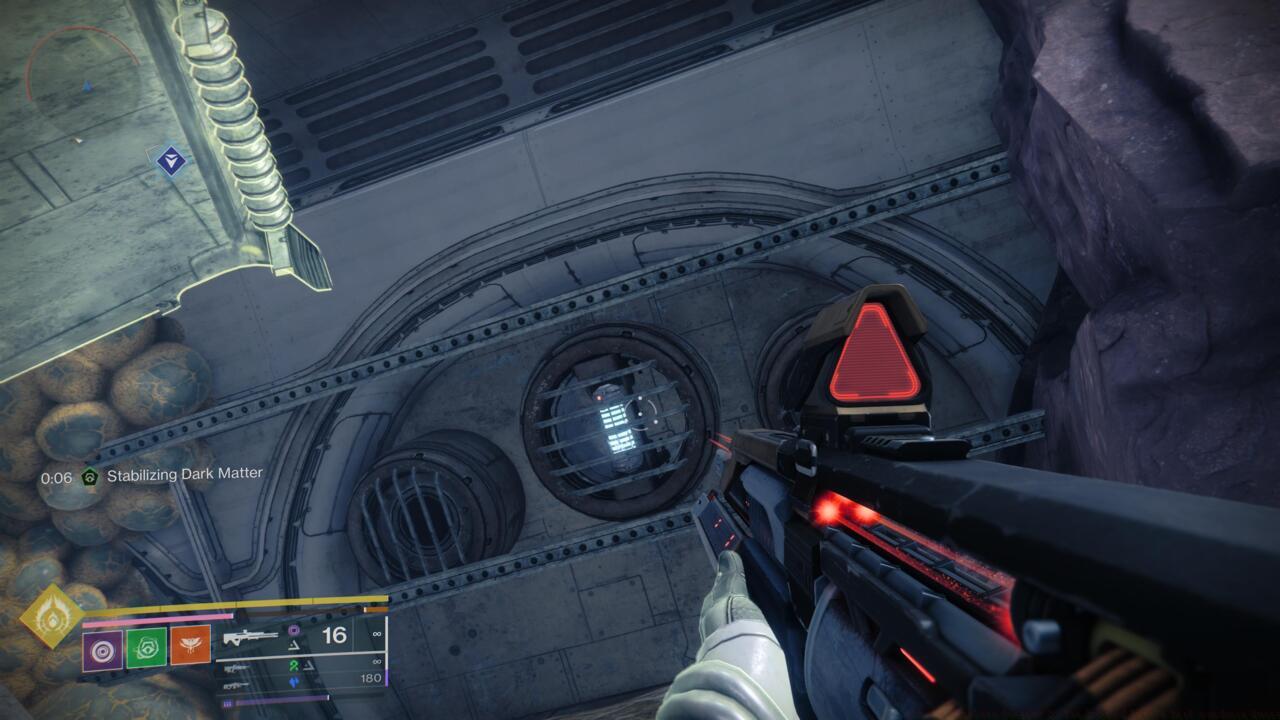
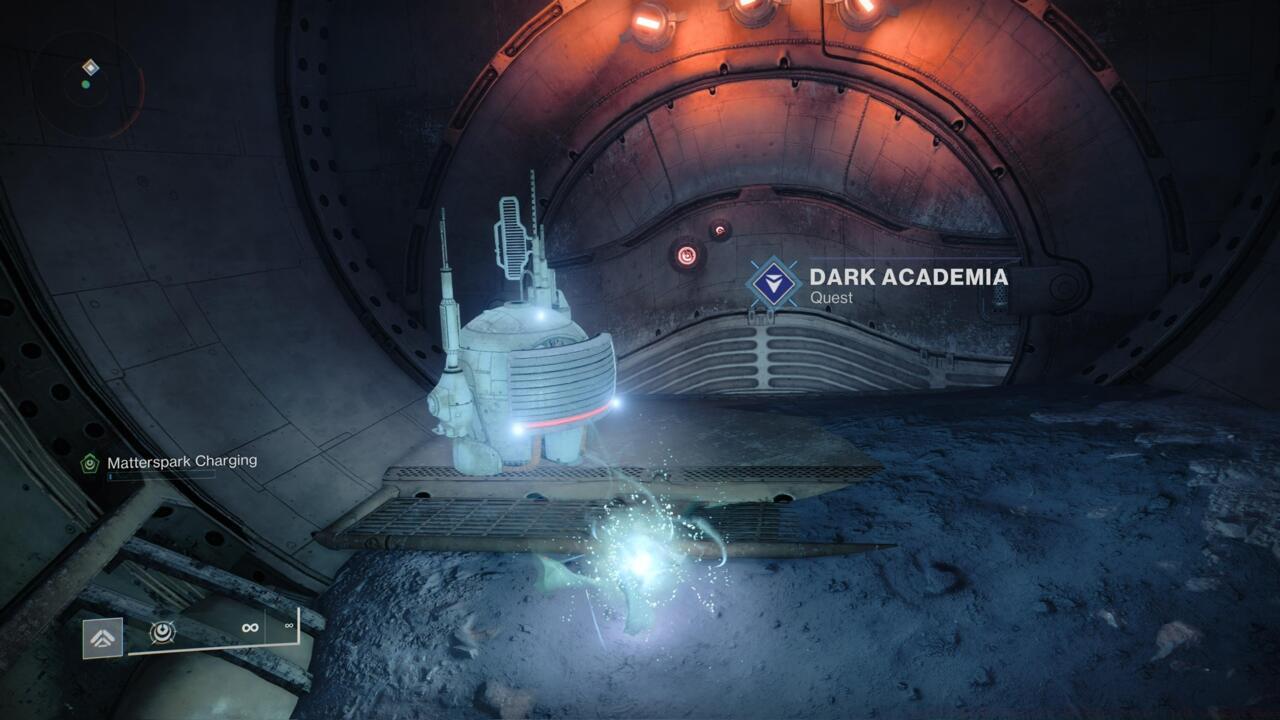
Upon arriving at Augur’s Bethel, you’ll discover the mission indicator concealed behind a sealed entrance. Observe the adjacent generator—it’s protected by an energy barrier, but unmistakably belongs to the category requiring Matterspark discharges for activation. Consequently, your initial and most critical objective involves disabling that shield to enable generator activation.
Your mission involves locating and destroying three energy conduits to disrupt shield power supply. These prove somewhat challenging to spot, so we’ll address them sequentially with detailed navigation.
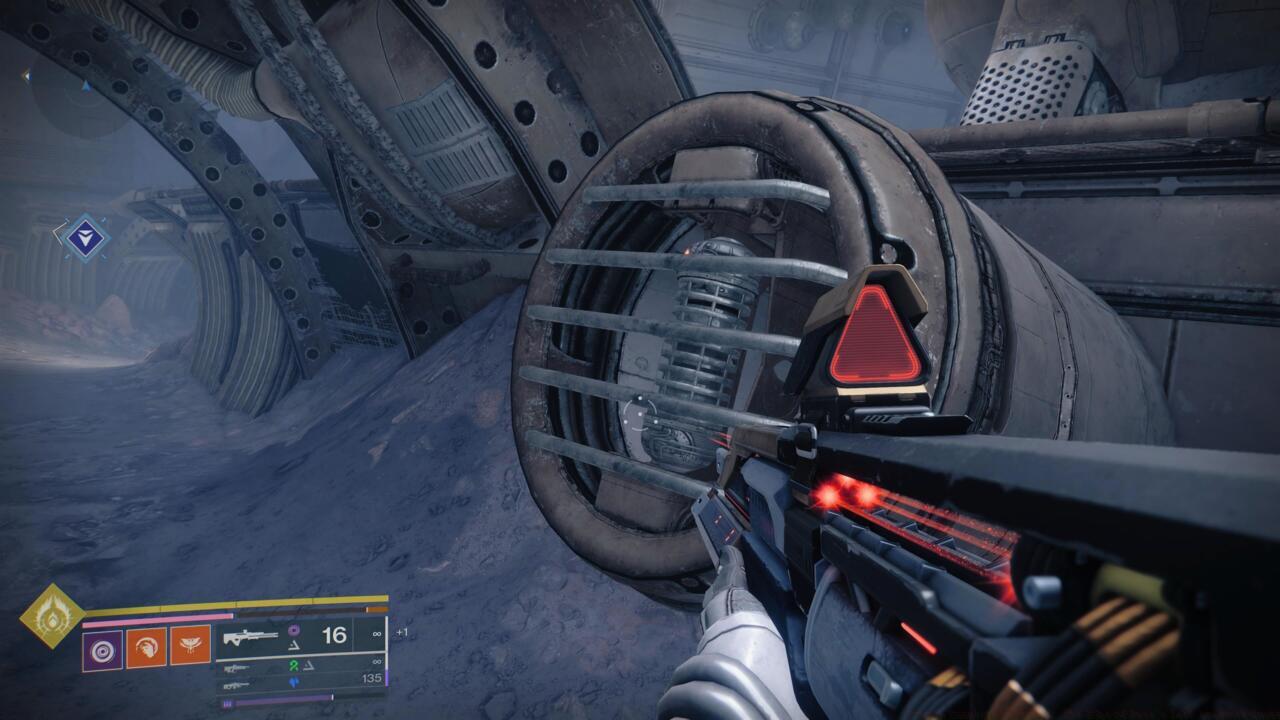
The simplest energy conduit resides on the area’s bottom tier, positioned immediately adjacent to the bridge housing the generator. Descend to locate it beneath the bridge structure; it will emit a distinctive blue luminescence. Eliminate it to activate the initial switch. Pro tip: Use your Ghost’s scanner function to highlight interactive objects through walls, saving valuable search time.
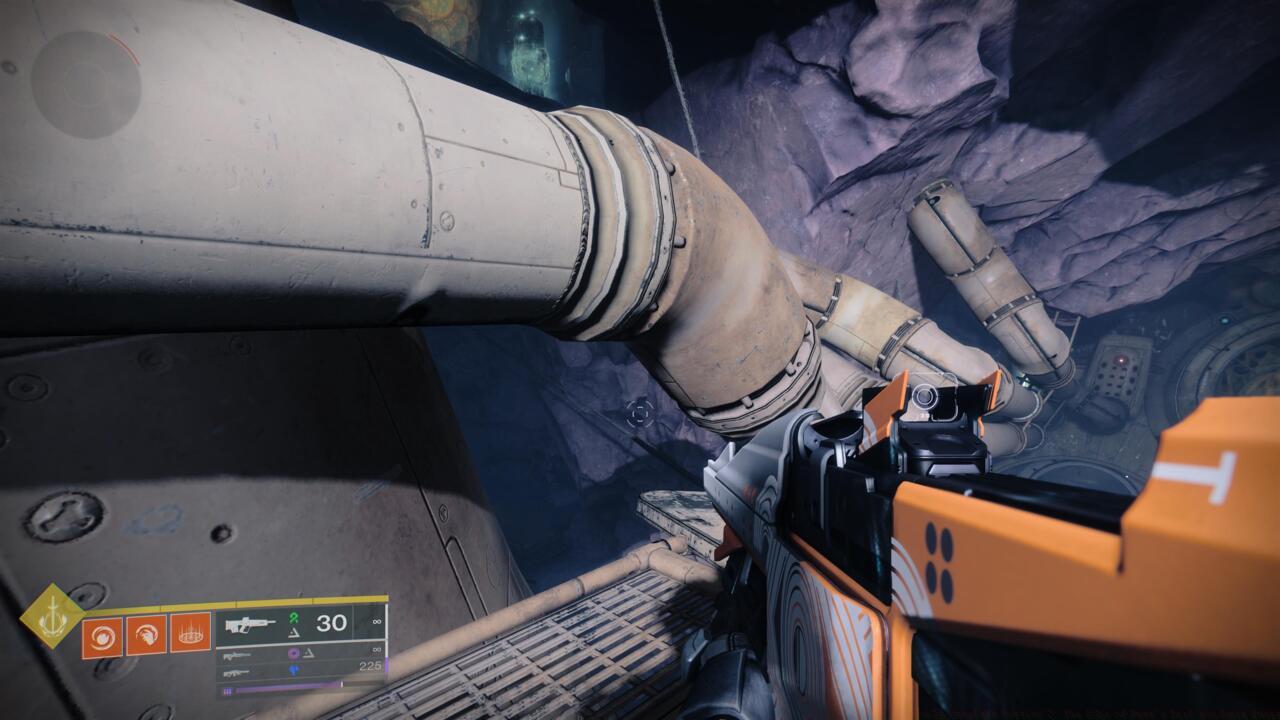
The remaining two switches demand acquiring Mattermorph capabilities to manipulate environmental elements. The Mattermorph deposit proves exceptionally well-concealed. You must ascend to the location’s uppermost level—the collection of platforms mounted on piping systems. Proceed along the conduits in the direction of the laser-barrier doors positioned at one arena extremity.
Approximately midway along the piping network, an intersection will direct one conduit upward and rightward. Survey that direction and you should discern the characteristic green radiance of Mattermorph. The accompanying image captures the perspective with the Guardian facing away from the laser barriers; it displays the Mattermorph deposit at upper left and the arena’s rear entrance at lower right.
Common mistake: Many players waste time searching ground level for Mattermorph. Remember it’s always positioned at elevation in Kepler environments. For additional character optimization strategies, explore our BF6 Class Selection Guide.
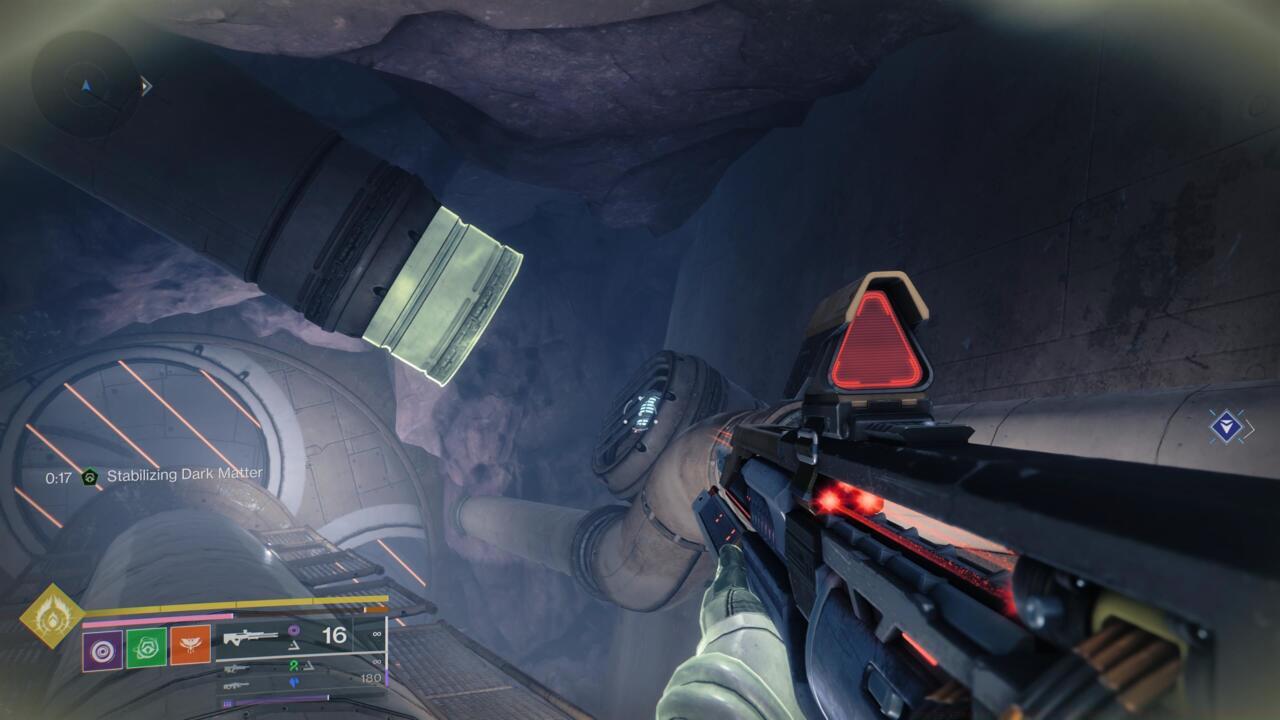
Once infused with dark matter stabilization energy, sprint toward the laser barrier doors and you’ll notice an overhead conduit pulsating with light green. Employ your Mattermorph capability to reveal the second energy conduit at the pipe’s right terminus. You can observe its blue glow in the preceding visual reference.
The third and ultimate energy conduit demands precise Mattermorph timing. Return to the central platform cluster and target the suspended conduit section directly above the initial bridge location. Activate your ability during its green pulsation phase to expose the final switch. Advanced technique: The Mattermorph charge duration is approximately 45 seconds—plan your route efficiently to activate both remaining cores within this window.
Strategic insight: Activate the second core first, then immediately proceed to the third location. This sequence minimizes backtracking and ensures completion within a single Mattermorph charge cycle.
With all three energy conduits eliminated, the generator shield will deactivate, allowing you to administer the necessary Matterspark discharge. The previously sealed door will retract, granting access to the mission objective completion area.
Upon concluding the mission, you’ll receive the promised equipment reward alongside substantial narrative revelations concerning Orin’s transformation and The Nine’s motivations. The gear typically includes weapons with unique Kepler-themed perks that synergize well with Mattermorph abilities. For comprehensive armament strategies, reference our detailed BF6 Weapons Unlock Guide.
Reward analysis: The obtained equipment often features “Reality Shift” perks that enhance weapon performance during Mattermorph activation periods.
Many Guardians encounter specific complications during Dark Academia execution. The most frequent problem involves Mattermorph charge expiration before activating both upper cores. Solution: Ensure you begin from the deposit location and take the most direct route between activation points.
Dialogue sequence frustration: The extended conversational segments cannot be skipped but can be minimized by remaining stationary during interactions rather than exploring.
Time optimization: Experienced players can complete the mission in 6-8 minutes versus the typical 15+ minutes for first attempts. Key time-savers include memorizing core locations and pre-planning movement routes between objectives.
Bug prevention: Occasionally, cores may fail to register destruction. If this occurs, return to orbit and reload the activity to reset the instance.
Advanced technique: Equip mobility-enhancing armor mods and use movement abilities like Icarus Dash or Hunter dodge to traverse between platforms more efficiently.
Action Checklist
- Navigate to Augur’s Bethel and locate the shielded generator
- Destroy the first power core beneath the bridge structure
- Ascend to highest platforms and locate Mattermorph deposit on pipes
- Activate Mattermorph and expose then destroy the second core near laser grids
- Locate and eliminate the third core above the bridge within charge duration
- Activate generator and complete quest for rewards
No reproduction without permission:SeeYouSoon Game Club » How To Complete Destiny 2: The Edge of Fate’s Dark Academia Quest Complete guide to Destiny 2's Dark Academia quest with expert strategies and troubleshooting tips