TL;DR
- Master wand targeting by moving your finger to align the cursor, not just tapping the screen
- Prioritize casting speed over perfect accuracy for maximum damage output
- Use Protego strategically and upgrade its effectiveness through profession skill trees
- Manage potions effectively as damage carries over between Wizarding Challenge battles
- Coordinate profession abilities and pre-battle spells for optimal team performance
GameSpot may receive revenue from affiliate and advertising partnerships for sharing this content and from purchases through links.
Magical confrontations form the core gameplay experience in Harry Potter: Wizards Unite, requiring mastery of both offensive and defensive techniques. As you combat The Calamity’s effects, you’ll encounter diverse adversaries including dark wizards, acromantulas, vampires, and werewolves. Progressing through the narrative, collaborating with allies, and securing elusive Foundables demands proficiency in handling aggressive magical entities. For comprehensive game knowledge, explore our extensive Harry Potter: Wizards Unite resource center.
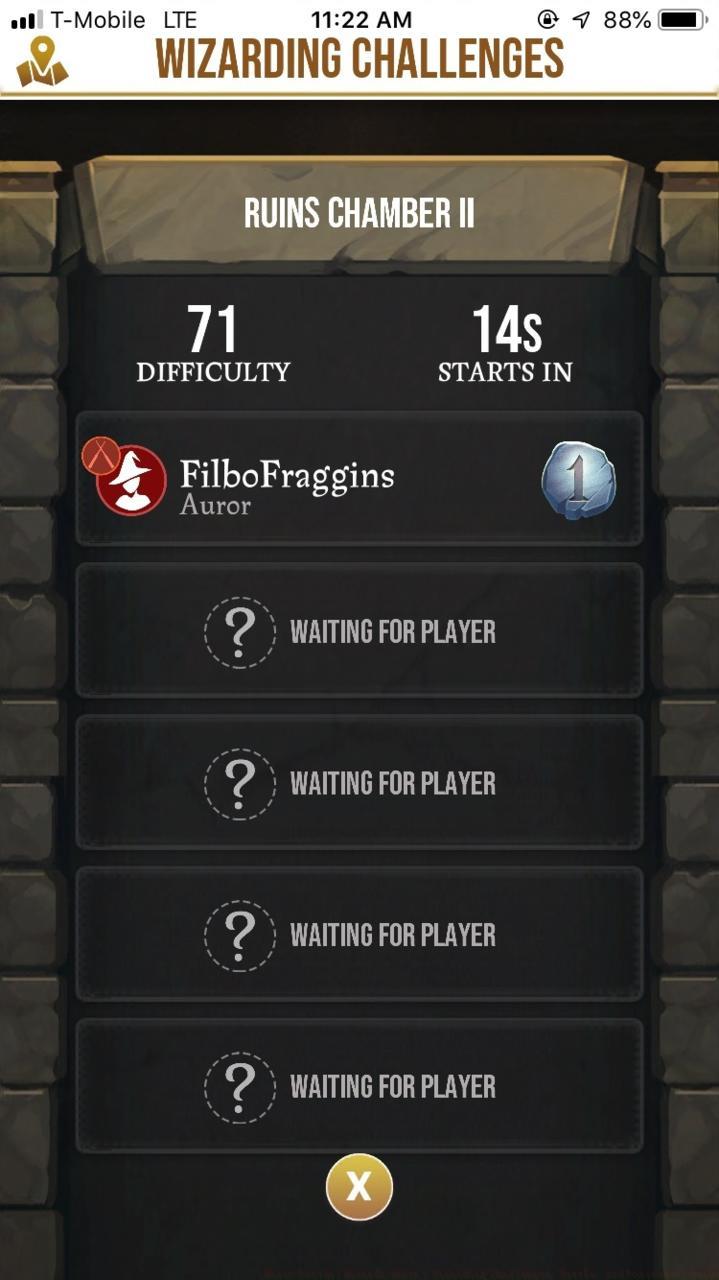
Primary combat occurs within Fortresses during Wizarding Challenges, offering exclusive rewards unavailable through standard gameplay. Additionally, hostile encounters may interrupt your Foundable collection missions, necessitating immediate dueling responses. While Wizards Unite combat mechanics appear simple initially, numerous subtle elements significantly impact battle outcomes. Critical factors include combat statistics optimization, spell execution methodology, Rune selection strategies, and tactical positioning considerations.

This guide provides comprehensive strategic insights for achieving victory in battles and successfully completing Wizarding Challenges. From precision spell-casting to synergistic team building, these advanced techniques will empower you to overcome magical opponents and maximize your wizardly potential.
Combat scenarios differ substantially from standard Confoundable encounters, introducing complex strategic layers and specialized mechanics. Successful spell deployment begins with precise enemy targeting, achieved by aligning a star-shaped reticle with the corresponding adversary symbol. This targeting system operates counterintuitively for new players—initiate by dragging your finger across the display to summon the targeting cursor, typically originating from the screen’s upper boundary. Recognize that you’re directing your wand’s trajectory rather than simply selecting targets, requiring continuous finger movement to synchronize the wand tip with the intended mark.
Maintaining cursor alignment proves challenging as opponents employ evasive maneuvers, demanding rapid response and precision targeting to prevent enemy retaliation. A common mistake is lifting your finger prematurely—maintain continuous contact until the targeting sequence completes.
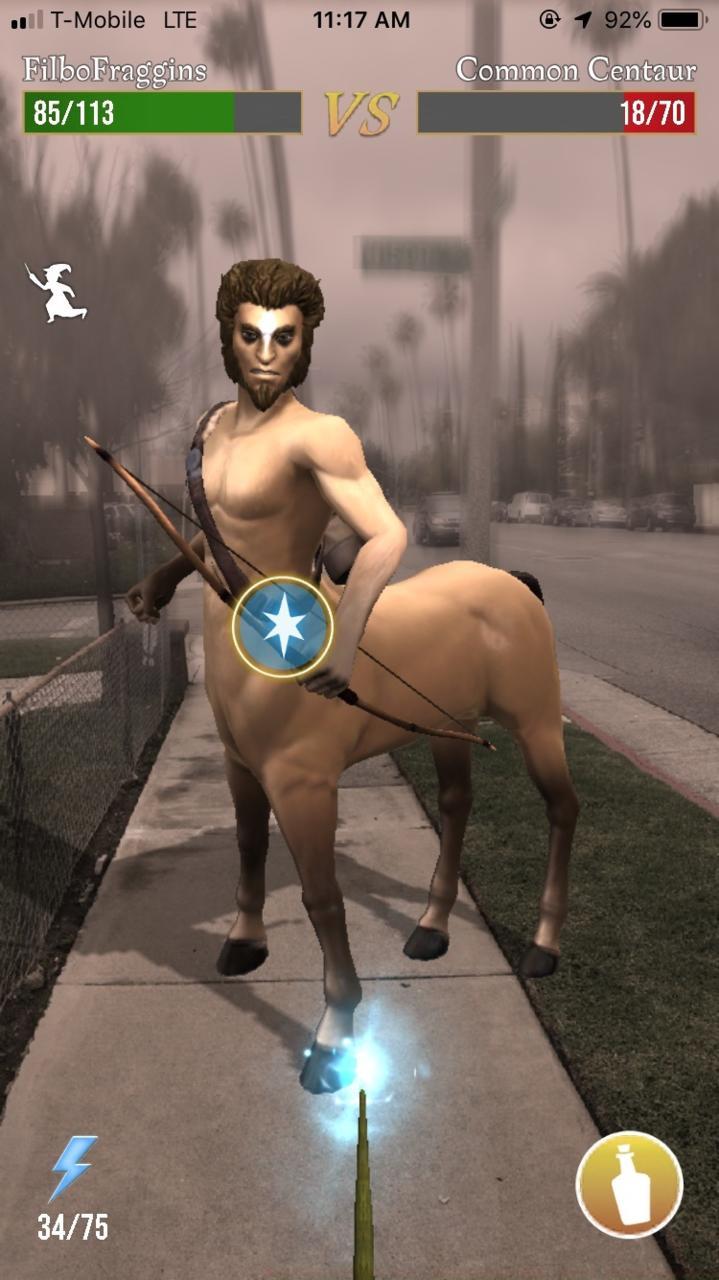
When the targeting reticle’s perimeter fully saturates with blue energy, you gain attack initiation capability. Similar to standard spellcasting, you must trace the displayed pattern with your finger. Casting velocity remains the paramount success determinant; mirroring Confoundable mechanics, swift execution outweighs meticulous accuracy. While precise tracing contributes to effectiveness, rapid imperfect casting consistently outperforms slow perfect execution. Advanced players should practice the ‘swipe-and-release’ technique for optimal speed.

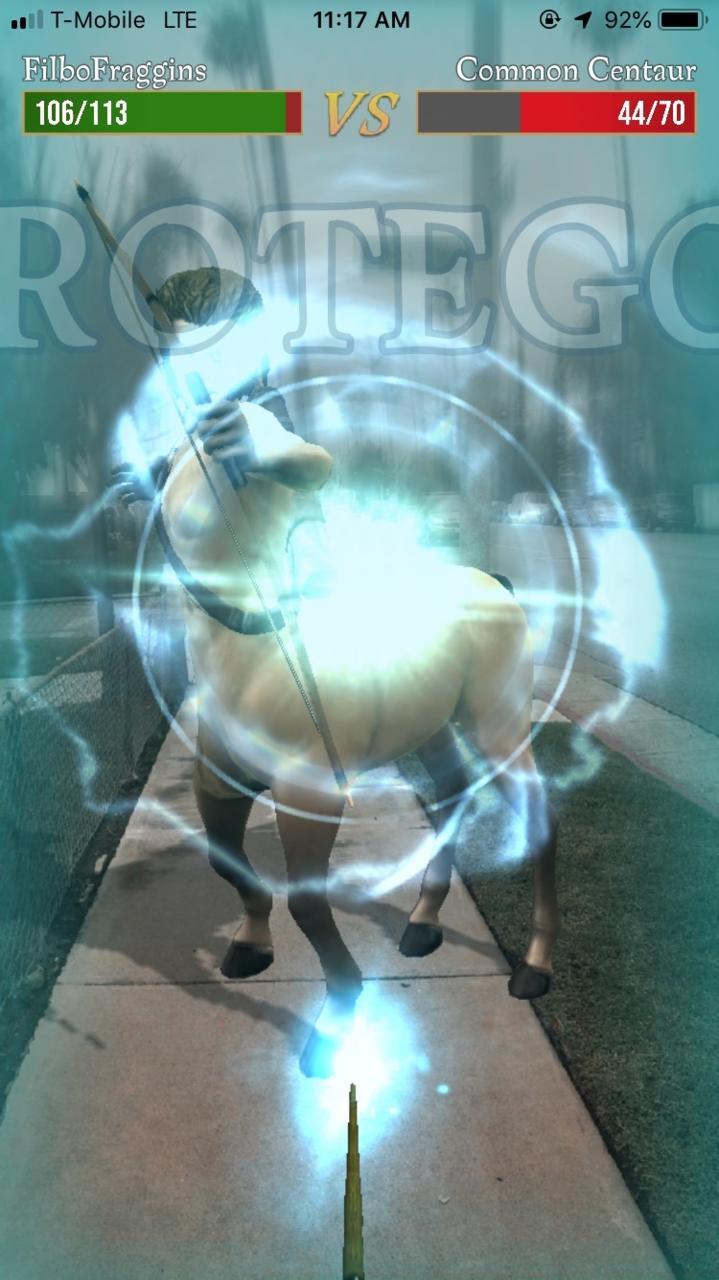
During enemy assault sequences, you receive a brief opportunity to mitigate incoming damage using the Protego defensive charm. Activation requires tracing a swift line following the on-screen directional indicator. However, Protego provides partial protection rather than complete immunity, meaning you’ll sustain reduced damage even during successful casts. To enhance defensive capabilities, allocate resources to Protego-enhancement nodes within your Profession’s ability matrix. For detailed profession analysis, consult our comprehensive Harry Potter: Wizards Unite Professions guide. Pro tip: Activate Protego just as the enemy’s attack animation begins for maximum effectiveness.
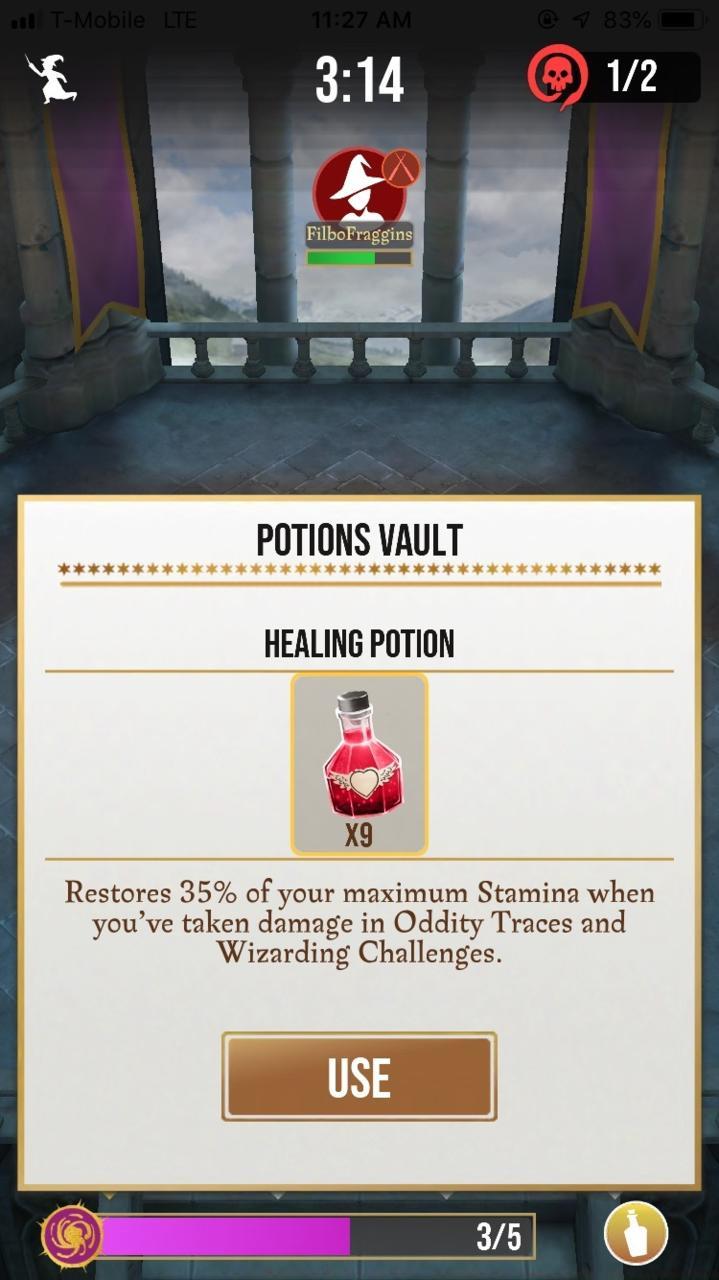
Combat isn’t limited to alternating attack exchanges, particularly when facing superior opponents or potential defeat scenarios. If overwhelmed or sustaining critical damage, activate the Potion interface via the bottom-right screen corner. This accesses your potion inventory, enabling immediate consumption for combat assistance. The Healing Potion serves as your primary restorative, replenishing Stamina reserves to outlast adversaries, while specialized potions provide tactical advantages through various enhancement mechanisms. Crucially, damage accumulated during multi-stage Wizarding Challenges persists across successive encounters, making inter-battle healing essential for survival. Advanced strategy: Always heal between battles rather than during combat to maximize action efficiency.
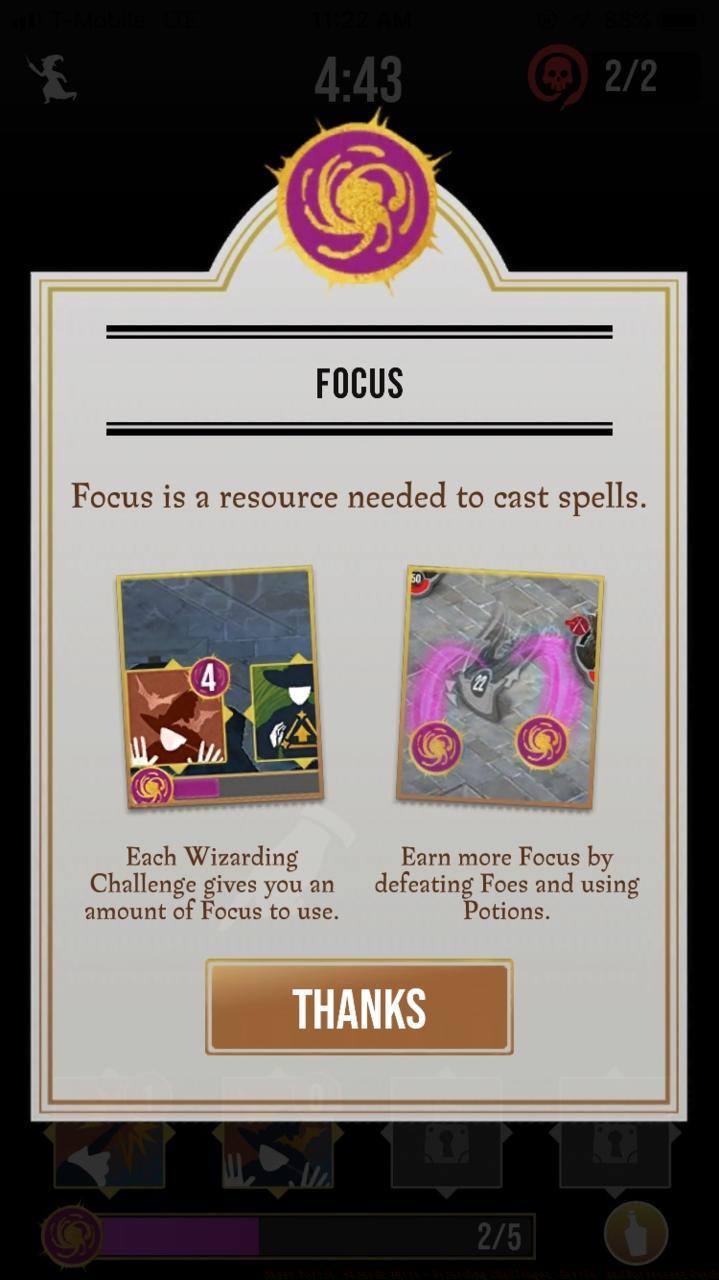
Progressing through your Profession’s ability matrix unlocks diverse combat spells with strategic applications. These specialized incantations don’t activate during standard duels—they’re designed for tactical deployment while navigating Fortresses and undertaking Wizarding Challenges. Upon challenge initiation, observe the sequence of squares beneath opponent icons representing their vulnerability states. If you’ve acquired strategic spells, their symbols appear along the display’s lower edge. Dragging these icons onto enemies enables pre-emptive spellcasting, allowing Stamina depletion or status effect application before formal combat initiation. This pre-battle advantage often determines victory in higher-level challenges.
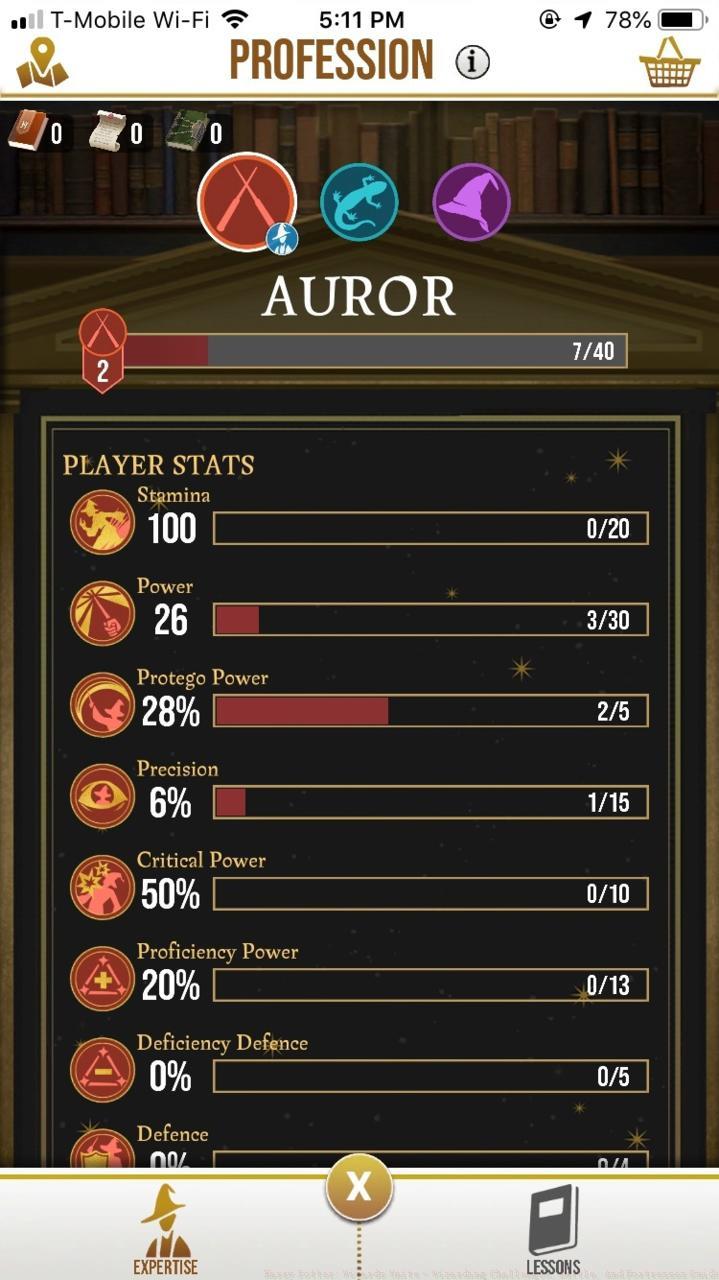
Your Profession selection fundamentally determines combat effectiveness through specialized statistics and unique abilities. Aurors excel at precision damage dealing, Magizoologists provide healing and support capabilities, while Professors offer balanced offensive and defensive utilities. Understanding your Profession’s statistical priorities—whether Power, Precision, or Proficiency—enables optimized skill tree development. For comprehensive class guidance, explore our BF6 Class Selection Guide to maximize your combat role effectiveness.
Collaborative play dramatically enhances Fortress challenge success rates through complementary Profession combinations. A balanced team typically includes one Auror for damage output, one Magizoologist for sustain, and one Professor for versatility. Coordinate ability usage timing to create synergistic effects—Aurors can weaken enemies for Professors to exploit, while Magizoologists maintain team survivability. For team strategy development, reference our Battlefield 6 Complete Guide for advanced tactical frameworks.

Adequate Spell Energy reserves prove critical for extended Fortress sessions, as depletion forces premature withdrawal. Simultaneously, monitor the challenge timer carefully—failed time management represents the most common reason for high-level failure. Always enter Fortresses with at least 50 Spell Energy for solo play or 75+ for team challenges. Weapon optimization also plays a crucial role—consult our BF6 Weapons Unlock Guide for optimal loadout configuration. Advanced teams should establish communication protocols for ability coordination and emergency response planning.
Action Checklist
- Practice wand targeting by dragging rather than tapping, focusing on cursor alignment
- Master quick spellcasting with the swipe-and-release technique
- Upgrade Protego effectiveness through profession skill tree investments
- Develop potion management strategy, healing between Wizarding Challenge battles
- Coordinate with team members to create profession synergies and ability chains
No reproduction without permission:SeeYouSoon Game Club » Harry Potter: Wizards Unite – Wizarding Challenges, Battle, And Fortresses Guide Master magical combat with advanced spellcasting, strategic potion use, and profession optimization in Harry Potter: Wizards Unite