TL;DR
- Complete seven new challenges to maximize Battle Pass XP gains in Week 4
- Strategic bounty hunting and weapon selection crucial for efficient completion
- Key management and location knowledge essential for chest and safe challenges
- Proper planning reduces completion time from 5+ matches to just 2-3 games
- Advanced tactics help overcome RNG-based challenges and spawn randomness
Continue progressing through your Battle Pass tiers by tackling the latest weekly objectives. These missions provide substantial experience point rewards that accelerate cosmetic unlocks throughout Fortnite’s current season.
For players aiming to maximize their Battle Pass advancement during Chapter 4 Season 3, completing weekly challenges remains the most effective method. Each new week introduces fresh objectives, and Week 4 of the Paradise season delivers several accessible tasks. While these challenges appear straightforward initially, our comprehensive breakdown reveals optimal completion strategies that save time and effort.
Paradise Week 4 presents seven distinct challenges requiring specific gameplay actions. Below you’ll find detailed guidance for efficiently accomplishing each objective.
To accomplish this objective, initiate a bounty contract at any available bounty board—these installations appear in every named location across the island. Subsequently eliminate your designated target using either the Cobra DMR or Hunter Bolt-Action Sniper Rifle. When participating in squad-based gameplay modes, consider downing opponents with your preferred firearms first, then executing the finishing blow with the required weapons while they’re in the Down But Not Out state.
Pro Tip: Bounty boards near less populated areas like Flutter Barn or Shimmering Shrine typically offer easier targets with reduced competition. The Cobra DMR works best at medium ranges, while the sniper rifle requires precise long-distance shooting. Avoid close-quarters engagements where these weapons become less effective.
Common Mistake: Many players forget that only the final elimination must use the specified weapons. You can soften up targets with any arsenal before delivering the killing shot with the challenge weapons.
This objective demands unlocking either a holo-chest or vault followed by accessing a safe within the same match. You’ll require a special key for the initial container, so prioritize locating one through chest searches or ground loot examination before proceeding. Safes frequently spawn inside vault interiors, potentially allowing simultaneous completion if fortune favors your attempt. Otherwise, explore urban environments where safes occasionally generate, though their appearance remains frustratingly random.
Advanced Strategy: Carry multiple keys when possible to attempt this challenge across several locations. The chrome-covered regions typically contain higher concentrations of both holo-chests and safes. Herald’s Sanctum and similar high-tier locations often feature both container types in close proximity.
Time Estimate: With proper planning, this challenge typically requires 2-3 matches. Without strategic key management, completion may extend to 5+ games due to RNG factors.
Finishing this mission simply involves locating a Port-a-Bunker item and deploying it across two separate matches. These defensive items randomly appear as loot within chests and as floor spawns, though you shouldn’t encounter significant difficulty acquiring two over several game sessions.
Optimization Tip: Land at named locations with multiple chest clusters to improve your chances. The Rumble Ruins and Brutal Bastion areas typically yield higher spawn rates for utility items like bunkers.
Pro Usage: Deploy bunkers strategically near objective areas or during final storm circles. They provide excellent temporary cover for challenging eliminations or survival scenarios.
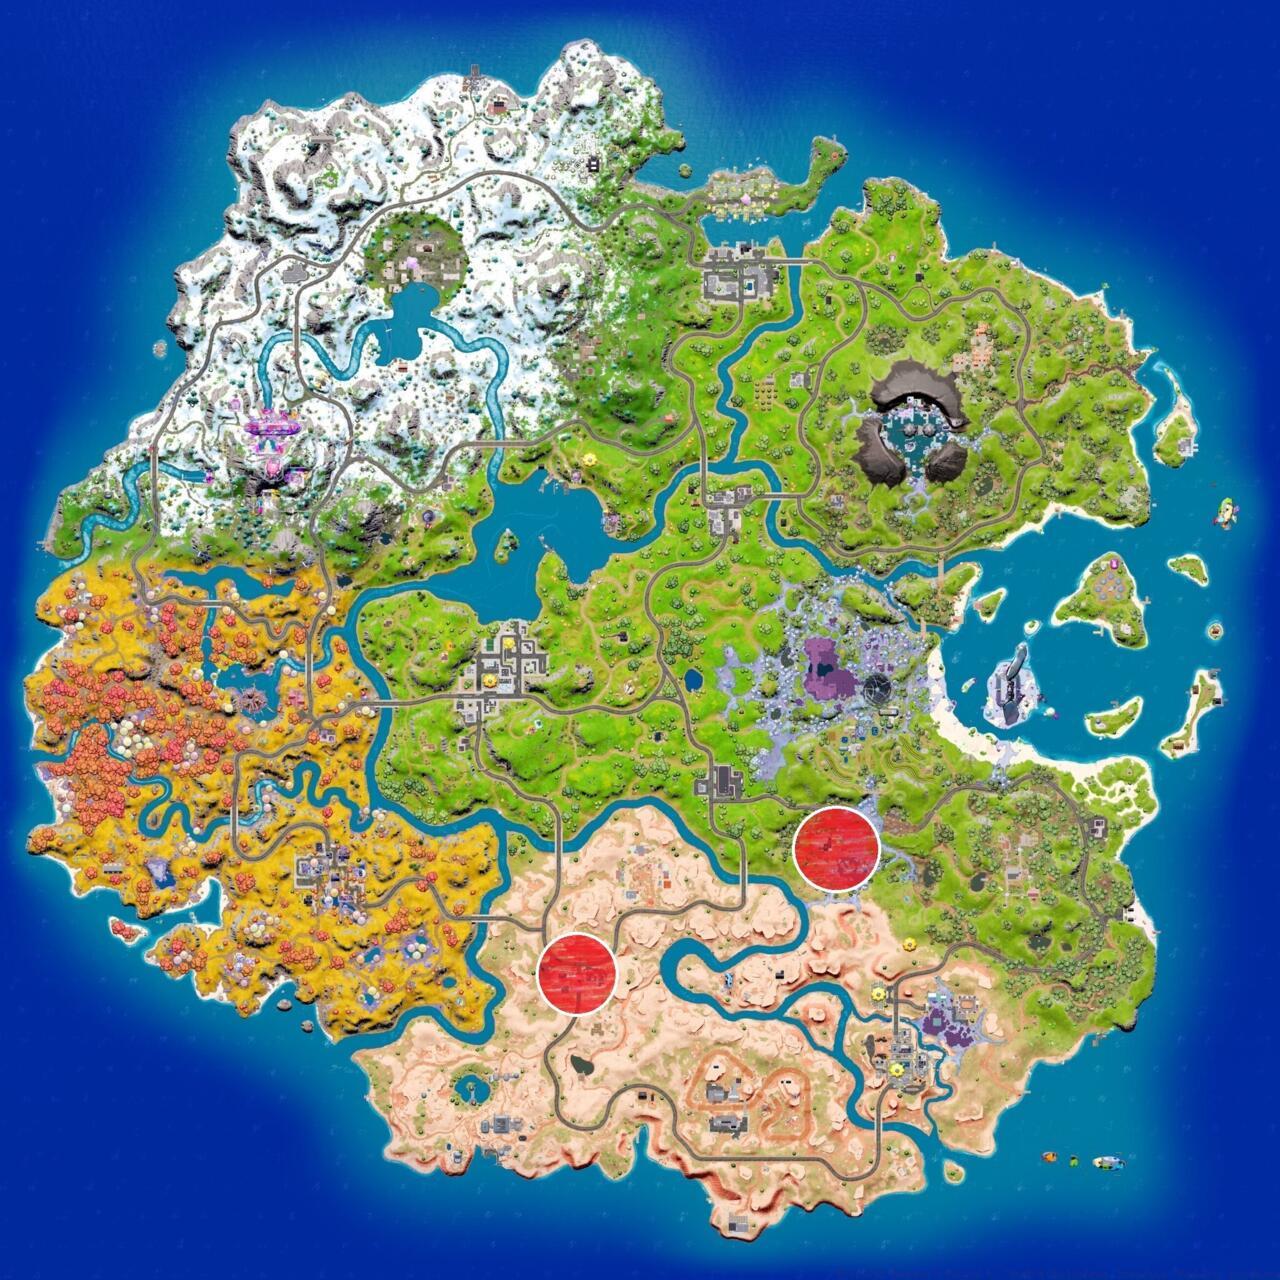
Locate one of the newly introduced throwable Launch Pads somewhere on the island, then activate a device at either Flutter Barn or Shimmering Shrine to fulfill this requirement. We’ve identified these specific locations in the visual reference below.
Flutter Barn (western location) and Shimmering Shrine (eastern destination)

Flutter Barn (left) and Shimmering Shrine (right)
Navigation Advice: These mobility items commonly spawn near landmark structures and points of interest. Carry one until you reach the target areas rather than searching for pads specifically at those locations.
This objective tasks you with landing precise headshots using either of the newly introduced EvoChrome weapon variants. These specialized firearms appear most frequently within chrome-transformed areas, particularly inside chrome chest containers. Deploy at locations like Herald’s Sanctum or Shimmering Shrine to acquire one, then execute accurate cranial shots demonstrating your marksmanship prowess.
Weapon Mechanics: The EvoChrome weapons feature evolving damage profiles that improve with usage. The shotgun variant proves excellent for close-range headshots, while the burst rifle works well at medium distances. Both weapons benefit from first-shot accuracy when aiming down sights.
Advanced Technique: Build brief cover between shots to maintain positioning. Target opponents engaged in other fights for easier headshot opportunities. The Weapons Unlock guide offers additional firearm mastery techniques that apply directly to this challenge.
This mission simply requires enduring ten separate storm phase transitions. Maintain your survival throughout matches! When progressing deeply into a round, you’ll typically experience 4-6 storm phases, meaning completion might require as few as two full matches.
Survival Tactics: Prioritize healing items and mobility gear. Avoid unnecessary engagements during late-game phases. The Class Guide provides excellent survival specialization recommendations that enhance your endurance capabilities.
Optimization: Play strategically in Team Rumble or other respawn-enabled modes where survival requirements become more manageable.
Pro Insight: Storm phases count individually regardless of match completion. Even if eliminated early, partial progress accumulates toward the ten-phase requirement.
Action Checklist
- Activate bounties at remote boards and eliminate targets with specified weapons
- Collect keys and unlock holo-chests/vaults followed by safes in same game
- Deploy Port-a-Bunkers across two different matches
- Use throwable Launch Pads at specified Flutter Barn or Shimmering Shrine locations
- Land headshots with EvoChrome weapons from chrome-rich areas
- Survive through ten storm phases across multiple matches
No reproduction without permission:SeeYouSoon Game Club » Fortnite Chapter 3 Season 4 – Week 4 Challenges: Bounties, Bunkers, And Barns Complete guide to Fortnite Week 4 Paradise challenges with expert strategies and time-saving tips
