TL;DR
- Unlock Odin during Chapter 11 by activating three summon crystals in Nibel region
- Essential preparation includes Nibel Chocobo mount and revival equipment
- Master complex button sequences with precise timing for crystal activation
- Dodge-focused combat strategy prevents instant-kill Zantetsuken attack
- Odin provides devastating melee attacks and one-hit kill ultimate ability
Acquiring the legendary Odin summon requires reaching Chapter 11: The Long Shadow of Shinra, when your party returns to explore the Nibel region. While you can attempt the combat trial immediately through Chadley’s Combat Simulator, experienced players strongly recommend first weakening this formidable entity by analyzing its summon crystals scattered throughout the landscape.
Securing the Nibel Chocobo mount becomes absolutely essential for this endeavor. This unique chocobo variant possesses hover capabilities when above bodies of water, allowing access to cavern systems and elevated ledges that would otherwise remain completely unreachable. This aerial mobility proves invaluable since all three Odin summon crystals reside in locations requiring vertical navigation.
Before embarking on your crystal hunt, equip Revival Earrings on key party members and ensure you have characters with robust healing capabilities like Aerith. The Phoenix summon materia also provides excellent backup revival options during the challenging boss encounter.
The Odin summon acquisition process in Final Fantasy 7 Rebirth involves locating and activating three distinct crystal sanctuaries positioned throughout the Nibel region. These activation points can be tackled in any sequence, though we’ve organized them according to their in-game numbering for clarity:
- Crystal #1 – Nestled within a compact cavern adjacent to the main inlet, easily accessible with basic exploration.
- Crystal #2 – Requires circling around to the southern perimeter of the rocky coastal formations to discover the concealed cave entrance.
- Crystal #3 – Positioned at the northern extremity of the protruding island chain. Utilize your Nibel Chocobo’s hover ability to ascend to the uppermost ledge.
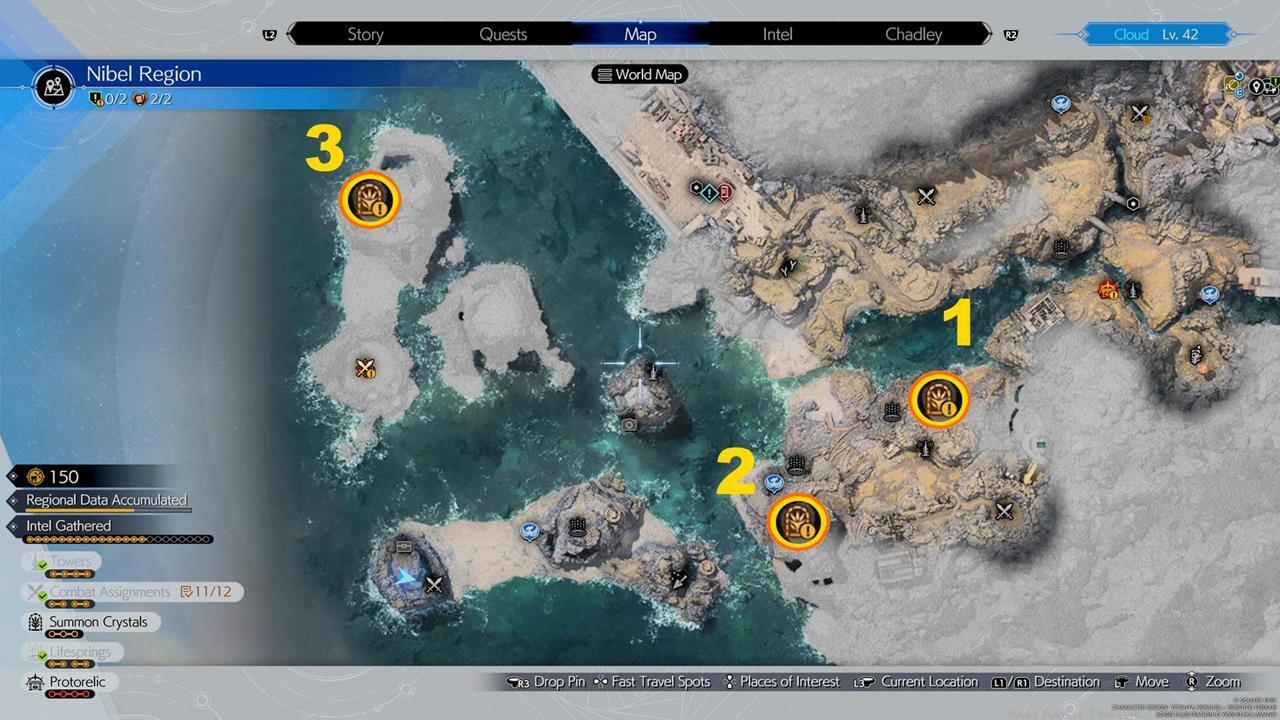
A map showing the locations of all three sanctuaries.
Pro tip: Activate your map’s custom waypoints as you discover each crystal location to streamline navigation between sites. The terrain features multiple vertical layers, so consistently check both ground level and elevated positions when searching.
Successfully activating each Odin summon crystal demands precise execution of specific button sequences within the Memory Matrix interface. These patterns incorporate deliberate timing elements that require both memorization and rhythmic execution:
- Crystal #1: X-Circle-Square-Triangle-X-Circle-Square-Triangle – This symmetrical pattern repeats the same four-button sequence twice.
- Crystal #2: Square-Square-wait-Triangle-Triangle-wait-Circle-X-wait-Circle-X – Features strategic pauses between button groups.
- Crystal #3: Circle-wait-X-X-wait-Square-wait-Square-wait-Triangle-Triangle-wait-Circle – The most complex sequence with multiple timing intervals.


From left to right: The button sequences for the first, second, and third crystals.
Common mistake: Players often rush through the “wait” intervals, causing sequence failure. Count two full seconds for each pause to ensure proper timing. Advanced strategy: Practice the sequences in a safe area before attempting the actual crystals to build muscle memory.
When confronting Odin in Chadley’s Combat Simulator, your preparation strategy becomes critically important. Beyond revival equipment, equip spell materia capable of inflicting debilitating status conditions like Bio for poison or Slow to reduce his action frequency. These afflictions significantly impact the battle’s difficulty curve.
The Odin boss enters a pressured state through three primary methods:
- Executing ATB-powered special attacks consistently.
- Successfully evading his aggressive assault patterns.
- Applying negative status effects that disrupt his combat rhythm.
While these pressure mechanics appear straightforward theoretically, the encounter introduces a devastating complication. If your party sustains excessive damage, Odin will cast Gjallarhorn’s Warning as an ominous precursor. Additional hits following this warning trigger Zantetsuken – an instant party wipe ability that defeats all characters simultaneously.
Surviving Zantetsuken requires specific countermeasures: active Reraise status, equipped Revival Earrings, or passives that preserve 1 HP. Consequently, this confrontation heavily emphasizes defensive mastery through precise dodging while maintaining offensive pressure through status effects and ATB attacks to achieve stagger phases.

Beware of the instant game over screen once Odin casts Zantetsuken.
Expert tip: Designate one party member exclusively for healing and revival duties while others focus on applying pressure through status effects and ATB abilities.
Upon emerging victorious from the Odin confrontation, you’ll receive his powerful summon materia. This acquisition introduces several distinctive combat characteristics:
- Summon Cost: 2 ATB segments once the summon gauge reaches maximum charge.
- Allfather’s Fury – Executes a rapid succession of lethal sword strikes at the cost of 1 ATB.
- Ring of Helheim – Rapidly closes distance to targets while damaging adjacent enemies; delivers amplified damage during stagger phases at 2 ATB cost.
- Ultimate: Zantetsuken – Inflicts enormous non-elemental damage; typically eliminates standard enemies in a single strike.

Odin rampages on the battlefield while mounted on Sleipnir.
Strategic application: Deploy Odin against boss enemies or large groups where his area damage and stagger amplification provide maximum value. His abilities excel in situations requiring rapid target elimination or when you need to quickly dispatch multiple adversaries simultaneously.
This comprehensive approach ensures you successfully obtain the Odin summon in Final Fantasy 7 Rebirth. His blistering melee assault combinations, complemented by the fight-ending Zantetsuken technique, will decisively overwhelm your opponents. For details about additional powerful summons available throughout your journey, consult our all summon materia guide.
An epic adventure unfolds in Final Fantasy 7 Rebirth. Our FF7 Rebirth guides hub contains extensive tips and advanced strategies to enhance your gameplay experience.
Action Checklist
- Progress to Chapter 11 and acquire Nibel Chocobo mount
- Locate and activate all three summon crystals using precise button sequences
- Equip revival gear and status effect materia before Combat Simulator battle
- Defeat Odin using dodge-focused strategy while applying status effects
- Integrate Odin summon into your combat rotation for difficult encounters
No reproduction without permission:SeeYouSoon Game Club » Final Fantasy 7 Rebirth – How To Get Odin Summon Master the complete strategy to acquire Odin's devastating summon in FF7 Rebirth with expert tips