TL;DR
- Complete Chapter 10 to unlock Protorelic challenges requiring strategic robot gambit configurations
- Deploy fire and thunder robots with cost-reduction modifications for maximum efficiency
- Use defensive portal skills like Regenga and Cautious Courage for sustained combat
- Monitor King Flan’s elemental weaknesses and counter mechanics carefully
- Maintain constant pressure on the boss while defending portals from minion waves
Deploy automated combat drones to systematically eliminate gelatinous adversaries throughout your Final Fantasy 7 Rebirth journey.
While Final Fantasy 7 Rebirth doesn’t incorporate traditional gambit systems for party members, this specialized activity introduces conditional automation through robotic units. Our comprehensive walkthrough details the complete process for conquering the Gears and Gambits challenges within the Cosmo Canyon Protorelic questline.
Final Fantasy 7 Rebirth Gears and Gambits – Cosmo Canyon Protorelic guide
To preserve narrative immersion and avoid spoiling the compelling backstory of Final Fantasy 7 Rebirth’s Cosmo Canyon Protorelic missions, we’ll focus exclusively on the mechanical aspects of the Gears and Gambits gameplay system:
- These objectives become accessible after concluding the complete Cosmo Canyon storyline during Chapter 10: Watcher of the Vale. Chadley will notify you about the initial Protorelic location at this juncture.
- One of Chadley’s specialized drones interfaces with the terminal at each site. When initiating the minigame, you configure conditional “gambits” for your robotic units, determining their autonomous behavior patterns based on:
- Specific triggers, such as detecting enemies vulnerable to particular elemental damage types.
- Corresponding actions, including targeting hostile units with specific attack capabilities.
- Integrated self-preservation protocols, enabling actions like “activate Cure” when the unit’s health drops below predetermined thresholds.
- The primary victory condition involves eliminating the King Flan positioned centrally in the arena, while simultaneously safeguarding your portal structures from destruction (detailed mechanics explained subsequently).

Remain vigilant against the King Flan’s devastating counterattack capabilities.
Cosmo Canyon Protorelic Challenge Locations
The accompanying visual references display the precise positions of Final Fantasy 7 Rebirth’s Cosmo Canyon challenge sites. We’ve sequentially numbered these locations according to recommended visitation order. Important navigation note: certain areas necessitate aerial approach utilizing the specialized Teal Chocobo mount.


The southern sector of Cosmo Canyon (left image) contains the first, third, and fourth Protorelic challenge locations. Conversely, the northern district (right image) exclusively houses the second challenge site, requiring advanced traversal capabilities.
Best Options for Gears and Gambits
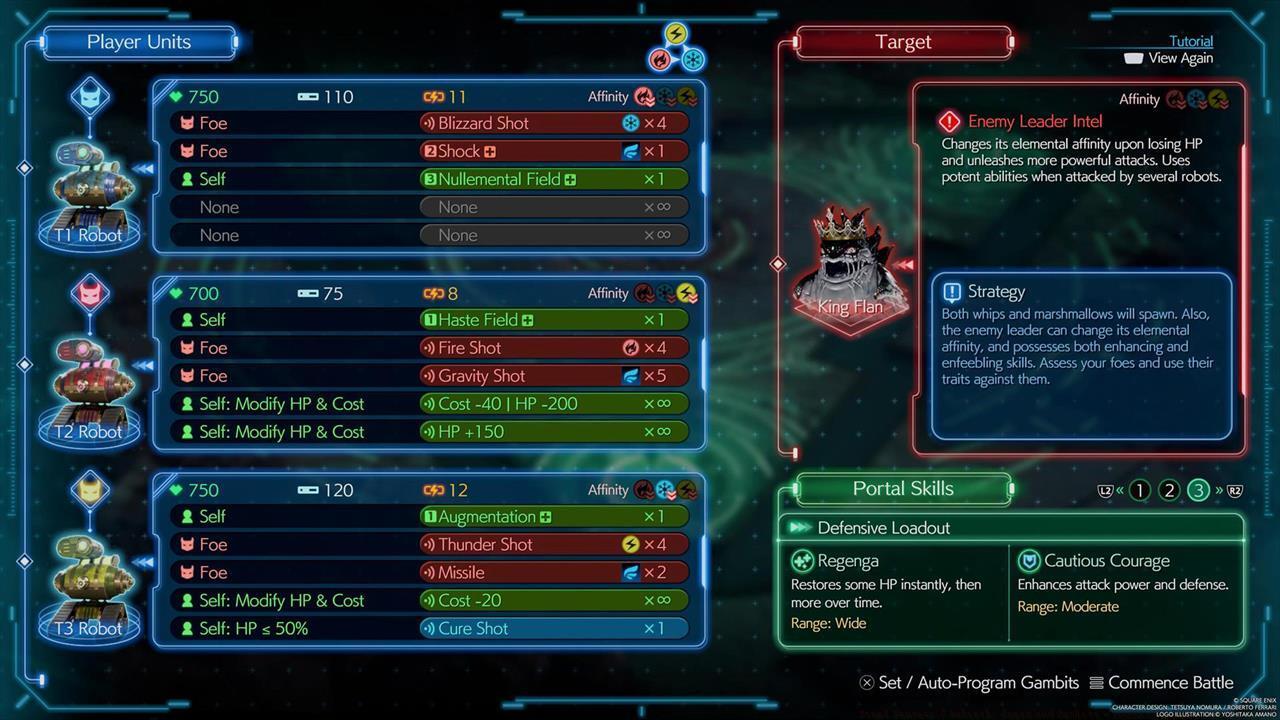
Initial Gears and Gambits encounters in Final Fantasy 7 Rebirth provide limited customization possibilities. Subsequent matches, however, unlock progressively sophisticated configuration options. Our testing revealed this highly effective setup:
- Primary Assault Unit:
- Enemy Targeting: Blizzard Projectile
- Enemy Targeting: Enhanced Shock Discharge
- Self-Preservation: Elemental Nullification Barrier
- Secondary Support Unit:
- Self-Buff: Accelerated Field Enhancement+
- Enemy Targeting: Incendiary Projectile
- Enemy Targeting: Gravitational Impact Shot
- System Modification: HP & Cost Adjustment – Resource Cost -40%; Structural Integrity -200
- System Modification: HP & Cost Adjustment – Structural Integrity +150
- Tertiary Tactical Unit
- Self-Buff: Combat Augmentation+
- Enemy Targeting: Electrical Discharge
- Enemy Targeting: Guided Missile System
- System Modification: HP & Cost Adjustment – Resource Cost -20
- Conditional Protocol: HP <50% – Therapeutic Projectile
Remember, these advanced configurations gradually become available throughout later challenge stages. Their absence during initial matches represents normal progression. The foundational strategy emphasizes concentrated deployment of incendiary and electrical discharge units once specific enhancement protocols activate.
This carefully optimized configuration significantly improved minigame manageability and success rates.
Advancing Through the Arena and Eliminating Hostiles
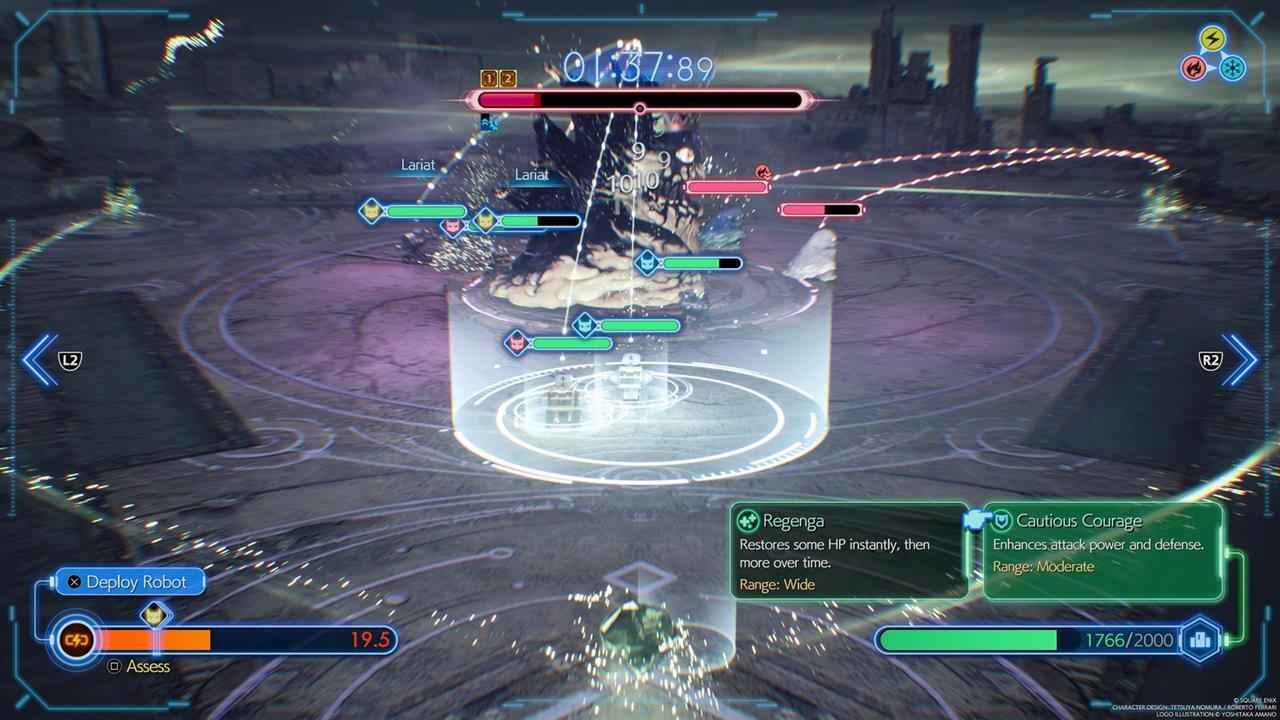
The Gears and Gambits arena features three distinct deployment zones–left flank, central corridor, and right flank–serving as spawn points for your drone units. Available drone selection depends on individual unit resource costs and accumulated deployment points visible in the interface’s lower-left quadrant.
Your automated units advance systematically toward the central combat zone from their initial sectors. Simultaneously, enemy formations emerge and progress toward the nearest friendly portal. Adversarial forces specifically target your portal structures for destruction, necessitating proactive elimination through robotic intervention.
Examining our previous configuration example, Secondary Support Unit possesses “Enemy Targeting: Incendiary Projectile” and “Enemy Targeting: Gravitational Impact Shot.” This operational logic dictates:
- Primary engagement utilizes Incendiary Projectile until elemental ammunition reserves deplete.
- Upon ammunition exhaustion, the unit automatically switches to Gravitational Impact Shot as secondary armament.
- Advanced matches unlock resource optimization modifications, enabling reduced drone deployment costs.
- Strategic emphasis favors “Incendiary Drones” and “Electrical Drones” due to their economical deployment requirements, facilitating numerical superiority against enemy advances.
Employ supportive magical abilities to minimize damage inflicted by the King Flan’s assault patterns.
Optimal Portal Skill Selection
Regarding Portal Skills, three distinct loadout combinations are available, though we strongly recommend Option #3: Defensive Configuration. This provides:
- Regenerative Engana – Immediately restores partial health, followed by sustained recuperation over time.
- Prudent Valor – Amplifies offensive capabilities and damage output.
Crucial operational note: Portal Skills exclusively affect robotic units within their specific sector. For example, activating Regenerative Engana on the left flank only heals drones positioned in that specific area, providing no benefits to central or right sector units.
Conquering the King Flan
The primary objective throughout Final Fantasy 7 Rebirth’s Gears and Gambits minigame involves eliminating the formidable King Flan occupying the chamber’s central position. This boss encounter presents considerable challenge due to sophisticated countermeasure systems and activation triggers. Anticipate these behavioral patterns:
- Pressing the Square button activates Assessment capability on the King Flan, revealing its reaction mechanisms and trigger conditions.
- When four robotic units simultaneously engage from one flank, the King Flan typically deploys Defensive Barrier to enhance protection.
- However, if five or more units concentrate fire (typically occurring after eliminating lesser slimes or when minions remain unengaged), it executes a leaping assault with expanded area-of-effect.
- The entity also alternates elemental attack modalities and vulnerability points upon reaching specific health milestones.
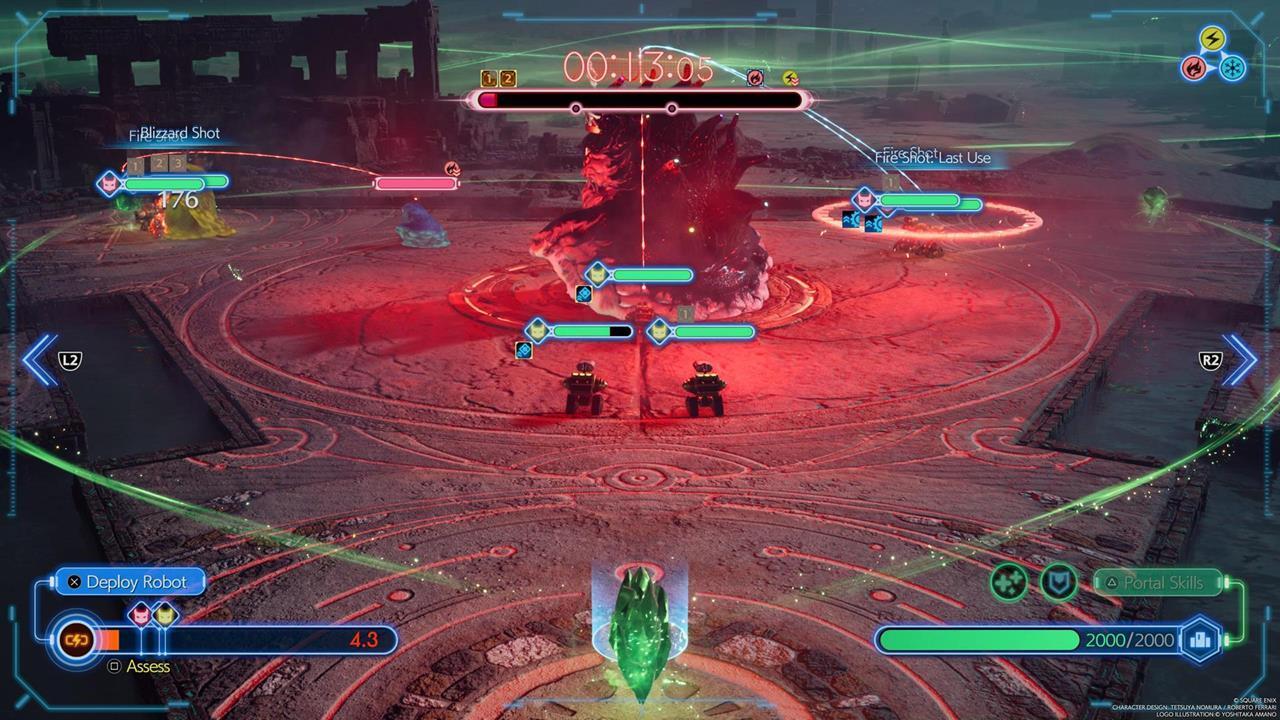
Victory hinges upon numerically overwhelming the King Flan. Maintain continuous offensive pressure against the primary target, even when supporting units become occupied confronting subordinate enemies.
As previously indicated, our implemented methodology favored quantity-oriented deployment. Once we achieved robotic spawn cost reduction, we prioritized frequent placement of Incendiary Drones and Electrical Drones. This approach proved particularly effective during matches featuring numerous slimes vulnerable to those elements. We additionally observed instances where the King Flan transitioned to these specific vulnerabilities at 50% health, enabling rapid elimination since appropriate units were already deployed. The synergistic combination of Regenerative Engana and Prudent Valor spells substantially extended our robotic units’ operational longevity beyond anticipated parameters.
This concludes our comprehensive Final Fantasy 7 Rebirth Cosmo Canyon Protorelic and Gears and Gambits guide. Completing all objectives unlocks challenging difficulty mode, where the King Flan and its minions will rigorously test your strategic capabilities. For comprehensive coverage of additional World Intelligence activities, consult our extensive Protorelic compendium.
An epic journey awaits throughout Final Fantasy 7 Rebirth. Access complete tactical guidance and advanced strategies through our FF7 Rebirth comprehensive guides hub.
Action Checklist
- Complete Chapter 10: Watcher of the Vale to unlock Protorelic challenges
- Configure robot gambits with elemental attacks and self-preservation protocols
- Prioritize cost-reduction modifications for fire and thunder robots
- Deploy defensive portal skills (Regenga + Cautious Courage) for sustained combat
- Monitor King Flan’s elemental shifts and counter mechanics during boss engagement
No reproduction without permission:SeeYouSoon Game Club » Final Fantasy 7 Rebirth: Gears And Gambits – Cosmo Canyon Protorelic Guide Master the Cosmo Canyon Protorelic Gears and Gambits minigame with strategic robot deployment and boss tactics