TL;DR
- Complete five Monodrive Mark II eliminations across two strategic locations in Nuts ‘n’ Bolts Hills
- Master barrier-swapping mechanics: white barriers require magic, green barriers need physical attacks
- Equip Wind materia and utilize Cloud-Aerith character switching for optimal damage
- Focus on single-target elimination and defensive positioning to avoid interruption
- Complete this quest to influence Aerith’s appearance in Chapter 9
The “Weapons on a Rampage” side mission in Final Fantasy 7 Remake’s eighth chapter presents a challenging hunt across the expansive Nuts ‘n’ Bolts Hills district. This guide provides comprehensive navigation and combat strategies to efficiently eliminate all targets.
Chapter 8 of Final Fantasy 7 Remake shifts focus from primary narrative progression to expanding Cloud’s mercenary reputation through optional assignments. Similar to Chapter 3’s structure, these side quests offer substantial rewards and notably impact character development—specifically influencing Aerith’s visual presentation in the subsequent chapter. “Weapons on a Rampage” stands out as particularly demanding due to its requirement to track specific enemy types within the labyrinthine Nuts ‘n’ Bolts Hills environment.
This walkthrough delivers complete tactical guidance for locating the rogue Shinra security units, engaging them effectively, and successfully concluding the “Weapons on a Rampage” objective during Chapter 8.
For additional assistance, explore our comprehensive Final Fantasy 7 Remake guide collection. Our official review awarded this title GameSpot’s prestigious 10/10 rating, highlighting its exceptional quality.
Begin by traveling northward from the Avalanche hideout to encounter a civilian discussing rampaging Shinra surveillance drones. Your objective involves neutralizing five of these units within the Nuts ‘n’ Bolts Hills region previously traversed after meeting Aerith at the chapel. Essential preparation includes equipping Wind materia before commencing the operation.
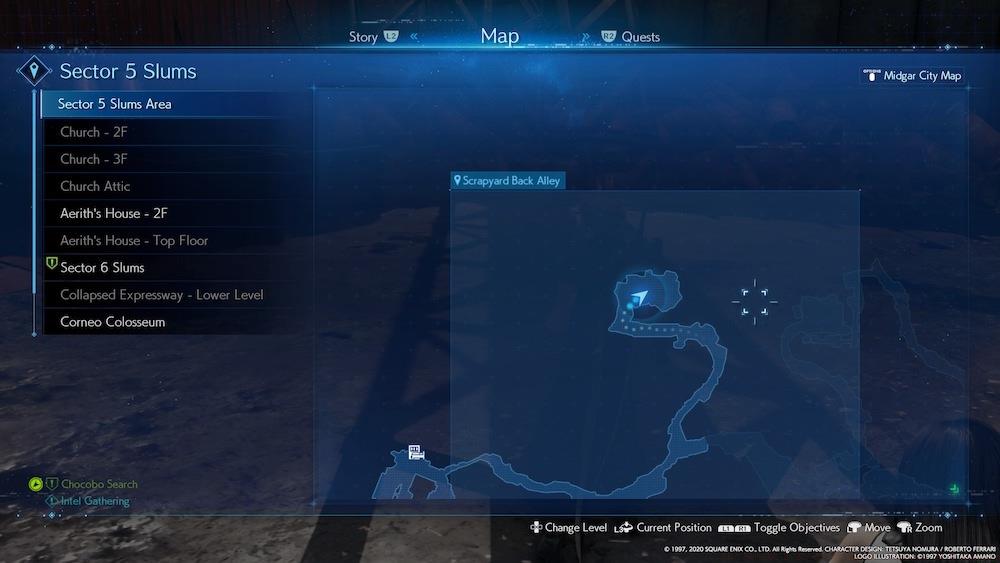
The initial trio of adversaries—designated as Monodrive Mark IIs—reside in the northern sector within the Scrapyard Back Alley subsection. Navigate toward the railway terminal and select the northern route immediately preceding arrival at the station to discover a cul-de-sac containing the first enemy cluster.
Monodrive Mark IIs demonstrate vulnerability to Wind-elemental spells, though their defensive capabilities introduce significant complexity: they deploy protective barriers granting immunity to specific damage types, substantially increasing their combat effectiveness. When manifesting a spherical white energy shield, transition to Aerith and assault them with her standard magical assaults or Wind-based incantations. Should they activate an emerald barrier resembling atomic orbital patterns, switch to Cloud and engage with physical sword strikes.
Remain vigilant against Monodrive assault patterns that involve subterranean burrowing or aerial drilling maneuvers; maintain defensive postures and concentrate fire on individual targets to eliminate them sequentially. Through coordinated magical barrages complemented by Cloud’s melee expertise, you should achieve stagger states and defeat one enemy, then replicate this methodology for the remaining two. Optimal strategy involves avoiding excessive commitment to physical attacks, as Monodrives deliver powerful strikes capable of interrupting spellcasting if situational awareness lapses. Upon completion, proceed discreetly to the train station and utilize the azure recovery bench for health restoration.
Critical mistake avoidance: Many players fail to recognize barrier color changes during combat, leading to wasted ATB charges and prolonged engagements. Always pause briefly to assess barrier status before committing to attack patterns. Advanced players can leverage the ATB Stagger ability to quickly build stagger meters once barriers are neutralized.
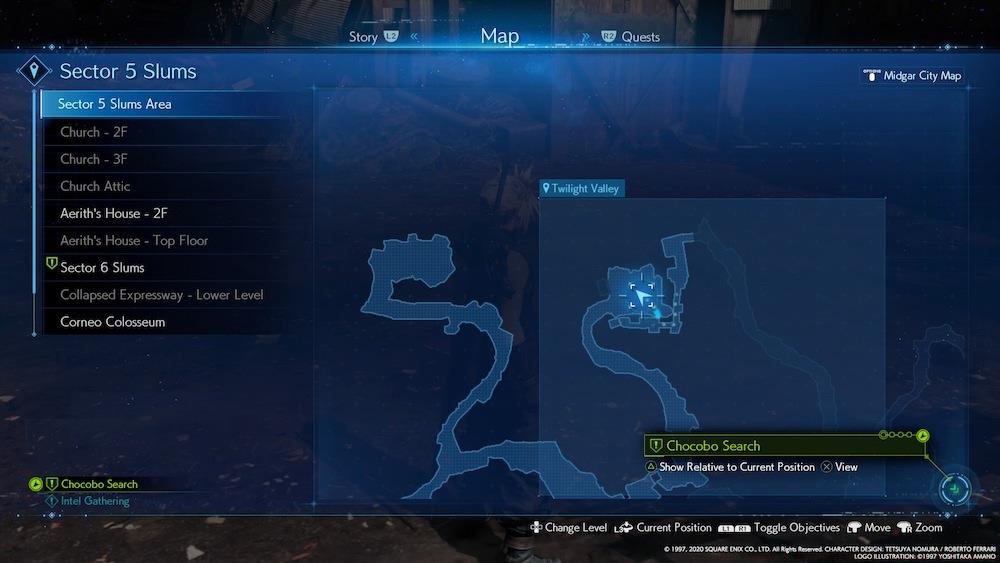
The final two Monodrive Mark II units await along the original bypass route used to circumvent the secured gate during your initial transit. Proceed northward from the locked gate entrance into Twilight Valley territory; you’ll encounter the remaining adversaries promptly along this passage.
Time optimization: Experienced players can complete both enemy engagements in approximately 8-12 minutes with proper preparation. For maximum efficiency, ensure both Cloud and Aerith have their limit breaks available before engaging the second group, as these can quickly eliminate one Monodrive when timed correctly during barrier downtime.
Final Fantasy 7 Remake News
Action Checklist
- Equip Wind materia on both characters and travel north from Avalanche hideout
- Navigate to Scrapyard Back Alley via path north of train station
- Engage first trio: analyze barrier colors and switch characters accordingly
- Heal at station bench then proceed to Twilight Valley via locked gate route
- Eliminate final two Monodrives using optimized barrier-countering tactics
No reproduction without permission:SeeYouSoon Game Club » FF7 Remake Side-Quest Guide: Weapons On A Rampage Master the Weapons on a Rampage quest with expert strategies for Monodrive Mark II barriers and combat tactics