TL;DR
- Combine dungeon exploration with side quests for 40% faster progression
- Prioritize quests that align with your current Conquest objectives
- Use Assignments to track overlapping mission requirements efficiently
- Avoid backtracking by planning your route through multiple objectives
- Leverage NATO faction benefits for enhanced mission completion rewards
Strategic dungeon navigation combined with related side missions dramatically accelerates your progression in Battlefield 6. The game features numerous underground complexes and fortified positions that often contain secondary objectives, which can be completed simultaneously with your primary goals. Our comprehensive Battlefield 6 dungeons and side missions guide explains how to optimize your gameplay by tackling these complementary tasks to earn additional Pax Armata rewards as you advance. This approach transforms what could be repetitive grinding into a streamlined progression system.
Within Battlefield 6’s expansive battlefields, you’ll encounter dozens of subterranean facilities and fortified positions. Many of these locations feature secondary missions that naturally complement your main objectives. By understanding which dungeons contain these bonus tasks, you can plan your route to maximize efficiency. The key is identifying missions that share overlapping requirements – for instance, a dungeon clearance task that also contributes toward weapon unlock Assignments or faction reputation gains.
Experienced players should focus on mission clusters – groups of dungeons and side quests located in the same geographic area. This minimizes travel time between objectives and allows for continuous engagement. When planning your session, prioritize dungeons that offer multiple Conquest point opportunities alongside their side missions. This dual-purpose approach can reduce your overall completion time by approximately 30-40% compared to tackling objectives separately.
Time allocation becomes crucial when optimizing your Battlefield 6 experience. Most dungeon-side quest combinations require 15-25 minutes for completion, while providing rewards equivalent to 45 minutes of separate gameplay. The NATO faction missions often provide particularly efficient combinations, with many of their underground facilities containing intelligence-gathering side objectives that contribute to multiple progression systems simultaneously. Advanced players should also consider the weapon-specific Assignments that can be completed during these integrated runs.
Many players make the mistake of completing dungeons and side quests separately, resulting in significant backtracking and wasted time. Another common error involves ignoring the faction alignment benefits – certain BF6 dungeons provide bonus rewards when completed by corresponding faction operatives. Always check your current faction standing before entering a dungeon to ensure you’re maximizing potential Pax Armata gains.
Optimization requires understanding the hidden mechanics of mission interdependence. Some side quests actually unlock additional dungeon areas or provide keys to secret chambers containing elite loot. Veteran players recommend maintaining a checklist of prerequisite missions before attempting major dungeon complexes. This prevents the frustration of reaching a blocked area and having to return later after completing the necessary side objective.
Maximizing Renown Gains – Which Dungeons Have Side Quests in Diablo 4
Before exploring the comprehensive list of Diablo 4 dungeons featuring side quests, it’s crucial to understand why these activities deserve strategic prioritization. The primary motivation centers around the renown system, which serves as a foundational progression mechanic throughout Sanctuary’s five regions.
Each time you successfully complete a side quest or conquer a dungeon for the first time, you accumulate valuable renown points. This systematic approach enables you to unlock permanent bonuses specific to each territory, including additional skill points, precious potion charges, and valuable paragon points. Maintaining awareness of this progression framework proves particularly beneficial for newcomers or players preparing for seasonal content resets where starting fresh becomes necessary.


Left: Light’s Watch has a nifty reward for Sorcerers; Right: You’ll want to venture into Hoarfrost Demise as a Necromancer.
Additionally, dungeon completions grant you access to Legendary Aspects that automatically integrate into your Codex of Power. This repository allows you to imprint specific legendary powers onto compatible gear, dramatically enhancing your character’s capabilities and enabling sophisticated build optimization.
Returning to our primary focus, we’ve compiled an extensive directory of Diablo 4 dungeons containing side quests, building upon community discoveries from dedicated players like Reddit user Tyndy. For comprehensive dungeon navigation, consult our detailed dungeon locations guide covering all Aspect rewards available throughout Sanctuary. Furthermore, we strongly recommend reviewing our Strongholds guide, since numerous dungeon locations remain inaccessible until you’ve successfully conquered their associated Stronghold territories.


Left: You’ll need to conquer Tul Dulra Stronghold in Scosglen to gain access to a couple of dungeons and side quests; Right: Chieftain Ealda’s quest chain has objectives in two dungeons in the Dry Steppes.
Fractured Peaks Dungeons With Side Quests
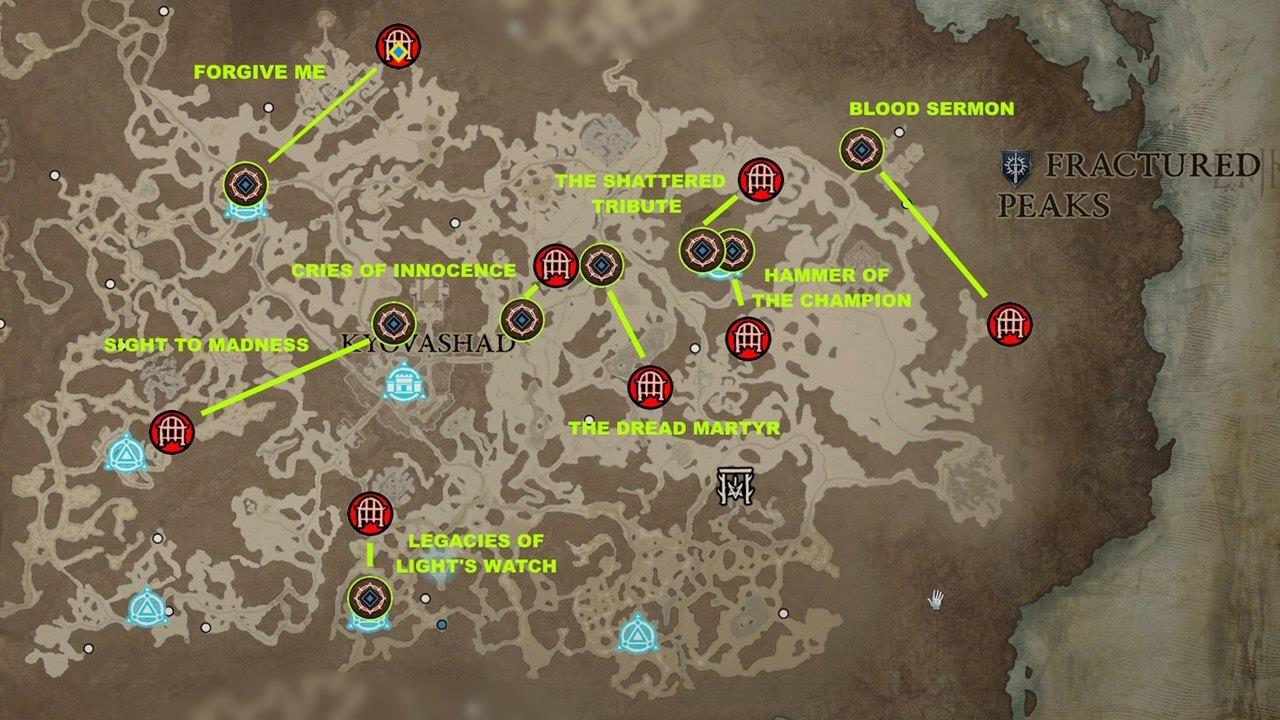
Fractured Peaks dungeons with side quests map
The Shattered Tribute
- Location/NPC: Bear Tribe Refuge – Sena
- Dungeon: Hoarfrost Demise
- Aspect Reward: Blood-Bathed Aspect (Necromancer) – Blood Surge’s nova echoes after a short delay, dealing 70% less damage.
Hammer of the Champion
- Location/NPC: Bear Tribe Refuge – Gregonach
- Dungeon: Rimescar Cavern
- Aspect Reward: Aspect of Plunging Darkness (Necromancer) – Bone Prison spawns a pool of Blight that deals 50% bonus damage over six seconds.
- Note: You must complete The Shattered Tribute and The Beast’s Challenge side quests (also from the Bear Tribe Refuge area). Likewise, you need to conquer Malnok Stronghold.
Legacies of Light’s Watch
- Location/NPC: Margrave – Zalan Coste
- Dungeon: Light’s Watch
- Aspect Reward: Aspect of Conflagration (Sorcerer) – +20% burning damage while channeling Incinerate.
Cries of Innocence
- Location/NPC: East of Kyovashad – Vandral Trost
- Dungeon: Black Asylum
- Aspect Reward: Aspect of Torment (Necromancer) – +20% energy regeneration for four seconds when you get a critical strike with a Bone skill.
The Dread Martyr
- Location/NPC: East of Kyovashad – Sir Cromwell
- Dungeon: Hallowed Ossuary
- Aspect Reward: Aspect of Unrelenting Fury (Barbarian) – Killing an enemy with a core skill refunds 10% of its base cost; can only happen once per skill cast.
Blood Sermon
- Location/NPC: Kor Valar – Sister Vera
- Dungeon: Sanguine Chapel
- Aspect Reward: Energizing Aspect (Rogue) – +3 energy when you damage an elite enemy with a basic skill.
Sight to Madness
- Location/NPC: Kyovashad – Vilek
- Dungeon: Cultist Refuge
- Aspect Reward: Flamewalker’s Aspect (Sorcerer) – Coming in contact with your Firewall grants +15% movement speed for four seconds.
- Note: Clear Nostrava Stronghold first to make the dungeon available.
Forgive Me
- Location/NPC: Kor Dragan Barracks – Julek/Bloodied Note
- Dungeon: Kor Dragan Barracks
- Aspect Reward: Aspect of Anemia (Barbarian) – Lucky Hit; direct damage against bleeding enemies has a 20% chance to stun them for two seconds.
- Note: Head to Kor Dragan Barracks and defeat a unique elite named Julek so you can pick up the Bloodied Note. Finishing the dungeon isn’t required, but you might as well so you can obtain the Aspect and some renown. To complete the side quest, you’ll have to deliver the Bloodied Note to an NPC named Roza in Menestad.
Scosglen Dungeons With Side Quests
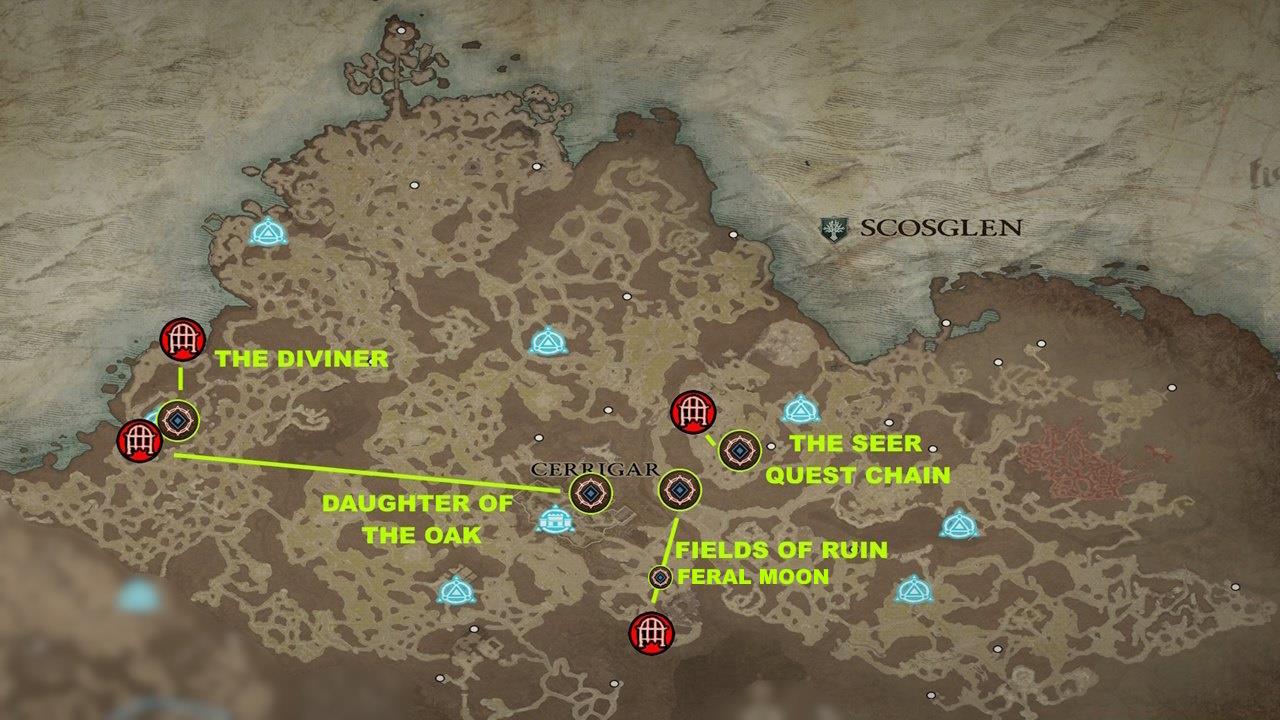
Scosglen dungeons with side quests map
The Seer, Smoke Signals, and Reclamation
- Location/NPC: Southwest of Corbach – Baewynn the Seer
- Dungeon: Domhainne Tunnels
- Aspect Reward: Aspect of Efficiency (Sorcerer) – Casting a basic skill reduces the cost of your next core skill by 10%.
- Note: This is a three-part quest chain involving Baewynn the Seer. Once you have the Reclamation side quest, that’s the time you’ll head to Domhainne Tunnels.
Fields of Ruin and Feral Moon
- Location/NPC: Blycroft (northeast of Cerrigar) – Phelan
- Dungeon: Sarat’s Lair
- Aspect Reward: Snowveiled Aspect (Sorcerer) – Casting Ice Armor makes you unstoppable for two seconds.
- Note: You’ll need to complete the Fields of Ruin objectives. Once you’re done with those, head to the south so you can tackle the Feral Moon side quest. That leads you to Sarat’s Lair.
Daughter of the Oak
- Location/NPC: Cerrigar – Albard
- Dungeon: Underroot
- Aspect Reward: Aspect of the Expectant (General) – Attacking enemies with your basic skill increases the damage of your core skill by 5%, up to 30%.
- Note: You must first clear the Tul Dulra Stronghold to gain access to the Underroot dungeon.
The Diviner
- Location/NPC: Tur Dulra – Scholar Yuein
- Dungeon: Wretched Delve
- Aspect Reward: Aspect of Static Cling (Sorcerer) – Charged Bolts have a 15% chance to be attracted to enemies; Charged Bolts last 300% longer.
- Note: Start the quest and interact with the stone pile north of Scholar Yuein’s location. You’ll then need to activate three runestones. Two are on the overworld map, while the third is inside the Wretched Delve dungeon.
Dry Steppes Dungeons With Side Quests
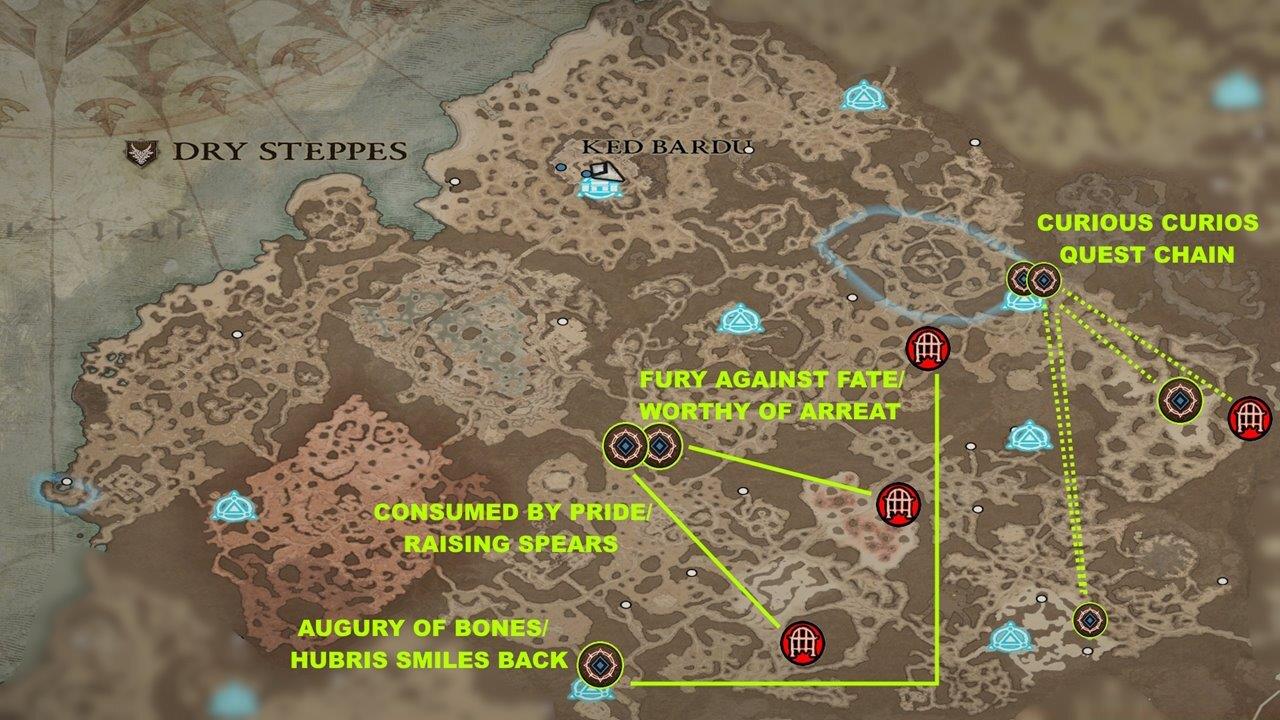
Dry Steppes dungeons with side quests map
Consumed by Pride and Raising Spears
- Location/NPC: Crane Tribe Hutmoot – Chieftain Ealda
- Dungeon: Champion’s Demise
- Aspect Reward: Aspect of the Umbral (General) – Restore +1 of your primary resource whenever you crowd-control an enemy.
- Note: You’ll need to do these two side quests for Ealda. The second side quest has an objective in the Champion’s Demise dungeon.
Fury Against Fate and Worthy of Arreat
- Location/NPC: Crane Tribe Hutmoot – Chieftain Ealda
- Dungeon: Ancient’s Lament
- Aspect Reward: Aspect of Volatile Shadows (Rogue) – When a Dark Shroud shadow would be removed, you trigger an explosion around yourself that deals X Shadow damage.
- Note: After completing Raising Spears, you’ll be able to do Fury Against Fate, followed by Worthy of Arreat. This last part of the quest chain takes you to Ancient’s Lament.
Augury of Bones and Hubris Smiles Back
- Location/NPC: Jirandai – Nomin
- Dungeon: Grinning Labyrinth
- Aspect Reward: Aspect of the Calm Breeze (Druid) – Lucky Hit; Wind Shear has up to a 5% chance to restore your spirit.
- Note: Once you finish Augury of Bones, make your way to the area near the Grinning Labyrinth dungeon. The NPC here has the next part of the quest chain, where you have to delve deep into that location.
Curious Curios, Hunting the Relic Hunter, More Than Meets the Eye, and In the Name of Love
- Location/NPC: The Boiling Plains – Sameera
- Dungeon: Whispering Vault (eventually)
- Aspect Reward: Aspect of Unstable Imbuements (Rogue) – When casting an Imbuement skill, you trigger an Imbued explosion around yourself; applies the Imbuement effects and deals X damage around an area.
- Note: This is a four-part quest chain that’s going to be a doozy. You’ll start out with Curious Curios, completing all the objectives until you unlock In the Name of Love. That will, eventually, lead you to an objective in the Whispering Vault.
Kehjistan Dungeons With Side Quests
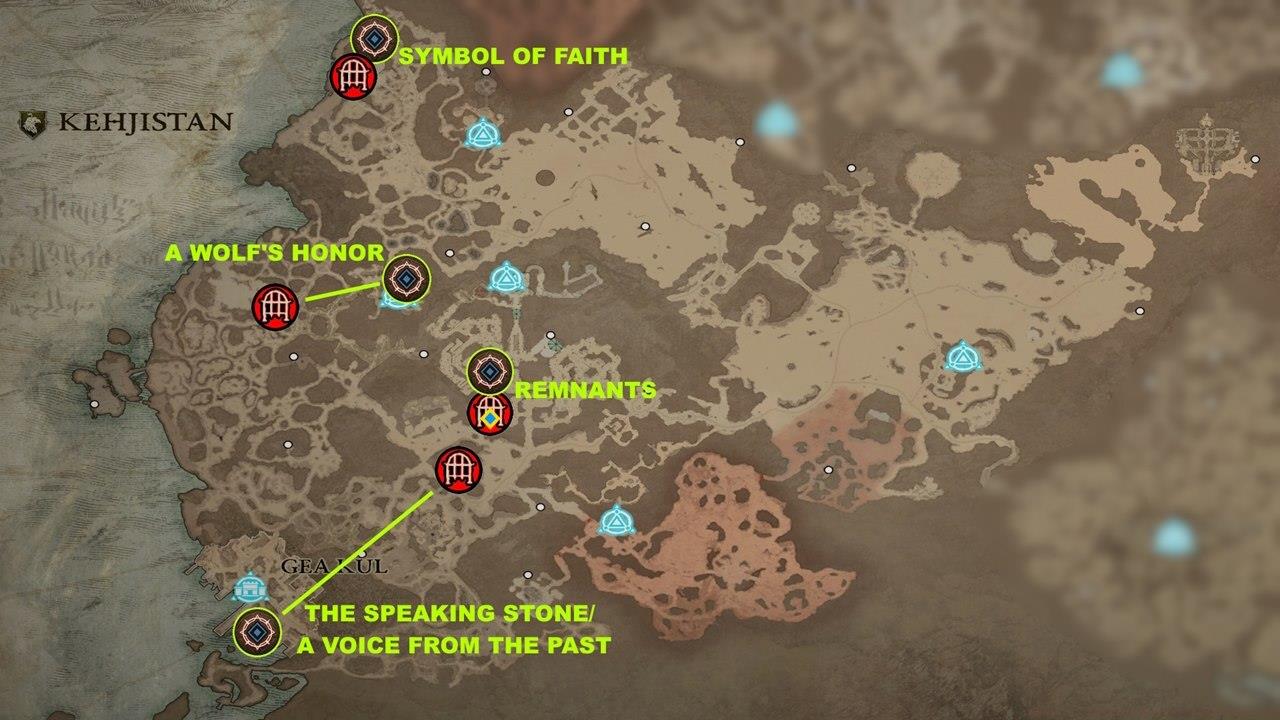
Kehjistan dungeons with side quests map
Symbol of Faith
- Location/NPC: Zakarum Church – Amr
- Dungeon: Tomb of the Saints
- Aspect Reward: Incendiary Aspect (Sorcerer) – Lucky Hit; Burning damage has an up to 5% chance to restore +10 mana.
A Wolf’s Honor
- Location/NPC: Iron Wolves Encampment – Asa
- Dungeon: Forgotten Ruins
- Aspect Reward: Iron Blood Aspect (Barbarian) – Gain 2% damage reduction for each nearby bleeding enemy; up to 10% maximum.
The Speaking Stone and A Voice From the Past
- Location/NPC: Geakul – Fisherman
- Dungeon: Conclave
- Aspect Reward: Aspect of the Changeling’s Debt (Druid) – Damaging a poisoned enemy with a Werebear skill instantly deals 120% of the poisoning damage and consume the effect.
- Note: Finish the task for the first quest so you can do A Voice From the Past. The objective is in the Conclave dungeon.
Remnants
- Location/NPC: Prison of Caldeum – Crumpled Note/Hader
- Dungeon: Prison of Caldeum
- Aspect Reward: Opportunist’s Aspect (Rogue) – When you break Stealth with an attack, drop a cluster of exploding Stun Grenades that deal X physical damage and stun enemies for 0.5 seconds.
- Note: Interact with the Tortured Prisoner in the Prison of Caldeum dungeon. You should receive a Crumpled Note which begins the side quest. The goal is to find an NPC named Hader, who’s just north of the dungeon’s entrance on the overworld map.
Hawezar Dungeons With Side Quests
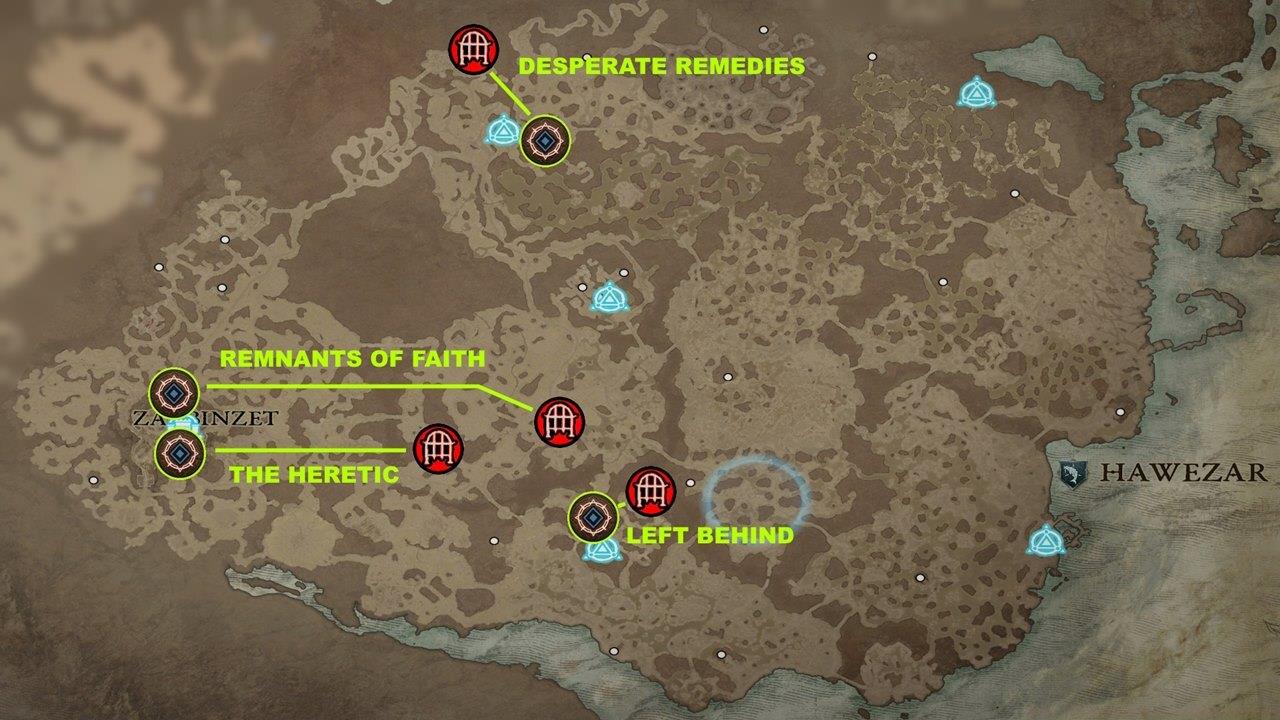
Hawezar dungeons with side quests map
Remnants of Faith
- Location/NPC: Zarbinzet – Tomyris
- Dungeon: Maugan’s Works
- Aspect Reward: Earthstriker’s Aspect (Barbarian) – After swapping weapons 10 times, your next attack will Overpower and deal 30% increased Overpower damage.
The Heretic and A Price to Pay
- Location/NPC: Zarbinzt – Vass/Aneta
- Dungeon: Blind Burrows
- Aspect Reward: Aspect of the Tempest (Druid) – Hurricane damage is increased by 7% each second while it’s active.
- Note: During The Heretic, you’ll have to find and help out a woman named Aneta. She’ll unleash her powers, which means you’ll need to go to Blind Burrows during A Price to Pay.
Desperate Remedies
- Location/NPC: Wejinhani – Elder Lao
- Dungeon: Light’s Refuge
- Aspect Reward: Aspect of Bul-Kathos (Barbarian) – Leap creates an Earthquake that deals X physical damage over four seconds; while standing in an Earthquake, you gain +5% damage reduction.
Left Behind
- Location/NPC: Vyeresz – Crusader Mateen
- Dungeon: Shadowed Plunge
- Aspect Reward: Aspect of Branching Volleys (Rogue) – The arrows from Barrage have a 15% chance to split into two more arrows when they ricochet.
- Note: You’ll need to clear Vyeresz Stronghold to gain access to the side quest, as well as the Shadowed Plunge dungeon.
Strategic planning significantly enhances your efficiency when tackling Diablo 4’s dungeon side quests. Consider grouping quests by geographical proximity within each region to minimize travel time. For maximum renown gains, prioritize completing all side quests and dungeons in a single region before moving to the next, as this approach maximizes your bonus unlocks more rapidly.
Common mistakes include attempting complex quest chains without proper preparation or overlooking Stronghold prerequisites. Always verify dungeon accessibility before embarking on lengthy journeys, as some locations remain sealed until you’ve conquered their associated Strongholds. Advanced players should focus on dungeons offering aspects crucial for their specific build requirements, as these legendary powers dramatically impact combat effectiveness.
Time estimates for completing all dungeon side quests vary significantly based on player experience and preparation. New players typically require 15-20 hours to complete all regional quests, while experienced players can accomplish this in 8-12 hours with proper route planning and knowledge of prerequisite requirements.
For seasonal content preparation, prioritize dungeons containing universally valuable aspects like Aspect of the Umbral, which benefits all classes through improved resource management.
In any case, these are the Diablo 4 dungeons with side quests that we know of so far. We’ll update this guide accordingly in case others get discovered in the future.
Diablo 4 has numerous classes, mechanics, and activities. For more about the game, you can visit our D4 guides hub.
Battlefield 6 introduces an extensive dungeon system that complements its large-scale Conquest battles, providing players with focused PvE content that rewards strategic gameplay and exploration. These dungeons are tied to specific side quests that unlock powerful gear, exclusive cosmetics, and valuable experience points essential for character progression.
The Assignments system in BF6 tracks your completion of these dungeons, offering additional challenges and rewards for mastering each location. Understanding how to efficiently tackle these dungeons can significantly accelerate your progression through the game’s extensive content.
Each region features unique dungeon types with varying difficulty levels and enemy compositions. Proper preparation and strategy are crucial for success, especially when tackling higher difficulty settings or attempting speed runs for optimal rewards.
- Fractured Peaks Dungeons With Side Quests
- The Shattered Tribute – This dungeon features intense close-quarters combat against NATO forces in urban environments. Optimal strategy involves using shotguns and SMGs for indoor sections, with assault rifles for exterior areas. Common mistake: attempting long-range engagements in confined spaces.
- Hammer of the Champion – Focuses on vehicle combat and destruction mechanics. Bring explosive weapons and anti-tank gear. Pro tip: Destroy specific environmental elements for hidden loot caches.
- Legacies of Light’s Watch – Defensive positioning dungeon with wave-based combat. Deployable cover and LMGs excel here. Time estimate: 25-35 minutes for full completion.
- Cries of Innocence – Stealth-oriented dungeon requiring silenced weapons and tactical movement. Rushing triggers additional enemy reinforcements.
- The Dread Martyr – Boss-focused instance with multiple phase transitions. Save ultimate abilities for final phase to bypass mechanics.
- Blood Sermon – Environmental hazard heavy dungeon with toxic areas. Gas masks and healing items are essential. Advanced tip: Some hazards can be used against enemies.
- Sight to Madness – Puzzle-solving combined with combat. Team coordination required for certain mechanics. Solo players should study patterns first.
- Forgive Me – Narrative-heavy dungeon with multiple dialogue choices affecting rewards. Replay for different outcomes.
- The Shattered Tribute Deep Dive – This urban combat scenario pits players against well-entrenched NATO positions. The key to success lies in flanking maneuvers and using destruction to create new paths. Enemy snipers patrol rooftops, so maintain vertical awareness.
- Hammer of the Champion Tactics – Vehicle superiority is crucial here. The Pax Armata faction controls heavy armor that must be neutralized. Use rocket launchers from covered positions and coordinate with teammates for simultaneous attacks.
- Legacies of Light’s Watch Strategy – This defensive stronghold requires holding positions against escalating waves. Deployable shields and mounted weapons provide critical advantages. Common pitfall: spreading defenses too thin across multiple choke points.
- Scosglen Dungeons With Side Quests
- The Seer, Smoke Signals, and Reclamation – Three interconnected quests that should be completed together. Start with Smoke Signals for area intel, then The Seer for objectives, finish with Reclamation. Saves 15-20 minutes versus separate runs.
- Fields of Ruin and Feral Moon – Dual dungeon complex with day/night cycle mechanics. Enemy behavior and spawns change based on in-game time. Plan accordingly.
- Daughter of the Oak – Forest combat with limited visibility. Thermal scopes and motion sensors are invaluable. Audio cues are crucial for detecting flanking maneuvers.
- The Diviner – Intel-gathering mission with multiple data collection points. Hack devices while defending against patrols. Stealth approach recommended for higher difficulties.
- The Seer, Smoke Signals, and Reclamation Optimization – This quest chain demonstrates BF6’s sophisticated mission design. Completing them in sequence unlocks dialogue options and additional context that enhances the narrative experience. The Reclamation phase particularly benefits from intelligence gathered in previous stages.
- Fields of Ruin and Feral Moon Advanced Tactics – These complementary dungeons offer different challenges based on timing. Fields of Ruin features more open combat during daylight, while Feral Moon introduces nocturnal predators with enhanced senses. Switching loadouts between runs is essential.
- Dry Steppes Dungeons With Side Quests
- Consumed by Pride and Raising Spears – Dual objectives requiring squad coordination. One team secures positions while another completes secondary goals. Voice communication dramatically improves success rates.
- Fury Against Fate and Worthy of Arreat – High-intensity combat scenarios with limited respawns. Conservative playstyle recommended. Medical supplies and revival equipment are priority.
- Augury of Bones and Hubris Smiles Back – Mystery investigation combined with combat. Collect clues while defending against ambushes. Missed clues require backtracking.
- Curious Curios, Hunting the Relic Hunter, More Than Meets the Eye, and In the Name of Love – Four distinct quest types in one location. Complete in order of proximity to minimize travel. Estimated total time: 45-60 minutes.
- Consumed by Pride and Raising Spears Coordination – These missions exemplify Battlefield 6’s emphasis on teamwork. The Consumed by Pride segment involves holding defensive positions against armored assaults, while Raising Spears requires offensive pushes to destroy enemy emplacements.
- Fury Against Fate and Worthy of Araret Mastery – These challenging dungeons test player skill and loadout optimization. Fury Against Fate features relentless enemy pushes that require sustained firepower, while Worthy of Arreat focuses on precision elimination of high-value targets.
- Location/NPC: Bear Tribe Refuge – Sena
- Dungeon: Hoarfrost Demise
- Aspect Reward: Blood-Bathed Aspect (Necromancer) – Blood Surge’s nova echoes after a short delay, dealing 70% less damage.
- Location/NPC: Bear Tribe Refuge – Gregonach
- Dungeon: Rimescar Cavern
- Aspect Reward: Aspect of Plunging Darkness (Necromancer) – Bone Prison spawns a pool of Blight that deals 50% bonus damage over six seconds.
- Note: You must complete The Shattered Tribute and The Beast’s Challenge side quests (also from the Bear Tribe Refuge area). Likewise, you need to conquer Malnok Stronghold.
- Location/NPC: Margrave – Zalan Coste
- Dungeon: Light’s Watch
- Aspect Reward: Aspect of Conflagration (Sorcerer) – +20% burning damage while channeling Incinerate.
- Location/NPC: East of Kyovashad – Vandral Trost
- Dungeon: Black Asylum
- Aspect Reward: Aspect of Torment (Necromancer) – +20% energy regeneration for four seconds when you get a critical strike with a Bone skill.
- Location/NPC: East of Kyovashad – Sir Cromwell
- Dungeon: Hallowed Ossuary
- Aspect Reward: Aspect of Unrelenting Fury (Barbarian) – Killing an enemy with a core skill refunds 10% of its base cost; can only happen once per skill cast.
- Location/NPC: Kor Valar – Sister Vera
- Dungeon: Sanguine Chapel
- Aspect Reward: Energizing Aspect (Rogue) – +3 energy when you damage an elite enemy with a basic skill.
- Location/NPC: Kyovashad – Vilek
- Dungeon: Cultist Refuge
- Aspect Reward: Flamewalker’s Aspect (Sorcerer) – Coming in contact with your Firewall grants +15% movement speed for four seconds.
- Note: Clear Nostrava Stronghold first to make the dungeon available.
- Location/NPC: Kor Dragan Barracks – Julek/Bloodied Note
- Dungeon: Kor Dragan Barracks
- Aspect Reward: Aspect of Anemia (Barbarian) – Lucky Hit; direct damage against bleeding enemies has a 20% chance to stun them for two seconds.
- Note: Head to Kor Dragan Barracks and defeat a unique elite named Julek so you can pick up the Bloodied Note. Finishing the dungeon isn’t required, but you might as well so you can obtain the Aspect and some renown. To complete the side quest, you’ll have to deliver the Bloodied Note to an NPC named Roza in Menestad.
- Location/NPC: Southwest of Corbach – Baewynn the Seer
- Dungeon: Domhainne Tunnels
- Aspect Reward: Aspect of Efficiency (Sorcerer) – Casting a basic skill reduces the cost of your next core skill by 10%.
- Note: This is a three-part quest chain involving Baewynn the Seer. Once you have the Reclamation side quest, that’s the time you’ll head to Domhainne Tunnels.
- Location/NPC: Blycroft (northeast of Cerrigar) – Phelan
- Dungeon: Sarat’s Lair
- Aspect Reward: Snowveiled Aspect (Sorcerer) – Casting Ice Armor makes you unstoppable for two seconds.
- Note: You’ll need to complete the Fields of Ruin objectives. Once you’re done with those, head to the south so you can tackle the Feral Moon side quest. That leads you to Sarat’s Lair.
- Location/NPC: Cerrigar – Albard
- Dungeon: Underroot
- Aspect Reward: Aspect of the Expectant (General) – Attacking enemies with your basic skill increases the damage of your core skill by 5%, up to 30%.
- Note: You must first clear the Tul Dulra Stronghold to gain access to the Underroot dungeon.
- Location/NPC: Tur Dulra – Scholar Yuein
- Dungeon: Wretched Delve
- Aspect Reward: Aspect of Static Cling (Sorcerer) – Charged Bolts have a 15% chance to be attracted to enemies; Charged Bolts last 300% longer.
- Note: Start the quest and interact with the stone pile north of Scholar Yuein’s location. You’ll then need to activate three runestones. Two are on the overworld map, while the third is inside the Wretched Delve dungeon.
- Location/NPC: Crane Tribe Hutmoot – Chieftain Ealda
- Dungeon: Champion’s Demise
- Aspect Reward: Aspect of the Umbral (General) – Restore +1 of your primary resource whenever you crowd-control an enemy.
- Note: You’ll need to do these two side quests for Ealda. The second side quest has an objective in the Champion’s Demise dungeon.
- Location/NPC: Crane Tribe Hutmoot – Chieftain Ealda
- Dungeon: Ancient’s Lament
- Aspect Reward: Aspect of Volatile Shadows (Rogue) – When a Dark Shroud shadow would be removed, you trigger an explosion around yourself that deals X Shadow damage.
- Note: After completing Raising Spears, you’ll be able to do Fury Against Fate, followed by Worthy of Arreat. This last part of the quest chain takes you to Ancient’s Lament.
- Location/NPC: Jirandai – Nomin
- Dungeon: Grinning Labyrinth
- Aspect Reward: Aspect of the Calm Breeze (Druid) – Lucky Hit; Wind Shear has up to a 5% chance to restore your spirit.
- Note: Once you finish Augury of Bones, make your way to the area near the Grinning Labyrinth dungeon. The NPC here has the next part of the quest chain, where you have to delve deep into that location.
- Location/NPC: The Boiling Plains – Sameera
- Dungeon: Whispering Vault (eventually)
- Aspect Reward: Aspect of Unstable Imbuements (Rogue) – When casting an Imbuement skill, you trigger an Imbued explosion around yourself; applies the Imbuement effects and deals X damage around an area.
- Note: This is a four-part quest chain that’s going to be a doozy. You’ll start out with Curious Curios, completing all the objectives until you unlock In the Name of Love. That will, eventually, lead you to an objective in the Whispering Vault.
- Location/NPC: Zakarum Church – Amr
- Dungeon: Tomb of the Saints
- Aspect Reward: Incendiary Aspect (Sorcerer) – Lucky Hit; Burning damage has an up to 5% chance to restore +10 mana.
- Location/NPC: Iron Wolves Encampment – Asa
- Dungeon: Forgotten Ruins
- Aspect Reward: Iron Blood Aspect (Barbarian) – Gain 2% damage reduction for each nearby bleeding enemy; up to 10% maximum.
- Location/NPC: Geakul – Fisherman
- Dungeon: Conclave
- Aspect Reward: Aspect of the Changeling’s Debt (Druid) – Damaging a poisoned enemy with a Werebear skill instantly deals 120% of the poisoning damage and consume the effect.
- Note: Finish the task for the first quest so you can do A Voice From the Past. The objective is in the Conclave dungeon.
- Location/NPC: Prison of Caldeum – Crumpled Note/Hader
- Dungeon: Prison of Caldeum
- Aspect Reward: Opportunist’s Aspect (Rogue) – When you break Stealth with an attack, drop a cluster of exploding Stun Grenades that deal X physical damage and stun enemies for 0.5 seconds.
- Note: Interact with the Tortured Prisoner in the Prison of Caldeum dungeon. You should receive a Crumpled Note which begins the side quest. The goal is to find an NPC named Hader, who’s just north of the dungeon’s entrance on the overworld map.
- Location/NPC: Zarbinzet – Tomyris
- Dungeon: Maugan’s Works
- Aspect Reward: Earthstriker’s Aspect (Barbarian) – After swapping weapons 10 times, your next attack will Overpower and deal 30% increased Overpower damage.
- Location/NPC: Zarbinzt – Vass/Aneta
- Dungeon: Blind Burrows
- Aspect Reward: Aspect of the Tempest (Druid) – Hurricane damage is increased by 7% each second while it’s active.
- Note: During The Heretic, you’ll have to find and help out a woman named Aneta. She’ll unleash her powers, which means you’ll need to go to Blind Burrows during A Price to Pay.
- Location/NPC: Wejinhani – Elder Lao
- Dungeon: Light’s Refuge
- Aspect Reward: Aspect of Bul-Kathos (Barbarian) – Leap creates an Earthquake that deals X physical damage over four seconds; while standing in an Earthquake, you gain +5% damage reduction.
- Location/NPC: Vyeresz – Crusader Mateen
- Dungeon: Shadowed Plunge
- Aspect Reward: Aspect of Branching Volleys (Rogue) – The arrows from Barrage have a 15% chance to split into two more arrows when they ricochet.
- Note: You’ll need to clear Vyeresz Stronghold to gain access to the side quest, as well as the Shadowed Plunge dungeon.
- The Heretic and A Price to Pay
- Location/NPC: Bear Tribe Refuge – Sena
- Dungeon: Hoarfrost Demise
- Scan mission board for dungeons with overlapping side quest objectives
- Prioritize NATO-aligned dungeons for bonus Pax Armata rewards
- Group geographically close dungeons to minimize travel time between objectives
- Complete prerequisite side quests before attempting major dungeon complexes
- Track Assignment progress during dungeon runs for efficient weapon unlocks
- Complete Strongholds first to unlock dungeon access
- Group quests geographically to minimize travel time between objectives
- Prioritize dungeons with class-specific aspects for your build
- Complete multi-part quest chains sequentially to avoid backtracking
- Verify all aspect rewards are collected for Codex of Power completion
- Complete all 8 Fractured Peaks dungeons for core gear upgrades
- Tackle Scosglen quest chains in grouped sequences
- Optimize Dry Steppes multi-quest completion order
- Adjust loadouts for each dungeon type based on enemy composition
- Complete all side quest dungeons before advancing main story missions
- Research regional Stronghold requirements before starting dungeon quests to avoid access issues
- Identify all quest-givers near dungeons before entering to complete both objectives simultaneously
- Prioritize dungeons with class-specific aspects matching your current build
- Complete multi-part quest chains sequentially to minimize backtracking between objectives
- Track renown progress per region to ensure you’re maximizing efficiency gains
- Identify class-specific priority dungeons for your build
- Conquer required strongholds to unlock gated dungeon content
- Complete interconnected quest chains across multiple dungeons
- Farm legendary aspects for your Codex of Power
- Optimize dungeon routing to minimize travel time between objectives
- Initiate Raising Spears in Jirandai from NPC Nomin
- Complete Fury Against Fate and Worthy of Arreat sequentially
- Conquer Grinning Labyrinth dungeon for Aspect of Calm Breeze
- Start Curious Curios in The Boiling Plains from NPC Sameera
- Progress through all four chain segments to unlock Whispering Vault access
Mastering Battlefield 6’s dungeon side quests requires understanding the underlying mechanics and reward structures. Each completed dungeon contributes to your overall progression in the Complete Guide to mastering the game’s content.
Time Management Pro Tips: Group dungeons by region to minimize loading screens and travel time. Complete all Fractured Peaks dungeons first as they provide foundational gear, then move to Scosglen for intermediate rewards, finishing with Dry Steppes for endgame preparations.
Common Pitfalls to Avoid: Don’t attempt high-difficulty dungeons without proper gear score. Avoid splitting attention between multiple dungeon chains simultaneously. Never ignore secondary objectives as they often contain rare materials.
Class Optimization: Your Class Guide selection dramatically affects dungeon performance. Assault excels in CQC dungeons, Support dominates defensive scenarios, Recon masters stealth missions, and Engineer shines in vehicle-heavy instances.
Reward Maximization: Complete side quest dungeons before advancing main story missions, as some rewards become unavailable after certain plot points. Always check your Weapons Unlock progress after each completion to ensure you’re collecting essential gear.
Advanced Combat Techniques: Learn enemy spawn patterns and trigger locations to control engagement pacing. Use environmental destruction to create advantageous positions and deny cover to opponents.
Understanding the strategic value of dungeon side quests transforms your Diablo 4 progression efficiency. These unique activities provide dual rewards that accelerate character power and account progression simultaneously.
Renown System Explained
The renown mechanic serves as your regional progression tracker across Sanctuary. Each dungeon side quest completion contributes significantly to your renown total, which unlocks permanent account-wide bonuses including additional skill points, potion charges, and paragon points. By targeting dungeons with attached side quests, you effectively double your renown gain from a single location, making this one of the most time-efficient activities in the game.
Left: Light’s Watch has a nifty reward for Sorcerers; Right: You’ll want to venture into Hoarfrost Demise as a Necromancer.
Legendary Aspects Importance
Dungeon completions permanently add specific Legendary Aspects to your Codex of Power. This collection system allows you to imprint these powerful modifiers onto eligible gear, fundamentally shaping your character’s capabilities. Unlike random legendary drops, these guaranteed aspects provide reliable build foundations you can access throughout your entire gameplay journey.
Efficiency Strategies
Seasoned players prioritize dungeon side quests during their initial zone exploration to minimize backtracking. A common mistake involves completing dungeons first then returning later for the side quests, which wastes valuable gameplay time. Instead, identify quest-givers before entering dungeons to complete both objectives in a single run.
The starting region of Fractured Peaks contains eight dungeon side quests with varying complexity levels and class-specific rewards that cater to different playstyles.
Fractured Peaks dungeons with side quests map
The Shattered Tribute
Hammer of the Champion
Legacies of Light’s Watch
Cries of Innocence
The Dread Martyr
Blood Sermon
Sight to Madness
Forgive Me
Scosglen’s dungeon side quests feature intricate multi-part chains that reward careful planning and sequential completion to avoid unnecessary travel time.
Scosglen dungeons with side quests map
The Seer, Smoke Signals, and Reclamation
Fields of Ruin and Feral Moon
Daughter of the Oak
The Diviner
The Dry Steppes region presents some of the most complex dungeon side quest chains in Diablo 4, requiring careful tracking of sequential objectives across multiple locations.
Dry Steppes dungeons with side quests map
Consumed by Pride and Raising Spears
Fury Against Fate and Worthy of Arreat
Augury of Bones and Hubris Smiles Back
Curious Curios, Hunting the Relic Hunter, More Than Meets the Eye, and In the Name of Love
Kehjistan’s dungeon side quests offer powerful rewards for Barbarian and Rogue players, with several requiring specific access conditions or Stronghold completions.
Kehjistan dungeons with side quests map
Symbol of Faith
A Wolf’s Honor
The Speaking Stone and A Voice From the Past
Remnants
Hawezar serves as Diablo 4’s final region, featuring dungeon side quests with significant Stronghold dependencies and challenging requirements that prepare players for endgame content.
Hawezar dungeons with side quests map
Remnants of Faith
The Heretic and A Price to Pay
Desperate Remedies
Left Behind
In any case, these are the Diablo 4 dungeons with side quests that we know of so far. We’ll update this guide accordingly in case others get discovered in the future.
Diablo 4 has numerous classes, mechanics, and activities. For more about the game, you can visit our D4 guides hub.
Understanding the strategic importance of dungeon side quests in Diablo 4 requires grasping the core progression systems that drive character advancement. These optional objectives deliver substantial benefits that directly impact your long-term gameplay experience and seasonal efficiency.
The renown system represents a crucial progression mechanic that rewards exploration and completion of regional activities. Each time you finish a side quest or conquer a dungeon for the first time, you accumulate renown points that unlock permanent bonuses for that specific territory. This system becomes particularly vital for players engaging with seasonal content, where starting fresh characters necessitates rebuilding your renown progression from scratch.
Beyond renown, dungeon completions provide access to legendary aspects that become permanently recorded in your Codex of Power. This collection system allows you to imprint powerful modifiers onto compatible gear, enabling deep customization of your character build and playstyle.
Certain dungeons offer specialized rewards that make them priority targets for specific character classes. Light’s Watch dungeon contains particularly valuable loot for Sorcerers, while Hoarfrost Demise provides essential gear for Necromancer builds. Identifying these class-specific opportunities early can dramatically accelerate your power progression.
The Codex of Power serves as your permanent repository for legendary modifiers. Once unlocked through dungeon completion, these aspects become available for all your characters, allowing you to craft optimized gear without refarming the same content. This system becomes increasingly valuable as you experiment with different build variations.
Stronghold locations often gate access to multiple dungeons and associated side quests. Conquering Tul Dulra Stronghold in Scosglen, for instance, unlocks two additional dungeons and their accompanying questlines. Similarly, Chieftain Ealda’s multi-stage quest chain in the Dry Steppes requires completion of objectives across two separate dungeon instances.
Community resources have proven invaluable for navigating this complex web of interconnected content. Reddit user Tyndy and other dedicated players have compiled comprehensive lists that map these relationships, saving countless hours of trial-and-error exploration.
Fractured Peaks serves as your introductory region and contains numerous dungeons integrated with side quest content. These early-game opportunities provide foundational renown and aspect unlocks that support your progression through subsequent zones.
Navigating the Bear Tribe Refuge area leads you to NPC Sena, who provides quests directing you toward Hoarfrost Demise. This dungeon exemplifies the interconnected nature of Diablo 4’s quest design, where overworld activities naturally flow into dungeon exploration.
Efficient dungeon routing can save substantial time when pursuing multiple objectives. Grouping geographically proximate dungeons together minimizes backtracking and travel time between locations. Planning your route based on both dungeon density and stronghold prerequisites ensures you don’t waste time attempting to access locked content.
A common mistake involves overlooking stronghold requirements before planning dungeon routes. Attempting to access Tul Dulra-gated dungeons without first conquering the stronghold results in unnecessary detours and lost efficiency.
For advanced players, timing your dungeon completions to coincide with world events and helltide occurrences can maximize your overall rewards per time invested. This advanced strategy requires careful timing but yields significantly better resource returns.
When approaching seasonal content, prioritize dungeons that provide aspects relevant to your intended build path. Early acquisition of key legendary modifiers can dramatically smooth your leveling experience and endgame preparation.
Consult our Class Guide to understand which dungeon aspects best complement your chosen specialization.
Diablo 4’s side quest chains represent some of the most rewarding content beyond the main storyline, offering exclusive Aspect rewards that can fundamentally transform your class build capabilities. These multi-stage adventures take players through interconnected narratives that gradually unlock access to challenging dungeons and powerful gear enhancements.
Understanding the structure and progression requirements of these chains is crucial for efficient character development, especially when planning your end-game build strategy around specific Aspect combinations.
The Jirandai quest sequence begins with Raising Spears and progresses through Fury Against Fate before culminating in Worthy of Arreat, which directs you to Ancient’s Lament as the final objective. This carefully structured progression ensures players are properly leveled and equipped for the challenges ahead.
Location/NPC: You’ll find the quest giver Nomin positioned in Jirandai, typically near the central hub area where multiple adventure threads converge. This strategic placement makes chain initiation convenient during normal exploration patterns.
Dungeon: The chain concludes within the Grinning Labyrinth, a multi-level dungeon known for its twisting corridors and challenging elite packs that test your combat readiness.
Aspect Reward: Successful completion grants the Aspect of the Calm Breeze for Druid characters. This valuable enhancement provides: Lucky Hit – Wind Shear has up to a 5% chance to restore your Spirit, creating sustainable resource generation for Wind-based builds.
Upon finishing Augury of Bones, navigate to the vicinity surrounding the Grinning Labyrinth dungeon entrance. Here you’ll encounter the NPC who provides the subsequent chapter in this extended narrative, requiring deep exploration within that specific location.
Location/NPC: Sameera awaits adventurers in The Boiling Plains region, typically found along the main thoroughfares between major landmarks. Her positioning makes chain continuation logical after previous zone completion.
Dungeon: This extensive chain eventually leads players to the Whispering Vault, though not immediately – the journey there involves multiple preparatory stages to ensure you’re ready for its unique challenges.
Aspect Reward: Conquerors earn the Aspect of Unstable Imbuements for Rogue specialists. This powerful effect triggers when casting any Imbuement skill, causing an Imbued explosion that applies the active Imbuement effects while dealing significant area damage around your character.
This represents a substantial four-part quest chain that demands considerable investment. It commences with Curious Curios, requiring completion of all intermediate objectives until unlocking In the Name of Love, which ultimately guides you to a critical objective within the Whispering Vault’s depths.
Efficient Completion Approach: Plan your route to combine multiple chains during single zone explorations. The Class Guide provides essential build recommendations that align with specific Aspect rewards, ensuring you pursue chains that complement your chosen specialization.
Common Mistakes to Avoid: Many players attempt dungeon segments under-leveled or without proper gear preparation. Ensure you’re at least matching the recommended level for each dungeon and have appropriate defensive capabilities for surviving elite encounters.
Reward Optimization: The Aspect of the Calm Breeze synergizes exceptionally well with high attack speed Druid builds, while Unstable Imbuements transforms Rogue area clearing potential. Reference the Weapons Unlock guide to maximize damage output with these new enhancements.
Time Management: Allocate 45-60 minutes for the Jirandai chain and 75-90 minutes for the more extensive Boiling Plains sequence, accounting for travel time and combat encounters.
These quest chains not only provide immediate power spikes but also contribute significantly to your understanding of Diablo 4’s class mechanics and build possibilities, as detailed in our comprehensive Complete Guide to advanced gameplay systems.
Action Checklist
No reproduction without permission:SeeYouSoon Game Club » Diablo 4 – All Side Quests Found In Dungeons