TL;DR
- Complete 200 close-range kills with specific weapons to unlock treasure map
- Navigate from Braytech Futurescape to Alton Dynamo’s server room
- Locate chest behind raised platform in diamond-shaped server room
- Use optimal weapon loadouts for fastest completion time
- Avoid common navigation errors that waste valuable gaming time
Engage in aggressive close-quarters combat to accumulate Imperials and Runes through the Season of Opulence’s specialized bounty system. This approach requires tactical positioning and weapon mastery to maximize efficiency.
Destiny 2’s Season of Opulence introduces the Menagerie activity, where strategic use of the Chalice of Opulence enables targeted acquisition of powerful weapons and armor sets. Weekly bounties distributed across the solar system provide essential upgrade materials for enhancing your chalice capabilities. Each bounty features a dual-stage completion process: first achieving specific combat objectives, then locating hidden treasure caches throughout various destinations. While treasure hunting presents navigation challenges, our comprehensive guide delivers precise location details and tactical advice. For additional exotic gear opportunities, consult our weekly vendor guide featuring Xur’s current inventory.
The Gaze Into Death’s Eyes bounty transports guardians to Mars for intense close-range engagements. This combat challenge mandates securing 200 eliminations using shotguns, submachine guns, sidearms, or swords within optimal engagement distances. Successful completion reveals a detailed Treasure Map pinpointing Alton Dynamo as your destination for claiming rewards. Understanding enemy spawn patterns and weapon effectiveness dramatically reduces completion time.
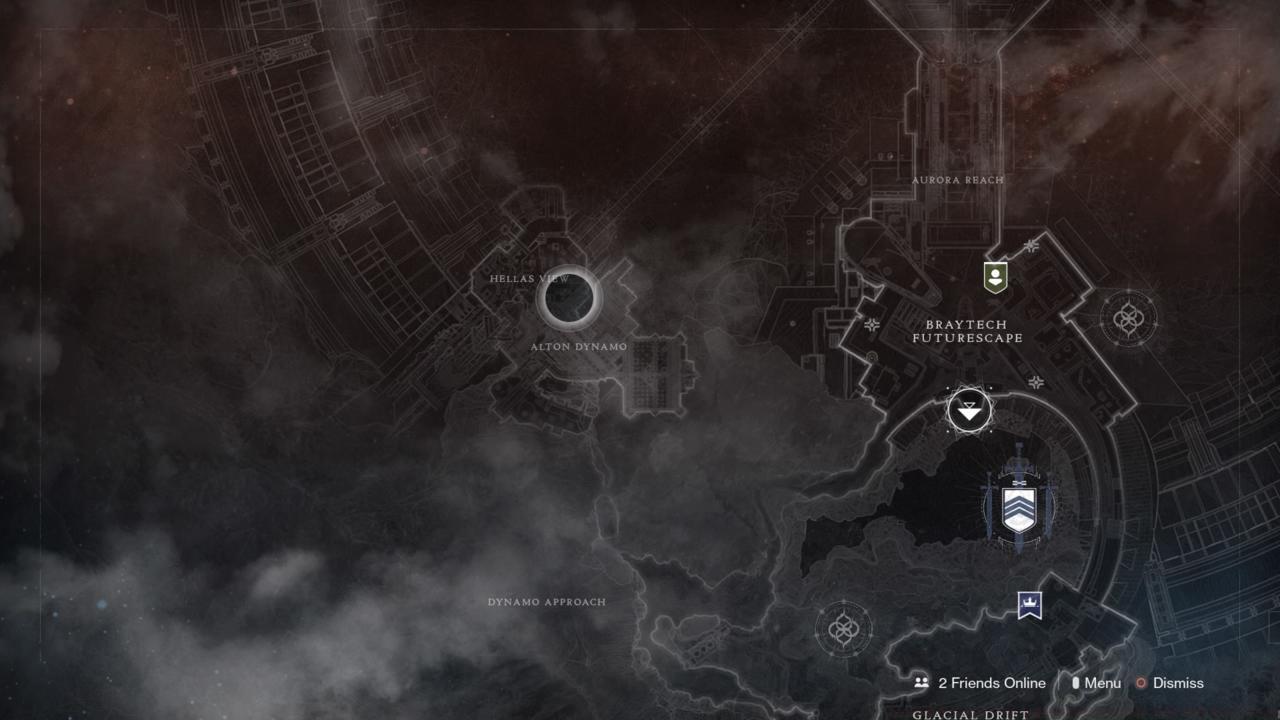
Initiate your journey from the Braytech Futurescape landing zone on Mars, then deploy your sparrow for rapid westward travel toward Alton Dynamo. This optimized route minimizes transit time while avoiding unnecessary combat encounters.
Navigate through Dynamo Approach and enter the facility via the cave tunnel passage. Engage Cabal forces strategically rather than eliminating every enemy—focus on creating pathways rather than total area clearance. Proceed through security doors until reaching the critical decision point: a branching hallway with left and right passages.
Seasoned players recommend bypassing non-essential combat to save approximately 3-5 minutes per run. The optimal path involves using sparrow boosts through open areas and dismounting only when necessary for interior navigation. For broader strategic context, our Complete Guide offers additional navigation techniques applicable across multiple game environments.
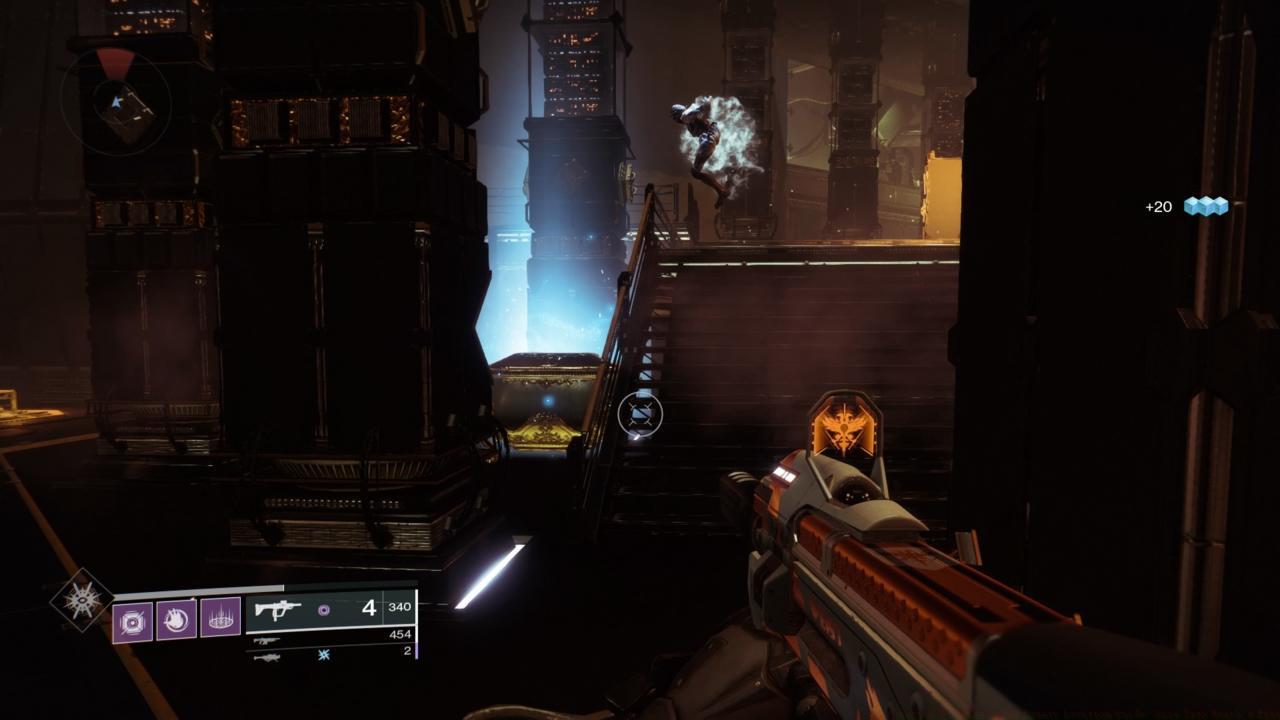
Select the right-hand corridor to access the extensive server room complex. This environment features the characteristic diamond-shaped layout prevalent throughout the facility, requiring specific navigation toward the rear left wall area.
Navigate around the perimeter of the elevated central platform while maintaining combat readiness. Remain vigilant for Hive adversaries that spawn unpredictably in the chamber’s deeper sections—these enemies can disrupt treasure retrieval if not handled proactively.
Upon locating the staircase on the platform’s left flank, continue along the outer edge to discover the illuminated treasure container positioned strategically in the corner. The chest emits a distinct glow visible from medium distances, aiding final location identification. For weapon selection guidance relevant to close-quarters combat, our Weapons Unlock resource provides complementary information.
Advanced players suggest clearing immediate threats before attempting chest interaction, as interruption during the claiming animation forces restarting the process. This oversight commonly adds 1-2 minutes to completion time for unprepared guardians.
Optimize your loadout by selecting weapons with high close-range damage output and rapid target acquisition. Shotguns with full-auto capabilities and swords with movement-enhancing perks significantly accelerate kill accumulation. Avoid using precision weapons that perform poorly in intimate combat scenarios.
The complete bounty-to-treasure cycle typically requires 15-25 minutes depending on player skill level and loadout effectiveness. Inexperienced guardians often spend 30+ minutes struggling with navigation and inefficient combat approaches.
Common errors include taking the left hallway instead of the right path, resulting in dead ends and wasted time. Another frequent mistake involves over-clearing areas rather than focusing on objective-based progression. For character build optimization that complements this bounty style, our Class Guide offers specialized recommendations.
Strategic positioning during the kill phase involves funneling enemies through choke points and utilizing environmental cover to minimize damage taken. This approach preserves resources for the treasure retrieval segment where unexpected combat encounters may occur.
Action Checklist
- Equip shotgun/SMG/sidearm/sword and complete 200 close-range kills
- Travel from Braytech Futurescape to Alton Dynamo via sparrow
- Navigate through cave tunnel and hallway, selecting right path at fork
- Locate server room, navigate to back left around central platform
- Find glowing chest past stairs on platform’s left side
No reproduction without permission:SeeYouSoon Game Club » Destiny 2 Treasure Map Bounty Location Guide: Gaze Into Death’s Eyes Master the Gaze Into Death's Eyes bounty with expert strategies for efficient treasure hunting in Destiny 2