TL;DR
- Lost Ghost Traces drop from moon chests and unlock Eris Morn’s Dead Ghost bounties
- Each Ghost reveals lore about the Great Disaster and fallen Guardians
- Navigate complex Hive structures using specific pathfinding techniques
- Complete all Ghosts for Phantasmal Fragments and Triumph lore books
- Use visual cues and environmental markers for efficient discovery
Mastering the Dead Ghost recovery system in Destiny 2’s Shadowkeep expansion requires understanding the specialized mechanics and progression pathways. Unlike traditional collectibles, these artifacts follow a structured quest chain that reveals crucial backstory about the moon’s tragic history.
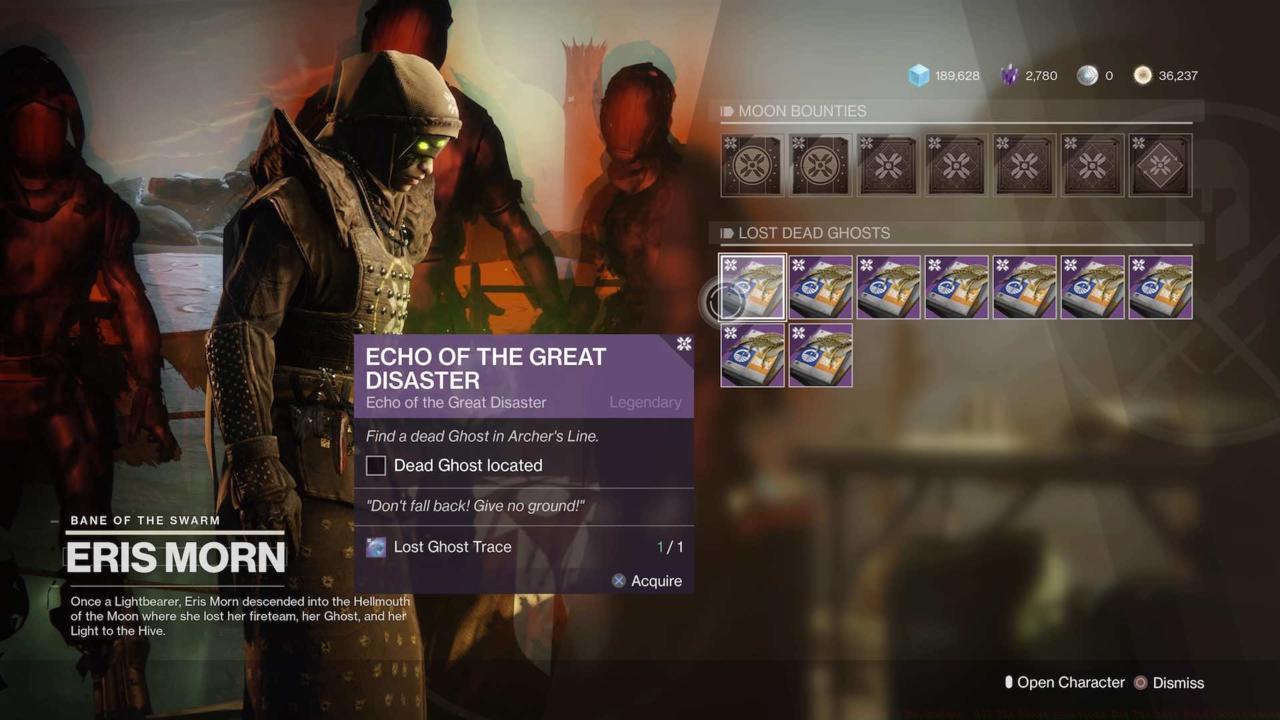
The Shadowkeep expansion introduces numerous exploration opportunities and activities across the lunar landscape, including the challenging Altars of Sorrow public events and intense Nightmare Hunts. As you explore these locations, you’ll encounter various chests scattered throughout the moon’s surface and receive them as completion rewards for various activities. Opening these containers frequently yields a unique consumable item called a Lost Ghost Trace, which serves as your entry point to Eris Morn’s specialized bounty series.
These special bounties task you with deciphering environmental clues and location descriptions to locate the deceased Ghosts of Guardians who fell during the Great Disaster—a catastrophic event where thousands of Guardians were slaughtered by Crota, the Hive deity. Each recovered Ghost fragment unveils historical context about the tragic events that unfolded on the moon years before the current timeline, providing deeper immersion into Destiny 2’s expansive universe. Discovering these artifacts unlocks specific lore Triumphs that chronicle the individual stories of the Guardians who perished, offering fascinating insights into Bungie’s meticulously crafted worldbuilding.
A minimum of eight spectral Ghosts await discovery, but their acquisition method differs significantly from the straightforward collection system in the original Destiny. Shadowkeep’s Ghost recovery involves obtaining a Lost Ghost Trace first, then exchanging it with Eris Morn to receive a targeted quest for locating a specific Ghost in predetermined lunar locations. Successful completion grants you additional lore entries for the Dead Ghosts lore book alongside valuable Phantasmal Fragments used for nightmare consumables.
Our comprehensive guide details every known spectral Ghost location, their described positions, and—where available—precise coordinates and discovery methods. We’ll persistently update this resource as we uncover additional locations. During your exploration, note that these artifacts emit a subtle luminous aura to assist identification, though unlike the objective markers provided for Lectern of Enchantment Essence quest items, you won’t receive waypoint indicators for these historical remnants.
Begin your Archer’s Line exploration by spawning at Sanctuary and navigating leftward toward the designated zone. When the path diverges, take the left branch and continue until you observe another fork immediately preceding a wrecked vehicle. Proceed rightward briefly until encountering a jump point. Pause at this position and rotate right to observe the substantial ground fissure. Immediately to the right, you’ll notice a depressed ledge. Descend to this level and advance toward another lower platform containing additional wreckage and a destroyed truck. The spectral Ghost rests in this vicinity.
Archer’s Line dead Ghost location
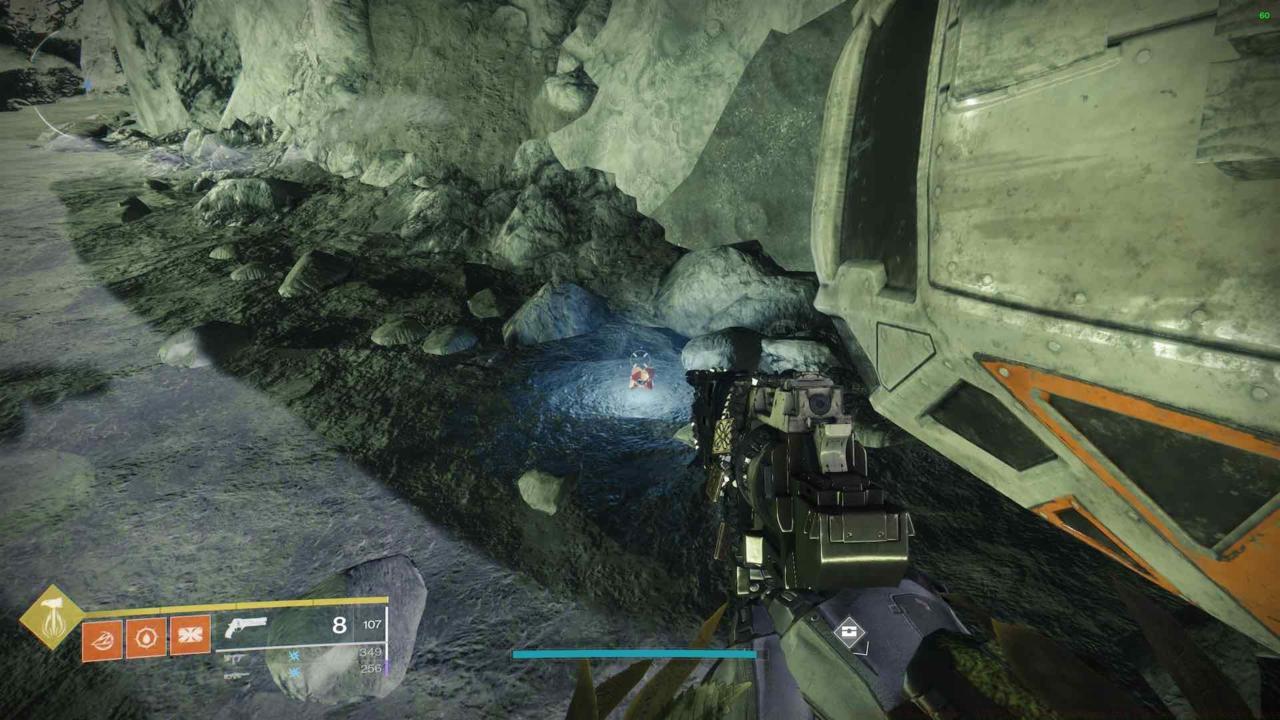
Archer’s Line dead Ghost location
Access the Shrine of Oryx through the Archer’s Line entrance point. Initiate from Sanctuary and transport to Archer’s Line, then ascend the right-side slope directing toward the domed structure. Traverse through this building and follow the descending pathway into the Hive architecture. Descend further and you’ll quickly reach the Hall of Wisdom chamber.
Continue advancing into the circular chamber featuring substantial, illuminated orange crystalline formations suspended from above. Rotate left and proceed through the doorway. You’ll encounter a large rounded entrance with apparent conduit or power transmission lines leading inward. Follow this corridor to its termination, then trace the curved path following the shrine’s perimeter until arriving at the expansive room containing a central structure with interior access. Pass through the central entrance into the construction to locate the deceased Ghost positioned on the flooring.
Journey to Anchor of Light and navigate toward the eastern sector, seeking a passage between lunar settlement structures that leads to a serpentine canyon roadway. Follow this route to access the Temple of Crota and enter the interior. Continue descending through the temple complex, bypassing several Hive seeding devices. You’ll eventually reach a sizable chamber containing one final Hive seeder accompanied by numerous hostile entities. Identify a doorway emitting verdant illumination and proceed through this opening.
The forward trajectory leads into the World’s Grave domain. Progress through the initial chamber into a stone corridor featuring elevated ceilings and continue beyond adversaries, ascending to the secondary level to locate a doorway. Continuing ahead, you’ll next encounter a room containing a large circular platform. Turn right and identify the substantial door with an orange-illuminated chamber immediately beyond. Enter this room, ascend the stairway, and rotate left. You’ll observe another accessible door directly ahead. Enter this portal and examine the left corner of the compact room beyond to discover the spectral Ghost.
Successful Ghost recovery requires strategic planning and environmental awareness. These advanced techniques will significantly improve your efficiency and completion rate.
Optimize your exploration by prioritizing high-yield chest locations near public event zones and Lost Sector entrances. The Altars of Sorrow activity provides exceptional Lost Ghost Trace acquisition opportunities, with completion typically yielding 1-2 traces per successful run. Always maintain situational awareness for Hive enemy patrols, as engagement can waste valuable exploration time. For maximum efficiency, complete multiple Ghost bounties during single moon excursions by planning efficient route sequences.
Common exploration errors include insufficient enemy clearance before searching, missing subtle environmental cues, and attempting complex jumps under fire. Always eliminate all nearby threats before attempting precise platforming or detailed environmental examination. The spectral glow from Ghosts becomes more visible in darker Hive structures—adjust your brightness settings accordingly. Each location typically requires 10-15 minutes for experienced players, though initial attempts may take 25-30 minutes due to navigation learning curves.
Action Checklist
- Farm Lost Ghost Traces from moon chests and activity completions
- Exchange traces with Eris Morn for specific Ghost bounties
- Plan efficient route sequencing for multiple Ghost recoveries
- Navigate to specified locations using environmental landmarks
- Clear all enemies before attempting precise platforming or searches
- Collect Phantasmal Fragments and unlock lore Triumphs
No reproduction without permission:SeeYouSoon Game Club » Destiny 2 Shadowkeep: All The Ghost Locations For The Lost Dead Ghosts Quest Complete guide to finding all Dead Ghosts in Destiny 2 Shadowkeep with expert strategies and lore insights