TL;DR
- Onslaught: Salvation introduces story-driven Scorn attacks with new Revenant Barons and prisoner rescue mechanics
- Destroy glowing orange Totems to permanently eliminate resurrecting Barons and free Eliksni prisoners from energy cages
- Face mixed faction waves including Scorn, Shadow Legion, and Dread enemies with dynamic Bane buffs
- Use strategic positioning and rapid Totem destruction to counter resurrection mechanics effectively
- Optimize loadouts with area control weapons and prioritize high-mobility for prisoner rescue objectives
GameSpot may receive revenue from affiliate and advertising partnerships for sharing this content and from purchases through links.
Destiny 2’s Revenant episode introduces Onslaught: Salvation, a significantly enhanced version of the popular Onslaught activity that debuted in the Into the Light content update. This iteration brings substantial gameplay evolution with completely new enemy types, strategic objectives, and defensive capabilities that transform the player experience.
As the central engagement mechanism for Revenant, Onslaught: Salvation becomes your primary pathway to acquiring episode-specific gear and advancing through the seasonal narrative. Understanding the nuanced changes from the base mode and mastering the introduced mechanics is crucial for maximizing your efficiency and success rate in this challenging activity.
Onslaught: Salvation adopts a more narrative-focused approach compared to its predecessor, centering on coordinated Scorn assaults against Eliksni settlements established across Europa and Earth. This story integration creates a more immersive combat environment with clear stakes for each engagement.
While standard Onslaught features rotating enemy factions spanning Hive, Vex, Cabal, Fallen, and Scorn, Salvation narrows the focus to three specific threat groups: the Fanatic’s Revenant Scorn, Calus’s Shadow Legion, and the ominous Dread forces introduced in The Final Shape expansion. The strategic innovation lies in how these factions combine during assault waves, creating unpredictable combat scenarios that demand adaptive tactics. For instance, you might encounter Subjugator mini-bosses materializing during certain phases, while Shadow Legion units summon aerial Grim reinforcements in others, requiring constant situational awareness and loadout flexibility.

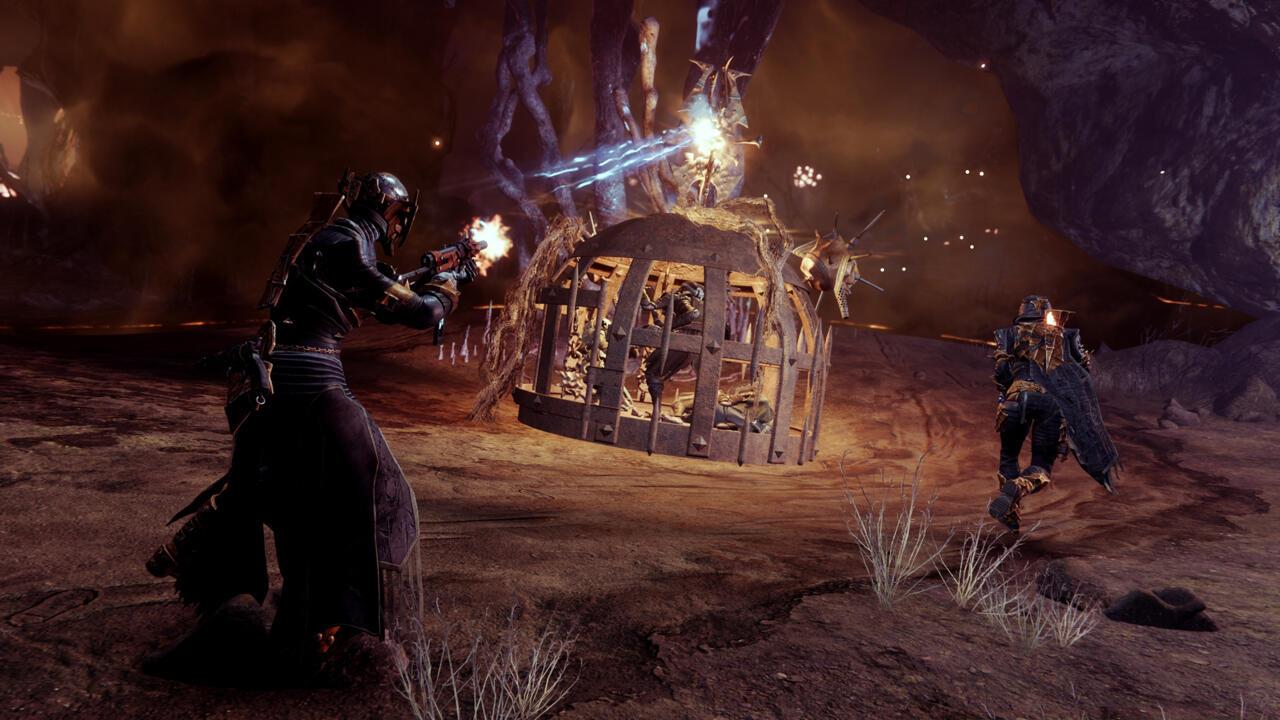
The defining innovations in Onslaught: Salvation revolve around two key interactive elements: Scorn Revenant Barons and Eliksni prisoner containment systems. Both mechanics share a common countermeasure—the systematic destruction of luminous orange energy sources called Totems that fuel these Scorn capabilities.
Revenant Barons represent elite-tier combatants with exceptional durability and a unique resurrection ability that sets them apart from standard enemies. When defeated, these formidable foes don’t remain eliminated; instead, an orange energy beam projects from their demise location, traveling a short distance before manifesting as a floating Totem resembling a wall-mounted torch. This resurrection sequence creates urgent time-pressure situations that can overwhelm unprepared fireteams.
To achieve permanent elimination of a Revenant Baron, you must immediately pursue and demolish the spawned Totem. These energy constructs possess minimal health pools and can be destroyed with virtually any weapon type, but their strategic positioning and the chaotic combat environment make this deceptively challenging. Successful destruction guarantees the Baron remains defeated for the encounter duration.

During specific assault waves, you’ll encounter containment cages imprisoning Eliksni civilians. Similar to the Baron mechanics, these cages feature torch-like Totems hovering above them, generating spheres of dark energy that envelop the area. These energy fields block projectile penetration and suppress Guardian ability usage, creating hazardous zones that must be breached strategically. Penetrating the bubble perimeter and targeting the central Totem dismantles the containment field, enabling prisoner liberation. Whenever these scenarios appear, your tactical priority shifts to rapid Totem neutralization and civilian extraction.
Beyond the Revenant Barons, Destiny 2 introduces a sophisticated enemy enhancement system called Banes that randomly empowers individual combatants during engagements. Enemies affected by Banes may exhibit various dangerous capabilities, including electrical discharge auras affecting nearby Guardians, homing meteor summoning, or damage immunity that requires melee initiation before becoming vulnerable to conventional attacks.

Pro Tip: Designate a dedicated Totem hunter in your fireteam—ideally a high-mobility Hunter or teleporting Warlock—who can rapidly respond to resurrection sequences. This role specialization dramatically improves wave clear efficiency and prevents resurrection cascades that can overwhelm defensive positions.
Common Mistake: Many players waste heavy ammunition on resurrecting Barons instead of conserving it for Totem destruction. Remember that Totems require minimal damage, so prioritize precision weapons for these targets while saving power weapons for major threats.
Loadout Optimization: Equip weapons with high handling stats and mobility-enhancing armor mods to quickly reposition between Totem emergencies. Fusion rifles and trace rifles excel at rapid Totem elimination due to their instant damage application.

Wave Management: The mixed faction composition means you’ll face enemies with different attack patterns simultaneously. Prioritize targets based on immediate threat—Subjugators that suppress abilities, Grim-summoning Legionaries, then standard infantry. This target priority system prevents ability lockdown and aerial swarm scenarios.
Onslaught: Salvation serves as the primary reward acquisition channel for the Revenant episode, offering exclusive weapons, armor sets, and cosmetic items unavailable through other activities. The progression system incorporates weekly challenge bonuses, difficulty scaling rewards, and mastery objectives for dedicated players seeking optimal gear rolls.
Time Investment: A typical successful run on standard difficulty takes approximately 20-25 minutes, while higher difficulty tiers may require 35-45 minutes for completion. Plan your sessions accordingly to maximize reward efficiency.
Episode Integration: Your performance in Onslaught: Salvation directly influences your progression through the Revenant narrative, with specific objectives and boss encounters unlocking additional story segments and character interactions.
For comprehensive loadout strategies and weapon optimization, consult our BF6 Weapons Unlock Guide for detailed damage analysis and perk recommendations tailored to this activity’s unique demands.
Action Checklist
- Assign dedicated Totem hunter role in fireteam composition
- Equip high-handling weapons and mobility armor for rapid repositioning
- Prioritize Totem destruction immediately after Baron elimination
- Breach energy bubbles and rescue Eliksni prisoners during cage waves
- Conserve heavy ammunition for major threats, not resurrecting Barons
- Complete weekly challenge objectives for bonus rewards
No reproduction without permission:SeeYouSoon Game Club » Destiny 2 Onslaught: Salvation Guide – Potions, Banes, And New Defenses Master Destiny 2's Onslaught: Salvation with advanced strategies, enemy tactics, and optimization tips