TL;DR
- SOA Subverter dominates long-range engagements with minimal recoil when properly configured
- SVA 545 offers exceptional versatility for mid-range combat with balanced performance
- HRM-9 SMG provides superior mobility for aggressive close-quarters gameplay
- MORS sniper delivers one-shot elimination potential with proper positioning
- Attachment combinations significantly impact weapon performance and handling characteristics
GameSpot may receive revenue from affiliate and advertising partnerships for sharing this content and from purchases through links.
Call of Duty: Warzone’s Season 3 refresh introduces substantial weapon balancing alongside new armaments that reshape combat dynamics. The recent update delivers a potent sniper rifle and agile submachine gun, compelling players to reconsider established loadout configurations from previous seasons. This comprehensive guide presents optimized weapon setups tailored for battle royale dominance, while our dedicated MW3 multiplayer loadouts for Season 3 address different engagement requirements.
Season 3’s weapon adjustments create distinct advantages for strategic loadout planning. Understanding attachment synergies becomes crucial for maximizing weapon potential across varying combat scenarios, from long-range sniper duels to close-quarters building clearing operations.
SOA Subverter
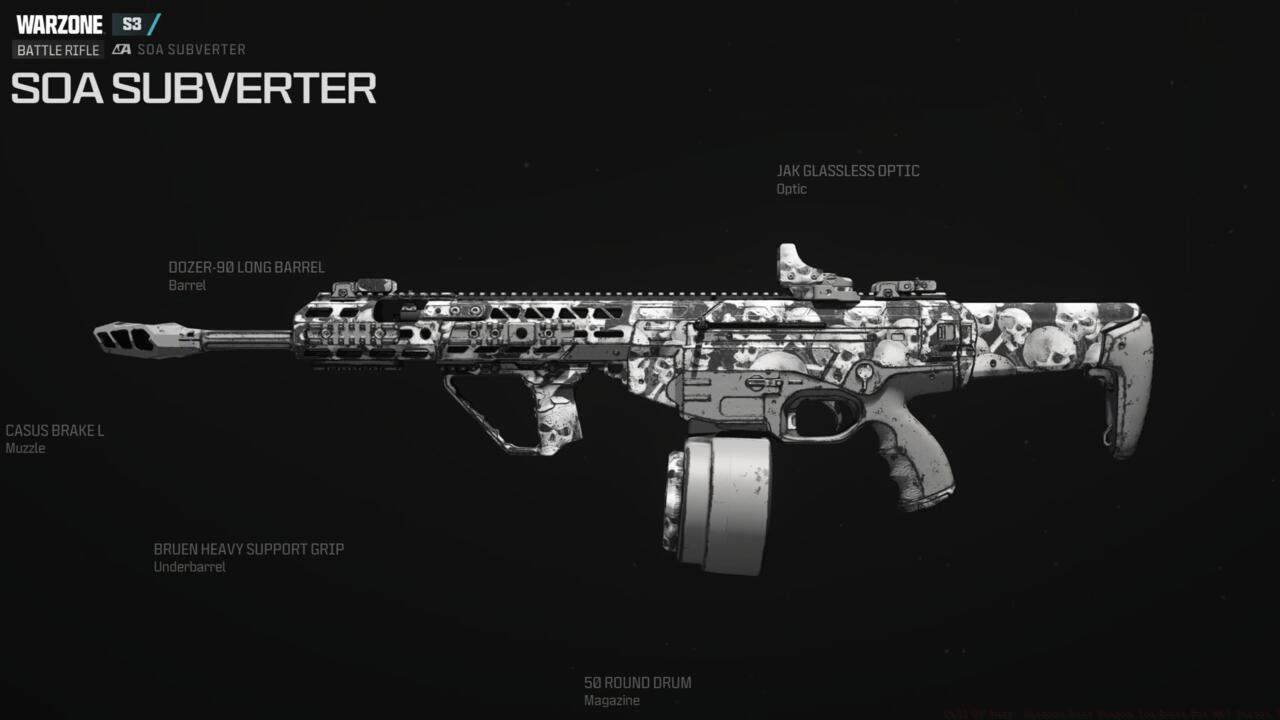
The SOA Subverter battle rifle establishes itself as the premier long-range option in Season 3, particularly excelling within Resurgence game modes where sustained firepower matters. Its default vertical recoil pattern requires specific attachment combinations to transform it into a laser-beam accurate weapon. The recommended configuration focuses on recoil stabilization while maintaining competitive time-to-kill statistics.
- Barrel: Dozer-90 Long Barrel (enhances bullet velocity and damage range)
- Optic: JAK Glassless Optic (provides clean sight picture without ADS penalty)
- Magazine: 50 Round Mag (ensures ample capacity for multiple engagements)
- Underbarrel: Bruen Heavy Support Grip (dramatically reduces vertical recoil)
- Muzzle: Casus Brake (further stabilizes initial shot recoil)
Advanced players should master burst-fire techniques at extreme distances, as controlled firing dramatically improves hit probability. Common mistakes include holding the trigger too long, which exacerbates the weapon’s horizontal bounce in sustained firefights.
SVA 545

As one of the most adaptable assault rifles available, the SVA 545 delivers exceptional performance across medium-range engagements with minimal handling penalties. Its unique hyper-burst firing mechanism provides an initial damage advantage when landing precise shots. The optimized attachment setup balances mobility with recoil control for versatile combat effectiveness.
- Muzzle: VT-7 Spiritfire Suppressor (conceals firing while improving vertical recoil)
- Barrel: STV Precision Barrel (boosts accuracy and effective damage range)
- Optic: Corio Eagleseye 2.5x (ideal sight for mid-range target acquisition)
- Underbarrel: DR-6 Handstop (improves movement speed and aim walking steadiness)
- Magazine: 60 Round Drum (extends engagement duration without frequent reloads)
The SVA 545 particularly shines in semi-automatic firing mode for precision shots beyond 50 meters. Players transitioning from fully automatic weapons should practice trigger discipline to maximize this rifle’s potential.
Bruen MK9
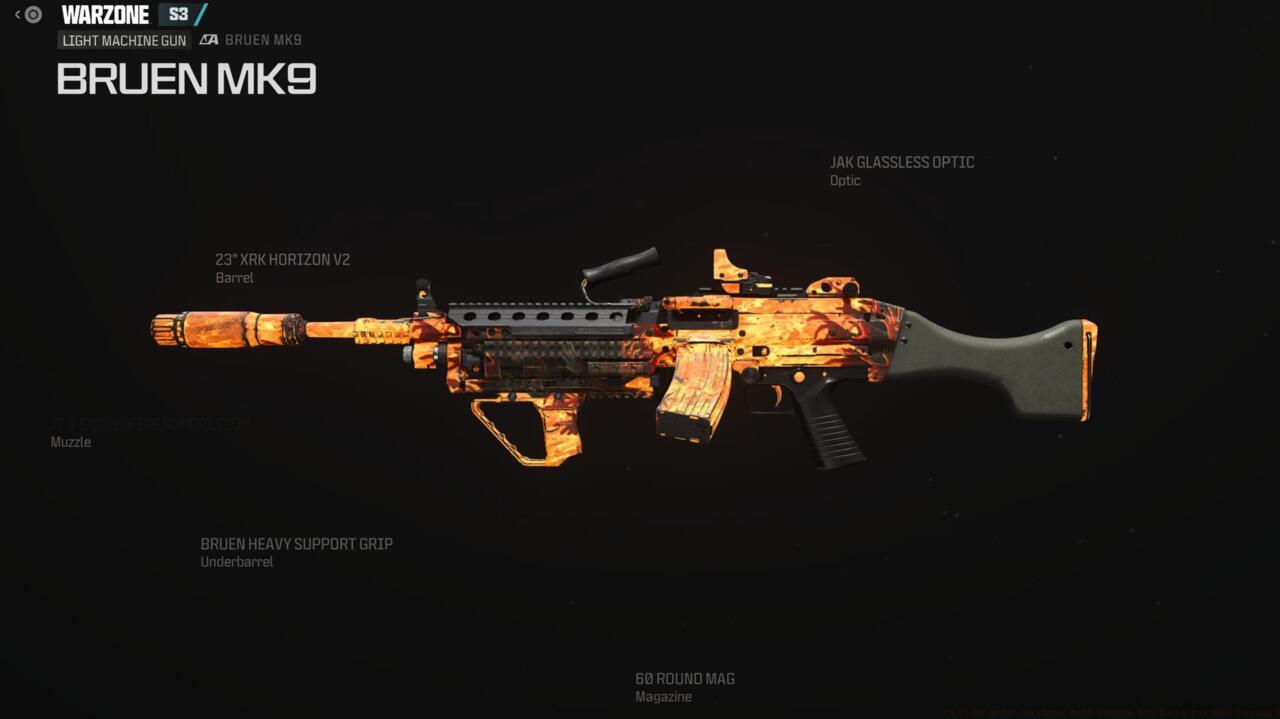
This light machine gun returns to meta relevance with Season 3 adjustments that improve its mobility characteristics. The Bruen MK9 dominates in suppression and area denial roles, especially when mounted on cover. Its large default magazine capacity makes it ideal for squad play where sustained fire is necessary.
- Barrel: 23″ Bruen Barrage (maximizes bullet velocity and recoil control)
- Optic: Schlager 3.4x (provides clarity for medium to long-range targets)
- Underbarrel: Bruen Heavy Support Grip (reduces idle sway and vertical recoil)
- Ammunition: 7.62 High Grain Rounds (increases bullet penetration and damage range)
- Rear Grip: Bruen G305 Grip (improves aim down sight speed significantly)
Strategic positioning becomes paramount with the Bruen MK9, as its slower handling requires pre-aiming common engagement lanes. Successful deployment involves anticipating enemy movement rather than reacting to it.
HRM-9

Season 3’s new submachine gun delivers exceptional mobility for aggressive playstyles, featuring a rapid fire rate that dominates within 15 meters. The HRM-9 requires specific attachments to mitigate its horizontal bounce while preserving its movement advantages. Optimal configuration focuses on hip-fire accuracy for close-quarters emergencies.
- Muzzle: ZEHMN35 Compensated Flash Hider (reduces horizontal recoil without slowing ADS)
- Barrel: Princeps Long Barrel (extends damage range while improving bullet velocity)
- Laser: FSS OLE-V Laser (enhances hip-fire precision for movement-heavy combat)
- Magazine: 50 Round Drum (ensures multiple target engagement capability)
- Stock: Folding Stock (maximizes sprint-to-fire speed and movement)
Mastering movement techniques like slide-canceling and jump-shotting dramatically improves HRM-9 effectiveness. This weapon pairs exceptionally well with longer-range primary weapons for balanced loadout coverage.
Renetti
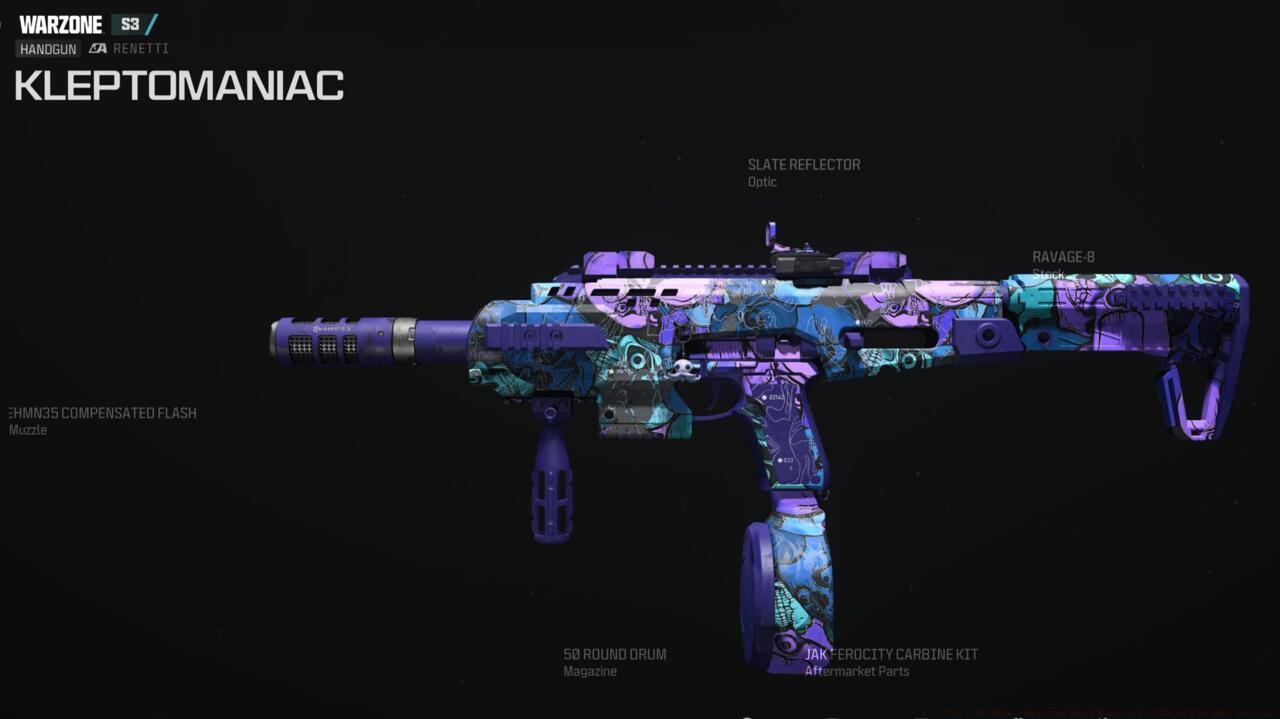
The Renetti pistol transforms into a formidable secondary option when equipped with its conversion kit, functioning as a mini-SMG with surprising stopping power. The burst-fire mod configuration delivers devastating damage at close range while conserving primary weapon ammunition.
- Muzzle: FT Steel Fire (reduces vertical climb during burst sequences)
- Barrel: Mk1 Renetti Long Barrel (improves damage range and bullet velocity)
- Conversion Kit: Jak Ferocity Carbine Kit (transforms pistol into full-auto secondary)
- Magazine: 33 Round Mag (extends engagement duration for multiple targets)
- Rear Grip: RGN Rear Grip (enhances recoil control and weapon switching speed)
The Renetti serves as an excellent backup when your primary weapon runs dry during critical moments. Practice quick-swap techniques to maximize its emergency utility in close-quarters situations.
FJX Horus
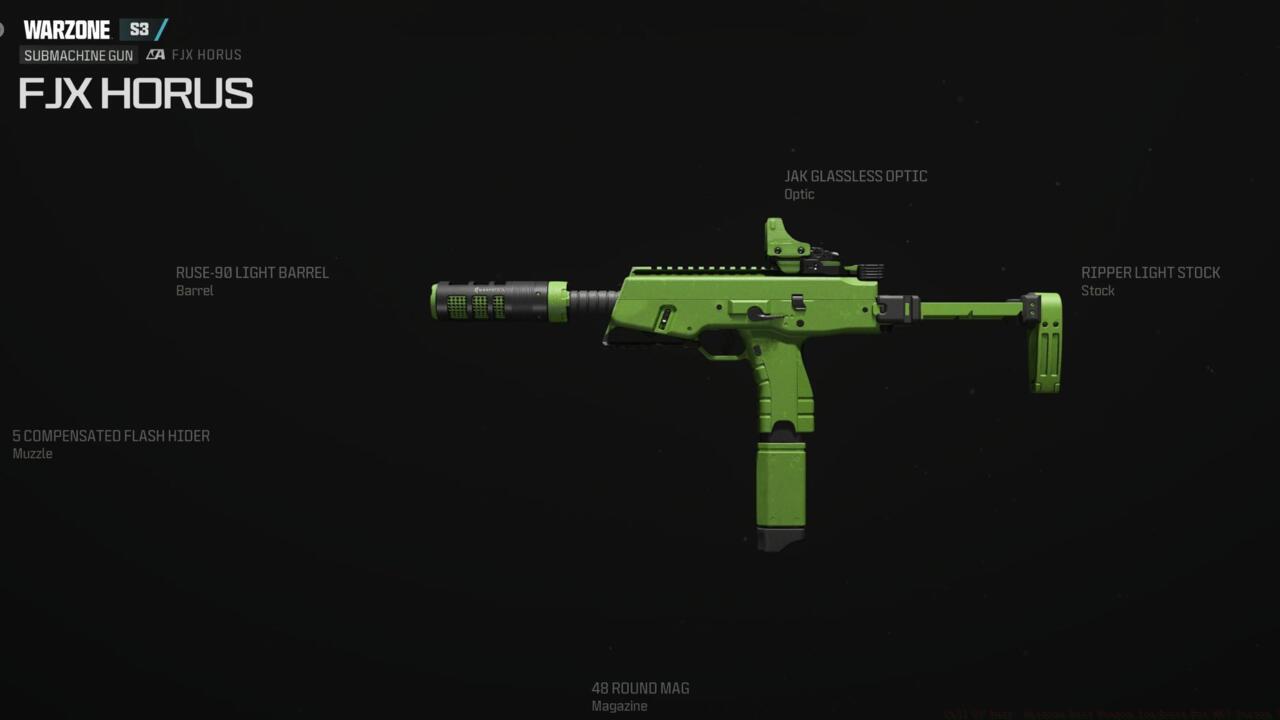
This compact sniper rifle offers unprecedented handling speeds for quick-scoping enthusiasts while maintaining one-shot elimination potential to the upper torso and head. The FJX Horus redefines aggressive sniper play with its rapid aim-down-sight time.
- Barrel: FJX Fulminator Barrel (improves bullet velocity without significant ADS penalty)
- Optic: Forge Tac Delta 4 (provides clean reticle without visual clutter)
- Laser: FSS OLE-V Laser (enhances aim stability for quick-scope accuracy)
- Ammunition: .300 Mag High Grain (ensures consistent one-shot downs within effective range)
- Bolt: FJX Light Bolt (increases rate of fire for follow-up shots)
Positioning remains critical with the FJX Horus—seek elevated positions with clear sightlines but multiple escape routes for repositioning after engagements.
MORS
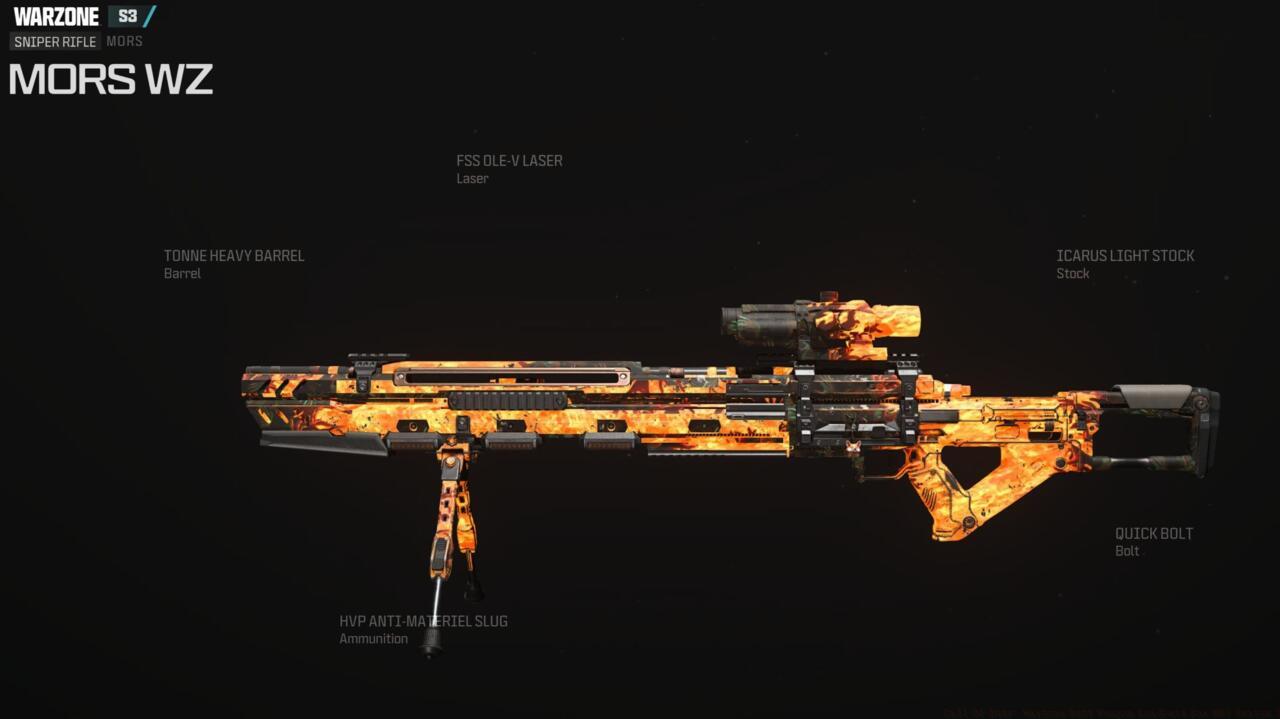
The new MORS sniper introduces unique photon-based technology that delivers exceptional penetration through materials. Its distinctive firing mechanism requires adjustment for players accustomed to traditional ballistic snipers, but rewards with unparalleled wall-bang potential.
- Barrel: 23″ Photonic Barrel (maximizes bullet velocity and penetration power)
- Optic: Raptor-FVM40 Scope (provides variable zoom for multiple engagement distances)
- Ammunition: Photonic Charge Battery (enhances penetration through multiple surfaces)
- Stock: FSS Fortress Heavy Stock (improves aim stability and reduces flinch when shot)
- Rear Grip: FSS Jawbreaker Grip (enhances aiming stability for precise shots)
The MORS excels at counter-sniping and area denial, particularly in final circle scenarios where positioning becomes predictable. Mastering leading shots at moving targets takes approximately 2-3 hours of dedicated practice in Plunder or Resurgence modes.
Success in Warzone Season 3 demands more than just meta weapon selection—it requires understanding attachment synergies and playstyle adaptation. Each weapon configuration serves specific combat roles, and understanding these roles determines match success rates.
Attachment selection should complement your intended engagement distance and movement style. Recoil-control attachments typically trade mobility for stability, while handling-focused attachments sacrifice some accuracy for responsiveness. Finding the right balance for your playstyle typically requires 5-7 matches of experimentation.
Common strategic mistakes include over-specializing for extreme ranges, neglecting secondary weapon utility, and failing to adapt loadouts to changing circle locations. The Complete Guide to modern military shooters provides additional context for mastering tactical positioning.
Weapon pairing strategy proves crucial—combine a long-range primary with a mobile secondary for optimal versatility. The Weapons Unlock system in similar titles demonstrates how progressive attachment unlocks can shape weapon evolution throughout a season.
Advanced players should master the art of loadout adaptation based on match progression. Early-game loadouts prioritize looting and mobility, while late-game configurations focus on positioning and engagement advantages.
Action Checklist
- Configure SOA Subverter with recoil-stabilizing attachments for long-range dominance
- Test SVA 545 in semi-automatic mode at 50+ meters for precision engagements
- Practice HRM-9 movement techniques in Plunder mode
- Master MORS sniper leading shots against moving targets
- Adapt loadouts based on circle progression and team composition
No reproduction without permission:SeeYouSoon Game Club » Call Of Duty: Warzone Best Weapon Loadouts For MW3 Season 3 Master Warzone Season 3 with these top weapon loadouts and expert strategies for dominating battle royale