TL;DR
- Hanya excels at generating skill points through her Burden status effect applied via her Skill
- Prioritize Speed and Energy Regeneration stats to maximize her ultimate uptime and team buffing
- Her ultimate provides both Speed and ATK buffs, making her ideal for hypercarry team compositions
- Use 4-piece Messenger or Musketeer sets with Energy Regeneration rope for optimal performance
- Coordinate Burden application timing with your DPS characters’ skill point consumption patterns
Hanya revolutionizes team resource management in Honkai: Star Rail by addressing the critical challenge of skill point economy. As a Ten-Lords Commission judge specializing in interrogation techniques, she brings unparalleled efficiency to teams struggling with action economy constraints.
Her signature mechanic revolves around the Burden status effect, which she applies to enemies through her Skill. This debuff serves dual purposes: increasing damage taken by afflicted targets while simultaneously generating precious skill points for your team. Mastering when and how to apply Burden separates average Hanya players from exceptional ones.
Strategic Burden management requires careful attention to its duration limitations. The effect automatically dissipates after your team recovers two skill points from attacking the marked enemy. Advanced players should time Burden reapplication to coincide with their main DPS characters’ burst windows for maximum impact.
Common mistake: Many players overlook that Burden only affects the most recent target it’s applied to. Avoid wasting skill points by reapplying Burden to different enemies unnecessarily. Instead, focus on maintaining the debuff on your primary target throughout key damage phases.
Hanya’s kit centers around efficient skill point generation while providing substantial team buffs. Understanding each ability’s nuances will help you maximize her contribution to any team composition.
Basic Attack: Admonishment
Deals Physical DMG equal to 50% of Hanya’s ATK to a single enemy. While this seems modest, it becomes valuable when conserving skill points for other team members.
Skill: Ten-Lords’ Judgment
Inflicts Physical DMG amounting to 120% of Hanya’s ATK on one enemy and applies the crucial Burden status. This debuff enables your team to recover one skill point for every two attacks made against the burdened enemy.
Ultimate: Sanctity of the Ten-Lords
Boosts a target ally’s SPD by 15% of Hanya’s own SPD while simultaneously increasing their ATK by 36%. This powerful combination lasts for two turns, making it exceptionally potent for hypercarry setups.
Talent: Inevitable Sentence
When allies attack enemies affected by Burden, their damage increases by 15% for two turns. This passive damage amplification stacks beautifully with her ultimate’s offensive buffs.
Technique: Immediate Interrogation
Hanya immediately assaults an enemy when battle begins, automatically applying Burden to a random target. This provides immediate skill point generation potential from the very first turn.
Advanced tip: The SPD buff from her ultimate scales with Hanya’s own Speed stat. Investing in Speed substats effectively doubles her value by enhancing both her turn frequency and the potency of her buffs.
Choosing the right Light Cone for Hanya significantly impacts her performance as a support unit. The ideal choice balances energy regeneration, survivability, and team utility enhancements.
Best-in-Slot: But the Battle Isn’t Over
This premium Light Cone provides Energy Regeneration Rate and regenerates 1 Skill Point when using Ultimate. The synergy with Hanya’s kit is exceptional, as it complements her natural skill point generation while ensuring more frequent ultimate casts.
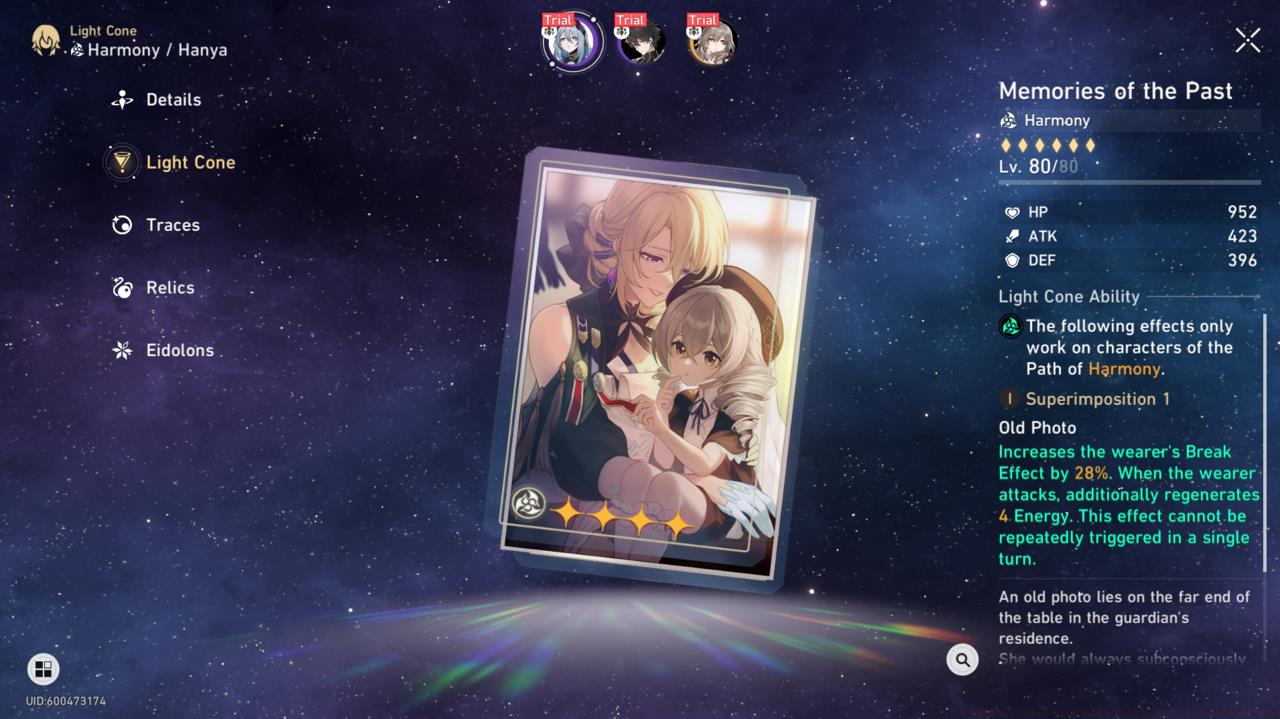
Excellent Alternative: Memories of the Past
Offers Break Effect and Energy Regeneration, making it a versatile choice that enhances both her utility and damage contribution.
Free-to-Play Option: Meshing Cogs
Grants Energy Regeneration each time Hanya attacks or gets hit. This reliable energy generation helps maintain ultimate uptime for consistent team buffing.
Budget Alternative: Past and Future
Increases the next ally’s DMG after using Skill, directly amplifying your main DPS’s damage output during critical turns.
Strategic consideration: Energy Regeneration should be your primary concern when selecting Light Cones. Hanya’s value scales dramatically with her ultimate frequency, making any Energy Regeneration bonuses particularly valuable.
Proper relic optimization transforms Hanya from a competent support into a game-changing team enabler. Focus on sets that enhance her supportive capabilities while ensuring she survives difficult content.
|
Relic |
Main Stat |
Sub-Stat |
|
Body |
HP, ATK |
SPD, ATK, HP, Effect Res |
|
Feet |
SPD |
SPD, ATK, HP, Effect Res |
|
Sphere |
HP, ATK |
SPD, ATK, HP, Effect Res |
|
Link Rope |
Energy Regeneration |
SPD, ATK, HP, Effect Res |
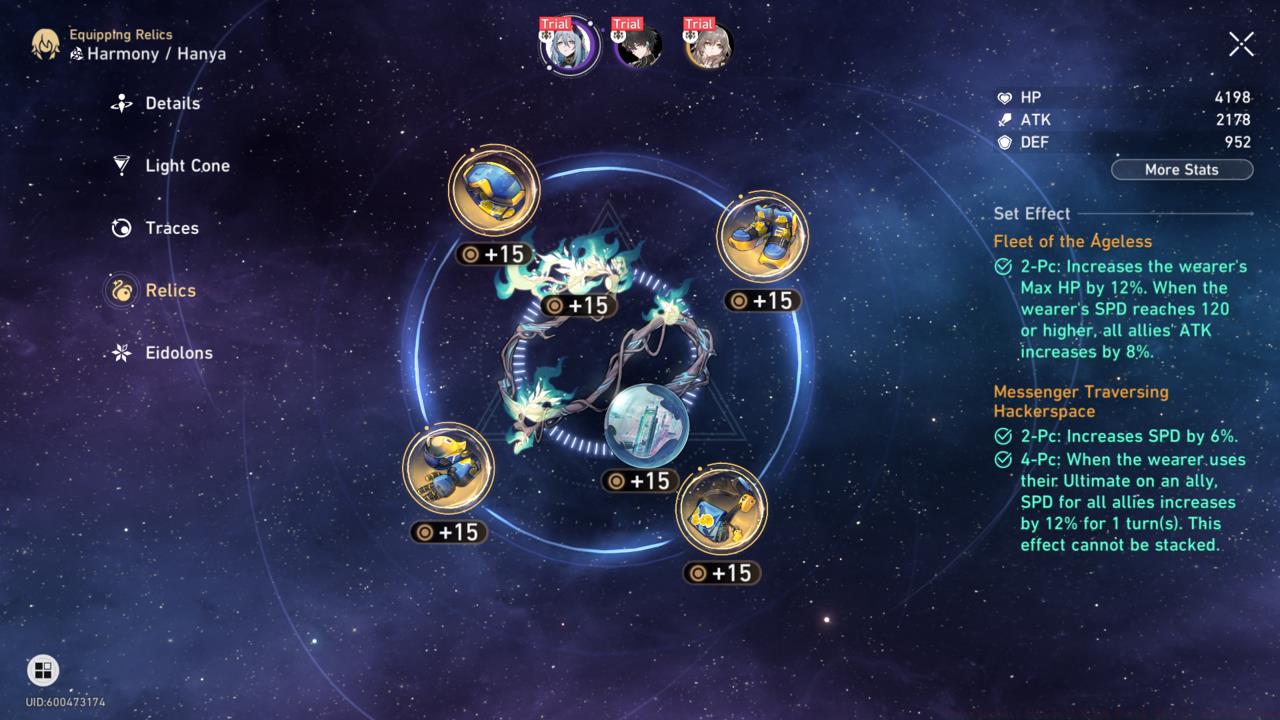
Primary Relic Set: Messenger Traversing Hackerspace (4-piece)
This set provides 6% SPD for the entire team and further increases ally SPD by 12% for one turn after Hanya uses her ultimate. The synergy is perfect since her ultimate already provides substantial SPD buffs.
Alternative Set: Musketeer of Wild Wheat (4-piece)
Offers 12% ATK and 6% SPD, enhancing both her personal damage and the potency of her ultimate’s SPD buff.
Planar Ornaments: Fleet of the Ageless
Increases max HP by 12% and boosts all allies’ ATK by 8% when Hanya’s SPD reaches 120 or higher. This threshold is easily achievable with proper stat investment.
Stat Priority Guide:
1. SPD (Feet main stat, substats everywhere)
2. Energy Regeneration Rate (Link Rope)
3. HP%/ATK% (Body and Sphere)
4. Effect RES (substats for survivability)
Advanced optimization: Aim for at least 134 SPD to guarantee Hanya acts twice in the first cycle of Memory of Chaos content.
Hanya excels in teams that benefit from both skill point generation and offensive buffs. Her versatility allows her to slot into various compositions, though she particularly shines in hypercarry setups.
Hypercarry Compositions
Pair Hanya with skill-point-hungry main DPS characters like Seele, Imbibitor Lunae, or Jing Yuan. These characters benefit tremendously from both the additional skill points and the ATK/SPD buffs from her ultimate.
Dual DPS Teams
Hanya can effectively support two damage dealers simultaneously. Her skill point generation ensures both characters have resources to use their skills while her ultimate can be strategically allocated to whichever DPS is in their damage phase.
Optimal Team Examples:
• Seele Hypercarry: Seele, Hanya, Silver Wolf, Fu Xuan
• Imbibitor Lunae Team: Imbibitor Lunae, Hanya, Tingyun, Luocha
• F2P Friendly: Sushang, Hanya, Asta, Natasha
Rotation Strategy:
Begin battles with Hanya’s technique to apply Burden immediately. Use her skill to maintain Burden on the primary target while timing her ultimate to coincide with your main DPS’s burst windows.
Common Pitfall: Avoid pairing Hanya with other skill-point-generating supports like Tingyun unless running extremely skill-point-demanding compositions.
Advanced team building: Consider Hanya’s energy requirements when selecting teammates. Characters that generate additional energy through their kits or Light Cones can help Hanya maintain 100% ultimate uptime with proper rotation planning.
Action Checklist
- Farm Messenger Traversing Hackerspace relics with SPD main stat on feet
- Prioritize Energy Regeneration rope and aim for 134+ SPD
- Practice Burden management by reapplying only after 2 skill points generated
- Test team rotations in simulated universe to optimize ultimate timing
- Coordinate Burden application with your main DPS’s skill point consumption patterns
No reproduction without permission:SeeYouSoon Game Club » Best Honkai: Star Rail Hanya Build, Skills, And Team Comps Master Hanya's skill point generation and team buffing mechanics to optimize your Honkai: Star Rail gameplay