Master FIFA 22’s meta formations with advanced tactics, player instructions, and strategic insights for dominating Ultimate Team
Understanding FIFA 22’s Tactical Revolution
The tactical landscape in FIFA 22 has undergone significant transformation, requiring players to adapt their strategies for maximum effectiveness in competitive modes like FUT Champions and Division Rivals. Understanding these changes is crucial for building winning teams.
FIFA 22 introduces revolutionary tactical controls that fundamentally change how formations and player instructions impact match outcomes.The enhanced customization options allow for unprecedented strategic depth, making proper setup more important than ever for consistent performance.
Competitive FIFA 22 gameplay demands tactical intelligence beyond simple player selection. Weekend League campaigns test both skill and strategic preparation, with poorly configured tactics often being the difference between victory and defeat. Whether you prefer aggressive formations like the 4-2-2-2 or experimental setups like the new 5-2-3 Diamond, mastering player instructions and tactical settings determines how effectively your team performs under pressure. Optimal configuration provides significant advantages in FUT Rivals, Squad Battles, and particularly during tense Weekend League matches where every decision matters.
This comprehensive guide explores EA’s tactical innovations in FIFA 22, analyzes the new formation additions, and provides actionable strategies to elevate your gameplay. We’ll cover everything from basic custom tactics to advanced meta strategies that professional players utilize.
Top Meta Formations and Custom Tactics
The 4-1-2-1-2 (narrow) formation stands as the definitive meta choice in FIFA 22, offering unparalleled control through midfield dominance and versatile attacking options. This setup creates natural passing triangles and overloads central areas, making it exceptionally difficult for opponents to defend against patient build-up play.
Four centrally positioned midfielders provide multiple passing lanes and defensive coverage, while the narrow structure naturally condenses play into high-percentage scoring areas. Full-back activation adds crucial width, transforming the formation from purely central to dynamically fluid.
4-1-2-1-2 (Narrow) Optimal Setup
- Left-back: Stay back while attacking (Override with balanced if trailing)
- Right-back: Stay back while attacking (Use overlap runs strategically)
- CDM: Cover center, Stay back while attacking (Anchor role essential)
- CM: Get into the box for crosses, Get forward (Box-to-box movement)
- ST: Stay forward, Get in behind (Dual threat positioning)
- Defensive Style: Balanced (Width: 45, Depth: 60)
- Build Up Play: Balanced (Speed: 50, Passing: 50)
- Chance Creation: Forward Runs or Direct Passing (Situational adjustment)
- Corners and Free Kicks: 2 bars (Optimal positioning balance)
For players seeking alternative approaches or requiring wing presence, several other meta formations deliver competitive performance with different strategic emphases.
4-2-3-1 Defensive Power
- Left-back: Stay back while attacking (Defensive stability)
- Right-back: Stay back while attacking (Counter-attack protection)
- CDMs: Cover center on both, Stay back while attacking on one, Get forward on the other (Dual-role midfield)
- CAM: Stay forward, Get into the box for crosses (Advanced playmaker)
- ST: Stay forward, Get in behind (Lone striker efficiency)
- Defensive Style: Balanced (Width: 40, Depth: 55)
- Build Up Play: Balanced (Speed: 45, Passing: 55)
- Chance Creation: Forward Runs (Progressive attacking)
- Corners and Free Kicks: 2 bars (Standard set piece setup)
4-4-2 Balanced Approach
- Left-back: Stay back while attacking (Wide protection)
- Right-back: Stay back while attacking (Symmetrical defense)
- CM: Cover center (use box-to-box midfielders) (Midfield engine)
- ST: Stay forward, Get in behind (Striker partnership)
- Defensive Style: Balanced (Width: 50, Depth: 50)
- Build Up Play: Balanced (Speed: 50, Passing: 50)
- Chance Creation: Balanced (Versatile creation)
- Corners and Free Kicks: 2 bars (Consistent positioning)
3-5-2 Attacking Overload
- CDMs: Cut passing lines, Cover center (Defensive screen)
- LM & RM: Come back on defence, get into box for cross, and stay wide (Dual-role wingers)
- ST: Both Stay forward, Get in behind (Dual striker threat)
- Defensive Style: Balanced (Width: 45, Depth: 60)
- Build Up Play: Long Ball (Direct transitions)
- Chance Creation: Direct Passing (Quick attacking)
- Players In Box: 5 bars (Attack commitment)
- Corners and Free Kicks: 3 bars (Enhanced set piece presence)
4-3-3 (4) Attacking Variation
- CAM: Get into the box for crosses, Stay forward (Advanced creator)
- GK: Comes for crosses, Sweeper keeper (Aggressive keeping)
- Defensive Style: Balanced (Width: 55, Depth: 65)
- Build Up Play: Fast Build Up (Quick transitions)
- Chance Creation: Direct Passing (Vertical attacking)
- Corners and Free Kicks: 2 bars (Standard positioning)
Alternative 4-3-3 (4) Setup
- RM & LM: Come back on Defence, Get in Behind, Conservative Interceptions (Defensive wingers)
- CDM: One on Get Forward, One on Stay back while Attacking (Split midfield roles)
- ST: One on Stay forward, Stay Central. One of them on Come back on Defence (False nine variation)
- Defensive Style: Balanced (Width: 50, Depth: 55)
- Build Up Play: Long Ball (Direct approach)
- Chance Creation: Direct Passing (Forward momentum)
- Corners and Free Kicks: 2 bars (Balanced set pieces)
4-3-3 (3) Control Variation
- CAM: Get forward, Get into the box for crosses (Attacking midfielder)
- ST: Stay forward, Stay Central (Target striker)
- Defensive Style: Balanced (Width: 45, Depth: 50)
- Build Up Play: Balanced (Speed: 50, Passing: 55)
- Chance Creation: Forward Runs (Movement creation)
- Corners and Free Kicks: 1 bar (Defensive set piece caution)
Advanced Player Instructions and Strategy
Mastering player instructions goes beyond basic setup—understanding how different roles interact creates cohesive team movement and exploits opponent weaknesses. Proper instruction configuration transforms generic formations into personalized tactical systems.
Common tactical mistakes include over-committing full-backs against pacey wingers, using contradictory instructions that create defensive gaps, and failing to adjust tactics based on match situations. Avoid setting both CDMs to ‘Get Forward’ in defensive formations, as this leaves your backline exposed to counter-attacks. Similarly, using ‘Fast Build Up’ with slow defenders often results in being caught out of position.
Advanced optimization involves matching chemistry styles to player roles—using Shadow on stay-back full-backs, Engine on creative midfielders, and Hunter on get-in-behind strikers. In-game adjustments should respond to opponent tactics: switch to ‘Long Ball’ when facing high presses, activate ‘Drop Back’ when protecting leads, and utilize ‘Constant Pressure’ when desperately seeking equalizers.
Professional players frequently create multiple custom tactic presets for different scenarios—one for balanced play, another for attacking overload, and a defensive setup for closing out games. This strategic flexibility allows adaptation to any match situation without requiring manual instruction changes during gameplay.
New Formations and Future Meta
FIFA 22 introduces three new formations that potentially reshape the competitive meta, offering fresh tactical approaches beyond established systems. These additions provide strategic variety and counter-options to popular formations.
The 5-4-1 Diamond represents another three-center-back formation with a five-player midfield configuration. This setup creates exceptional defensive solidity while maintaining midfield presence, though it requires specific player types to maximize effectiveness.
The new 5-2-3 formation features three central defenders, two wing-backs operating in advanced roles, and a front three providing attacking threat. This structure offers width through wing-backs while maintaining central defensive numbers, creating unique attacking patterns.
Position role changes see RF and LF positions transitioning to CF roles in certain formations, potentially altering how wide attackers function within tactical systems. The impact on meta viability depends on how these role adjustments interact with FIFA 22’s updated gameplay mechanics.
Early testing suggests the 5-2-3 formation could become a counter-meta option against narrow setups, using wing-backs to overload wide areas while maintaining defensive stability. However, these new formations require specific player types and tactical understanding to maximize their potential.
Mastering Defensive and Attacking Systems
Custom tactics in FIFA 22 provide unprecedented control over defensive organization, allowing precise adjustment of pressing lines from deep blocks to aggressive high presses. The expanded tactical options enable tailored approaches against different opponent styles.
 EA SPORTS
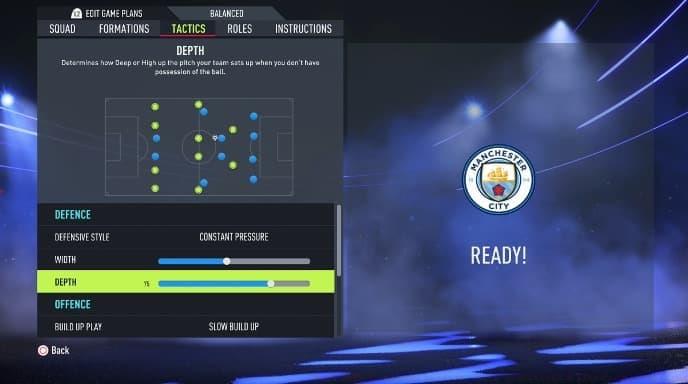
Enhanced defensive customization provides tactical depth previously unavailable in FIFA titles. July’s Gameplay Pitch Notes revealed four significant defensive innovations that change how teams organize without the ball. These additions create new strategic dimensions for defensive setup.
- Granular Slider Control: Depth and Width Sliders now range from 1 to 100, enabling micro-adjustments for precise defensive shape and pressing triggers
- Creative Midfield Roles: Free Roam instructions for CDMs facilitate deep-lying playmaker functionality, supporting build-up while maintaining defensive presence
- Aggressive Defending: Step Up instructions for Center Backs and Full Backs create proactive marking, intercepting passes before they reach attackers
- Defensive Overloads: Overlap Instructions for Center Backs (3/5 defender formations) enable unexpected attacking contributions from defensive players
 EA SPORTS
Attacking tactics now separate build-up patterns from chance creation methods. FIFA 22 splits attacking tactics into Build Up Play and Chance Creation categories, providing layered control over offensive phases. This separation allows hybrid approaches combining different build-up styles with varied final-third strategies.
Build Up Play Options
- Balanced: Maintains formation structure during possession phases with situational support runs
- Slow Build Up: Prioritizes possession retention over penetration, ideal for technical midfielders
- Long Ball: Direct transitions targeting advanced runners behind defensive lines
- Fast Build Up: Aggressive forward movement creating numerical advantages quickly
Chance Creation Methods
- Balanced: Mixed approach combining support play with timed penetrating runs
- Possession: Positional play focusing on ball retention and patient opportunity creation
- Direct Passing: Vertical attacking emphasizing runs behind defensive lines
- Forward Runs: Committed attacking with multiple players advancing simultaneously
Effective tactical setup requires balancing these systems—pairing ‘Long Ball’ build-up with ‘Direct Passing’ creates overwhelming verticality, while ‘Slow Build Up’ combined with ‘Possession’ facilitates controlled, technical football. Understanding these interactions is key to developing cohesive tactical identities.
No reproduction without permission:SeeYouSoon Game Club » Best FIFA 22 custom tactics, meta formations & player instructions Master FIFA 22's meta formations with advanced tactics, player instructions, and strategic insights for dominating Ultimate Team