TL;DR
- Shatterscarp features five major exploration zones surrounding an impassable central mountain
- Thirdborn serves as the southern coastal hub but requires separate interior mapping
- Red dotted main roads provide the safest navigation routes through dangerous territory
- Dreamscourge corruption and Archmage threats make this the game’s most hazardous region
- Strategic exploration reveals hidden paths and valuable resources despite environmental dangers
Exploring Shatterscarp presents both breathtaking beauty and extreme danger in Avowed’s Living Lands. This region demands thorough preparation and strategic navigation to uncover its full cartographic secrets while surviving its numerous threats.
As the third major territory encountered in your Avowed journey, Shatterscarp hosts Thirdborn—a notorious settlement populated by pirates, outcasts, and lawbreakers. Many experienced players consider this the most perilous area within the entire game world due to the Dreamscourge’s complete domination over local inhabitants. Compounding these dangers, a powerful Archmage actively consumes entire map sections, creating dynamically changing terrain hazards.
Despite the overwhelming chaos, Shatterscarp contains stunning visual landscapes and substantial additional content beyond primary story missions. To streamline your exploration efforts, we’ve meticulously revealed the complete regional cartography, providing comprehensive visibility of all locations and optimal travel routes. This detailed guide presents the fully uncovered map alongside critical points of interest essential for successful navigation.
Unlike conventional Avowed regions that center around major cities, Shatterscarp’s layout revolves around its treacherous geography. Thirdborn occupies a modest coastal position along the southern map boundary rather than serving as a central hub. A colossal, largely impassable mountain dominates the region’s core, forcing travelers to circumnavigate this natural barrier when accessing Shatterscarp’s expansive locations.
Shatterscarp divides into five principal exploration sectors that experienced players should prioritize:
The Emerald Basin features dense vegetation and hidden caves perfect for resource gathering but requires careful navigation due to limited visibility and ambush points.
Whispering Canyons contains narrow passageways and echo-locations that can disorient unprepared travelers, though they offer valuable shortcuts.
Sunken Marshes present environmental hazards like quicksand and toxic flora, but conceal ancient ruins with rare artifacts.
Azure Coastlines provide relatively safer coastal routes with fishing opportunities, though pirate patrols remain a constant threat.
Obsidian Peaks surround the central mountain with challenging climbs that reward explorers with panoramic vistas and mineral deposits.
Beyond these core sectors, numerous additional significant locations emerge throughout story progression. All primary zones encircle the massive central mountain, making the main roadway—marked by distinctive red dotted lines on your map—the wisest path for efficient regional traversal and threat minimization.
Below are comprehensive views of the fully revealed Shatterscarp cartography:
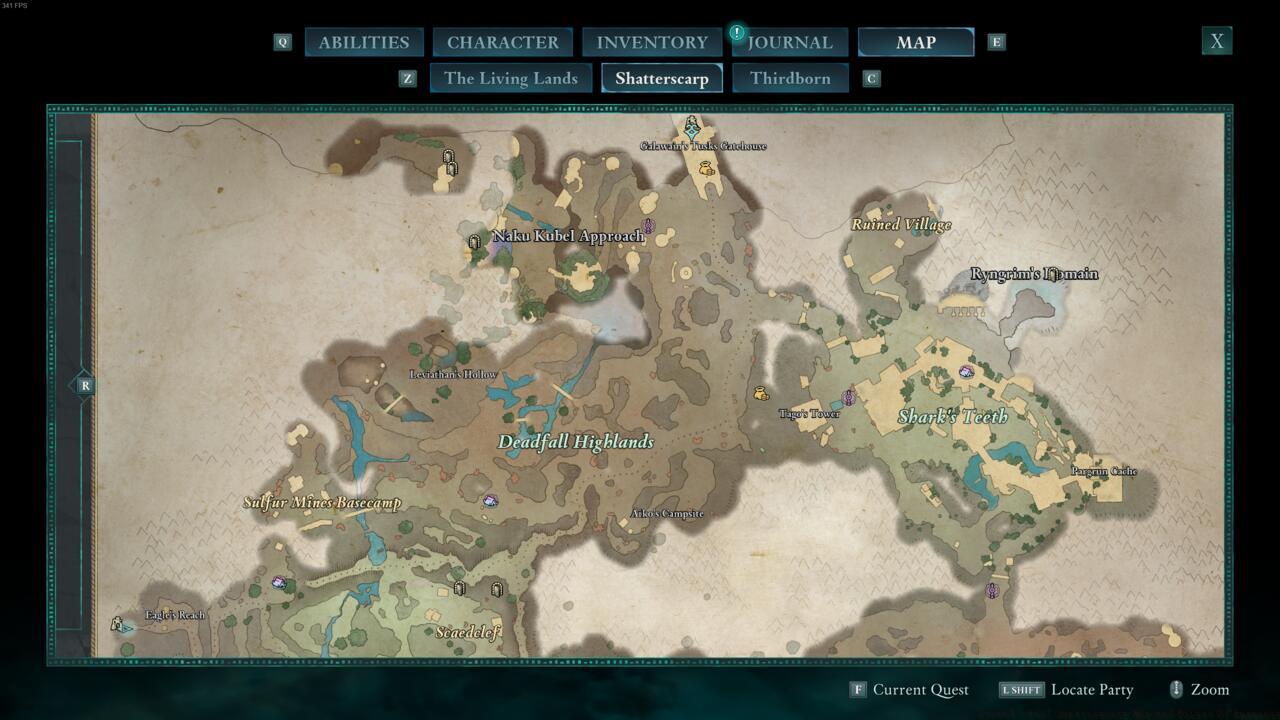
Northern Shatterscarp territories showcase elevated terrain, mining operations, and Dreamscourge infestation zones requiring careful approach strategies.
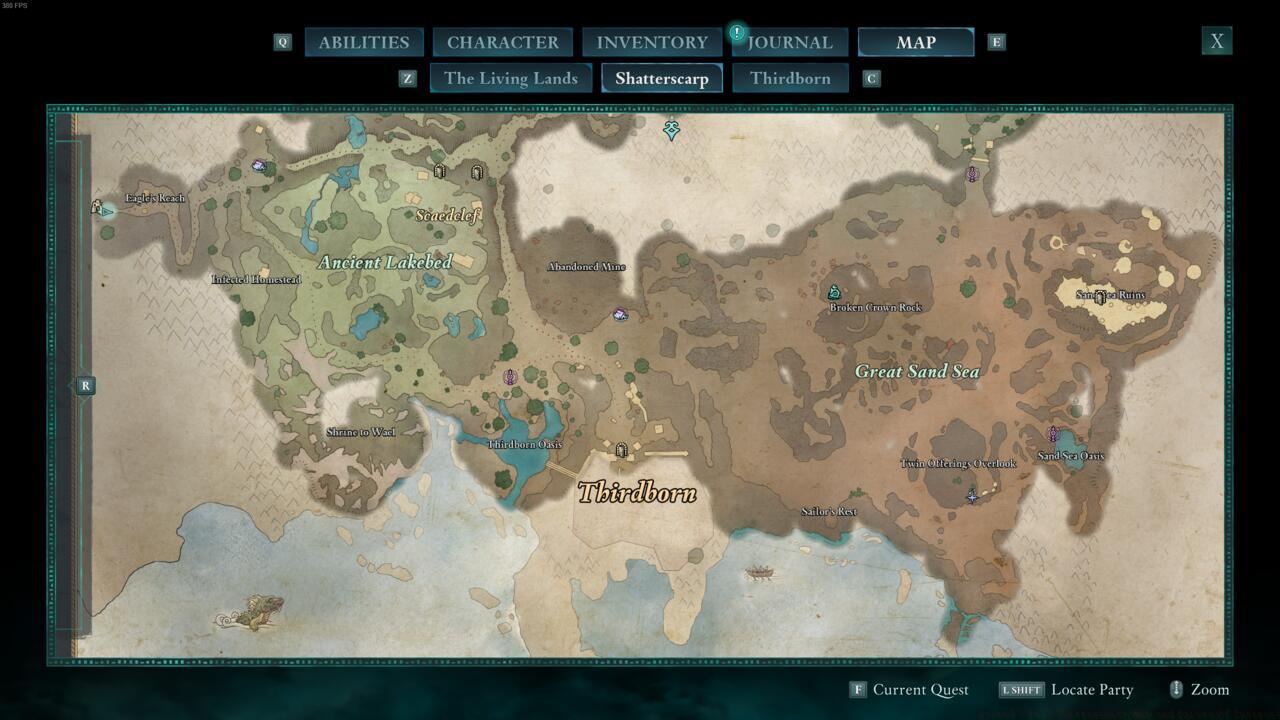
Southern Shatterscarp regions highlight coastal access points, Thirdborn’s location, and safer travel routes along the shoreline.
Thirdborn maintains its obscured status since it utilizes an independent interior map that activates upon entering through its main gates. The central mountain represents the only other partially concealed area, though adventurous players can discover limited accessible sections that permit minor exploration of this geological feature.
The Dreamscourge corruption manifests most severely in northern sectors, where transformed inhabitants exhibit aggressive behavior patterns and enhanced combat capabilities. Strategic approaches should prioritize stealth and avoidance in these zones unless properly equipped for intense confrontations.
Resource distribution follows predictable patterns: mineral deposits concentrate in mountainous areas, herbal components thrive in basin regions, and aquatic resources dominate coastal zones. Understanding these patterns significantly improves gathering efficiency.
Hidden pathways exist throughout Shatterscarp, often concealed behind destructible environmental elements or accessible only during specific weather conditions. These secret routes frequently bypass dangerous areas or lead to valuable loot caches.
Navigation markers placed by previous explorers provide crucial guidance but sometimes lead to ambush sites—verify marker authenticity before following unfamiliar trails.
Successful Shatterscarp exploration demands strategic route planning that accounts for both efficiency and safety considerations. The main roadway offers the most direct connections between major zones but attracts increased patrol activity. Alternative paths through difficult terrain provide stealth advantages but extend travel time considerably.
Time management proves critical—exploring during daylight hours significantly reduces encounter rates with Dreamscourge-enhanced creatures that grow more aggressive after sunset. Planning overnight stays in safe zones or Thirdborn prevents unnecessary night travel risks.
Common navigation errors include underestimating travel distances between zones, attempting direct mountain ascents, and neglecting to stock adequate healing supplies before extended journeys.
Advanced players should master environmental interaction: using terrain features for cover, identifying audible threat cues, and recognizing visual indicators of nearby resources or dangers.
For players seeking comprehensive gameplay guidance, our Complete Guide offers detailed strategies across all game aspects. Those focusing on combat effectiveness will benefit from our Weapons Unlock strategies, while character optimization enthusiasts should consult our Class Guide for specialized builds.
Action Checklist
- Study the complete map to identify the five main sectors and their connecting routes
- Prioritize main roadway travel initially, then explore alternative paths for hidden content
- Map Thirdborn’s interior separately upon arrival, noting vendor locations and safe zones
- Establish resource gathering routes based on sector-specific distribution patterns
- Develop threat-avoidance strategies for northern Dreamscourge zones using stealth and environmental cover
No reproduction without permission:SeeYouSoon Game Club » Avowed – Full Shatterscarp Map And Points Of Interest Master Shatterscarp's treacherous terrain with complete map exploration strategies and survival tactics